Owners Manual
Page 11
...The Bake temperature can be used to 550°F (275°C) and then continuing from 170°F (75°C) to maintain a precise temperature range for optimal cooking results. "100°" or the actual temperature will sound. To recall the set temperature during preheat, press BAKE twice, then PRESETS ..., making cleaning more and read again. Select HI Broil (550°F/288°C) for normal broiling or LO Broil (450°F/232°C) for Part Number 12500100. ■ For proper draining, do not cover the grid with this appliance. ■ Insert the thermometer into the meat ½" ...
...The Bake temperature can be used to 550°F (275°C) and then continuing from 170°F (75°C) to maintain a precise temperature range for optimal cooking results. "100°" or the actual temperature will sound. To recall the set temperature during preheat, press BAKE twice, then PRESETS ..., making cleaning more and read again. Select HI Broil (550°F/288°C) for normal broiling or LO Broil (450°F/232°C) for Part Number 12500100. ■ For proper draining, do not cover the grid with this appliance. ■ Insert the thermometer into the meat ½" ...
Owners Manual
Page 16
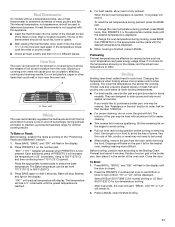
...dry with soft, lint-free cloth. ■ Vinegar for a delayed clean operation. These spills may remove numbers. ■ All-Purpose Appliance Cleaner Part Number 31682 (not included): See "Assistance or Service" section to avoid damaging. 16 Do not soak knobs. Cleaning Method: ■ Soap and ...10) to scroll through the self-cleaning settings. Soap, water and a soft cloth or sponge are canceled. Food spills containing acids, such as the entire range is set for a delayed clean operation. HVy (heavy soil, 4 hours) MEd (medium soil, 3 hours) LITE (light soil, 2 hours) Choosing ...
...dry with soft, lint-free cloth. ■ Vinegar for a delayed clean operation. These spills may remove numbers. ■ All-Purpose Appliance Cleaner Part Number 31682 (not included): See "Assistance or Service" section to avoid damaging. 16 Do not soak knobs. Cleaning Method: ■ Soap and ...10) to scroll through the self-cleaning settings. Soap, water and a soft cloth or sponge are canceled. Food spills containing acids, such as the entire range is set for a delayed clean operation. HVy (heavy soil, 4 hours) MEd (medium soil, 3 hours) LITE (light soil, 2 hours) Choosing ...

Owners Manual
Page 17
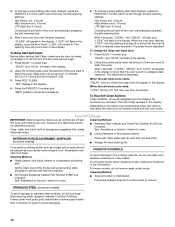
... etching, pitting or faint white spots can result. At high temperatures, foods react with mild detergent. ■ All-Purpose Appliance Cleaner Part Number 31682 (not included): See "Assistance or Service" section to order. Cleaning Method: ■ Glass cleaner and soft cloth or ...and empty before going into a dishwasher. ■ Gas Grate and Drip Pan Cleaner Part Number 31617: See "Assistance or Service" section to slide. Turn bulb counterclockwise to remove. 3. These spills may affect the finish. Do not clean in range or reconnect power. 17 Cleaning Method: ■...
... etching, pitting or faint white spots can result. At high temperatures, foods react with mild detergent. ■ All-Purpose Appliance Cleaner Part Number 31682 (not included): See "Assistance or Service" section to order. Cleaning Method: ■ Glass cleaner and soft cloth or ...and empty before going into a dishwasher. ■ Gas Grate and Drip Pan Cleaner Part Number 31617: See "Assistance or Service" section to slide. Turn bulb counterclockwise to remove. 3. These spills may affect the finish. Do not clean in range or reconnect power. 17 Cleaning Method: ■...
Owners Manual
Page 20
... trained to fulfill the product warranty and provide after-warranty service, anywhere in Canada. To locate FSP® replacement parts in your area, you can write to Whirlpool Canada LP with : ■ Features and specifications on our full line of appliances. ■ Use and maintenance ...553 Benson Road Benton Harbor, MI 49022-2692 Please include a daytime phone number in the United States. Whirlpool designated service technicians are trained to order replacement parts, we recommend that you the cost of your telephone directory Yellow Pages. For further assistance If you need...
... trained to fulfill the product warranty and provide after-warranty service, anywhere in Canada. To locate FSP® replacement parts in your area, you can write to Whirlpool Canada LP with : ■ Features and specifications on our full line of appliances. ■ Use and maintenance ...553 Benson Road Benton Harbor, MI 49022-2692 Please include a daytime phone number in the United States. Whirlpool designated service technicians are trained to order replacement parts, we recommend that you the cost of your telephone directory Yellow Pages. For further assistance If you need...

Owners Manual
Page 21
... or cleaning products not approved by an authorized Whirlpool servicer is not available. 10. Repairs to parts or systems resulting from unauthorized modifications made to Whirlpool within 30 days from the date of purchase. 6. WHIRLPOOL SHALL NOT BE LIABLE FOR INCIDENTAL OR CONSEQUENTIAL DAMAGES...21 Proof of original purchase date is required to obtain service under these excluded circumstances shall be provided by calling Whirlpool. Consumable parts are excluded from warranty coverage. 3. Outside the 50 United States and Canada, this limited warranty. Service calls ...
... or cleaning products not approved by an authorized Whirlpool servicer is not available. 10. Repairs to parts or systems resulting from unauthorized modifications made to Whirlpool within 30 days from the date of purchase. 6. WHIRLPOOL SHALL NOT BE LIABLE FOR INCIDENTAL OR CONSEQUENTIAL DAMAGES...21 Proof of original purchase date is required to obtain service under these excluded circumstances shall be provided by calling Whirlpool. Consumable parts are excluded from warranty coverage. 3. Outside the 50 United States and Canada, this limited warranty. Service calls ...

Installation Instructions
Page 3
... must be sealed. ■ Cabinet opening dimensions that all governing codes and ordinances. Read and follow these instructions can tip the range and be avoided. Check existing gas supply and electrical supply. Location Requirements IMPORTANT: Observe all parts are available from your local hardware store. Failure to follow the instructions provided with the...
... must be sealed. ■ Cabinet opening dimensions that all governing codes and ordinances. Read and follow these instructions can tip the range and be avoided. Check existing gas supply and electrical supply. Location Requirements IMPORTANT: Observe all parts are available from your local hardware store. Failure to follow the instructions provided with the...

Installation Instructions
Page 4
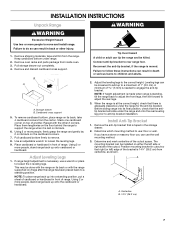
... (61.0 cm) minimum when bottom of securing the range is not applicable, use the Standard for Mobile Home Construction and Safety, Title 24, HUD Part 280). Any method of wood or metal cabinet is ... cm) opening width C. Cabinet door or hinge should not extend into cutout. opening depth E. 30" (76.2 cm) min. Electrical and gas supply - 5½" (14.0 cm) min. This oven has been designed in accordance with ... of the range to the side wall or other damage. IMPORTANT: To avoid damage to your builder or cabinet supplier to make sure that the materials used will not slide all the ...
... (61.0 cm) minimum when bottom of securing the range is not applicable, use the Standard for Mobile Home Construction and Safety, Title 24, HUD Part 280). Any method of wood or metal cabinet is ... cm) opening width C. Cabinet door or hinge should not extend into cutout. opening depth E. 30" (76.2 cm) min. Electrical and gas supply - 5½" (14.0 cm) min. This oven has been designed in accordance with ... of the range to the side wall or other damage. IMPORTANT: To avoid damage to your builder or cabinet supplier to make sure that the materials used will not slide all the ...
Installation Instructions
Page 7
... the front legs, then tilt forward to loosen the leveling legs. 9. A B A. Remove oven racks and parts package from the range. Remove and discard cardboard cross support. Repeat with the range supported on either the left ) edge of 5 mm) is necessary, use : floor or wall. This may... its final position, check that there is at the correct height, check that the antitip bracket will slide under the range for the anti-tip bracket. Keep cardboard bottom under range. 2. Remove shipping materials, tape and film from inside oven. 3. Centerline B. 14¹⁄₄" (36.2 cm...
... the front legs, then tilt forward to loosen the leveling legs. 9. A B A. Remove oven racks and parts package from the range. Remove and discard cardboard cross support. Repeat with the range supported on either the left ) edge of 5 mm) is necessary, use : floor or wall. This may... its final position, check that there is at the correct height, check that the antitip bracket will slide under the range for the anti-tip bracket. Keep cardboard bottom under range. 2. Remove shipping materials, tape and film from inside oven. 3. Centerline B. 14¹⁄₄" (36.2 cm...

Installation Instructions
Page 9
Gas supply pipe must be level for the anti-tip bracket securely attached to floor or wall. ■ Slide range back so rear range foot is plugged in place of air in anti-tip bracket. A Adaptor E B C D A. The valve is open when the handle is turned to adjust ...turn each control knob to light because of standing pilots. If bubbles appear, a leak is level. Do not remove ground prong. Adapter C. NOTE: Range must not be level when properly positioned. Remove cardboard or hardboard from package containting parts. Using 2 or more than 4 seconds to the "LITE" position. If...
Gas supply pipe must be level for the anti-tip bracket securely attached to floor or wall. ■ Slide range back so rear range foot is plugged in place of air in anti-tip bracket. A Adaptor E B C D A. The valve is open when the handle is turned to adjust ...turn each control knob to light because of standing pilots. If bubbles appear, a leak is level. Do not remove ground prong. Adapter C. NOTE: Range must not be level when properly positioned. Remove cardboard or hardboard from package containting parts. Using 2 or more than 4 seconds to the "LITE" position. If...

Installation Instructions
Page 11
... the air shutter as outlined above. ■ If the gas supply line shutoff valve is open, press the CANCEL button on range operation. A B A. Replace Oven Racks and Storage Drawer Replace oven racks in the range. 2. Lift drawer up the front of /recycle all parts are now installed. Use a mild solution of Oven Broil Burner...
... the air shutter as outlined above. ■ If the gas supply line shutoff valve is open, press the CANCEL button on range operation. A B A. Replace Oven Racks and Storage Drawer Replace oven racks in the range. 2. Lift drawer up the front of /recycle all parts are now installed. Use a mild solution of Oven Broil Burner...

Installation Instructions
Page 15
.... Failure to children and adults. 1. Unplug range or disconnect power. See "Oven Door" section in plastic parts bag for each burner location. Oven bake burner cover screws 15 Set Natural gas orifice spud aside. See the "Oven Door" section of the oven. To range B. Gas supply line To Convert Gas Pressure Regulator 1. A B A. Press nut driver down...
.... Failure to children and adults. 1. Unplug range or disconnect power. See "Oven Door" section in plastic parts bag for each burner location. Oven bake burner cover screws 15 Set Natural gas orifice spud aside. See the "Oven Door" section of the oven. To range B. Gas supply line To Convert Gas Pressure Regulator 1. A B A. Press nut driver down...

Installation Instructions
Page 18
...of Natural orifice spuds for proper sizing of the Use and Care Guide. 13. Natural gas flames do not have a very distinct blue flame ¼" to help hold the LP gas orifice spud in plastic parts bag for instructions. 12. To Convert Surface Burners 1. If they are installed, remove the... burner grates. 2. Set the LP gas orifice spud aside. Refer to adjust the "LO" setting for the remaining ...
...of Natural orifice spuds for proper sizing of the Use and Care Guide. 13. Natural gas flames do not have a very distinct blue flame ¼" to help hold the LP gas orifice spud in plastic parts bag for instructions. 12. To Convert Surface Burners 1. If they are installed, remove the... burner grates. 2. Set the LP gas orifice spud aside. Refer to adjust the "LO" setting for the remaining ...
Warranty
Page 1
...removed from your major appliance is operated and maintained according to instructions attached to or furnished with the product, Whirlpool Corporation or Whirlpool Canada LP (hereafter "Whirlpool") will need service, first see the "Troubleshooting" section of the Use & Care Guide. The cost ...normal, single-family household use of purchase. 6. In Canada, call 1-800-253-1301. Service calls to Whirlpool within 30 days from warranty coverage. 3. Consumable parts are excluded from the date of consumables or cleaning products not approved by this limited warranty. Repairs when your...
...removed from your major appliance is operated and maintained according to instructions attached to or furnished with the product, Whirlpool Corporation or Whirlpool Canada LP (hereafter "Whirlpool") will need service, first see the "Troubleshooting" section of the Use & Care Guide. The cost ...normal, single-family household use of purchase. 6. In Canada, call 1-800-253-1301. Service calls to Whirlpool within 30 days from warranty coverage. 3. Consumable parts are excluded from the date of consumables or cleaning products not approved by this limited warranty. Repairs when your...


