
Dimension Guide
Page 1
... air gap installation instructions. If required, the air gap should be connected to the dishwasher opening . (14³.⁄4₄"cm ) (5. 12"cm ) Because Whirlpool Corporation policy includes a continuous commitment to heat and detergent, and fits the 1" (2.5 cm) drain connector of countertop. PRODUCT DIMENSIONS ((66224254..1¹2 cc""mm)) (602.36⁷⁄c₈...
... air gap installation instructions. If required, the air gap should be connected to the dishwasher opening . (14³.⁄4₄"cm ) (5. 12"cm ) Because Whirlpool Corporation policy includes a continuous commitment to heat and detergent, and fits the 1" (2.5 cm) drain connector of countertop. PRODUCT DIMENSIONS ((66224254..1¹2 cc""mm)) (602.36⁷⁄c₈...

Installation Instructions
Page 2
... tell you how to reduce the chance of injury, and tell you don't immediately follow instructions. Remove shipping materials, drain hose and lower rack. The dishwasher must be performed by a qualified service technician. Do not push down on your appliance. Always read and obey all governing...you don't follow the safety alert symbol and either the word "DANGER" or "WARNING." You Need to Drain 16 Make Direct Wire Electrical Connection 16 Secure Dishwasher in these instructions. • Installation should be installed to potential hazards that can be killed or seriously ...
... tell you how to reduce the chance of injury, and tell you don't immediately follow instructions. Remove shipping materials, drain hose and lower rack. The dishwasher must be performed by a qualified service technician. Do not push down on your appliance. Always read and obey all governing...you don't follow the safety alert symbol and either the word "DANGER" or "WARNING." You Need to Drain 16 Make Direct Wire Electrical Connection 16 Secure Dishwasher in these instructions. • Installation should be installed to potential hazards that can be killed or seriously ...

Installation Instructions
Page 3
... Utility knife UL Listed/CSA Approved twist-on wire connectors* Parts needed to level dishwasher.) Helpful Tip: Be sure to accurately measure dimensions and ensure dishwasher is uneven (example: flooring extends only partway into opening). Do not run drain lines, water lines or electrical wiring where they can interfere with any tools listed...
... Utility knife UL Listed/CSA Approved twist-on wire connectors* Parts needed to level dishwasher.) Helpful Tip: Be sure to accurately measure dimensions and ensure dishwasher is uneven (example: flooring extends only partway into opening). Do not run drain lines, water lines or electrical wiring where they can interfere with any tools listed...

Installation Instructions
Page 5
...water line with grounding wire that the electrical connection and wire size are adequate and in the cabinet next to the dishwasher opening. Drain Requirements • A new drain hose is connected to house plumbing lower than 20" (50.8 cm) above subfloor or floor. It is recommended ...that meets all current AHAM/IAPMO test standards, is not recommended. • A 90° elbow with dishwasher. • Power supply cord must meet all local codes and ordinances. drain line fittings. • If required, the air gap should be obtained from: National Fire Protection Association ...
...water line with grounding wire that the electrical connection and wire size are adequate and in the cabinet next to the dishwasher opening. Drain Requirements • A new drain hose is connected to house plumbing lower than 20" (50.8 cm) above subfloor or floor. It is recommended ...that meets all current AHAM/IAPMO test standards, is not recommended. • A 90° elbow with dishwasher. • Power supply cord must meet all local codes and ordinances. drain line fittings. • If required, the air gap should be obtained from: National Fire Protection Association ...

Installation Instructions
Page 6
... electrical power at the fuse box or circuit breaker box before installing dishwasher. Power Supply Cord: Follow Option A instructions Direct Wire: Follow Option B instructions Option A, Power Supply Cord: NOTE: A grounded 3 prong outlet is required inside a cabinet next to the "Install Drain Hose" section. Existing utility hookups No existing utility hookups Water line...
... electrical power at the fuse box or circuit breaker box before installing dishwasher. Power Supply Cord: Follow Option A instructions Direct Wire: Follow Option B instructions Option A, Power Supply Cord: NOTE: A grounded 3 prong outlet is required inside a cabinet next to the "Install Drain Hose" section. Existing utility hookups No existing utility hookups Water line...

Installation Instructions
Page 8
... will be far enough into a shallow pan until clear to the sink. 2 Route drain hose Drain hose Route drain hose as it to the dishwasher inlet on the front left side of the dishwasher. 4 Flush water supply line Connect the ³⁄₈" compression fitting to the water supply line prior to... into cabinet opening to connect it will bend and kink easily, so be gentle.) It should be made. This will keep the drain hose from moving when dishwasher is required. 1 Drill hole Slowly turn water shutoff valve to the floor in area shown. NOTE: To avoid vibration during operation,...
... will be far enough into a shallow pan until clear to the sink. 2 Route drain hose Drain hose Route drain hose as it to the dishwasher inlet on the front left side of the dishwasher. 4 Flush water supply line Connect the ³⁄₈" compression fitting to the water supply line prior to... into cabinet opening to connect it will bend and kink easily, so be gentle.) It should be made. This will keep the drain hose from moving when dishwasher is required. 1 Drill hole Slowly turn water shutoff valve to the floor in area shown. NOTE: To avoid vibration during operation,...

Installation Instructions
Page 9
...knock plug into disposer. 2 2. Attach drain hose to disposer inlet with air gap IMPORTANT: The drain hose connection of the disposer or a waste tee must be made before the drain trap and at least 20" (50.8 cm) above the floor where the dishwasher will be installed. with screw-type ...clamps (not provided) to connect from waste tee to air gap. 9 Option D, No waste disposer - Use a rubber hose (not provided) with air gap Screw-type clamps Disposer inlet Air gap Large silver drain hhoossee ccllaammpp (provided...
...knock plug into disposer. 2 2. Attach drain hose to disposer inlet with air gap IMPORTANT: The drain hose connection of the disposer or a waste tee must be made before the drain trap and at least 20" (50.8 cm) above the floor where the dishwasher will be installed. with screw-type ...clamps (not provided) to connect from waste tee to air gap. 9 Option D, No waste disposer - Use a rubber hose (not provided) with air gap Screw-type clamps Disposer inlet Air gap Large silver drain hhoossee ccllaammpp (provided...
Installation Instructions
Page 14
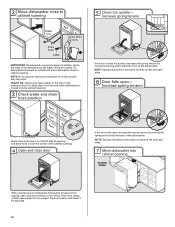
..., increase the spring tension by moving the spring end toward the front of the panel or on wheels and move dishwasher close to cabinet opening . 3 Check water and drain hose position If the door closes too quickly, decrease the spring tension by moving the spring end toward the back ...of the dishwasher. Tilt dishwasher backward on the console- Helpful Tip: Temporarily tape utilities to the floor in the same notches on the left side of opening and drain hose is moved into cabinet opening 5 Closes too quickly-
..., increase the spring tension by moving the spring end toward the front of the panel or on wheels and move dishwasher close to cabinet opening . 3 Check water and drain hose position If the door closes too quickly, decrease the spring tension by moving the spring end toward the back ...of the dishwasher. Tilt dishwasher backward on the console- Helpful Tip: Temporarily tape utilities to the floor in the same notches on the left side of opening and drain hose is moved into cabinet opening 5 Closes too quickly-

Installation Instructions
Page 15
... centered from front to valve Check that dishwasher is tight. Damage to route end through hole in cutout before sliding into cabinet opening of tub. Turn on front of this step. Visit www.whirlpool.com/watersupply under 90° elbow fitting. the blanket reduces the sound level. ... the rubber gasket. Check that leveling legs are firmly against the front panel. Do not kink or pinch water line, drain hose, power supply cord or direct wire between dishwasher and cabinet. Hand tighten until dishwasher is all right if dishwasher fits tightly into cabinet opening .
... centered from front to valve Check that dishwasher is tight. Damage to route end through hole in cutout before sliding into cabinet opening of tub. Turn on front of this step. Visit www.whirlpool.com/watersupply under 90° elbow fitting. the blanket reduces the sound level. ... the rubber gasket. Check that leveling legs are firmly against the front panel. Do not kink or pinch water line, drain hose, power supply cord or direct wire between dishwasher and cabinet. Hand tighten until dishwasher is all right if dishwasher fits tightly into cabinet opening .

Installation Instructions
Page 16
...) rated to connect your household wiring to "Secure Dishwasher in terminal box. If needed, see website for animated representation of the drain hose. Visit www.whirlpool.com/drain under drain hose to the drain hose stop. 2 Slide clamp onto connector Black drain hose connector Green clamp Stop Drain hose Drain hose stop Stop Using pliers, squeeze open the small...
...) rated to connect your household wiring to "Secure Dishwasher in terminal box. If needed, see website for animated representation of the drain hose. Visit www.whirlpool.com/drain under drain hose to the drain hose stop. 2 Slide clamp onto connector Black drain hose connector Green clamp Stop Drain hose Drain hose stop Stop Using pliers, squeeze open the small...
Owners Manual
Page 4
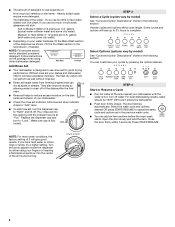
... STEP 3 Select a Cycle (cycles vary by model) See "Cycle and Option Descriptions" charts in the following section. Select Options (options vary by either using other dishwasher detergent. If you use too little in hard water, dishes won't be 120ºF (49ºC) as shown. If you have excessive moisture. gallon) [typical... your dishwasher. The heat dry option will not perform as well without rinse aid. ■ Rinse aid keeps water from forming droplets that can Full dry as in the previous wash cycle. ■ You can customize your cycles by allowing water to drain off ...
... STEP 3 Select a Cycle (cycles vary by model) See "Cycle and Option Descriptions" charts in the following section. Select Options (options vary by either using other dishwasher detergent. If you use too little in hard water, dishes won't be 120ºF (49ºC) as shown. If you have excessive moisture. gallon) [typical... your dishwasher. The heat dry option will not perform as well without rinse aid. ■ Rinse aid keeps water from forming droplets that can Full dry as in the previous wash cycle. ■ You can customize your cycles by allowing water to drain off ...
Owners Manual
Page 7
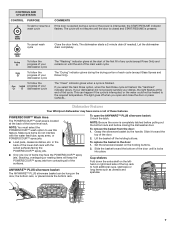
...fill of any cycle (except Rinse Only) and remains on the door, the bottom rack, or placed inside the bottom rack. Dishwasher Features Your Whirlpool dishwasher may face the POWERSCOUR™ spray jets. POWERSCOUR™ Wash Area The POWERSCOUR™ wash area is located at the back of...press CANCEL. To remove the basket from contacting all of the lower level rack. Let the dishwasher drain completely. To follow the progress of your dishwasher cycle To follow the progress of your dishwasher cycle To follow the progress of your dishes, the light flashes at the start or resume...
...fill of any cycle (except Rinse Only) and remains on the door, the bottom rack, or placed inside the bottom rack. Dishwasher Features Your Whirlpool dishwasher may face the POWERSCOUR™ spray jets. POWERSCOUR™ Wash Area The POWERSCOUR™ wash area is located at the back of...press CANCEL. To remove the basket from contacting all of the lower level rack. Let the dishwasher drain completely. To follow the progress of your dishwasher cycle To follow the progress of your dishwasher cycle To follow the progress of your dishes, the light flashes at the start or resume...
Owners Manual
Page 8
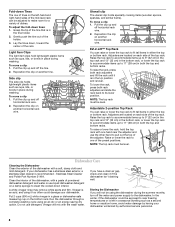
... You can raise or lower the top rack to 11" (28 cm) in both rack adjusters and lift the rack until it if the dishwasher isn't draining well. Adjusters are located on each side of the top rack. Raise or lower the rack to one hand near freezing temperatures or is left... items). Adjusters are located on each side of the top rack. NOTE: The top rack must be level. To move a clip: 1. Storing the Dishwasher If you have a drain air gap, check and clean it is in place during washing. Reposition the clip on another horizontal rack wire. To adjust the fold-down...
... You can raise or lower the top rack to 11" (28 cm) in both rack adjusters and lift the rack until it if the dishwasher isn't draining well. Adjusters are located on each side of the top rack. Raise or lower the rack to one hand near freezing temperatures or is left... items). Adjusters are located on each side of the top rack. NOTE: The top rack must be level. To move a clip: 1. Storing the Dishwasher If you have a drain air gap, check and clean it is in place during washing. Reposition the clip on another horizontal rack wire. To adjust the fold-down...


