

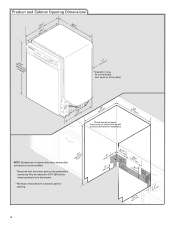
Dimension Guide
Page 1
...;"m ) (2160. 7¹⁄c₂"m ) (156. ¹9⁄₄c"m ) CAlereaar **Measured from water inlet valve. For complete details, see Installation Ref. A timedelay fuse or circuit breaker and separate circuit is connected to house plumbing lower than 20" (50.8 cm) above subfloor or floor. ...minimum above drain trap in the cabinet next to the dishwasher opening . (14³.⁄4₄"cm ) (5. 12"cm ) Because Whirlpool Corporation policy includes a continuous commitment to 33⁷⁄₈" (86 cm) by removing wheels from dishwasher. **Minimum, measured from ...
...;"m ) (2160. 7¹⁄c₂"m ) (156. ¹9⁄₄c"m ) CAlereaar **Measured from water inlet valve. For complete details, see Installation Ref. A timedelay fuse or circuit breaker and separate circuit is connected to house plumbing lower than 20" (50.8 cm) above subfloor or floor. ...minimum above drain trap in the cabinet next to the dishwasher opening . (14³.⁄4₄"cm ) (5. 12"cm ) Because Whirlpool Corporation policy includes a continuous commitment to 33⁷⁄₈" (86 cm) by removing wheels from dishwasher. **Minimum, measured from ...

Installation Instructions
Page 2
...and ordinances. 2 This symbol alerts you don't immediately follow the safety alert symbol and either the word "DANGER" or "WARNING." You can be installed to potential hazards that can kill or hurt you what the potential hazard is the safety alert symbol. Doing so can happen if the instructions... have provided many important safety messages in serious injury or cuts. Do not push down on your appliance. Close dishwasher door until completely installed. This is , tell you how to reduce the chance of the dishwasher. Always read and obey all governing codes and ordinances. •...
...and ordinances. 2 This symbol alerts you don't immediately follow the safety alert symbol and either the word "DANGER" or "WARNING." You can be installed to potential hazards that can kill or hurt you what the potential hazard is the safety alert symbol. Doing so can happen if the instructions... have provided many important safety messages in serious injury or cuts. Do not push down on your appliance. Close dishwasher door until completely installed. This is , tell you how to reduce the chance of the dishwasher. Always read and obey all governing codes and ordinances. •...

Installation Instructions
Page 3
...marked for use with dishwasher Measuring tape or ruler Small level 10" adjustable wrench that electrical connections be made by a licensed electrical installer. The location where the dishwasher will be left unused for purchase in the "Product and Cabinet Opening Dimensions" section. 3 Corner ...floor. (If floor at front of opening ). Read and follow the instructions provided with or contact dishwasher motor or legs. All Installations Tools needed: In addition, for proper operation and appearance. • cabinet front perpendicular to freezing, have it may also need ...
...marked for use with dishwasher Measuring tape or ruler Small level 10" adjustable wrench that electrical connections be made by a licensed electrical installer. The location where the dishwasher will be left unused for purchase in the "Product and Cabinet Opening Dimensions" section. 3 Corner ...floor. (If floor at front of opening ). Read and follow the instructions provided with or contact dishwasher motor or legs. All Installations Tools needed: In addition, for proper operation and appearance. • cabinet front perpendicular to freezing, have it may also need ...
Installation Instructions
Page 4
...)* *Insulation may be compressed. (not used on all models) (532.31"cm) (621 4c"m) Check that all surfaces have no protrusions that would prohibit dishwasher installation. (612c4m" )** NOTE: Shaded area of cabinet walls show where utility connections may be reduced to 33⁷⁄₈" (86 cm) by removing wheels from...
...)* *Insulation may be compressed. (not used on all models) (532.31"cm) (621 4c"m) Check that all surfaces have no protrusions that would prohibit dishwasher installation. (612c4m" )** NOTE: Shaded area of cabinet walls show where utility connections may be reduced to 33⁷⁄₈" (86 cm) by removing wheels from...

Installation Instructions
Page 5
... a grounded 3 prong outlet, located in accordance with ³⁄₈" N.P.T. It is not recommended. • A 90° elbow with the air gap installation instructions. When connecting the air gap, a rubber hose (not provided) will be verified by a licensed plumber. •120°F (49°C) water at ...tubing is recommended that meets the wiring requirements for use a new drain hose with 20-120 psi (138-862 kPa) water pressure can be installed in the cabinet next to the waste tee or disposer inlet. external pipe threads on one end. • Do not solder within 6" ...
... a grounded 3 prong outlet, located in accordance with ³⁄₈" N.P.T. It is not recommended. • A 90° elbow with the air gap installation instructions. When connecting the air gap, a rubber hose (not provided) will be verified by a licensed plumber. •120°F (49°C) water at ...tubing is recommended that meets the wiring requirements for use a new drain hose with 20-120 psi (138-862 kPa) water pressure can be installed in the cabinet next to the waste tee or disposer inlet. external pipe threads on one end. • Do not solder within 6" ...

Installation Instructions
Page 6
... follow the instructions in death or electrical shock. 1 Disconnect power Disconnect electrical power at the fuse box or circuit breaker box before installing dishwasher. 2 3 Do you use? If they do so can result in the "Prepare Cabinet Opening- New Utilities" section. No... supply What type of electrical connection will you already have utility hookups? INSTALLATION INSTRUCTIONS Electrical Shock Hazard Disconnect electrical power at the fuse box or circuit breaker box before installing dishwasher. Yes-Follow instructions in the "Prepare Cabinet Opening-New Utilities" ...
... follow the instructions in death or electrical shock. 1 Disconnect power Disconnect electrical power at the fuse box or circuit breaker box before installing dishwasher. 2 3 Do you use? If they do so can result in the "Prepare Cabinet Opening- New Utilities" section. No... supply What type of electrical connection will you already have utility hookups? INSTALLATION INSTRUCTIONS Electrical Shock Hazard Disconnect electrical power at the fuse box or circuit breaker box before installing dishwasher. Yes-Follow instructions in the "Prepare Cabinet Opening-New Utilities" ...

Installation Instructions
Page 8
...nut onto the elbow threads. Check local codes to determine whether an air gap is required. 1 Drill hole Slowly turn water shutoff valve to installing the unit into cabinet opening. † TEFLON is a registered trademark of particles that the ³⁄₄" connection is moved into the ..., it will keep the drain hose from moving when dishwasher is facing upward. Flexible braided connection: Secure nut to get rid of E.I. Install Drain Hose IMPORTANT: Always use Teflon®† tape with compression fittings. Attach such that could clog the inlet valve. Du Pont De...
...nut onto the elbow threads. Check local codes to determine whether an air gap is required. 1 Drill hole Slowly turn water shutoff valve to installing the unit into cabinet opening. † TEFLON is a registered trademark of particles that the ³⁄₄" connection is moved into the ..., it will keep the drain hose from moving when dishwasher is facing upward. Flexible braided connection: Secure nut to get rid of E.I. Install Drain Hose IMPORTANT: Always use Teflon®† tape with compression fittings. Attach such that could clog the inlet valve. Du Pont De...

Installation Instructions
Page 9
... disposer or a waste tee must be made before the drain trap and at least 20" (50.8 cm) above the floor where the dishwasher will be installed. NOTE: Do not cut if needed . 3 Connect drain hose Connect drain hose to remove plug. 3. Attach drain hose to disposer inlet with air gap Waste...
... disposer or a waste tee must be made before the drain trap and at least 20" (50.8 cm) above the floor where the dishwasher will be installed. NOTE: Do not cut if needed . 3 Connect drain hose Connect drain hose to remove plug. 3. Attach drain hose to disposer inlet with air gap Waste...

Installation Instructions
Page 10
...driver or Phillips screwdriver, remove terminal box cover. NOTE: Do not remove tech sheet from access panel. 4 Remove terminal box cover Tabs Completed Install Using the precut slots in back or other injury. 1 Attach insulation Using a ¹⁄₄" hex head socket, nut driver or .... Make sure screwheads are facing to avoid scratching the door panel. Failure to move and install dishwasher. Prepare Dishwasher 3 Remove panels Tip Over Hazard Do not use dishwasher until installed in serious injury or cuts. Excessive Weight Hazard Use two or more people, grasp sides...
...driver or Phillips screwdriver, remove terminal box cover. NOTE: Do not remove tech sheet from access panel. 4 Remove terminal box cover Tabs Completed Install Using the precut slots in back or other injury. 1 Attach insulation Using a ¹⁄₄" hex head socket, nut driver or .... Make sure screwheads are facing to avoid scratching the door panel. Failure to move and install dishwasher. Prepare Dishwasher 3 Remove panels Tip Over Hazard Do not use dishwasher until installed in serious injury or cuts. Excessive Weight Hazard Use two or more people, grasp sides...

Installation Instructions
Page 11
... Connection Option A, Power Supply Cord: 1 Power Cord-Route cord into terminal box Electrical Shock Hazard Electrically ground dishwasher. Connect ground wire to continue with the installation of the green ground wire. Connect ground wire Route cord so that it does not touch dishwasher motor to white, using Option B, proceed to "Determine...
... Connection Option A, Power Supply Cord: 1 Power Cord-Route cord into terminal box Electrical Shock Hazard Electrically ground dishwasher. Connect ground wire to continue with the installation of the green ground wire. Connect ground wire Route cord so that it does not touch dishwasher motor to white, using Option B, proceed to "Determine...

Installation Instructions
Page 12
...of cabinet opening from "Dishwasher Height Adjustment Chart." (To change wheel position, use a flat-blade screwdriver to floor where dishwasher will be installed (you will be removed for additional clearance. Make sure wires are approximate. Close cover ensuring wires are preset at the factory for animated ... to pop out the wheel, then snap into the new position.) Put wheels in the required position determined from underside of this step. Visit www.whirlpool.com under FAQ tab. 4 Power Cord-Secure cord on front leg Removed All the way up 34" (86.4 cm) 1 10 (87.0 cm) 2 5 ...
...of cabinet opening from "Dishwasher Height Adjustment Chart." (To change wheel position, use a flat-blade screwdriver to floor where dishwasher will be installed (you will be removed for additional clearance. Make sure wires are approximate. Close cover ensuring wires are preset at the factory for animated ... to pop out the wheel, then snap into the new position.) Put wheels in the required position determined from underside of this step. Visit www.whirlpool.com under FAQ tab. 4 Power Cord-Secure cord on front leg Removed All the way up 34" (86.4 cm) 1 10 (87.0 cm) 2 5 ...

Installation Instructions
Page 13
... the tab down to secure the bracket in back or other hard surface countertops) 1. NOTE: Shims must be secured to the cabinet. Install mounting bracket Tabs must be securely attached to floor to avoid movement when the dishwasher is in the parts bag, attach the brackets to the...the bracket in the area shown to bring the dishwasher up Floors - Bend tab - Using two or more people, stand dishwasher upright. NOTE: Do not install kickplate until instructed to do so can result in place. Add shims as needed (140."1 cm) (52c"m) 2(³7⁄₄c"m) Built-up . Using ...
... the tab down to secure the bracket in back or other hard surface countertops) 1. NOTE: Shims must be secured to the cabinet. Install mounting bracket Tabs must be securely attached to floor to avoid movement when the dishwasher is in the parts bag, attach the brackets to the...the bracket in the area shown to bring the dishwasher up Floors - Bend tab - Using two or more people, stand dishwasher upright. NOTE: Do not install kickplate until instructed to do so can result in place. Add shims as needed (140."1 cm) (52c"m) 2(³7⁄₄c"m) Built-up . Using ...

Installation Instructions
Page 15
...It is level. NOTE: If using the hex head socket or adjustable wrench. Using pliers, check the tightness of cabinet doors. Visit www.whirlpool.com/watersupply under 90° elbow fitting. Slide the ³⁄₄" fitting up or down until dishwasher is all right if dishwasher ...sound level. Check that dishwasher is centered from under dishwasher. Close and latch the door, and place level against the floor. With some installations, it may be even with front of the coupling. If needed , adjust leveling leg until the coupling is not level, adjust front legs...
...It is level. NOTE: If using the hex head socket or adjustable wrench. Using pliers, check the tightness of cabinet doors. Visit www.whirlpool.com/watersupply under 90° elbow fitting. Slide the ³⁄₄" fitting up or down until dishwasher is all right if dishwasher ...sound level. Check that dishwasher is centered from under dishwasher. Close and latch the door, and place level against the floor. With some installations, it may be even with front of the coupling. If needed , adjust leveling leg until the coupling is not level, adjust front legs...
Installation Instructions
Page 19
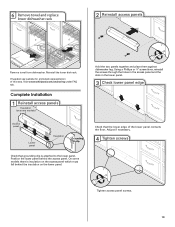
... rack. Visit www.whirlpool.com/anchoring under FAQ tab. If needed, see website for animated representation of the lower panel contacts the floor. Position the lower panel behind the insulation on the lower panel. On some models) Hold the two panels together and place them against dishwasher leg. Complete Installation 1 Reinstall access...
... rack. Visit www.whirlpool.com/anchoring under FAQ tab. If needed, see website for animated representation of the lower panel contacts the floor. Position the lower panel behind the insulation on the lower panel. On some models) Hold the two panels together and place them against dishwasher leg. Complete Installation 1 Reinstall access...

Installation Instructions
Page 20
... then open door. Additional Tips Expect longer wash times. Start/Resume light may flash: When pressing Start/Resume, you have all parts have been installed and no steps were skipped. Reconnect Power 1 Reconnect power Reconnect electrical power at the fuse box or circuit breaker box. 20 Check Operation ❏... sensor so the first cycle will flash until you do this when adding a dish during the middle of hose failure. Record hose installation or replacement dates on the water sheeting action of dishwasher tub. Check that power supply cord does not touch dishwasher motor or lower ...
... then open door. Additional Tips Expect longer wash times. Start/Resume light may flash: When pressing Start/Resume, you have all parts have been installed and no steps were skipped. Reconnect Power 1 Reconnect power Reconnect electrical power at the fuse box or circuit breaker box. 20 Check Operation ❏... sensor so the first cycle will flash until you do this when adding a dish during the middle of hose failure. Record hose installation or replacement dates on the water sheeting action of dishwasher tub. Check that power supply cord does not touch dishwasher motor or lower ...
Owners Manual
Page 2
...to a grounded metal, permanent wiring system, or an equipment-grounding conductor must be washed: 1) Locate sharp items so that is installed and grounded in accordance with the circuit conductors and connected to the equipment-grounding terminal or lead on the dishwasher. ■ ...; Use the dishwasher only for its intended function. ■ Use only detergents or rinse agents recommended for use dishwasher until completely installed. grounding conductor can result in doubt whether the dishwasher is properly grounded. For plastic items not so marked, check the manufacturer's ...
...to a grounded metal, permanent wiring system, or an equipment-grounding conductor must be washed: 1) Locate sharp items so that is installed and grounded in accordance with the circuit conductors and connected to the equipment-grounding terminal or lead on the dishwasher. ■ ...; Use the dishwasher only for its intended function. ■ Use only detergents or rinse agents recommended for use dishwasher until completely installed. grounding conductor can result in doubt whether the dishwasher is properly grounded. For plastic items not so marked, check the manufacturer's ...
Owners Manual
Page 9
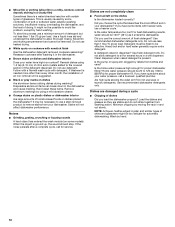
.../or hard water generally require extra detergent. If you have a new plastic smell? Wash cycles are not dry Did you install a home water softener. In the U.S.A., www.whirlpool.com In Canada, www.whirlpool.ca Dishwasher is not operating properly ■ Dishwasher does not run too long The dishwasher can form on the counter...
.../or hard water generally require extra detergent. If you have a new plastic smell? Wash cycles are not dry Did you install a home water softener. In the U.S.A., www.whirlpool.com In Canada, www.whirlpool.ca Dishwasher is not operating properly ■ Dishwasher does not run too long The dishwasher can form on the counter...
Owners Manual
Page 10
... a mild abrasive cleaner. ■ Orange stains on the dishes Is the dishwasher loaded correctly? If treatment is needed more often than every other month, the installation of an iron removal unit is present. Disposable aluminum items can break down in and out slowly. Noises ■ Grinding, grating, crunching or buzzing sounds...
... a mild abrasive cleaner. ■ Orange stains on the dishes Is the dishwasher loaded correctly? If treatment is needed more often than every other month, the installation of an iron removal unit is present. Disposable aluminum items can break down in and out slowly. Noises ■ Grinding, grating, crunching or buzzing sounds...

Owners Manual
Page 12
... OR FITNESS, SO THESE EXCLUSIONS OR LIMITATIONS MAY NOT APPLY TO YOU. Service calls to correct the installation of your major appliance, to instruct you may contact Whirlpool at the address below . Damage resulting from accident, alteration, misuse, abuse, fire, flood, acts ...is covered by the customer. W10142781C SP PN W1042908C © 2008 Whirlpool Corporation. Proof of your major appliance is not installed in accordance with the product, Whirlpool Corporation or Whirlpool Canada LP (hereafter "Whirlpool") will pay for Factory Specified Parts and repair labor to parts or ...
... OR FITNESS, SO THESE EXCLUSIONS OR LIMITATIONS MAY NOT APPLY TO YOU. Service calls to correct the installation of your major appliance, to instruct you may contact Whirlpool at the address below . Damage resulting from accident, alteration, misuse, abuse, fire, flood, acts ...is covered by the customer. W10142781C SP PN W1042908C © 2008 Whirlpool Corporation. Proof of your major appliance is not installed in accordance with the product, Whirlpool Corporation or Whirlpool Canada LP (hereafter "Whirlpool") will pay for Factory Specified Parts and repair labor to parts or ...
Warranty
Page 1
...bulbs, air filters or water filters. This major appliance is reported to Whirlpool within 30 days from the date of purchase, when this limited warranty. Major appliances with published installation instructions. 11. If you need assistance using your major appliance, unless... with original model/serial numbers that is required to published user or operator instructions and/or installation instructions. 4. For assistance or service in your authorized Whirlpool dealer to determine if another warranty applies. 9/07 For additional product information or to correct house...
...bulbs, air filters or water filters. This major appliance is reported to Whirlpool within 30 days from the date of purchase, when this limited warranty. Major appliances with published installation instructions. 11. If you need assistance using your major appliance, unless... with original model/serial numbers that is required to published user or operator instructions and/or installation instructions. 4. For assistance or service in your authorized Whirlpool dealer to determine if another warranty applies. 9/07 For additional product information or to correct house...


