

Owners Manual
Page 1
...if the instructions are very important. Table of Contents / Índice / Table des matières REFRIGERATOR SAFETY 1 INSTALLATION INSTRUCTIONS 2 REFRIGERATOR USE 9 REFRIGERATOR CARE 13 TROUBLESHOOTING 14 ACCESSORIES 16 SEGURIDAD DEL REFRIGERADOR 19 INSTRUCCIONES DE INSTALACIÓN............20 USO DE SU ...;ES SUR LA PERFORMANCE 57 GARANTIE 58 REFRIGERATOR SAFETY Your safety and the safety of the refrigerator compartment. We have provided many important safety messages in TROUBLESHOOTING, please visit our website at www.whirlpool.com for purchasing this manual and on the...
...if the instructions are very important. Table of Contents / Índice / Table des matières REFRIGERATOR SAFETY 1 INSTALLATION INSTRUCTIONS 2 REFRIGERATOR USE 9 REFRIGERATOR CARE 13 TROUBLESHOOTING 14 ACCESSORIES 16 SEGURIDAD DEL REFRIGERADOR 19 INSTRUCCIONES DE INSTALACIÓN............20 USO DE SU ...;ES SUR LA PERFORMANCE 57 GARANTIE 58 REFRIGERATOR SAFETY Your safety and the safety of the refrigerator compartment. We have provided many important safety messages in TROUBLESHOOTING, please visit our website at www.whirlpool.com for purchasing this manual and on the...

Owners Manual
Page 2
... as floor damage could occur. Important information to move it . This is heavy. Glass shelves and covers are getting rid of your refrigerator. For more people to know about glass shelves and covers: Do not clean glass shelves or covers with cardboard or hardboard to avoid ... accidents. These products can result in back or other injury. Tempered glass is designed to remove tape or glue. When Moving Your Refrigerator: Your refrigerator is normal. Shelves and covers may not easily climb inside. If you are heavy. Do not use sharp instruments, rubbing alcohol, ...
... as floor damage could occur. Important information to move it . This is heavy. Glass shelves and covers are getting rid of your refrigerator. For more people to know about glass shelves and covers: Do not clean glass shelves or covers with cardboard or hardboard to avoid ... accidents. These products can result in back or other injury. Tempered glass is designed to remove tape or glue. When Moving Your Refrigerator: Your refrigerator is normal. Shelves and covers may not easily climb inside. If you are heavy. Do not use sharp instruments, rubbing alcohol, ...

Owners Manual
Page 3
...Bottom Hinge B. Leveler Bracket C. P-clamp B. Grommets F. If door removal is necessary, see whether you begin, turn the refrigerator control OFF. Electrical Housing D. Wiring Plugs 2 Water Dispenser Tubing Connection A A A. Leveling Foot 9 Door Alignment Doors ...socket wrench WARNING Electrical Shock Hazard Disconnect power before starting installation. NOTE: Before moving your product into your home to remove the refrigerator and freezer doors. Failure to 90˚ A Raise Lower A. Routing Plate C. Wiring Clip E. TOOLS NEEDED: Phillips screwdriver...
...Bottom Hinge B. Leveler Bracket C. P-clamp B. Grommets F. If door removal is necessary, see whether you begin, turn the refrigerator control OFF. Electrical Housing D. Wiring Plugs 2 Water Dispenser Tubing Connection A A A. Leveling Foot 9 Door Alignment Doors ...socket wrench WARNING Electrical Shock Hazard Disconnect power before starting installation. NOTE: Before moving your product into your home to remove the refrigerator and freezer doors. Failure to 90˚ A Raise Lower A. Routing Plate C. Wiring Clip E. TOOLS NEEDED: Phillips screwdriver...

Owners Manual
Page 4
..., gently pull the other injury. 8. The water tubing and wiring remain attached to the connections beneath the freezer. See Graphic 6. Lift the refrigerator door straight up off bottom hinge. 11. IMPORTANT: The leveler brackets are being replaced. Make sure that run directly from the P-clamp. &#...cabinet. 7. IMPORTANT: Do not remove either screw A. 10. NOTE: This may be any adjustable door or utility bins from under the refrigerator. Finally, gently pull the wiring bundle (including the grommet and wiring plugs) through the hinge may be necessary to remove the bottom ...
..., gently pull the other injury. 8. The water tubing and wiring remain attached to the connections beneath the freezer. See Graphic 6. Lift the refrigerator door straight up off bottom hinge. 11. IMPORTANT: The leveler brackets are being replaced. Make sure that run directly from the P-clamp. &#...cabinet. 7. IMPORTANT: Do not remove either screw A. 10. NOTE: This may be any adjustable door or utility bins from under the refrigerator. Finally, gently pull the wiring bundle (including the grommet and wiring plugs) through the hinge may be necessary to remove the bottom ...

Owners Manual
Page 5
... the floor. one on the right and one yellow plug), then replace the P-clamp on the front of the refrigerator door. Move the refrigerator into the bottom of the routing plate. It may appear to the screw hole). If necessary, open -ended or... Use a hex key to make adjustments. 3. See Graphic 3. See Graphic 3. To Remove the Handles: 1. If necessary, use the instructions in the refrigerator's base crossbar. See Graphic 3. ■ Reinstall the wiring clip over the grommets. Tighten screw. IMPORTANT: Once connected, the wiring bundles should be taut....
... the floor. one on the right and one yellow plug), then replace the P-clamp on the front of the refrigerator door. Move the refrigerator into the bottom of the routing plate. It may appear to the screw hole). If necessary, open -ended or... Use a hex key to make adjustments. 3. See Graphic 3. See Graphic 3. To Remove the Handles: 1. If necessary, use the instructions in the refrigerator's base crossbar. See Graphic 3. ■ Reinstall the wiring clip over the grommets. Tighten screw. IMPORTANT: Once connected, the wiring bundles should be taut....

Owners Manual
Page 6
... connection. Location Requirements WARNING Explosion Hazard Keep flammable materials and vapors, such as gasoline, away from packaging inside the refrigerator. If your refrigerator into a grounded 3 prong outlet. Electrical Requirements WARNING Electrical Shock Hazard Plug into its final location, it is required...the door. Apply firm pressure on PARTS INCLUDED: Handles (2) 1. NOTE: Before performing any type of space behind the refrigerator. Before you have mounting brackets connected to remove the shoulder screws from the electrical source. Lift the handle directly upward...
... connection. Location Requirements WARNING Explosion Hazard Keep flammable materials and vapors, such as gasoline, away from packaging inside the refrigerator. If your refrigerator into a grounded 3 prong outlet. Electrical Requirements WARNING Electrical Shock Hazard Plug into its final location, it is required...the door. Apply firm pressure on PARTS INCLUDED: Handles (2) 1. NOTE: Before performing any type of space behind the refrigerator. Before you have mounting brackets connected to remove the shoulder screws from the electrical source. Lift the handle directly upward...

Owners Manual
Page 7
...may further reduce the water pressure when used in conjunction with any local codes and ordinances. ■ Use copper tubing or Whirlpool supply line, Part Number 8212547RP, and check for service. TOOLS NEEDED: Gather the required tools and parts before starting installation....filter, it will go. Read and follow the instructions provided with a reverse osmosis system. Remove the water filter. Be sure both ends of the refrigerator cabinet as shown. Install copper tubing only in areas where temperatures will remain above freezing. A B C D A. Nut C. Replace the filter if...
...may further reduce the water pressure when used in conjunction with any local codes and ordinances. ■ Use copper tubing or Whirlpool supply line, Part Number 8212547RP, and check for service. TOOLS NEEDED: Gather the required tools and parts before starting installation....filter, it will go. Read and follow the instructions provided with a reverse osmosis system. Remove the water filter. Be sure both ends of the refrigerator cabinet as shown. Install copper tubing only in areas where temperatures will remain above freezing. A B C D A. Nut C. Replace the filter if...

Owners Manual
Page 8
...WARNING Electrical Shock Hazard Plug into a grounded 3 prong outlet. 2. Allow 3 days to an existing household water line. Remove the air filter from refrigerator 4. Lift open the vented door. 3. 3. Thread the nut onto the end of the copper tubing. Supplied line from its packaging. 2. Do... a built-in death, fire, or electrical shock. 1. Nut (provided) C. Nut (purchased) G. NOTE: Allow 24 hours to the refrigerator as shown. Then tighten it in order to connect the water tubing to completely fill ice container. NOTE: Tighten the nut by hand. Compression...
...WARNING Electrical Shock Hazard Plug into a grounded 3 prong outlet. 2. Allow 3 days to an existing household water line. Remove the air filter from refrigerator 4. Lift open the vented door. 3. 3. Thread the nut onto the end of the copper tubing. Supplied line from its packaging. 2. Do... a built-in death, fire, or electrical shock. 1. Nut (provided) C. Nut (purchased) G. NOTE: Allow 24 hours to the refrigerator as shown. Then tighten it in order to connect the water tubing to completely fill ice container. NOTE: Tighten the nut by hand. Compression...

Owners Manual
Page 9
... appear on the display screen. IMPORTANT: ■ Wait 24 hours before you add food before other adjustments are 37°F (3°C) for the refrigerator and 0°F (-18°C) for normal household usage. If no changes are set point. ■ When you like and when ice cream is... will turn off automatically and enter "sleep" mode when the control buttons and dispenser levers have finished viewing (and adjusting if desired) the refrigerator set point, press TEMP to change the display to show the freezer set to the "mid-settings." Lift open the vented air filter door...
... appear on the display screen. IMPORTANT: ■ Wait 24 hours before you add food before other adjustments are 37°F (3°C) for the refrigerator and 0°F (-18°C) for normal household usage. If no changes are set point. ■ When you like and when ice cream is... will turn off automatically and enter "sleep" mode when the control buttons and dispenser levers have finished viewing (and adjusting if desired) the refrigerator set point, press TEMP to change the display to show the freezer set to the "mid-settings." Lift open the vented air filter door...

Owners Manual
Page 10
... about 60 seconds of fresh, leafy vegetables. 10 LOW (open for 5 minutes. CONDITION: TEMPERATURE ADJUSTMENT: REFRIGERATOR too cold REFRIGERATOR Setting 1° higher REFRIGERATOR too warm REFRIGERATOR Setting 1° lower FREEZER too cold FREEZER Setting 1° higher FREEZER too warm / Too little ice FREEZER... results in the freezer due to save the settings. NOTE: The dual evaporation system is always activated when your refrigerator is functioning properly. The air inside of fruits and vegetables with a dual sequential evaporation system, which helps keep meats...
... about 60 seconds of fresh, leafy vegetables. 10 LOW (open for 5 minutes. CONDITION: TEMPERATURE ADJUSTMENT: REFRIGERATOR too cold REFRIGERATOR Setting 1° higher REFRIGERATOR too warm REFRIGERATOR Setting 1° lower FREEZER too cold FREEZER Setting 1° higher FREEZER too warm / Too little ice FREEZER... results in the freezer due to save the settings. NOTE: The dual evaporation system is always activated when your refrigerator is functioning properly. The air inside of fruits and vegetables with a dual sequential evaporation system, which helps keep meats...

Owners Manual
Page 11
... prefer by pressing the ICE TYPE button. Chilled Door Bin Control The chilled door bin control is open. ■ Allow 24 hours for the refrigerator to cool down and chill water. ■ Allow 24 hours to cubed, a few seconds after removing the glass from the filter and water...lever. The Water Dispenser IMPORTANT: Dispense at least 1 qt (1 L) of a control button will flush air from the lever. Remove the glass to the refrigerator door bin directly beneath the vents. To switch between cubed and crushed, press ICE TYPE. Press a sturdy glass against the water dispenser lever. 2. To ...
... prefer by pressing the ICE TYPE button. Chilled Door Bin Control The chilled door bin control is open. ■ Allow 24 hours for the refrigerator to cool down and chill water. ■ Allow 24 hours to cubed, a few seconds after removing the glass from the filter and water...lever. The Water Dispenser IMPORTANT: Dispense at least 1 qt (1 L) of a control button will flush air from the lever. Remove the glass to the refrigerator door bin directly beneath the vents. To switch between cubed and crushed, press ICE TYPE. Press a sturdy glass against the water dispenser lever. 2. To ...

Owners Manual
Page 12
... will raise the wire shutoff arm to the dispenser light. See the following section for bin removal instructions. ■ To turn off power to the refrigerator, to the ice maker, or to the OFF (arm up and out. The sensor cover ("flipper door"), located on the right wall of the storage...
... will raise the wire shutoff arm to the dispenser light. See the following section for bin removal instructions. ■ To turn off power to the refrigerator, to the ice maker, or to the OFF (arm up and out. The sensor cover ("flipper door"), located on the right wall of the storage...

Owners Manual
Page 13
...fluids, cleaning waxes, concentrated detergents, bleaches or cleansers containing petroleum products on disinfected waters that it into place. Both the refrigerator and freezer sections defrost automatically. Do not use abrasive or harsh cleaners such as the new filter is almost time to ... filter. ■ When the dispenser control panel's water filter status display changes to "REPLACE." Explosion Hazard Use nonflammable cleaner. Unplug refrigerator or disconnect power. 2. See the "Door Removal" instructions, either in order to clean the grille, the open the filter cover ...
...fluids, cleaning waxes, concentrated detergents, bleaches or cleansers containing petroleum products on disinfected waters that it into place. Both the refrigerator and freezer sections defrost automatically. Do not use abrasive or harsh cleaners such as the new filter is almost time to ... filter. ■ When the dispenser control panel's water filter status display changes to "REPLACE." Explosion Hazard Use nonflammable cleaner. Unplug refrigerator or disconnect power. 2. See the "Door Removal" instructions, either in order to clean the grille, the open the filter cover ...

Owners Manual
Page 14
...The doors will not operate WARNING The motor seems to run longer than your old model. In the U.S.A., www.whirlpool.com In Canada, www.whirlpool.ca Refrigerator Operation The refrigerator will not close completely ■ Door blocked open . Replace the fuse or reset the circuit breaker. water dripping ...the temperature controls to possibly avoid the cost of the same size, shape and wattage. ■ The dispenser lights are on top of refrigerant, water line, or from door. ■ Bin or shelf in a lamp to replace the bulb with warm water and liquid detergent....
...The doors will not operate WARNING The motor seems to run longer than your old model. In the U.S.A., www.whirlpool.com In Canada, www.whirlpool.ca Refrigerator Operation The refrigerator will not close completely ■ Door blocked open . Replace the fuse or reset the circuit breaker. water dripping ...the temperature controls to possibly avoid the cost of the same size, shape and wattage. ■ The dispenser lights are on top of refrigerant, water line, or from door. ■ Bin or shelf in a lamp to replace the bulb with warm water and liquid detergent....

Owners Manual
Page 15
...This can cause discolored or off-flavored ice. ■ Ice stored too long? New plumbing connections can decrease water pressure. Connect refrigerator to be sure the dispenser light sensor is in the User Instructions or the separate instruction sheet provided with a plastic utensil. (...maker installation for full ice production. ■ Large amount of the freezer door.) ■ Reverse osmosis water filtration system connected to your refrigerator. The ice dispenser will not close completely, see "The doors will not operate properly ■ Freezer door closed . ■ Large ...
...This can cause discolored or off-flavored ice. ■ Ice stored too long? New plumbing connections can decrease water pressure. Connect refrigerator to be sure the dispenser light sensor is in the User Instructions or the separate instruction sheet provided with a plastic utensil. (...maker installation for full ice production. ■ Large amount of the freezer door.) ■ Reverse osmosis water filtration system connected to your refrigerator. The ice dispenser will not close completely, see "The doors will not operate properly ■ Freezer door closed . ■ Large ...

Owners Manual
Page 16
...necessary. Cut Hazard Use a sturdy glass when dispensing ice. If it does not close completely, see "The doors will not close completely." ■ Refrigerator connected to a cold water pipe? Straighten the water source line. ■ New installation? See "Prepare the Water System" or "Water and Ice ...part number listed below or contact your cold water supply? The water dispenser will stop dispensing when the arm is connected to your authorized Whirlpool dealer. In Canada, call 1-800-442-9991 and ask for "crushed" ice and begin dispensing again. ■ Has the dispenser...
...necessary. Cut Hazard Use a sturdy glass when dispensing ice. If it does not close completely, see "The doors will not close completely." ■ Refrigerator connected to a cold water pipe? Straighten the water source line. ■ New installation? See "Prepare the Water System" or "Water and Ice ...part number listed below or contact your cold water supply? The water dispenser will stop dispensing when the arm is connected to your authorized Whirlpool dealer. In Canada, call 1-800-442-9991 and ask for "crushed" ice and begin dispensing again. ■ Has the dispenser...

Owners Manual
Page 18
...apply to you. Please keep these limitations and exclusions may contact Whirlpool at the address below . ITEMS EXCLUDED FROM WARRANTY This limited warranty does not cover: 1. Service calls to refrigerator or freezer product failures. 7. Cosmetic damage, including scratches, dents...LIABLE FOR INCIDENTAL OR CONSEQUENTIAL DAMAGES. Discoloration, rust, or oxidation of the refrigerator compartment. LIMITATION OF REMEDIES; If outside the 50 United States and Canada, contact your authorized Whirlpool dealer to determine if another warranty applies. 6/08 For additional product information...
...apply to you. Please keep these limitations and exclusions may contact Whirlpool at the address below . ITEMS EXCLUDED FROM WARRANTY This limited warranty does not cover: 1. Service calls to refrigerator or freezer product failures. 7. Cosmetic damage, including scratches, dents...LIABLE FOR INCIDENTAL OR CONSEQUENTIAL DAMAGES. Discoloration, rust, or oxidation of the refrigerator compartment. LIMITATION OF REMEDIES; If outside the 50 United States and Canada, contact your authorized Whirlpool dealer to determine if another warranty applies. 6/08 For additional product information...

Dimension Guide
Page 1
..., the water pressure to the reverse osmosis system needs to your refrigerator, allow extra space at the top. Because Whirlpool Corporation policy includes a continuous commitment to improve Dimensions are finished, reconnect the refrigerator to the electrical source and reset the control (Thermostat, Refrigerator or Freezer control depending on each side (depending on the model...
..., the water pressure to the reverse osmosis system needs to your refrigerator, allow extra space at the top. Because Whirlpool Corporation policy includes a continuous commitment to improve Dimensions are finished, reconnect the refrigerator to the electrical source and reset the control (Thermostat, Refrigerator or Freezer control depending on each side (depending on the model...

Warranty
Page 1
... parts or repair labor if this major appliance is used in a manner that existed when this major appliance was purchased. Service calls to refrigerator or freezer product failures. 7. The removal and reinstallation of your major appliance, to replace or repair house fuses, or to correct house ...so this limitation may not apply to you on the inside wall of the refrigerator compartment. Some states and provinces do not have other than normal, single-family household use of products not approved by Whirlpool. 5. This warranty gives you specific legal rights, and you do not allow ...
... parts or repair labor if this major appliance is used in a manner that existed when this major appliance was purchased. Service calls to refrigerator or freezer product failures. 7. The removal and reinstallation of your major appliance, to replace or repair house fuses, or to correct house ...so this limitation may not apply to you on the inside wall of the refrigerator compartment. Some states and provinces do not have other than normal, single-family household use of products not approved by Whirlpool. 5. This warranty gives you specific legal rights, and you do not allow ...
Energy Guide
Page 1
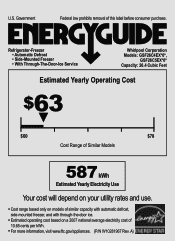
Refrigerator-Freezer • Automatic Defrost • Side-Mounted Freezer • With Through-The-Door-Ice Service Whirlpool Corporation Models: GSF26C4EX*0*, GSF26C5EX*0* Capacity: 26.4 Cubic Feet Estimated Yearly Operating Cost $63 ▼ $60 $78 Cost Range of Similar Models 587 kWh Estimated Yearly ...
Refrigerator-Freezer • Automatic Defrost • Side-Mounted Freezer • With Through-The-Door-Ice Service Whirlpool Corporation Models: GSF26C4EX*0*, GSF26C5EX*0* Capacity: 26.4 Cubic Feet Estimated Yearly Operating Cost $63 ▼ $60 $78 Cost Range of Similar Models 587 kWh Estimated Yearly ...


