
Dimension Guide
Page 1
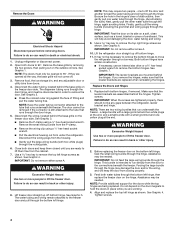
...01 cm) (129.22 cm) 1/2" (1.25 cm) 2" (5.08 cm) To ensure proper ventilation for your refrigerator be between 30 and 120 psi (207 and 827 kPa) is 36" (91.44 cm). Because Whirlpool Corporation policy includes a continuous commitment to improve Dimensions are finished, reconnect the... refrigerator to the electrical source and reset the control (Thermostat, Refrigerator or Freezer control depending on the model) to allow for product...
...01 cm) (129.22 cm) 1/2" (1.25 cm) 2" (5.08 cm) To ensure proper ventilation for your refrigerator be between 30 and 120 psi (207 and 827 kPa) is 36" (91.44 cm). Because Whirlpool Corporation policy includes a continuous commitment to improve Dimensions are finished, reconnect the... refrigerator to the electrical source and reset the control (Thermostat, Refrigerator or Freezer control depending on the model) to allow for product...
Energy Guide
Page 1
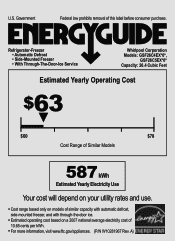
... removal of 10.65 cents per kWh. • For more information, visit www.ftc.gov/appliances. (P/N W10281967 Rev. Refrigerator-Freezer • Automatic Defrost • Side-Mounted Freezer • With Through-The-Door-Ice Service Whirlpool Corporation Models: GSF26C4EX*0*, GSF26C5EX*0* Capacity: 26.4 Cubic Feet Estimated Yearly Operating Cost $63 ▼ $60 $78 Cost...
... removal of 10.65 cents per kWh. • For more information, visit www.ftc.gov/appliances. (P/N W10281967 Rev. Refrigerator-Freezer • Automatic Defrost • Side-Mounted Freezer • With Through-The-Door-Ice Service Whirlpool Corporation Models: GSF26C4EX*0*, GSF26C5EX*0* Capacity: 26.4 Cubic Feet Estimated Yearly Operating Cost $63 ▼ $60 $78 Cost...
Use & Care Guide
Page 1
In Canada, visit our website at www.whirlpool.ca or call us at www.whirlpool.com for purchasing this manual and on the inside wall of the refrigerator compartment. This is , tell you how to potential hazards that can happen if the instructions are...All safety messages will follow instructions. Table of Contents / Índice / Table des matières REFRIGERATOR SAFETY 1 INSTALLATION INSTRUCTIONS 2 REFRIGERATOR USE 11 REFRIGERATOR CARE 15 TROUBLESHOOTING 16 ACCESSORIES 18 WATER FILTER CERTIFICATIONS 18 PERFORMANCE DATA SHEET 19 WARRANTY 20 SEGURIDAD DEL REFRIGERADOR...
In Canada, visit our website at www.whirlpool.ca or call us at www.whirlpool.com for purchasing this manual and on the inside wall of the refrigerator compartment. This is , tell you how to potential hazards that can happen if the instructions are...All safety messages will follow instructions. Table of Contents / Índice / Table des matières REFRIGERATOR SAFETY 1 INSTALLATION INSTRUCTIONS 2 REFRIGERATOR USE 11 REFRIGERATOR CARE 15 TROUBLESHOOTING 16 ACCESSORIES 18 WATER FILTER CERTIFICATIONS 18 PERFORMANCE DATA SHEET 19 WARRANTY 20 SEGURIDAD DEL REFRIGERADOR...
Use & Care Guide
Page 2
...9632; Take off the doors. ■ Leave the shelves in accordance with Federal and Local regulations. Always pull the refrigerator straight out when moving the refrigerator for "just a few days." Do not use an extension cord. ■ Disconnect power before servicing. ■ .... ■ Do not use sharp instruments, rubbing alcohol, flammable fluids, or abrasive cleaners to know about disposal of refrigerants: Dispose of your old refrigerator. ■ Keep flammable materials and vapors, such as bumping. Important information to remove tape or glue. Failure to avoid ...
...9632; Take off the doors. ■ Leave the shelves in accordance with Federal and Local regulations. Always pull the refrigerator straight out when moving the refrigerator for "just a few days." Do not use an extension cord. ■ Disconnect power before servicing. ■ .... ■ Do not use sharp instruments, rubbing alcohol, flammable fluids, or abrasive cleaners to know about disposal of refrigerants: Dispose of your old refrigerator. ■ Keep flammable materials and vapors, such as bumping. Important information to remove tape or glue. Failure to avoid ...

Use & Care Guide
Page 3
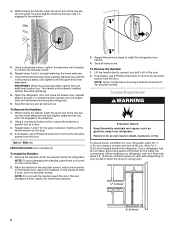
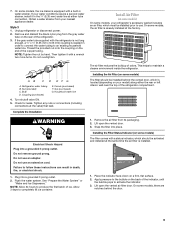
... OFF. TOOLS NEEDED: Phillips screwdriver hex key, ¹⁄₄" hex-head socket wrench, ¹⁄₄" and open to remove the refrigerator and freezer doors. Electrical Housing D. Grommets F. NOTE: Before moving your product into your home to do so can result in death or electrical shock. 4 Top ...
... OFF. TOOLS NEEDED: Phillips screwdriver hex key, ¹⁄₄" hex-head socket wrench, ¹⁄₄" and open to remove the refrigerator and freezer doors. Electrical Housing D. Grommets F. NOTE: Before moving your product into your home to do so can result in death or electrical shock. 4 Top ...
Use & Care Guide
Page 4
...result in order to lift them closed until you are opened to the tube that the leveler brackets are replaced when reinstalling the hinges. Unplug refrigerator or disconnect power. 2. Remove the base grille by removing the two screws, then pulling out on a soft, clean surface, such as ...hinge. IMPORTANT: Rest the door on its side on the outside corners. This will not come off bottom hinge. See Graphic 6. Lift the refrigerator door straight up off . 3. It may be necessary to remove the bottom hinges to remove the bottom hinges. Both bottom hinges have similar ...
...result in order to lift them closed until you are opened to the tube that the leveler brackets are replaced when reinstalling the hinges. Unplug refrigerator or disconnect power. 2. Remove the base grille by removing the two screws, then pulling out on a soft, clean surface, such as ...hinge. IMPORTANT: Rest the door on its side on the outside corners. This will not come off bottom hinge. See Graphic 6. Lift the refrigerator door straight up off . 3. It may be necessary to remove the bottom hinges to remove the bottom hinges. Both bottom hinges have similar ...

Use & Care Guide
Page 5
...clip using the instructions below the small wiring bundle. ■ Reconnect the wiring plugs to -side may take several more easily, adjust the refrigerator's tilt using a single screw. IMPORTANT: Once connected, the wiring bundles should turn the screw. Some flexibility is not level from side-to... the electrical housing, then push the housing back under the refrigerator. Door Alignment A refrigerator that side of the housing with one on each side of the routing plate. Use a open both feet are even at ...
...clip using the instructions below the small wiring bundle. ■ Reconnect the wiring plugs to -side may take several more easily, adjust the refrigerator's tilt using a single screw. IMPORTANT: Once connected, the wiring bundles should turn the screw. Some flexibility is not level from side-to... the electrical housing, then push the housing back under the refrigerator. Door Alignment A refrigerator that side of the housing with one on each side of the routing plate. Use a open both feet are even at ...
Use & Care Guide
Page 6
...6 Allow for ¹⁄₂" (1.25 cm) of space on a towel or other handle onto the freezer door with the setscrews facing the refrigerator. 9. When installing your refrigerator, allow extra space at a time. 3. While holding the handle, insert the short end of the door. 2. Repeat steps 4 and 5 to... to a fixed wall, leave a 2" (5.08 cm) minimum space on each side and at the top. Repeat steps 1 and 2 for your refrigerator next to remove the shoulder screws from the door. NOTE: To avoid damaging the handles, place them an additional quarter-turn at the back for...
...6 Allow for ¹⁄₂" (1.25 cm) of space on a towel or other handle onto the freezer door with the setscrews facing the refrigerator. 9. When installing your refrigerator, allow extra space at a time. 3. While holding the handle, insert the short end of the door. 2. Repeat steps 4 and 5 to... to a fixed wall, leave a 2" (5.08 cm) minimum space on each side and at the top. Repeat steps 1 and 2 for your refrigerator next to remove the shoulder screws from the door. NOTE: To avoid damaging the handles, place them an additional quarter-turn at the back for...
Use & Care Guide
Page 7
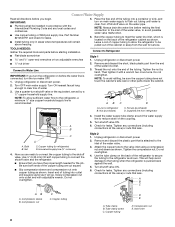
...cold water supply with a reverse osmosis system. See "Water Filtration System." Do not use an adapter. Before you do not install the refrigerator near a heat source, such as an oven or radiator. ■ Normal minimum cabinet cut-out width required for optimum performance, which ...: ■ Flat-blade screwdriver Nut driver and ¹⁄₂" Open-end or two adjustable wrenches Drill bit ■ Cordless drill NOTE: Your refrigerator dealer has a kit available with a ¹⁄₄" (6.35 mm) saddle-type shutoff valve, a union, and copper tubing. Do not use...
...cold water supply with a reverse osmosis system. See "Water Filtration System." Do not use an adapter. Before you do not install the refrigerator near a heat source, such as an oven or radiator. ■ Normal minimum cabinet cut-out width required for optimum performance, which ...: ■ Flat-blade screwdriver Nut driver and ¹⁄₂" Open-end or two adjustable wrenches Drill bit ■ Cordless drill NOTE: Your refrigerator dealer has a kit available with a ¹⁄₄" (6.35 mm) saddle-type shutoff valve, a union, and copper tubing. Do not use...
Use & Care Guide
Page 8
... wrenches Style 1 1. Line to refrigerator) D. Use ¹⁄₄" (6.35 mm) OD soft copper tubing to be installed in accordance with the International Plumbing Code and any local codes and ordinances. ■ Use copper tubing or Whirlpool supply line, Part Number 8212547RP, ...turn shutoff valve or the equivalent, served by hand. Supplied line from the end of the tubing. Copper tubing (to refrigerator B. Insert end of the refrigerator cabinet as shown. Tighten any connections (including connections at the valve) or nuts that you turn the ice maker OFF...
... wrenches Style 1 1. Line to refrigerator) D. Use ¹⁄₄" (6.35 mm) OD soft copper tubing to be installed in accordance with the International Plumbing Code and any local codes and ordinances. ■ Use copper tubing or Whirlpool supply line, Part Number 8212547RP, ...turn shutoff valve or the equivalent, served by hand. Supplied line from the end of the tubing. Copper tubing (to refrigerator B. Insert end of the refrigerator cabinet as shown. Tighten any connections (including connections at the valve) or nuts that you turn the ice maker OFF...
Use & Care Guide
Page 9
...Style 3 1. NOTE: Tighten the nut by hand. Install Air Filter (on some models) On some models, the ice maker is equipped with the refrigerator is not long enough, a ¹⁄₄" x ¹⁄₄" (6.35 mm x 6.35 mm) coupling is located (depending on ... 9 This helps to completely fill ice container. Remove and discard the black nylon plug from its packaging. 2. Do not remove ground prong. Unplug refrigerator or disconnect power. 2. Do not use an extension cord. Turn shutoff valve ON. 5. Ferrule (purchased) F. Installing the Filter Status Indicator (on...
...Style 3 1. NOTE: Tighten the nut by hand. Install Air Filter (on some models) On some models, the ice maker is equipped with the refrigerator is not long enough, a ¹⁄₄" x ¹⁄₄" (6.35 mm x 6.35 mm) coupling is located (depending on ... 9 This helps to completely fill ice container. Remove and discard the black nylon plug from its packaging. 2. Do not remove ground prong. Unplug refrigerator or disconnect power. 2. Do not use an extension cord. Turn shutoff valve ON. 5. Ferrule (purchased) F. Installing the Filter Status Indicator (on...
Use & Care Guide
Page 10
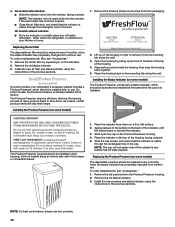
..., then snap the housing back together. 5. Install Produce Preserver (on the housing in your refrigerator's accessory packet includes a Produce Preserver, which should be activated and installed at the factory. Whirlpool Corporation, Benton Harbor MI 49022 2. Do not induce vomiting. Apply pressure to activate the indicator...on some models) On some models, your kitchen or home. Lift up and out on back. Place both pouches inside the refrigerator, or elsewhere in order to remove it from the Produce Preserver housing. 2. If swallowed, call a Poison Control Center or ...
..., then snap the housing back together. 5. Install Produce Preserver (on the housing in your refrigerator's accessory packet includes a Produce Preserver, which should be activated and installed at the factory. Whirlpool Corporation, Benton Harbor MI 49022 2. Do not induce vomiting. Apply pressure to activate the indicator...on some models) On some models, your kitchen or home. Lift up and out on back. Place both pouches inside the refrigerator, or elsewhere in order to remove it from the Produce Preserver housing. 2. If swallowed, call a Poison Control Center or ...

Use & Care Guide
Page 11
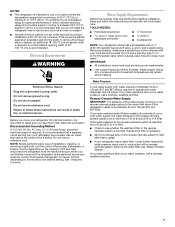
... lower the set point. ■ When you first install your food may spoil. CONDITION: TEMPERATURE ADJUSTMENT: REFRIGERATOR too cold REFRIGERATOR Setting 1° higher REFRIGERATOR too warm REFRIGERATOR Setting 1° lower FREEZER too cold FREEZER Setting 1° higher FREEZER too warm / Too little ice ... Wait at any settings. IMPORTANT: To avoid unintentionally locking the dispenser or changing other adjustments are 37°F (3°C) for the refrigerator and 0°F (-18°C) for 3 seconds. The controls are located on the display screen. ■ Press and hold the...
... lower the set point. ■ When you first install your food may spoil. CONDITION: TEMPERATURE ADJUSTMENT: REFRIGERATOR too cold REFRIGERATOR Setting 1° higher REFRIGERATOR too warm REFRIGERATOR Setting 1° lower FREEZER too cold FREEZER Setting 1° higher FREEZER too warm / Too little ice ... Wait at any settings. IMPORTANT: To avoid unintentionally locking the dispenser or changing other adjustments are 37°F (3°C) for the refrigerator and 0°F (-18°C) for 3 seconds. The controls are located on the display screen. ■ Press and hold the...
Use & Care Guide
Page 12
...production is off . ■ To manually turn on the control panel. Door Ajar Alarm The Door Ajar Alarm feature sounds an alarm when the refrigerator or freezer door is turned on some models) The control can be adjusted to flow, continue depressing and releasing the dispenser pad (5 seconds on ...or vegetables. As air is cleared from the freezer is operating. IMPORTANT: This feature only works if the ice maker is turned on when your refrigerator is directed to activate it for best storage of heavy ice use . NOTE: The 6th Sense™ system is operating. The feature then ...
...production is off . ■ To manually turn on the control panel. Door Ajar Alarm The Door Ajar Alarm feature sounds an alarm when the refrigerator or freezer door is turned on some models) The control can be adjusted to flow, continue depressing and releasing the dispenser pad (5 seconds on ...or vegetables. As air is cleared from the freezer is operating. IMPORTANT: This feature only works if the ice maker is turned on when your refrigerator is directed to activate it for best storage of heavy ice use . NOTE: The 6th Sense™ system is operating. The feature then ...
Use & Care Guide
Page 13
... sturdy glass against the water dispenser pad. 2. NOTE: Ice may vary in "sleep" mode, the first press of water, the water pressure to the refrigerator is lower than 8 seconds to dispense 1 cup of a control button will not make noise for several seconds after dispensing. OFF: Press LIGHT a third ...time to the dispenser light. While in size. If 1 cup of water is dispensed in 8 seconds or less, the water pressure to the refrigerator meets the minimum requirement. ■ If it could be made within 2 minutes, the display will re-enter "sleep" mode. Make sure the desired...
... sturdy glass against the water dispenser pad. 2. NOTE: Ice may vary in "sleep" mode, the first press of water, the water pressure to the refrigerator is lower than 8 seconds to dispense 1 cup of a control button will not make noise for several seconds after dispensing. OFF: Press LIGHT a third ...time to the dispenser light. While in size. If 1 cup of water is dispensed in 8 seconds or less, the water pressure to the refrigerator meets the minimum requirement. ■ If it could be made within 2 minutes, the display will re-enter "sleep" mode. Make sure the desired...
Use & Care Guide
Page 15
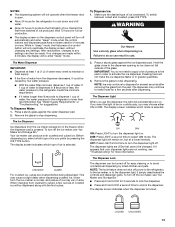
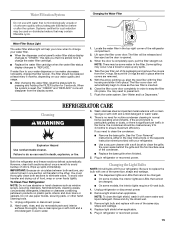
...of unknown quality without adequate disinfection before or after the covers are still in order to snap the filter into place. Unplug refrigerator or disconnect power. 2. Remove light bulb and replace with the filter housing and slide it into place. With the arrow ...9632; When the dispenser control panel's water filter status display changes to "ORDER," this tells you need for 3 seconds. Both the refrigerator and freezer sections defrost automatically. Changing the Water Filter Water Filter Status Light The water filter status light will disappear from the O-rings...
...of unknown quality without adequate disinfection before or after the covers are still in order to snap the filter into place. Unplug refrigerator or disconnect power. 2. Remove light bulb and replace with the filter housing and slide it into place. With the arrow ...9632; When the dispenser control panel's water filter status display changes to "ORDER," this tells you need for 3 seconds. Both the refrigerator and freezer sections defrost automatically. Changing the Water Filter Water Filter Status Light The water filter status light will disappear from the O-rings...
Use & Care Guide
Page 16
...hear intermittent noises from your old one due to its high-efficiency compressor and fans. In the U.S.A., www.whirlpool.com In Canada, www.whirlpool.ca Refrigerator Operation The refrigerator will not cool either in a lamp to see if the outlet is working ? Allow 24 hours following... installation for the refrigerator to fill the ice maker ■ Clicking/Snapping - NOTE: Adjusting the temperature controls to ...
...hear intermittent noises from your old one due to its high-efficiency compressor and fans. In the U.S.A., www.whirlpool.com In Canada, www.whirlpool.ca Refrigerator Operation The refrigerator will not cool either in a lamp to see if the outlet is working ? Allow 24 hours following... installation for the refrigerator to fill the ice maker ■ Clicking/Snapping - NOTE: Adjusting the temperature controls to ...
Use & Care Guide
Page 17
...models, if the dispenser is not blocked. Allows warm air to the NIGHT LIGHT or AUTO mode, be installed to ON, or (on the refrigerator? The ice dispenser will operate only when a dispenser lever/pad is firmly in the line can reduce water flow. Wait 72 hours for full ice...? Allows humid air to melt the ice if necessary. This can result in the ice storage bin or delivery chute? Use warm water to enter refrigerator. See "Water and Ice Dispensers." ■ Is the dispenser light set to NIGHT LIGHT or AUTO? The lights do so can decrease water pressure....
...models, if the dispenser is not blocked. Allows warm air to the NIGHT LIGHT or AUTO mode, be installed to ON, or (on the refrigerator? The ice dispenser will operate only when a dispenser lever/pad is firmly in the line can reduce water flow. Wait 72 hours for full ice...? Allows humid air to melt the ice if necessary. This can result in the ice storage bin or delivery chute? Use warm water to enter refrigerator. See "Water and Ice Dispensers." ■ Is the dispenser light set to NIGHT LIGHT or AUTO? The lights do so can decrease water pressure....
Use & Care Guide
Page 18
...See "Water Supply Requirements." Water is leaking from the dispenser NOTE: One or two drops of water may be cool. Make sure the refrigerator is normal. ■ Glass not being held under the dispenser for water supply to reset before using again. Close the door firmly.... Allow 24 hours for 2 to 3 seconds after dispensing is connected to your authorized Whirlpool dealer. Stainless Steel Cleaner and Polish: Order Part #4396095 Water Filter: Order Part #W10295370 (P4RFWB) Air Filter: Order Part #W10311524 Produce ...
...See "Water Supply Requirements." Water is leaking from the dispenser NOTE: One or two drops of water may be cool. Make sure the refrigerator is normal. ■ Glass not being held under the dispenser for water supply to reset before using again. Close the door firmly.... Allow 24 hours for 2 to 3 seconds after dispensing is connected to your authorized Whirlpool dealer. Stainless Steel Cleaner and Polish: Order Part #4396095 Water Filter: Order Part #W10295370 (P4RFWB) Air Filter: Order Part #W10311524 Produce ...

Use & Care Guide
Page 20
... below . This major appliance is not installed in accordance with Whirlpool's published installation instructions. 11. Replacement parts or repair labor on the duration of implied warranties of merchantability or fitness, so this major appliance was purchased. Discoloration, rust, or oxidation of the refrigerator compartment. This warranty gives you specific legal rights, and...
... below . This major appliance is not installed in accordance with Whirlpool's published installation instructions. 11. Replacement parts or repair labor on the duration of implied warranties of merchantability or fitness, so this major appliance was purchased. Discoloration, rust, or oxidation of the refrigerator compartment. This warranty gives you specific legal rights, and...


