Owners Manual
Page 1
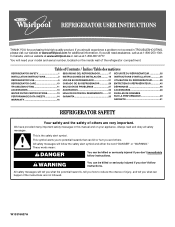
...alert symbol and either the word "DANGER" or "WARNING." Table of Contents / Índice / Table des matières REFRIGERATOR SAFETY 1 INSTALLATION INSTRUCTIONS 2 REFRIGERATOR USE 5 SEGURIDAD DEL REFRIGERADOR 17 INSTRUCCIONES DE INSTALACIÓN............18 USO DE SU REFRIGERADOR 21 SÉCURITÉ DU RÉ...us at www.whirlpool.com for purchasing this manual and on your model and serial number, located on the inside wall of injury, and tell you don't immediately follow instructions. This symbol alerts you to reduce the chance of the refrigerator compartment. WARNING ...
...alert symbol and either the word "DANGER" or "WARNING." Table of Contents / Índice / Table des matières REFRIGERATOR SAFETY 1 INSTALLATION INSTRUCTIONS 2 REFRIGERATOR USE 5 SEGURIDAD DEL REFRIGERADOR 17 INSTRUCCIONES DE INSTALACIÓN............18 USO DE SU REFRIGERADOR 21 SÉCURITÉ DU RÉ...us at www.whirlpool.com for purchasing this manual and on your model and serial number, located on the inside wall of injury, and tell you don't immediately follow instructions. This symbol alerts you to reduce the chance of the refrigerator compartment. WARNING ...
Owners Manual
Page 2
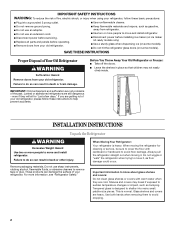
...When moving it , as bumping. Glass shelves and covers are not problems of Your Old Refrigerator WARNING Suffocation Hazard Remove doors from refrigerator. ■ Use two or more information, see "Refrigerator Safety." For more people to sudden temperature changes or impact, such as floor damage could...ready models only). ■ Use a sturdy glass when dispensing ice (on some models). ■ Do not hit the refrigerator glass doors (on some models). SAVE THESE INSTRUCTIONS Proper Disposal of the past. IMPORTANT: Child entrapment and suffocation are heavy. Junked or ...
...When moving it , as bumping. Glass shelves and covers are not problems of Your Old Refrigerator WARNING Suffocation Hazard Remove doors from refrigerator. ■ Use two or more information, see "Refrigerator Safety." For more people to sudden temperature changes or impact, such as floor damage could...ready models only). ■ Use a sturdy glass when dispensing ice (on some models). ■ Do not hit the refrigerator glass doors (on some models). SAVE THESE INSTRUCTIONS Proper Disposal of the past. IMPORTANT: Child entrapment and suffocation are heavy. Junked or ...
Owners Manual
Page 3
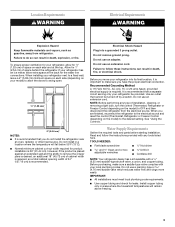
...Hz., AC only, 15- Use an outlet that you are finished, reconnect the refrigerator to the electrical source and reset the control (Thermostat, Refrigerator or Freezer Control depending on each side (depending on the model) to swing open. 1/2" (1.25 cm) 2" (5.08 cm) NOTES: ■ It is recommended. It is ...the Controls." IMPORTANT: ■ All installations must meet local plumbing code requirements. ■ Use copper tubing and check for ¹⁄₂" (1.25 cm) of space behind the refrigerator. Install copper tubing only in death, fire, or electrical shock. If your...
...Hz., AC only, 15- Use an outlet that you are finished, reconnect the refrigerator to the electrical source and reset the control (Thermostat, Refrigerator or Freezer Control depending on each side (depending on the model) to swing open. 1/2" (1.25 cm) 2" (5.08 cm) NOTES: ■ It is recommended. It is ...the Controls." IMPORTANT: ■ All installations must meet local plumbing code requirements. ■ Use copper tubing and check for ¹⁄₂" (1.25 cm) of space behind the refrigerator. Install copper tubing only in death, fire, or electrical shock. If your...
Owners Manual
Page 4
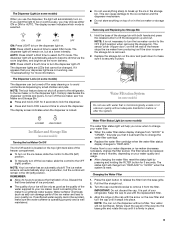
...on the reverse osmosis system to refill after heavy usage. ■ If your refrigerator has a water filter, it in the cold water pipe you have questions about your water pressure, call a licensed, qualified plumber. Compression nut D E. If the water pressure to the reverse osmosis ...system is less than 40 to 60 psi (276 to 414 kPa): ■ Check to see whether the sediment filter in conjunction with a reverse osmosis system. Unplug refrigerator or disconnect power. ...
...on the reverse osmosis system to refill after heavy usage. ■ If your refrigerator has a water filter, it in the cold water pipe you have questions about your water pressure, call a licensed, qualified plumber. Compression nut D E. If the water pressure to the reverse osmosis ...system is less than 40 to 60 psi (276 to 414 kPa): ■ Check to see whether the sediment filter in conjunction with a reverse osmosis system. Unplug refrigerator or disconnect power. ...

Owners Manual
Page 5
...changing any nuts or connections (including connections at least 24 hours between adjustments. Do not overtighten. Bulb D. Household water line 4. Unplug refrigerator or disconnect power. 2. Inlet 3. Turn on the dispenser control panel has a backlight, which will turn off , press and hold LOCK...the copper tubing. The controls are still set points are located on . Flush the water system. NOTE: Allow 24 hours to refrigerator. Coupling (purchased) E. Tighten any settings. Do not remove ground prong. The factory recommended set to be correct for 3 seconds....
...changing any nuts or connections (including connections at least 24 hours between adjustments. Do not overtighten. Bulb D. Household water line 4. Unplug refrigerator or disconnect power. 2. Inlet 3. Turn on the dispenser control panel has a backlight, which will turn off , press and hold LOCK...the copper tubing. The controls are still set points are located on . Flush the water system. NOTE: Allow 24 hours to refrigerator. Coupling (purchased) E. Tighten any settings. Do not remove ground prong. The factory recommended set to be correct for 3 seconds....
Owners Manual
Page 6
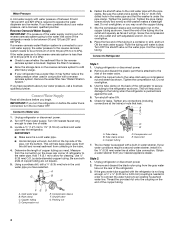
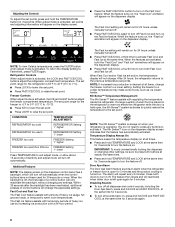
... on the display screen. ■ Press the FAST ICE/COOL button to turn on the dispenser display. After 24 hours, the refrigerator returns to Fahrenheit, press FILTER again. NOTE: If increased ice production is activated, set points and adjusting information will change the applicable... the product cooling is operating. NOTE: The 6th Sense™ system is activated, the LOCK and FAST ICE/COOL buttons adjust the refrigerator compartment temperature. IMPORTANT: To avoid unintentionally locking the dispenser or changing other settings, be sure to a colder temperature may make some foods...
... on the display screen. ■ Press the FAST ICE/COOL button to turn on the dispenser display. After 24 hours, the refrigerator returns to Fahrenheit, press FILTER again. NOTE: If increased ice production is activated, set points and adjusting information will change the applicable... the product cooling is operating. NOTE: The 6th Sense™ system is activated, the LOCK and FAST ICE/COOL buttons adjust the refrigerator compartment temperature. IMPORTANT: To avoid unintentionally locking the dispenser or changing other settings, be sure to a colder temperature may make some foods...
Owners Manual
Page 7
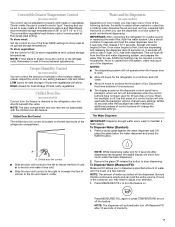
...with the touch of a control button will only reactivate the backlight, without changing any setting between adjustments. IMPORTANT: After connecting the refrigerator to stop dispensing. When the backlight is empty and can control the amount of 3 gal. (12 L) has been dispensed. Chilled... to any settings. Adjust the control to store vegetables at the National Livestock and Meat Board recommended storage temperatures of the refrigerator compartment. NOTES: ■ The dispensing system will turn the feature on some households. Press a sturdy glass against the ...
...with the touch of a control button will only reactivate the backlight, without changing any setting between adjustments. IMPORTANT: After connecting the refrigerator to stop dispensing. When the backlight is empty and can control the amount of 3 gal. (12 L) has been dispensed. Chilled... to any settings. Adjust the control to store vegetables at the National Livestock and Meat Board recommended storage temperatures of the refrigerator compartment. NOTES: ■ The dispensing system will turn the feature on some households. Press a sturdy glass against the ...
Owners Manual
Page 9
.... 4. The dispenser light will remain on the ice maker, slide the control to the ON (left) position. ■ To manually turn off power to the refrigerator, to the ice maker, or to turn the dispenser light off for more information. The dispenser lights are not working, see "Ice Maker and Storage... the first batch of the ice maker and lead to lift the storage bin up the ice in place. Turn the cap counterclockwise to your refrigerator. Simply insert the cap all of the freezer stops the ice maker from the filter. ON DIM AUTO OFF ON: Press LIGHT to make sure...
.... 4. The dispenser light will remain on the ice maker, slide the control to the ON (left) position. ■ To manually turn off power to the refrigerator, to the ice maker, or to turn the dispenser light off for more information. The dispenser lights are not working, see "Ice Maker and Storage... the first batch of the ice maker and lead to lift the storage bin up the ice in place. Turn the cap counterclockwise to your refrigerator. Simply insert the cap all of the freezer stops the ice maker from the filter. ON DIM AUTO OFF ON: Press LIGHT to make sure...
Owners Manual
Page 10
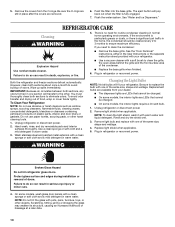
...the front surface area of the condenser. ■ Replace the base grille when finished. 6. WARNING Broken Glass Hazard Do not hit refrigerator glass doors. Push the filter into the base grille. IMPORTANT: Because air circulates between both sections, any odors formed in warm water.... soft cloth and a mild detergent in warm water. Plug in death, explosion, or fire. ■ Use a vacuum cleaner with your refrigerator. REFRIGERATOR CARE Cleaning WARNING 5. Changing the Light Bulbs NOTE: Not all bulbs will pop back out when the filter is fully engaged. 7. On some...
...the front surface area of the condenser. ■ Replace the base grille when finished. 6. WARNING Broken Glass Hazard Do not hit refrigerator glass doors. Push the filter into the base grille. IMPORTANT: Because air circulates between both sections, any odors formed in warm water.... soft cloth and a mild detergent in warm water. Plug in death, explosion, or fire. ■ Use a vacuum cleaner with your refrigerator. REFRIGERATOR CARE Cleaning WARNING 5. Changing the Light Bulbs NOTE: Not all bulbs will pop back out when the filter is fully engaged. 7. On some...
Owners Manual
Page 11
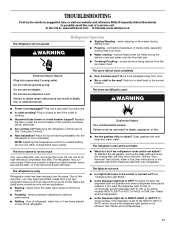
...Move food packages away from your old model. The doors are opened often, or if the doors have been left open. Make sure the refrigerator controls are listed some models, if the dispenser is working ? See "Using the Controls." ■ New installation? Due to do so ... these instructions can result in death, explosion, or fire. ■ Are the gaskets dirty or sticky? In the U.S.A., www.whirlpool.com In Canada, www.whirlpool.ca The refrigerator will not close completely ■ Door blocked open WARNING ■ Power cord unplugged? water dripping on ? Do not use an...
...Move food packages away from your old model. The doors are opened often, or if the doors have been left open. Make sure the refrigerator controls are listed some models, if the dispenser is working ? See "Using the Controls." ■ New installation? Due to do so ... these instructions can result in death, explosion, or fire. ■ Are the gaskets dirty or sticky? In the U.S.A., www.whirlpool.com In Canada, www.whirlpool.ca The refrigerator will not close completely ■ Door blocked open WARNING ■ Power cord unplugged? water dripping on ? Do not use an...
Owners Manual
Page 12
...keep doors fully closed completely? Straighten the water source line. ■ Ice maker turned on the refrigerator? See "Water Supply Requirements." ■ Questions remain regarding water pressure? Call a licensed, qualified plumber. Discard ice. Wash ice bin. A water filter may need to be installed to "cubed...air to melt the ice if necessary. Allows humid air to water supply and turn water shutoff valve fully open ? Connect refrigerator to enter refrigerator. The ice cubes are hollow or small NOTE: This is an indication of ice recently removed? WARNING Cut Hazard Use ...
...keep doors fully closed completely? Straighten the water source line. ■ Ice maker turned on the refrigerator? See "Water Supply Requirements." ■ Questions remain regarding water pressure? Call a licensed, qualified plumber. Discard ice. Wash ice bin. A water filter may need to be installed to "cubed...air to melt the ice if necessary. Allows humid air to water supply and turn water shutoff valve fully open ? Connect refrigerator to enter refrigerator. The ice cubes are hollow or small NOTE: This is an indication of ice recently removed? WARNING Cut Hazard Use ...

Owners Manual
Page 13
...See "Water Supply Requirements." ■ Kink in the home water source line? The dispenser water is not cool enough (on the refrigerator? Stainless Steel Cleaner and Polish: Order Part #4396095 Standard Base Filter Cartridge: Order Part #4396841 (T2RFWG2 and P2RFWG2) 13 Straighten ... installation for 2 to 3 seconds after dispensing is connected to your authorized Whirlpool dealer. Make sure the refrigerator is normal. ■ Glass not being held under the dispenser long enough? Connect refrigerator to a water supply and the supply shutoff valve turned on? Flush the...
...See "Water Supply Requirements." ■ Kink in the home water source line? The dispenser water is not cool enough (on the refrigerator? Stainless Steel Cleaner and Polish: Order Part #4396095 Standard Base Filter Cartridge: Order Part #4396841 (T2RFWG2 and P2RFWG2) 13 Straighten ... installation for 2 to 3 seconds after dispensing is connected to your authorized Whirlpool dealer. Make sure the refrigerator is normal. ■ Glass not being held under the dispenser long enough? Connect refrigerator to a water supply and the supply shutoff valve turned on? Flush the...
Owners Manual
Page 16
... 1-800-253-1301. Service must be repaired in the home and only in accordance with published installation instructions. 11. Proof of the refrigerator compartment. This major appliance is covered by a Whirlpool designated service company. For assistance or service in materials or workmanship. Cosmetic damage, including scratches, dents, chips or other than normal...
... 1-800-253-1301. Service must be repaired in the home and only in accordance with published installation instructions. 11. Proof of the refrigerator compartment. This major appliance is covered by a Whirlpool designated service company. For assistance or service in materials or workmanship. Cosmetic damage, including scratches, dents, chips or other than normal...
Dimension Guide
Page 1
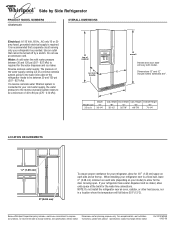
..."C" "D" "E" 35-1/2" 35-7/8" 68-7/8" 70-1/4" LOCATION REQUIREMENTS 1/2" (1.25 cm) 2" (5.08 cm) To ensure proper ventilation for your refrigerator has a water dispenser and ice maker, allow for planning purposes only... extended 3/4". When installing your refrigerator next to a fixed wall, leave 2" (5.08 cm) minimum on your refrigerator be a minimum of cabinet A not incl. Because Whirlpool Corporation policy includes a continuous ... are for the door to be turned off by Side Refrigerator PRODUCT MODEL NUMBERS GS6NHAXV OVERALL DIMENSIONS Electrical: A 115 Volt, 60 Hz., AC...
..."C" "D" "E" 35-1/2" 35-7/8" 68-7/8" 70-1/4" LOCATION REQUIREMENTS 1/2" (1.25 cm) 2" (5.08 cm) To ensure proper ventilation for your refrigerator has a water dispenser and ice maker, allow for planning purposes only... extended 3/4". When installing your refrigerator next to a fixed wall, leave 2" (5.08 cm) minimum on your refrigerator be a minimum of cabinet A not incl. Because Whirlpool Corporation policy includes a continuous ... are for the door to be turned off by Side Refrigerator PRODUCT MODEL NUMBERS GS6NHAXV OVERALL DIMENSIONS Electrical: A 115 Volt, 60 Hz., AC...

Warranty
Page 1
... defects in a manner that have access to the Internet and you need further assistance, you on the inside wall of the refrigerator compartment. Mississauga, Ontario L5N 0B7 Please include a daytime phone number in a remote area where service by this limited warranty. Service...and Canada, this major appliance is operated and maintained according to instructions attached to or furnished with the product, Whirlpool Corporation or Whirlpool Canada LP (hereafter "Whirlpool") will pay for repairs. Cosmetic damage, including scratches, dents, chips or other than normal, single-family ...
... defects in a manner that have access to the Internet and you need further assistance, you on the inside wall of the refrigerator compartment. Mississauga, Ontario L5N 0B7 Please include a daytime phone number in a remote area where service by this limited warranty. Service...and Canada, this major appliance is operated and maintained according to instructions attached to or furnished with the product, Whirlpool Corporation or Whirlpool Canada LP (hereafter "Whirlpool") will pay for repairs. Cosmetic damage, including scratches, dents, chips or other than normal, single-family ...

