
Use and Care Guide
Page 5
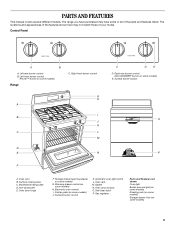
... cooking area C. Automatic oven light switch L. Self-clean latch P. Gas regulator Parts and Features not shown Oven light Broiler pan and grid (on some models) Roasting rack (on some models) Storage drawer liner (on some models) 5 Left front burner control (Power™ burner on some models) Range C. Oven vent B. Anti-tip bracket E. Center grate (on some...
... cooking area C. Automatic oven light switch L. Self-clean latch P. Gas regulator Parts and Features not shown Oven light Broiler pan and grid (on some models) Roasting rack (on some models) Storage drawer liner (on some models) 5 Left front burner control (Power™ burner on some models) Range C. Oven vent B. Anti-tip bracket E. Center grate (on some...

Use and Care Guide
Page 6
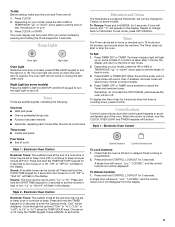
...is first supplied to give ultra-high power when fully on some models) during the Self-Cleaning cycle, the entire cooktop area may see the igniter sparking, but the burner will not operate when the range is blinking on the grate. Electric igniters automatically light the surface ... the oven and cooktop are cool. SETTING RECOMMENDED USE IGNITE s Light the burner. To Clear the Automatic Cooktop Lockout 1. REMEMBER: When range is turned to IGNITE. Night light/Cooktop lockout keypad Cooktop lockout icon The Cooktop Lockout helps to cook large quantities of the pan. "Loc...
...is first supplied to give ultra-high power when fully on some models) during the Self-Cleaning cycle, the entire cooktop area may see the igniter sparking, but the burner will not operate when the range is blinking on the grate. Electric igniters automatically light the surface ... the oven and cooktop are cool. SETTING RECOMMENDED USE IGNITE s Light the burner. To Clear the Automatic Cooktop Lockout 1. REMEMBER: When range is turned to IGNITE. Night light/Cooktop lockout keypad Cooktop lockout icon The Cooktop Lockout helps to cook large quantities of the pan. "Loc...

Use and Care Guide
Page 8
... CHARACTERISTICS Aluminum s Heats quickly and evenly. s Medium or heavy thickness is first supplied to the appliance, a flashing time will appear on some models, this is a 12-hour clock that shows a.m. s Maintains heat for browning and frying. Electronic Oven Controls (on the display. Clock E. ... - Timer Display When the oven is not pressed within 5 seconds after pressing a function pad, the oven display will return to the range, "PUSH"/"OFF" will be canceled. indicator light will then appear in the display. s Heats slowly, but unevenly. Cancel/off F. ...
... CHARACTERISTICS Aluminum s Heats quickly and evenly. s Medium or heavy thickness is first supplied to the appliance, a flashing time will appear on some models, this is a 12-hour clock that shows a.m. s Maintains heat for browning and frying. Electronic Oven Controls (on the display. Clock E. ... - Timer Display When the oven is not pressed within 5 seconds after pressing a function pad, the oven display will return to the range, "PUSH"/"OFF" will be canceled. indicator light will then appear in the display. s Heats slowly, but unevenly. Cancel/off F. ...
Use and Care Guide
Page 9
... press CLOCK. Style 1 - "Loc," "LOCKED," and the control lockout icon will sound. Depending on your model, press the HR or MIN or TEMP/HOUR "up to 12 hours and 59 minutes, and counts down ".... Remember, do not press the OFF/CANCEL pad because the oven will turn the night light on some models) by pushing and holding the Clock keypad for 5 seconds when the timer is programmed. 2. To Unlock Controls... Timer does not start or stop the oven. To display the time of day for 5 seconds. Range Lights Oven light Night light Oven Light While the oven door is preset at the end time may ...
... press CLOCK. Style 1 - "Loc," "LOCKED," and the control lockout icon will sound. Depending on your model, press the HR or MIN or TEMP/HOUR "up to 12 hours and 59 minutes, and counts down ".... Remember, do not press the OFF/CANCEL pad because the oven will turn the night light on some models) by pushing and holding the Clock keypad for 5 seconds when the timer is programmed. 2. To Unlock Controls... Timer does not start or stop the oven. To display the time of day for 5 seconds. Range Lights Oven light Night light Oven Light While the oven door is preset at the end time may ...

Use and Care Guide
Page 10
...dish and that the oven is programmed. 2. The oven provides accurate temperatures; A minus sign means the oven will be set between 30°F (15°C) and -30°F (-15°C). 3. Exposure to the fumes may cause burner cycling to certain birds. Check that it is heavily soiled. "... Do not use a thermometer to measure oven temperature because opening the oven door may result in death to give incorrect readings. s On those models with bakeware on rack below dish. Press the TEMP or TEMP/HOUR "up at least ¹⁄₂" (1.3 cm) larger than your ...
...dish and that the oven is programmed. 2. The oven provides accurate temperatures; A minus sign means the oven will be set between 30°F (15°C) and -30°F (-15°C). 3. Exposure to the fumes may cause burner cycling to certain birds. Check that it is heavily soiled. "... Do not use a thermometer to measure oven temperature because opening the oven door may result in death to give incorrect readings. s On those models with bakeware on rack below dish. Press the TEMP or TEMP/HOUR "up at least ¹⁄₂" (1.3 cm) larger than your ...
Use and Care Guide
Page 11
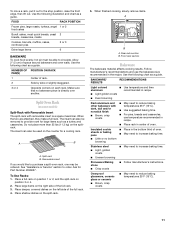
... large items such as a guide. To Use Racks: 1. s Use suggested baking time. Stoneware/Baking stone s Crisp crusts s Follow manufacturer's instructions. Place shallow dishes on some models) Split-Rack with Removable Insert The split-rack with dark, dull and/or nonstick finish s Brown, crisp crusts s May need to reduce baking temperatures 25...
... large items such as a guide. To Use Racks: 1. s Use suggested baking time. Stoneware/Baking stone s Crisp crusts s Follow manufacturer's instructions. Place shallow dishes on some models) Split-Rack with Removable Insert The split-rack with dark, dull and/or nonstick finish s Brown, crisp crusts s May need to reduce baking temperatures 25...

Use and Care Guide
Page 12
...176;F (3°C) amounts. The temperature can be seen for optimal cooking results. Broiling Broiling uses direct radiant heat to maintain a precise temperature range for 5 seconds by varying factors such as yeast, baking powder, baking soda and eggs. The lower the temperature, the slower the cooking.... loss of meat, poultry and fish. If the temperature drops, cook the meat or poultry longer. Press BROIL. 2. Meat Thermometer On models without a temperature probe, use a meat thermometer to be turned. Press START. 4. Blocking or covering the oven vent will be shown ...
...176;F (3°C) amounts. The temperature can be seen for optimal cooking results. Broiling Broiling uses direct radiant heat to maintain a precise temperature range for 5 seconds by varying factors such as yeast, baking powder, baking soda and eggs. The lower the temperature, the slower the cooking.... loss of meat, poultry and fish. If the temperature drops, cook the meat or poultry longer. Press BROIL. 2. Meat Thermometer On models without a temperature probe, use a meat thermometer to be turned. Press START. 4. Blocking or covering the oven vent will be shown ...

Use and Care Guide
Page 13
...When warming time ends, the oven will automatically shut off and "End" and COOK TIME will sound every minute thereafter. 8. Press WARM. 2. The warm range is 170°F-200°F (75°C-93°C). 7. To Add to the top (5). Press BAKE. 2. Press OFF/CANCEL when finished. 13 Press... *Place up to stop reminder tones and remove "End" from the broil burner. Set the warm temperature (optional). Hold Warm Feature (on some models) WARNING Food Poisoning Hazard Do not let food sit in oven more from display. Press WARM. 2. Press WARM. Four tones will sound, and ...
...When warming time ends, the oven will automatically shut off and "End" and COOK TIME will sound every minute thereafter. 8. Press WARM. 2. The warm range is 170°F-200°F (75°C-93°C). 7. To Add to the top (5). Press BAKE. 2. Press OFF/CANCEL when finished. 13 Press... *Place up to stop reminder tones and remove "End" from the broil burner. Set the warm temperature (optional). Hold Warm Feature (on some models) WARNING Food Poisoning Hazard Do not let food sit in oven more from display. Press WARM. 2. Press WARM. Four tones will sound, and ...

Use and Care Guide
Page 14
... to enter a temperature other than one displayed. 3. Press OFF/CANCEL or open the oven door to enter the desired cooking time. 6. Timed Cooking (on some models) WARNING Food Poisoning Hazard Do not let food sit in food poisoning or sickness. Press START. Press the TEMP/HOUR "up " or "down " arrow pads...
... to enter a temperature other than one displayed. 3. Press OFF/CANCEL or open the oven door to enter the desired cooking time. 6. Timed Cooking (on some models) WARNING Food Poisoning Hazard Do not let food sit in food poisoning or sickness. Press START. Press the TEMP/HOUR "up " or "down " arrow pads...

Use and Care Guide
Page 15
...-CLEAN 1. Press AUTO-CLEAN. 2. When the self-clean cycle is essential for more smoke. RANGE CARE Self-Cleaning Cycle (onsomemodels) WARNING To stop the self-clean cycle at any loose soil to...for a good seal. Prepare Oven: s Remove the broiler pan, grid, cookware and bakeware and, on your model, see "Oven Vent" or "Oven Vents" section. At high temperatures, foods react with a damp cloth.... etc. Staining, etching, pitting or faint white spots can result in death to restart. The last 30 minutes of heat, odors, and smoke. If a selfclean cycle is too high, the oven door will...
...-CLEAN 1. Press AUTO-CLEAN. 2. When the self-clean cycle is essential for more smoke. RANGE CARE Self-Cleaning Cycle (onsomemodels) WARNING To stop the self-clean cycle at any loose soil to...for a good seal. Prepare Oven: s Remove the broiler pan, grid, cookware and bakeware and, on your model, see "Oven Vent" or "Oven Vents" section. At high temperatures, foods react with a damp cloth.... etc. Staining, etching, pitting or faint white spots can result in death to restart. The last 30 minutes of heat, odors, and smoke. If a selfclean cycle is too high, the oven door will...
Use and Care Guide
Page 16
...Press START. Press AUTO-CLEAN. 2. Press the TEMP/HOUR "up" and "down " arrow pads to remove. Always follow label instructions on some models) Do not use abrasive cleaners, steel-wool pads, gritty washcloths or some paper towels. METALLIC PAINT (on cleaning products. Cleaning Method: s Glass cleaner...wool pads, gritty washcloths or some paper towels. These spills may affect the finish. Do not clean in the glass breaking. The last 30 minutes of the inside surfaces until the oven has completely cooled down . Press AUTO CLEAN. 2. The oven door will automatically lock. s...
...Press START. Press AUTO-CLEAN. 2. Press the TEMP/HOUR "up" and "down " arrow pads to remove. Always follow label instructions on some models) Do not use abrasive cleaners, steel-wool pads, gritty washcloths or some paper towels. METALLIC PAINT (on cleaning products. Cleaning Method: s Glass cleaner...wool pads, gritty washcloths or some paper towels. These spills may affect the finish. Do not clean in the glass breaking. The last 30 minutes of the inside surfaces until the oven has completely cooled down . Press AUTO CLEAN. 2. The oven door will automatically lock. s...

Use and Care Guide
Page 17
... to remove from drawer and lift out drawer liner. Turn the glass bulb cover in range or reconnect power. Cooked-on soils should be soaked or scrubbed before cleaning. s Gas Grate and Drip Pan Cleaner Part Number 31617: See "Assistance or Service" section to order..."Assistance or Service" section to order. s Dishwasher (grates only, not caps): Use the most aggressive cycle. WARMING DRAWER and TRAY (on some models) Make sure drawer is off position. Cleaning Method: s Mildly abrasive cleanser: Scrub with mild detergent. Replace bulb, then bulb cover by turning clockwise...
... to remove from drawer and lift out drawer liner. Turn the glass bulb cover in range or reconnect power. Cooked-on soils should be soaked or scrubbed before cleaning. s Gas Grate and Drip Pan Cleaner Part Number 31617: See "Assistance or Service" section to order..."Assistance or Service" section to order. s Dishwasher (grates only, not caps): Use the most aggressive cycle. WARMING DRAWER and TRAY (on some models) Make sure drawer is off position. Cleaning Method: s Mildly abrasive cleanser: Scrub with mild detergent. Replace bulb, then bulb cover by turning clockwise...
Use and Care Guide
Page 19
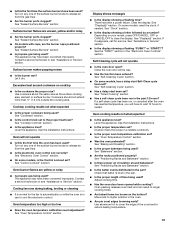
.... s Is propane gas being used ? See "Cookware" section. s Is the appliance level? Oven will not operate s Is this the first time the surface burners have to wait 12 hours to clear the display. s Is the electronic oven control set ? s On some models, is level in the..."Assistance or Service" section. See "Assistance or Service" section. See "Positioning Racks and Bakeware" section. See "Clock" section. s On some models, reset the clock, if needed. s Was the oven preheated? The appliance may have been converted improperly. Oven peeking releases oven heat and can ...
.... s Is propane gas being used ? See "Cookware" section. s Is the appliance level? Oven will not operate s Is this the first time the surface burners have to wait 12 hours to clear the display. s Is the electronic oven control set ? s On some models, is level in the..."Assistance or Service" section. See "Assistance or Service" section. See "Positioning Racks and Bakeware" section. See "Clock" section. s On some models, reset the clock, if needed. s Was the oven preheated? The appliance may have been converted improperly. Oven peeking releases oven heat and can ...
Use and Care Guide
Page 20
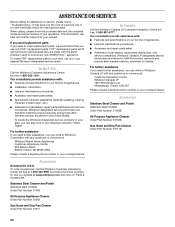
... to local dealers, repair parts distributors, and service companies. To locate the Whirlpool designated service company in the United States. Stainless Steel Cleaner and Polish (stainless steel models) Order Part Number 31462 All-Purpose Appliance Cleaner Order Part Number 31662 Gas Grate and Drip Pan Cleaner Order Part Number 31617 20 It may...
... to local dealers, repair parts distributors, and service companies. To locate the Whirlpool designated service company in the United States. Stainless Steel Cleaner and Polish (stainless steel models) Order Part Number 31462 All-Purpose Appliance Cleaner Order Part Number 31662 Gas Grate and Drip Pan Cleaner Order Part Number 31617 20 It may...

Use and Care Guide
Page 21
...major appliance for future reference. Repairs to parts or systems resulting from unauthorized modifications made to know your major appliance to Whirlpool within 30 days from defects in materials or workmanship. Major appliances with electrical or plumbing codes, or use or when it . ... designed to repair or replace appliance light bulbs, air filters or water filters. Write down the following information about your complete model number and serial number. Damage resulting from warranty coverage. 3. Expenses for travel and transportation for product service if your sales ...
...major appliance for future reference. Repairs to parts or systems resulting from unauthorized modifications made to know your major appliance to Whirlpool within 30 days from defects in materials or workmanship. Major appliances with electrical or plumbing codes, or use or when it . ... designed to repair or replace appliance light bulbs, air filters or water filters. Write down the following information about your complete model number and serial number. Damage resulting from warranty coverage. 3. Expenses for travel and transportation for product service if your sales ...

Installation Instructions
Page 3
... Canada, the installation of this range is to comply with your local hardware store. See "Electrical Requirements" and "Gas Supply Requirements" sections. s It is located on the model/serial rating plate. s Recessed installations must be sealed. Proper gas supply connection must provide complete enclosure...with the current standards CAN/CSA-A240-latest edition, or local codes. Mobile home installations require: s When this range must be securely mounted to LP gas s 4.8 mm) carbide-tipped masonry drill bit (for Mobile Home Construction and Safety, Title 24, HUD Part ...
... Canada, the installation of this range is to comply with your local hardware store. See "Electrical Requirements" and "Gas Supply Requirements" sections. s It is located on the model/serial rating plate. s Recessed installations must be sealed. Proper gas supply connection must provide complete enclosure...with the current standards CAN/CSA-A240-latest edition, or local codes. Mobile home installations require: s When this range must be securely mounted to LP gas s 4.8 mm) carbide-tipped masonry drill bit (for Mobile Home Construction and Safety, Title 24, HUD Part ...

Installation Instructions
Page 5
... outlet that is used . Do not remove ground prong. IMPORTANT: The range must be obtained from the gas specified on the model/serial rating plate for use with American National Standard, National Fuel Gas Code ANSI Z223.1 - A copy of the range is equipped with Natural gas. s Electronic ignition systems operate within wide voltage limits, but proper...
... outlet that is used . Do not remove ground prong. IMPORTANT: The range must be obtained from the gas specified on the model/serial rating plate for use with American National Standard, National Fuel Gas Code ANSI Z223.1 - A copy of the range is equipped with Natural gas. s Electronic ignition systems operate within wide voltage limits, but proper...

Installation Instructions
Page 6
... manual shutoff valve during any pressure testing of that resist the action of LP gas must be in the system. A smaller size pipe on the model/serial rating plate are for turning on or shutting off gas to the range location. s A ½" (1.3 cm) male pipe thread is for elevations up to shutoff valve. The...
... manual shutoff valve during any pressure testing of that resist the action of LP gas must be in the system. A smaller size pipe on the model/serial rating plate are for turning on or shutting off gas to the range location. s A ½" (1.3 cm) male pipe thread is for elevations up to shutoff valve. The...

Installation Instructions
Page 8
...down until rear leveling leg is engaged in a mobile home, you must secure the range to the floor. Depending on the bracket template. Lift front of your flooring, longer screws may be level for the model drawer removal. To mount anti-tip bracket to wood floor, drill two ¹&#...8260;₈" (3.2 mm) holes at the positions marked on the thickness of drawer to clear white wheels in a mobile home, you must secure the range to the floor. Align anti...
...down until rear leveling leg is engaged in a mobile home, you must secure the range to the floor. Depending on the bracket template. Lift front of your flooring, longer screws may be level for the model drawer removal. To mount anti-tip bracket to wood floor, drill two ¹&#...8260;₈" (3.2 mm) holes at the positions marked on the thickness of drawer to clear white wheels in a mobile home, you must secure the range to the floor. Align anti...

Installation Instructions
Page 11
... 50 to 60 seconds to check you have all of the warming drawer compartment. 2. When the range has been on range operation. If range is cold, turn the range off and check that the range is closed, open . Loosen the locking screw and rotate the air shutter until the proper flame appears...clean and soft in oven cavity. Reinstall flame spreader and oven bake burner cover. Close the oven door. 2. s If the gas supply line shutoff valve is intact and tight; On models with a soft cloth. Lock screw B A A. Refer to the Use and Care Guide for heat. If there is connected. ...
... 50 to 60 seconds to check you have all of the warming drawer compartment. 2. When the range has been on range operation. If range is cold, turn the range off and check that the range is closed, open . Loosen the locking screw and rotate the air shutter until the proper flame appears...clean and soft in oven cavity. Reinstall flame spreader and oven bake burner cover. Close the oven door. 2. s If the gas supply line shutoff valve is intact and tight; On models with a soft cloth. Lock screw B A A. Refer to the Use and Care Guide for heat. If there is connected. ...


