
Use and Care Guide
Page 3
... California to reduce the chance of injury, and tell you what the potential hazard is, tell you and others are not followed. RANGE SAFETY Your safety and the safety of others . All safety messages will follow the safety alert symbol and either the word "DANGER"... causing property damage, personal injury or death. - This symbol alerts you don't immediately follow instructions. These words mean: DANGER You can be killed or seriously injured if you cannot reach your gas supplier, call your appliance. WARNING You can be performed by a qualified installer, service agency or the...
... California to reduce the chance of injury, and tell you what the potential hazard is, tell you and others are not followed. RANGE SAFETY Your safety and the safety of others . All safety messages will follow the safety alert symbol and either the word "DANGER"... causing property damage, personal injury or death. - This symbol alerts you don't immediately follow instructions. These words mean: DANGER You can be killed or seriously injured if you cannot reach your gas supplier, call your appliance. WARNING You can be performed by a qualified installer, service agency or the...

Use and Care Guide
Page 4
... Over Hazard A child or adult can tip if you apply too much force or weight to rear range foot. The range, when installed, must be adjusted so it does not extend beyond the edge of a range - See the installation instructions for details. s WARNING: NEVER use . s Top burner flame size should be electrically grounded in accordance with...
... Over Hazard A child or adult can tip if you apply too much force or weight to rear range foot. The range, when installed, must be adjusted so it does not extend beyond the edge of a range - See the installation instructions for details. s WARNING: NEVER use . s Top burner flame size should be electrically grounded in accordance with...

Use and Care Guide
Page 18
... a delayed self-clean set correctly? s Is the control knob set ? Open the oven door. You should hear a "click" as it inside the range in order to open and close. End of the drawer to the locked position. To Replace: 1. Slowly push the drawer into the door. 2. Nothing will... position. Drawer stop notch and the end of the drawer and pull the drawer out. s Is the main or regulator gas shutoff valve in self-clean? See Installation Instructions. Surface burners will not operate s Is the power supply cord unplugged? 3. Lift up the back of an unnecessary service...
... a delayed self-clean set correctly? s Is the control knob set ? Open the oven door. You should hear a "click" as it inside the range in order to open and close. End of the drawer to the locked position. To Replace: 1. Slowly push the drawer into the door. 2. Nothing will... position. Drawer stop notch and the end of the drawer and pull the drawer out. s Is the main or regulator gas shutoff valve in self-clean? See Installation Instructions. Surface burners will not operate s Is the power supply cord unplugged? 3. Lift up the back of an unnecessary service...
Use and Care Guide
Page 19
... See "Self-Cleaning Cycle" section. s Is propane gas being used ? Turn on any one of time being used? s Has a delay start Self-Clean cycle been set ? s Are baked items too brown on the bottom? See the Installation Instructions. s On some models, reset the clock, if ...needed. The appliance may have been converted improperly. Move rack to release air from the gas lines. See "Cooktop Controls" section. Oven peeking releases oven heat ...
... See "Self-Cleaning Cycle" section. s Is propane gas being used ? Turn on any one of time being used? s Has a delay start Self-Clean cycle been set ? s Are baked items too brown on the bottom? See the Installation Instructions. s On some models, reset the clock, if ...needed. The appliance may have been converted improperly. Move rack to release air from the gas lines. See "Cooktop Controls" section. Oven peeking releases oven heat ...
Use and Care Guide
Page 20
... right and work right because they are made with any questions or concerns at 1-800-442-9991 and follow the instructions below. Our consultants provide assistance with: s Features and specifications on our full line of appliances. s Specialized customer ...Accessories." s Installation information. Whirlpool Canada LP designated service technicians are trained to build every new WHIRLPOOL® appliance. Accessories Stainless Steel Cleaner and Polish (stainless steel models) Order Part Number 31462B All-Purpose Appliance Cleaner Order Part Number 31662B Gas Grate and ...
... right and work right because they are made with any questions or concerns at 1-800-442-9991 and follow the instructions below. Our consultants provide assistance with: s Features and specifications on our full line of appliances. s Specialized customer ...Accessories." s Installation information. Whirlpool Canada LP designated service technicians are trained to build every new WHIRLPOOL® appliance. Accessories Stainless Steel Cleaner and Polish (stainless steel models) Order Part Number 31462B All-Purpose Appliance Cleaner Order Part Number 31662B Gas Grate and ...

Use and Care Guide
Page 21
... in the United States or Canada and applies only when the major appliance is covered by an authorized Whirlpool servicer is contrary to published user or operator instructions and/or installation instructions. 4. In Canada, call 1-800-253-1301. You can find additional help you obtain assistance or... it is used for in accordance with original model/serial numbers that is not available. 10. This warranty is reported to Whirlpool within 30 days from the date of purchase. 6. The cost of repair or replacement under this limited warranty. Costs associated with electrical or...
... in the United States or Canada and applies only when the major appliance is covered by an authorized Whirlpool servicer is contrary to published user or operator instructions and/or installation instructions. 4. In Canada, call 1-800-253-1301. You can find additional help you obtain assistance or... it is used for in accordance with original model/serial numbers that is not available. 10. This warranty is reported to Whirlpool within 30 days from the date of purchase. 6. The cost of repair or replacement under this limited warranty. Costs associated with electrical or...
Installation Instructions
Page 2
... injured if you don't immediately follow these instructions can kill or hurt you what can tip the range and be a T-handle type. s A flexible gas connector, when used, must be performed by a qualified or licensed contractor, plumber, or gasfitter qualified or licensed by a qualified installer, service agency or the gas supplier. WARNING: If the information in...
... injured if you don't immediately follow these instructions can kill or hurt you what can tip the range and be a T-handle type. s A flexible gas connector, when used, must be performed by a qualified or licensed contractor, plumber, or gasfitter qualified or licensed by a qualified installer, service agency or the gas supplier. WARNING: If the information in...

Installation Instructions
Page 3
..., Title 24 CFR, Part 3280 (formerly the Federal Standard for concrete/ceramic floors) s Noncorrosive leak-detection solution For LP/Natural Gas Conversions s ½" combination wrench s ⁵⁄₈" combination wrench s nut driver s Quadrex®† or Phillips screwdriver.... Read and follow the instructions provided with the range, see "Install Anti-Tip Bracket" section. s The range should be installed. s The floor anti-tip bracket must be located for Manufactured Home Installations, ANSI A225.1/NFPA 501A or with installation clearances specified on the oven...
..., Title 24 CFR, Part 3280 (formerly the Federal Standard for concrete/ceramic floors) s Noncorrosive leak-detection solution For LP/Natural Gas Conversions s ½" combination wrench s ⁵⁄₈" combination wrench s nut driver s Quadrex®† or Phillips screwdriver.... Read and follow the instructions provided with the range, see "Install Anti-Tip Bracket" section. s The range should be installed. s The floor anti-tip bracket must be located for Manufactured Home Installations, ANSI A225.1/NFPA 501A or with installation clearances specified on the oven...

Installation Instructions
Page 4
...E H G I . 17" (43.2 cm) J. 4¹⁄₂" (11.4 cm) K. 2" (5.1 cm) L. 2" (5.1 cm) min. upper cabinet depth C. 30" (76.2 cm) min. For minimum clearance to top of rigid gas pipe. This shaded area recommended for installation of cooktop, see NOTE*. Grounded outlet I F K J A. 18" (45.7 cm) upper side cabinet to side wall or other...cooking platform and the bottom of an unprotected wood or metal cabinet. E. 30¹⁄₈" (76.5 cm) min. opening width D. If installing a hood above the range, follow the hood instructions for 25" (64 cm) countertop depth, 24" (61 cm) ...
...E H G I . 17" (43.2 cm) J. 4¹⁄₂" (11.4 cm) K. 2" (5.1 cm) L. 2" (5.1 cm) min. upper cabinet depth C. 30" (76.2 cm) min. For minimum clearance to top of rigid gas pipe. This shaded area recommended for installation of cooktop, see NOTE*. Grounded outlet I F K J A. 18" (45.7 cm) upper side cabinet to side wall or other...cooking platform and the bottom of an unprotected wood or metal cabinet. E. 30¹⁄₈" (76.5 cm) min. opening width D. If installing a hood above the range, follow the hood instructions for 25" (64 cm) countertop depth, 24" (61 cm) ...

Installation Instructions
Page 5
...operate within wide voltage limits, but proper grounding and polarity are in a clear plastic bag. NOTE: The metal chassis of the range must be made to whether the metal chassis of the storage drawer or below the warming drawer in doubt as to convert the appliance... Securely tighten all governing codes and ordinances. If connected to follow these instructions can be grounded in death, fire, or electrical shock. Failure to work. Type of local codes, installation must be obtained from the gas specified on the types of a qualified person include: licensed heating personnel,...
...operate within wide voltage limits, but proper grounding and polarity are in a clear plastic bag. NOTE: The metal chassis of the range must be made to whether the metal chassis of the storage drawer or below the warming drawer in doubt as to convert the appliance... Securely tighten all governing codes and ordinances. If connected to follow these instructions can be grounded in death, fire, or electrical shock. Failure to work. Type of local codes, installation must be obtained from the gas specified on the types of a qualified person include: licensed heating personnel,...

Installation Instructions
Page 7
...;⁄₈" drive ratchet B. Remove template from the anti-tip bracket kit (found inside oven. 2. Tape template into place. 4. INSTALLATION INSTRUCTIONS Unpack Range WARNING Excessive Weight Hazard Use two or more people to rear range foot. Do not remove the shipping base at this manual. 2. Remove shipping materials, tape and protective film from inside...
...;⁄₈" drive ratchet B. Remove template from the anti-tip bracket kit (found inside oven. 2. Tape template into place. 4. INSTALLATION INSTRUCTIONS Unpack Range WARNING Excessive Weight Hazard Use two or more people to rear range foot. Do not remove the shipping base at this manual. 2. Remove shipping materials, tape and protective film from inside...

Installation Instructions
Page 8
... bracket. Remove template from your local hardware store. 8. Depending on the bracket template. Level Range Place rack in floor. Any method of your range using the following installation instructions. Remove shipping base, cardboard or hardboard from floor. If installing the range in a mobile home, you must be necessary to anchor the bracket to the standards in...
... bracket. Remove template from your local hardware store. 8. Depending on the bracket template. Level Range Place rack in floor. Any method of your range using the following installation instructions. Remove shipping base, cardboard or hardboard from floor. If installing the range in a mobile home, you must be necessary to anchor the bracket to the standards in...

Installation Instructions
Page 11
... flame. Use a mild solution of drawer slightly and push firmly to remove waxy residue caused by protective shipping material. s If the gas supply line shutoff valve is open, contact a qualified technician. 11 No yellow tips, blowing or lifting of your tools. 3. Locking ...installed. s Electrical supply is plugged into a grounded 3 prong outlet. Loosen the locking screw and rotate the air shutter until the proper flame appears. See the Use and Care Guide for heat. s Range is connected. When the range has been on for 5 minutes, check for specific instruction...
... flame. Use a mild solution of drawer slightly and push firmly to remove waxy residue caused by protective shipping material. s If the gas supply line shutoff valve is open, contact a qualified technician. 11 No yellow tips, blowing or lifting of your tools. 3. Locking ...installed. s Electrical supply is plugged into a grounded 3 prong outlet. Loosen the locking screw and rotate the air shutter until the proper flame appears. See the Use and Care Guide for heat. s Range is connected. When the range has been on for 5 minutes, check for specific instruction...
Installation Instructions
Page 12
...;" combination wrench to children and adults. Remove storage drawer or warming drawer. Install a shut-off valve. Examples of storage or warming drawer compartment. To range B. Failure to follow these instructions can result in death, explosion, or fire. Turn over the gas pressure regulator cap and reinstall on regulator so that the hollow end faces...
...;" combination wrench to children and adults. Remove storage drawer or warming drawer. Install a shut-off valve. Examples of storage or warming drawer compartment. To range B. Failure to follow these instructions can result in death, explosion, or fire. Turn over the gas pressure regulator cap and reinstall on regulator so that the hollow end faces...

Installation Instructions
Page 14
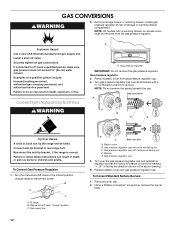
... A child or adult can result in the "Installation Instructions" section of storage or warming drawer compartment. To Convert Gas Pressure Regulator 1. Plastic cover B. Washer E. B A C A. Gas pressure regulator cap with a ⁵⁄₈" combination wrench to children and adults. LP gas flames have to rear range foot. Turn over the gas pressure regulator cap and reinstall on regulator...
... A child or adult can result in the "Installation Instructions" section of storage or warming drawer compartment. To Convert Gas Pressure Regulator 1. Plastic cover B. Washer E. B A C A. Gas pressure regulator cap with a ⁵⁄₈" combination wrench to children and adults. LP gas flames have to rear range foot. Turn over the gas pressure regulator cap and reinstall on regulator...

Installation Instructions
Page 15
...Orifice spud holder C. Pin C. increase flame size (preset at factory for future use and keep with literature package. 6. Place LP gas orifice spuds in the "Installation Instructions" section of a nut driver to complete this procedure. 15 Replace the burner base using both screws. 7. Replace burner cap. 8.... not made . Refer to the following chart for properly connecting the range to close drawer. Press nut driver down onto the gas orifice spud and remove by turning it . C A D B A. Replace the LP gas orifice spud with a number on sides of spuds for each burner location...
...Orifice spud holder C. Pin C. increase flame size (preset at factory for future use and keep with literature package. 6. Place LP gas orifice spuds in the "Installation Instructions" section of a nut driver to complete this procedure. 15 Replace the burner base using both screws. 7. Replace burner cap. 8.... not made . Refer to the following chart for properly connecting the range to close drawer. Press nut driver down onto the gas orifice spud and remove by turning it . C A D B A. Replace the LP gas orifice spud with a number on sides of spuds for each burner location...


