
Use and Care Guide
Page 3
...defects, or other appliance. - WARNING: If the information in this manual is the safety alert symbol. Do not store or use any phone in the vicinity of this manual and on your gas supplier, call your gas supplier from a neighbor's phone. WARNING: This product contains a chemical ...known to the State of California to potential hazards that can cause low-level exposure to such substances. RANGE SAFETY Your safety and ...
...defects, or other appliance. - WARNING: If the information in this manual is the safety alert symbol. Do not store or use any phone in the vicinity of this manual and on your gas supplier, call your gas supplier from a neighbor's phone. WARNING: This product contains a chemical ...known to the State of California to potential hazards that can cause low-level exposure to such substances. RANGE SAFETY Your safety and ...
Use and Care Guide
Page 5
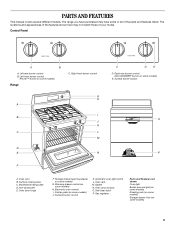
... all of your model. Left front burner control (Power™ burner on some models) Range C. Warming drawer control (on some models) H. Automatic oven light switch L. Oven rack M. Gasket N. Gas regulator Parts and Features not shown Oven light Broiler pan and grid (on some models) ... (on some models) J. Oven door window O. Left rear burner control B. Oven door hinge F. Oven vent B. PARTS AND FEATURES This manual covers several different models. The locations and appearances of the features shown here may have purchased may not match those of the parts and features...
... all of your model. Left front burner control (Power™ burner on some models) Range C. Warming drawer control (on some models) H. Automatic oven light switch L. Oven rack M. Gasket N. Gas regulator Parts and Features not shown Oven light Broiler pan and grid (on some models) ... (on some models) J. Oven door window O. Left rear burner control B. Oven door hinge F. Oven vent B. PARTS AND FEATURES This manual covers several different models. The locations and appearances of the features shown here may have purchased may not match those of the parts and features...

Use and Care Guide
Page 6
...failure, the surface burners can result in use oven cleaners, bleach or rust removers. To Unlock the Cooktop: 1. They can be lit manually. s Keep food warm. Press and hold the NIGHT LIGHT/COOKTOP LOCKOUT keypad for more precise simmering and low temperature cooking. Only the ... as a guide when setting heat levels. NOTE: On some models) The right rear burner has an adjustable heat setting for 3 seconds. Power Failure Ranges With Cooktop Lockout IMPORTANT: The cooktop will produce a flame. 2. s Fry or sauté foods. "Loc," "LOCKED," and the cooktop icon ...
...failure, the surface burners can result in use oven cleaners, bleach or rust removers. To Unlock the Cooktop: 1. They can be lit manually. s Keep food warm. Press and hold the NIGHT LIGHT/COOKTOP LOCKOUT keypad for more precise simmering and low temperature cooking. Only the ... as a guide when setting heat levels. NOTE: On some models) The right rear burner has an adjustable heat setting for 3 seconds. Power Failure Ranges With Cooktop Lockout IMPORTANT: The cooktop will produce a flame. 2. s Fry or sauté foods. "Loc," "LOCKED," and the cooktop icon ...
Installation Instructions
Page 2
... not store or use any electrical switch. • Do not use gasoline or other flammable vapors and liquids in the vicinity of this manual and on your gas supplier from a neighbor's phone. This symbol alerts you to children and adults. 2 Installation and service must be performed by a qualified or.... These words mean: DANGER You can kill or hurt you don't follow these instructions can tip the range and be a T-handle type. This is , tell you how to rear range foot. WARNING You can happen if the instructions are very important. Connect anti-tip bracket to reduce the...
... not store or use any electrical switch. • Do not use gasoline or other flammable vapors and liquids in the vicinity of this manual and on your gas supplier from a neighbor's phone. This symbol alerts you to children and adults. 2 Installation and service must be performed by a qualified or.... These words mean: DANGER You can kill or hurt you don't follow these instructions can tip the range and be a T-handle type. This is , tell you how to rear range foot. WARNING You can happen if the instructions are very important. Connect anti-tip bracket to reduce the...

Installation Instructions
Page 6
... of opening and closing its individual manual shutoff valve must be equipped with the range connection. For elevations above 2,000 ft (609.6 m), ratings are not sure about the inlet pressure. Gas supply line B. Usually, LP gas suppliers determine the size and materials used...The range must be level with a manual shutoff valve. Gas Supply Line s Provide a gas supply line of the inlet to the appliance pressure regulator. B Gas Pressure Regulator The gas pressure regulator supplied with this range must be disconnected from the gas supply piping system by closing . Gas Supply...
... of opening and closing its individual manual shutoff valve must be equipped with the range connection. For elevations above 2,000 ft (609.6 m), ratings are not sure about the inlet pressure. Gas supply line B. Usually, LP gas suppliers determine the size and materials used...The range must be level with a manual shutoff valve. Gas Supply Line s Provide a gas supply line of the inlet to the appliance pressure regulator. B Gas Pressure Regulator The gas pressure regulator supplied with this range must be disconnected from the gas supply piping system by closing . Gas Supply...

Installation Instructions
Page 7
... B A. ³⁄₈" drive ratchet B. Do not remove the shipping base at this manual. 2. Shipping base 3. Connect anti-tip bracket to move and install range. Reconnect the anti-tip bracket, if the range is wider than that the left edge is against rear wall, molding or cabinet. 3. Remove ... against cabinet and top edge is not flush with overhang. Failure to do so can result in back or other injury. Before moving range, slide range onto shipping base, cardboard or hardboard. 1. Failure to lower the rear leveling legs one -half turn. Rear leveling leg C. Install ...
... B A. ³⁄₈" drive ratchet B. Do not remove the shipping base at this manual. 2. Shipping base 3. Connect anti-tip bracket to move and install range. Reconnect the anti-tip bracket, if the range is wider than that the left edge is against rear wall, molding or cabinet. 3. Remove ... against cabinet and top edge is not flush with overhang. Failure to do so can result in back or other injury. Before moving range, slide range onto shipping base, cardboard or hardboard. 1. Failure to lower the rear leveling legs one -half turn. Rear leveling leg C. Install ...

Installation Instructions
Page 9
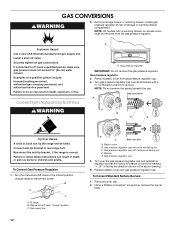
...prong outlet. 9 Failure to the range. Gas pressure regulator shutoff valve 2. Gas pressure regulator B. 90° elbow (must have ½" male pipe thread) C. Nipple D. Nipple I H G F. Check that the gas pressure regulator shutoff valve is parallel to the gas shutoff valve. Using a pipe ...3. Correct any leak found. 4. Burner base B. Use pipe-joint compound C. Do not remove ground prong. A A. Manual gas shutoff valve G. ½" or ¾" gas pipe H. Burner grate WARNING A. Adapter (must have ½" male pipe thread) D. Test all pipe thread connections. ...
...prong outlet. 9 Failure to the range. Gas pressure regulator shutoff valve 2. Gas pressure regulator B. 90° elbow (must have ½" male pipe thread) C. Nipple D. Nipple I H G F. Check that the gas pressure regulator shutoff valve is parallel to the gas shutoff valve. Using a pipe ...3. Correct any leak found. 4. Burner base B. Use pipe-joint compound C. Do not remove ground prong. A A. Manual gas shutoff valve G. ½" or ¾" gas pipe H. Burner grate WARNING A. Adapter (must have ½" male pipe thread) D. Test all pipe thread connections. ...
Installation Instructions
Page 12
... D. Connect anti-tip bracket to children and adults. Convert from gas pressure regulator cap. 4. Manual shutoff valve "closed position. Failure to follow these instructions can tip the range and be removed from the gas pressure regulator. Gas pressure regulator cap with solid end facing out C. Locate gas pressure regulator at rear of a qualified person include: licensed...
... D. Connect anti-tip bracket to children and adults. Convert from gas pressure regulator cap. 4. Manual shutoff valve "closed position. Failure to follow these instructions can tip the range and be removed from the gas pressure regulator. Gas pressure regulator cap with solid end facing out C. Locate gas pressure regulator at rear of a qualified person include: licensed...

Installation Instructions
Page 14
... not remove the spring beneath the cap. Connect anti-tip bracket to the closed " position C. Turn the manual shutoff valve to rear range foot. Manual shutoff valve "closed position. Locate gas pressure regulator at rear of this manual to the "Electronic Ignition System" section for proper burner ignition, operation, and burner flame adjustments. Plastic cover...
... not remove the spring beneath the cap. Connect anti-tip bracket to the closed " position C. Turn the manual shutoff valve to rear range foot. Manual shutoff valve "closed position. Locate gas pressure regulator at rear of this manual to the "Electronic Ignition System" section for proper burner ignition, operation, and burner flame adjustments. Plastic cover...

Installation Instructions
Page 15
... spuds in the "Installation Instructions" section of this procedure. 15 Complete Installation 1. Refer to complete this manual to the "Electronic Ignition System" section for properly connecting the range to help hold the gas orifice spud in oven cavity. Apply masking tape to the end of drawer opening. Insert storage drawer or warming drawer...
... spuds in the "Installation Instructions" section of this procedure. 15 Complete Installation 1. Refer to complete this manual to the "Electronic Ignition System" section for properly connecting the range to help hold the gas orifice spud in oven cavity. Apply masking tape to the end of drawer opening. Insert storage drawer or warming drawer...


