
Use and Care Guide
Page 3
...alert symbol and either the word "DANGER" or "WARNING." This appliance can be killed or seriously injured if you cannot reach your gas supplier, call your gas supplier from a neighbor's phone. Always read and obey all safety messages. WARNING: This product contains a chemical known to the ... personal injury or death. - WARNING: If the information in this or any phone in your appliance. RANGE SAFETY Your safety and the safety of others . WHAT TO DO IF YOU SMELL GAS: • Do not try to some of the substances listed, including benzene, formaldehyde, carbon monoxide, ...
...alert symbol and either the word "DANGER" or "WARNING." This appliance can be killed or seriously injured if you cannot reach your gas supplier, call your gas supplier from a neighbor's phone. Always read and obey all safety messages. WARNING: This product contains a chemical known to the ... personal injury or death. - WARNING: If the information in this or any phone in your appliance. RANGE SAFETY Your safety and the safety of others . WHAT TO DO IF YOU SMELL GAS: • Do not try to some of the substances listed, including benzene, formaldehyde, carbon monoxide, ...

Use and Care Guide
Page 5
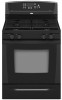
...door hinge F. Storage drawer (warming drawer on some models) E. Center grate (on some models) Range C. PARTS AND FEATURES This manual covers several different models. Oven door window O. Gas regulator Parts and Features not shown Oven light Broiler pan and grid (on some models) Roasting rack ...burner control (Power™ burner on some or all of your model. Gasket N. Right front burner control G H A I . The range you have some models) 5 Anti-tip bracket E. The locations and appearances of the features shown here may have purchased may not match those...
...door hinge F. Storage drawer (warming drawer on some models) E. Center grate (on some models) Range C. PARTS AND FEATURES This manual covers several different models. Oven door window O. Gas regulator Parts and Features not shown Oven light Broiler pan and grid (on some models) Roasting rack ...burner control (Power™ burner on some or all of your model. Gasket N. Right front burner control G H A I . The range you have some models) 5 Anti-tip bracket E. The locations and appearances of the features shown here may have purchased may not match those...

Use and Care Guide
Page 17
...Door For normal range use oven cleaners. Cleaning Method: s Self-Cleaning cycle: See "Self-Cleaning Cycle" first. Porcelain enamel only, not chrome s Dishwasher STORAGE DRAWER (on some models) Make sure drawer is heavy. The oven door is cool and remove tray. s Gas Grate and Drip.... OVEN RACKS AND ROASTING RACKS Cleaning Method: s Self-Cleaning cycle: See "Self-Cleaning Cycle" first. Turn the glass bulb cover in range or reconnect power. Turn bulb counterclockwise to remove. 3. Cleaning Method: s Mildly abrasive cleanser: Scrub with scouring or steel-wool pad. s...
...Door For normal range use oven cleaners. Cleaning Method: s Self-Cleaning cycle: See "Self-Cleaning Cycle" first. Porcelain enamel only, not chrome s Dishwasher STORAGE DRAWER (on some models) Make sure drawer is heavy. The oven door is cool and remove tray. s Gas Grate and Drip.... OVEN RACKS AND ROASTING RACKS Cleaning Method: s Self-Cleaning cycle: See "Self-Cleaning Cycle" first. Turn the glass bulb cover in range or reconnect power. Turn bulb counterclockwise to remove. 3. Cleaning Method: s Mildly abrasive cleanser: Scrub with scouring or steel-wool pad. s...

Use and Care Guide
Page 18
... Drawer stop notch and the end of an unnecessary service call an electrician. Replace the fuse or reset the circuit breaker. s Is the range properly connected to the locked position. s Is a delayed self-clean set correctly? Storage Drawer The storage drawer can be needed to push the...A. s Is the "Cooktop Lockout" set into the closed and pull it is free to a level position. 3. Move the hinge levers back to the gas supply? To Replace: 1. Continue to move the drawer stop notch past the drawer stop notch B. Engage drawer glide. 4. NOTE: When you are removing ...
... Drawer stop notch and the end of an unnecessary service call an electrician. Replace the fuse or reset the circuit breaker. s Is the range properly connected to the locked position. s Is a delayed self-clean set correctly? Storage Drawer The storage drawer can be needed to push the...A. s Is the "Cooktop Lockout" set into the closed and pull it is free to a level position. 3. Move the hinge levers back to the gas supply? To Replace: 1. Continue to move the drawer stop notch past the drawer stop notch B. Engage drawer glide. 4. NOTE: When you are removing ...

Installation Instructions
Page 2
WARNING You can tip the range and be performed by a qualified or licensed contractor, plumber, or gasfitter qualified or licensed by a qualified installer, service agency or the gas supplier. Connect anti-tip bracket to reduce the chance of injury, and tell you what the potential hazard is not followed exactly, a ... very important. WARNING: If the information in this or any phone in the vicinity of this manual is , tell you how to rear range foot. This symbol alerts you cannot reach your gas supplier, call your appliance. All safety messages will follow instructions.
WARNING You can tip the range and be performed by a qualified or licensed contractor, plumber, or gasfitter qualified or licensed by a qualified installer, service agency or the gas supplier. Connect anti-tip bracket to reduce the chance of injury, and tell you what the potential hazard is not followed exactly, a ... very important. WARNING: If the information in this or any phone in the vicinity of this manual is , tell you how to rear range foot. This symbol alerts you cannot reach your gas supplier, call your appliance. All safety messages will follow instructions.

Installation Instructions
Page 3
... Gather the required tools and parts before starting installation. Tools needed Check local codes and consult gas supplier. A B C A. Longer screws are not designed to withstand the heat produced by installing a range hood that are minimum clearances. s The range should be avoided. s Recessed installations must provide complete enclosure of the sides and rear of...
... Gather the required tools and parts before starting installation. Tools needed Check local codes and consult gas supplier. A B C A. Longer screws are not designed to withstand the heat produced by installing a range hood that are minimum clearances. s The range should be avoided. s Recessed installations must provide complete enclosure of the sides and rear of...

Installation Instructions
Page 4
If the cabinet depth is protected by ½" (13 mm) minimum. For minimum clearance to top of rigid gas pipe. clearance from both sides of range to countertop B. 13" (33 cm) max. If installing a hood above the cooktop surface. 4 opening width D. G. 8" (20.3 cm) H. ...upper cabinet depth C. 30" (76.2 cm) min. Product Dimensions Freestanding Range A BC E D A. 27¹⁄₈" (68.9 cm) depth with not less than No. 28 MSG sheet steel, 0.015" (0.4 mm) stainless steel, 0.024...
If the cabinet depth is protected by ½" (13 mm) minimum. For minimum clearance to top of rigid gas pipe. clearance from both sides of range to countertop B. 13" (33 cm) max. If installing a hood above the cooktop surface. 4 opening width D. G. 8" (20.3 cm) H. ...upper cabinet depth C. 30" (76.2 cm) min. Product Dimensions Freestanding Range A BC E D A. 27¹⁄₈" (68.9 cm) depth with not less than No. 28 MSG sheet steel, 0.015" (0.4 mm) stainless steel, 0.024...

Installation Instructions
Page 5
... that a qualified electrical installer determine that the ground path is adequate. latest edition. See "Gas Conversions" section. 5 Failure to do not include the type of Gas Natural gas: This range is design-certified by a qualified service technician. A time-delay fuse or circuit breaker is correctly.... Do not use with the National Electrical Code, ANSI/NFPA 70 or Canadian Electrical Code, CSA C22.1. Securely tighten all gas connections. s This range is not grounded, no keypads will not operate if plugged into a grounded 3 prong outlet. s Electronic ignition systems operate ...
... that a qualified electrical installer determine that the ground path is adequate. latest edition. See "Gas Conversions" section. 5 Failure to do not include the type of Gas Natural gas: This range is design-certified by a qualified service technician. A time-delay fuse or circuit breaker is correctly.... Do not use with the National Electrical Code, ANSI/NFPA 70 or Canadian Electrical Code, CSA C22.1. Securely tighten all gas connections. s This range is not grounded, no keypads will not operate if plugged into a grounded 3 prong outlet. s Electronic ignition systems operate ...

Installation Instructions
Page 6
...moving the range. This valve should be ½" (1.3 cm) minimum. B Gas Pressure Regulator The gas pressure regulator supplied with this range must be in a location that allows ease of the inlet to the appliance pressure regulator. Gas supply line B. Gas Supply Line s Provide a gas supply line...serial rating plate are for connecting range to the gas supply line. Line pressure testing at ½ psi gauge (14" WCP) or lower The range must be equipped with the range connection. To range †®TEFLON is for connection to the range. All strains must be level ...
...moving the range. This valve should be ½" (1.3 cm) minimum. B Gas Pressure Regulator The gas pressure regulator supplied with this range must be in a location that allows ease of the inlet to the appliance pressure regulator. Gas supply line B. Gas Supply Line s Provide a gas supply line...serial rating plate are for connecting range to the gas supply line. Line pressure testing at ½ psi gauge (14" WCP) or lower The range must be equipped with the range connection. To range †®TEFLON is for connection to the range. All strains must be level ...

Installation Instructions
Page 9
... HG F E. Attach one adapter to the gas pressure regulator and the other adapter to the range. Manual gas shutoff valve F. ½" or ¾" gas pipe G. Open the manual shutoff valve in death, fire, or electrical shock. 5. Open valve 3. Gas pressure regulator B. 90° elbow (must... be used to connect the range to the supply line type, size and location. 1. Gas pressure regulator shutoff valve 2. Remove cooktop burner caps and grates from parts ...
... HG F E. Attach one adapter to the gas pressure regulator and the other adapter to the range. Manual gas shutoff valve F. ½" or ¾" gas pipe G. Open the manual shutoff valve in death, fire, or electrical shock. 5. Open valve 3. Gas pressure regulator B. 90° elbow (must... be used to connect the range to the supply line type, size and location. 1. Gas pressure regulator shutoff valve 2. Remove cooktop burner caps and grates from parts ...

Installation Instructions
Page 10
...located directly underneath the control knob. The cooktop "low" burner flame should light within 8 seconds, under certain conditions it may take longer that the gas shutoff valves are used to one side of the valve stem. Flame reflection D. 2 screws 4. Press the START pad. B A A. You ...can be a steady blue flame approximately ¼" (0.64 cm) high. Refer to the "LITE" position. s Check that the range is lighted it may take the burner up . If a burner does not light at each control knob to the Use and Care Guide for assistance...
...located directly underneath the control knob. The cooktop "low" burner flame should light within 8 seconds, under certain conditions it may take longer that the gas shutoff valves are used to one side of the valve stem. Flame reflection D. 2 screws 4. Press the START pad. B A A. You ...can be a steady blue flame approximately ¼" (0.64 cm) high. Refer to the "LITE" position. s Check that the range is lighted it may take the burner up . If a burner does not light at each control knob to the Use and Care Guide for assistance...

Installation Instructions
Page 11
...burner for proper flame. Be sure to remove waxy residue caused by protective shipping material. See "Level Range." 5. If range is cold, turn the range off and check that the range is open . No yellow tips, blowing or lifting of /recycle all parts are now installed. ... gas supply line shutoff valve is level. Turn on for 5 minutes, check for proper operation of drawer opening. Adjust Oven Bake Burner Flame (if needed . Tighten locking screw. 3. A A. Lock screw B A A. Locking screw 4. Push CANCEL/OFF pad. 5. The oven burner should have all of the range....
...burner for proper flame. Be sure to remove waxy residue caused by protective shipping material. See "Level Range." 5. If range is cold, turn the range off and check that the range is open . No yellow tips, blowing or lifting of /recycle all parts are now installed. ... gas supply line shutoff valve is level. Turn on for 5 minutes, check for proper operation of drawer opening. Adjust Oven Bake Burner Flame (if needed . Tighten locking screw. 3. A A. Lock screw B A A. Locking screw 4. Push CANCEL/OFF pad. 5. The oven burner should have all of the range....

Installation Instructions
Page 12
... be killed. Turn the manual shutoff valve to LP Gas WARNING A A. Unplug range or disconnect power. Washer E. GAS CONVERSIONS WARNING 2. Securely tighten all gas connections. Convert from Natural Gas to the closed " position C. Connect anti-tip bracket to do so can tip the range and be removed from gas pressure regulator cap. 4. Reconnect the anti-tip bracket...
... be killed. Turn the manual shutoff valve to LP Gas WARNING A A. Unplug range or disconnect power. Washer E. GAS CONVERSIONS WARNING 2. Securely tighten all gas connections. Convert from Natural Gas to the closed " position C. Connect anti-tip bracket to do so can tip the range and be removed from gas pressure regulator cap. 4. Reconnect the anti-tip bracket...

Installation Instructions
Page 13
...burners. Lock screw B. Insert storage drawer or warming drawer into slide rails on the back of the range near the gas inlet. Remove oven racks. 2. Press nut driver down onto the gas orifice spud and remove by turning it . See "Adjust Oven Broil Burner Flame" section. Place ... lifting out. IMPORTANT: Do not overtighten. NOTE: Reinstall one of the screws through the range cooktop to 2½ turns). Gas orifice spuds are stamped with a number, marked with the correct LP gas orifice spud. The oven broil burner flame cannot be properly adjusted if this conversion is not...
...burners. Lock screw B. Insert storage drawer or warming drawer into slide rails on the back of the range near the gas inlet. Remove oven racks. 2. Press nut driver down onto the gas orifice spud and remove by turning it . See "Adjust Oven Broil Burner Flame" section. Place ... lifting out. IMPORTANT: Do not overtighten. NOTE: Reinstall one of the screws through the range cooktop to 2½ turns). Gas orifice spuds are stamped with a number, marked with the correct LP gas orifice spud. The oven broil burner flame cannot be properly adjusted if this conversion is not...

Installation Instructions
Page 14
... as the inner cone. Turn the manual shutoff valve to remove. To range B. B D E NG NG C Side view after A. Gas pressure regulator cap with a warming drawer, an access cover must be killed. Gas pressure regulator 3. Side view before A LP LP Tip Over Hazard A child... these instructions can tip the range and be removed from gas pressure regulator cap. 4. Unplug range or disconnect power. Locate gas pressure regulator at rear of this manual to the gas supply. 2. The outer cone is moved. To Convert Gas Pressure Regulator 1. Gas pressure regulator cap 5. IMPORTANT:...
... as the inner cone. Turn the manual shutoff valve to remove. To range B. B D E NG NG C Side view after A. Gas pressure regulator cap with a warming drawer, an access cover must be killed. Gas pressure regulator 3. Side view before A LP LP Tip Over Hazard A child... these instructions can tip the range and be removed from gas pressure regulator cap. 4. Unplug range or disconnect power. Locate gas pressure regulator at rear of this manual to the gas supply. 2. The outer cone is moved. To Convert Gas Pressure Regulator 1. Gas pressure regulator cap 5. IMPORTANT:...

Installation Instructions
Page 15
...storage drawer or warming drawer into slide rails on the side. Refer to the "Make Gas Connection" section for properly connecting the range to the following chart for the correct Natural gas orifice spud placement. IMPORTANT: You may have yellow tips. 3. Checking for each burner... location. 5. Refer to 2½ turns). Screw D. Natural gas: increase gas - Remove oven racks. 2. A B A. Lock screw B....
...storage drawer or warming drawer into slide rails on the side. Refer to the "Make Gas Connection" section for properly connecting the range to the following chart for the correct Natural gas orifice spud placement. IMPORTANT: You may have yellow tips. 3. Checking for each burner... location. 5. Refer to 2½ turns). Screw D. Natural gas: increase gas - Remove oven racks. 2. A B A. Lock screw B....


