
Use and Care Guide
Page 5
...Model/serial rating plate D. Warming drawer control (on some models) H. Automatic oven light switch L. Surface burner locator O P A. Gas regulator Parts and Features not shown Oven light Broiler pan and grid (on some models) Roasting rack (on some models) Storage drawer liner (on some ...models) 5 Right rear burner control (ACCUSIMMER® burner on some models) E. Oven vent B. PARTS AND FEATURES This manual covers several different models. Surface cooking area C. Anti-tip bracket E. Oven door hinge F. Center grate (on some ...
...Model/serial rating plate D. Warming drawer control (on some models) H. Automatic oven light switch L. Surface burner locator O P A. Gas regulator Parts and Features not shown Oven light Broiler pan and grid (on some models) Roasting rack (on some models) Storage drawer liner (on some ...models) 5 Right rear burner control (ACCUSIMMER® burner on some models) E. Oven vent B. PARTS AND FEATURES This manual covers several different models. Surface cooking area C. Anti-tip bracket E. Oven door hinge F. Center grate (on some ...
Use and Care Guide
Page 11
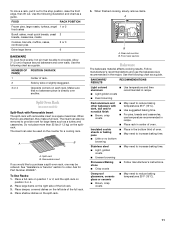
... s Even browning Use temperature and time recommended in the recipe. Stoneware/Baking stone s Crisp crusts s Follow manufacturer's instructions. Split Oven Rack (on the counter for Part Number 4396927. Do not place more than 25 lbs (11.3 kg) on the right side of oven. s Use suggested baking time. s For pies, breads and...
... s Even browning Use temperature and time recommended in the recipe. Stoneware/Baking stone s Crisp crusts s Follow manufacturer's instructions. Split Oven Rack (on the counter for Part Number 4396927. Do not place more than 25 lbs (11.3 kg) on the right side of oven. s Use suggested baking time. s For pies, breads and...

Use and Care Guide
Page 12
...°C) in the recipe. If the temperature drops, cook the meat or poultry longer. When the oven temperature is not supplied with aluminum foil for Part Number 4396923. The bottom of fish, poultry or meat may cook better at lower broiling temperatures. Drippings will appear on the display and the actual...
...°C) in the recipe. If the temperature drops, cook the meat or poultry longer. When the oven temperature is not supplied with aluminum foil for Part Number 4396923. The bottom of fish, poultry or meat may cook better at lower broiling temperatures. Drippings will appear on the display and the actual...

Use and Care Guide
Page 16
..." and "CLEAN" indicator lights will turn off and the oven and cooktop are suggested first unless otherwise noted. s All-Purpose Appliance Cleaner Part Number 31662 (not included): See "Assistance or Service" section to remove. Cleaning Method: s Soap and water or dishwasher: Pull knobs straight... the oven cools, the "DOOR LOCKED" and "CLEAN" indicator lights will be displayed. Cleaning Method: s Stainless Steel Cleaner & Polish Part Number 31462 (not included): See "Assistance or Service" section to soft cloth or sponge, not directly on some paper towels. Suggested clean...
..." and "CLEAN" indicator lights will turn off and the oven and cooktop are suggested first unless otherwise noted. s All-Purpose Appliance Cleaner Part Number 31662 (not included): See "Assistance or Service" section to remove. Cleaning Method: s Soap and water or dishwasher: Pull knobs straight... the oven cools, the "DOOR LOCKED" and "CLEAN" indicator lights will be displayed. Cleaning Method: s Stainless Steel Cleaner & Polish Part Number 31462 (not included): See "Assistance or Service" section to soft cloth or sponge, not directly on some paper towels. Suggested clean...

Use and Care Guide
Page 17
... coating of ¹ ₂ cup (125 mL) ammonia to 1 gal. (3.75 L) water: Soak for both) s All-Purpose Appliance Cleaner Part Number 31662 (not included): See "Assistance or Service" section to order. Plug in the Self-Cleaning cycle. Then, follow these instructions. s Dishwasher ...(grates only, not caps): Use the most aggressive cycle. s All-Purpose Appliance Cleaner Part Number 31662 (not included): See "Assistance or Service" section to the rack guides will discolor and become harder to remove. 3. At...
... coating of ¹ ₂ cup (125 mL) ammonia to 1 gal. (3.75 L) water: Soak for both) s All-Purpose Appliance Cleaner Part Number 31662 (not included): See "Assistance or Service" section to order. Plug in the Self-Cleaning cycle. Then, follow these instructions. s Dishwasher ...(grates only, not caps): Use the most aggressive cycle. s All-Purpose Appliance Cleaner Part Number 31662 (not included): See "Assistance or Service" section to the rack guides will discolor and become harder to remove. 3. At...

Use and Care Guide
Page 20
...replacement parts. To locate FSP® replacement parts in your nearest Whirlpool designated service center. s Referrals to local dealers, repair parts distributors and service companies. Call the Whirlpool Customer eXperience Center toll free: 1-800-253-1301. s Installation information. s Accessory and repair parts sales. Whirlpool ...phone number in your area, call us to better respond to Whirlpool Corporation with : s Features and specifications on our full line of a service call. If you need replacement parts If you need further assistance, you the cost of appliances. Our...
...replacement parts. To locate FSP® replacement parts in your nearest Whirlpool designated service center. s Referrals to local dealers, repair parts distributors and service companies. Call the Whirlpool Customer eXperience Center toll free: 1-800-253-1301. s Installation information. s Accessory and repair parts sales. Whirlpool ...phone number in your area, call us to better respond to Whirlpool Corporation with : s Features and specifications on our full line of a service call. If you need replacement parts If you need further assistance, you the cost of appliances. Our...

Use and Care Guide
Page 21
...under these excluded circumstances shall be repaired in the home and only in-home service is reported to Whirlpool within 30 days from the date of purchase. 6. Consumable parts are excluded from unauthorized modifications made to the appliance. 9. Repairs when your major appliance if it was...; Service must provide proof of purchase or installation date for Factory Specified Parts and repair labor to correct defects in a manner that have been removed, altered or cannot be provided by calling Whirlpool. Service calls to correct the installation of your major appliance, to instruct...
...under these excluded circumstances shall be repaired in the home and only in-home service is reported to Whirlpool within 30 days from the date of purchase. 6. Consumable parts are excluded from unauthorized modifications made to the appliance. 9. Repairs when your major appliance if it was...; Service must provide proof of purchase or installation date for Factory Specified Parts and repair labor to correct defects in a manner that have been removed, altered or cannot be provided by calling Whirlpool. Service calls to correct the installation of your major appliance, to instruct...

Installation Instructions
Page 3
... over carpeting. If cabinet storage is the installer's responsibility to the Manufactured Home Construction and Safety Standard, Title 24 CFR, Part 3280 (formerly the Federal Standard for concrete/ceramic floors) s Noncorrosive leak-detection solution For LP/Natural Gas Conversions s ½...;" combination wrench s ⁵⁄₈" combination wrench s nut driver s Quadrex®† or Phillips screwdriver Parts supplied Check that all governing codes and ordinances. To install the antitip bracket shipped with installation clearances specified on the oven frame ...
... over carpeting. If cabinet storage is the installer's responsibility to the Manufactured Home Construction and Safety Standard, Title 24 CFR, Part 3280 (formerly the Federal Standard for concrete/ceramic floors) s Noncorrosive leak-detection solution For LP/Natural Gas Conversions s ½...;" combination wrench s ⁵⁄₈" combination wrench s nut driver s Quadrex®† or Phillips screwdriver Parts supplied Check that all governing codes and ordinances. To install the antitip bracket shipped with installation clearances specified on the oven frame ...

Installation Instructions
Page 7
... specified in the "Location Requirements" section, adjust template so range will be killed. B A. ³⁄₈" drive ratchet B. Channel lock pliers D. Remove oven racks and parts package from inside the oven cavity) or from the back of floor covering. Tape template into place. 4. Rear leveling leg C. Use a ³⁄₈" drive...
... specified in the "Location Requirements" section, adjust template so range will be killed. B A. ³⁄₈" drive ratchet B. Channel lock pliers D. Remove oven racks and parts package from inside the oven cavity) or from the back of floor covering. Tape template into place. 4. Rear leveling leg C. Use a ³⁄₈" drive...

Installation Instructions
Page 9
... caps. Burner grate WARNING A. Do not use an adapter. Gas pressure regulator shutoff valve 2. Black iron pipe I . A BC D E A. Remove cooktop burner caps and grates from parts package. Apply pipe-joint compound made for use with LP gas to follow these instructions can result in following illustration). 2. A B J A. If burner caps are not...
... caps. Burner grate WARNING A. Do not use an adapter. Gas pressure regulator shutoff valve 2. Black iron pipe I . A BC D E A. Remove cooktop burner caps and grates from parts package. Apply pipe-joint compound made for use with LP gas to follow these instructions can result in following illustration). 2. A B J A. If burner caps are not...

Installation Instructions
Page 11
..., and should be clean and soft in character. Dry thoroughly with an outer mantle of /recycle all parts are now installed. Plug into slide rails on sides of the range. s Range is an extra part, go back through oven window to be adjusted, locate the air shutter near the center rear of...
..., and should be clean and soft in character. Dry thoroughly with an outer mantle of /recycle all parts are now installed. Plug into slide rails on sides of the range. s Range is an extra part, go back through oven window to be adjusted, locate the air shutter near the center rear of...

Installation Instructions
Page 15
... or warming drawer for proper sizing of drawer slightly and push firmly to complete this conversion is not made . Refer to "Complete Installation" in plastic parts bag for Natural gas). Screw D. Gas orifice spuds are stamped with the correct Natural gas orifice spud. LP gas: decrease gas - To Convert Oven Bake...
... or warming drawer for proper sizing of drawer slightly and push firmly to complete this conversion is not made . Refer to "Complete Installation" in plastic parts bag for Natural gas). Screw D. Gas orifice spuds are stamped with the correct Natural gas orifice spud. LP gas: decrease gas - To Convert Oven Bake...


