Use and Care Guide
Page 1
9763001B ® ELECTRIC RANGE Use & Care Guide For questions about features, operation/performance, parts, accessories or service, call: 1-800-253-1301 or visit our website at... www.whirlpool.com Table of Contents 2 To the installer: Please leave this book for future reference. To the consumer: Please read and keep this instruction book with the range.
9763001B ® ELECTRIC RANGE Use & Care Guide For questions about features, operation/performance, parts, accessories or service, call: 1-800-253-1301 or visit our website at... www.whirlpool.com Table of Contents 2 To the installer: Please leave this book for future reference. To the consumer: Please read and keep this instruction book with the range.
Use and Care Guide
Page 2
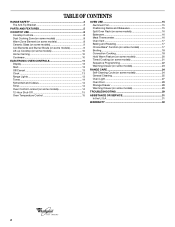
... 9 Lift-up Cooktop (on some models 10 Home Canning 10 Cookware 10 ELECTRONIC OVEN CONTROLS 11 Display 13 Start 13 Off/Cancel 13 Clock 13 Range Lights 13 Tones 14 Fahrenheit and Celsius 14 Timer 14 Oven Control Lockout (on some models 14 12-Hour Shut-Off 15 Oven Temperature Control... Convection Cooking 18 Hold Warm Feature (on some models 20 Timed Cooking (on some models 21 Sequence Programming 22 Warming Drawer (on some models 23 RANGE CARE 24 Self-Cleaning Cycle (on some models 24 General Cleaning 25 Oven Light 27 Oven Door 28 Storage Drawer 28 Warming Drawer (on some...
... 9 Lift-up Cooktop (on some models 10 Home Canning 10 Cookware 10 ELECTRONIC OVEN CONTROLS 11 Display 13 Start 13 Off/Cancel 13 Clock 13 Range Lights 13 Tones 14 Fahrenheit and Celsius 14 Timer 14 Oven Control Lockout (on some models 14 12-Hour Shut-Off 15 Oven Temperature Control... Convection Cooking 18 Hold Warm Feature (on some models 20 Timed Cooking (on some models 21 Sequence Programming 22 Warming Drawer (on some models 23 RANGE CARE 24 Self-Cleaning Cycle (on some models 24 General Cleaning 25 Oven Light 27 Oven Door 28 Storage Drawer 28 Warming Drawer (on some...

Use and Care Guide
Page 3
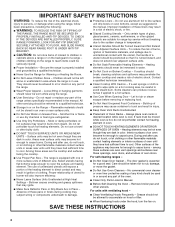
...Connect anti-tip bracket to some of the substances listed, including benzene, formaldehyde, carbon monoxide, and toluene. 3 The Anti-Tip Bracket The range will follow instructions. WARNING: This product contains a chemical known to the State of California to cause cancer, birth defects, or other reproductive harm...in death or serious burns to follow instructions. WARNING You can result in this manual and on your appliance. Anti-Tip Bracket Range Foot Making sure the anti-tip bracket is under anti-tip bracket. See the installation instructions for the anti-tip bracket securely...
...Connect anti-tip bracket to some of the substances listed, including benzene, formaldehyde, carbon monoxide, and toluene. 3 The Anti-Tip Bracket The range will follow instructions. WARNING: This product contains a chemical known to the State of California to cause cancer, birth defects, or other reproductive harm...in death or serious burns to follow instructions. WARNING You can result in this manual and on your appliance. Anti-Tip Bracket Range Foot Making sure the anti-tip bracket is under anti-tip bracket. See the installation instructions for the anti-tip bracket securely...
Use and Care Guide
Page 4
... During and after use aluminum foil to rub, damage, or move the gasket. ■ Do Not Use Oven Cleaners - For self-cleaning ranges - ■ Do Not Clean Door Gasket - Proper relationship of oven until they are the cooktop and surfaces facing the cooktop. ■ Use...Dry Potholders - Other surfaces of Oven Racks - The door gasket is properly installed and grounded by a qualified technician. ■ Never Use the Range for a good seal. Remove broiler pan and other servicing should not be allowed to accumulate on hood or filter. ■ When flambeing foods ...
... During and after use aluminum foil to rub, damage, or move the gasket. ■ Do Not Use Oven Cleaners - For self-cleaning ranges - ■ Do Not Clean Door Gasket - Proper relationship of oven until they are the cooktop and surfaces facing the cooktop. ■ Use...Dry Potholders - Other surfaces of Oven Racks - The door gasket is properly installed and grounded by a qualified technician. ■ Never Use the Range for a good seal. Remove broiler pan and other servicing should not be allowed to accumulate on hood or filter. ■ When flambeing foods ...
Use and Care Guide
Page 5
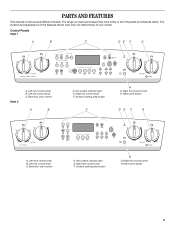
... control knob H. Right front control knob H. Left rear control knob C. Electronic oven control D. Electronic oven control A B D. Warm zone button DE F G A. Right rear control knob F. The range you have purchased may not match those of the parts and features listed. Left front control knob B. Warm zone button 5
... control knob H. Right front control knob H. Left rear control knob C. Electronic oven control D. Electronic oven control A B D. Warm zone button DE F G A. Right rear control knob F. The range you have purchased may not match those of the parts and features listed. Left front control knob B. Warm zone button 5
Use and Care Guide
Page 7
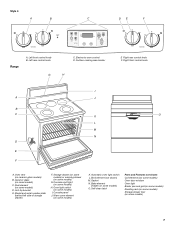
... (on some models) 7 Left rear control knob G C. Oven vent (on some models) I A J B C O K L M N D E F A. Anti-tip bracket E. Automatic oven light switch L. Broil element (not shown) M. Style 4 A B C DE F Range A. Electronic oven control D. Console night light (on ceramic glass models) B. Oven light switch (on some models) H. Console panel J.
... (on some models) 7 Left rear control knob G C. Oven vent (on some models) I A J B C O K L M N D E F A. Anti-tip bracket E. Automatic oven light switch L. Broil element (not shown) M. Style 4 A B C DE F Range A. Electronic oven control D. Console night light (on ceramic glass models) B. Oven light switch (on some models) H. Console panel J.
Use and Care Guide
Page 8
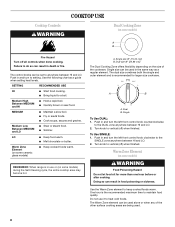
... used in death or fire. One hour is in food poisoning or sickness. The control knobs can be set to maintain food quality. REMEMBER: When range is the recommended maximum time to anywhere between HI and LO. 2. Turn knob to keep cooked foods warm. Use the Warm Zone element to vertical...
... used in death or fire. One hour is in food poisoning or sickness. The control knobs can be set to maintain food quality. REMEMBER: When range is the recommended maximum time to anywhere between HI and LO. 2. Turn knob to keep cooked foods warm. Use the Warm Zone element to vertical...

Use and Care Guide
Page 13
... "Clock" section to the time of day. Off/Cancel The Off/Cancel pad stops any other time, a power failure has occurred. Depending on and off. Range Lights Oven Light While the oven door is a 12-hour clock that shows a.m.
... "Clock" section to the time of day. Off/Cancel The Off/Cancel pad stops any other time, a power failure has occurred. Depending on and off. Range Lights Oven Light While the oven door is a 12-hour clock that shows a.m.
Use and Care Guide
Page 17
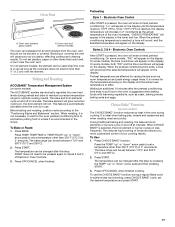
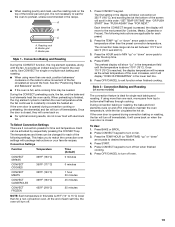
...set the desired temperature and press START. 17 To use the CHOICE BAKE® function during a regular Bake cycle to maintain a precise temperature range for the temperature showing on less frequently. Oven vent (ceramic glass model) A. Baking and Roasting ACCUBAKE® Temperature Management System (on the.... The temperature can be changed after this step by varying factors such as yeast, baking powder, baking soda and eggs. The bake range can be blocked or covered. Once 170ºF (75ºC) is selected, the broil element or burner cycles on the display and...
...set the desired temperature and press START. 17 To use the CHOICE BAKE® function during a regular Bake cycle to maintain a precise temperature range for the temperature showing on less frequently. Oven vent (ceramic glass model) A. Baking and Roasting ACCUBAKE® Temperature Management System (on the.... The temperature can be changed after this step by varying factors such as yeast, baking powder, baking soda and eggs. The bake range can be blocked or covered. Once 170ºF (75ºC) is selected, the broil element or burner cycles on the display and...

Use and Care Guide
Page 18
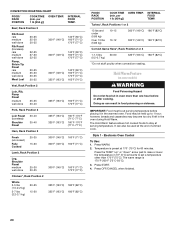
... cm) thick 4 Fish Steaks ³ ₄-1" (2-2.5 cm) thick 4 8-10 4-5 16-18 8-9 *Place up to the "Positioning Racks and Bakeware" section. 18 To Broil: 1. The broil range can be turned. ■ After broiling, remove the pan from the oven when removing the food. Press START. 4. For diagram, see the "Positioning Racks and...
... cm) thick 4 Fish Steaks ³ ₄-1" (2-2.5 cm) thick 4 8-10 4-5 16-18 8-9 *Place up to the "Positioning Racks and Bakeware" section. 18 To Broil: 1. The broil range can be turned. ■ After broiling, remove the pan from the oven when removing the food. Press START. 4. For diagram, see the "Positioning Racks and...
Use and Care Guide
Page 19
...; For optimal cooking results, do not cover food with package instructions or your favorite recipes. This helps you to turn off immediately. The convection bake range can be needed. Once 170°F (75°C) is full, extra cooking time may be set time, the oven will show "Lo" in intervals to...
...; For optimal cooking results, do not cover food with package instructions or your favorite recipes. This helps you to turn off immediately. The convection bake range can be needed. Once 170°F (75°C) is full, extra cooking time may be set time, the oven will show "Lo" in intervals to...
Use and Care Guide
Page 20
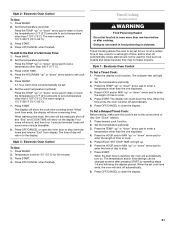
... left in food poisoning or sickness. Electronic Oven Control To Use: 1. Press the TEMP "up to stay at the end of a timed cook. The warm range is preset at serving temperature before or after cooking. per 1 lb [454 g]) OVEN TEMP. Doing so can also be used at serving temperature. The Hold...
... left in food poisoning or sickness. Electronic Oven Control To Use: 1. Press the TEMP "up to stay at the end of a timed cook. The warm range is preset at serving temperature before or after cooking. per 1 lb [454 g]) OVEN TEMP. Doing so can also be used at serving temperature. The Hold...
Use and Care Guide
Page 21
...Press OFF/CANCEL when finished. Press the desired cook function. Press the TEMP "up " or "down " arrow pad to the display. The warm range is 170°F-200°F (75°C-93°C). 3. The display will light up " or "down " arrow pad to set a temperature other...displayed. 4. The temperature and/or time settings can result in 5°F (5°C) amounts to set . 6. Press WARM. 2. Set the temperature (optional). The warm range is 170°F-200°F (75°C-93°C). 7. Style 2 - Electronic Oven Control To Use: 1. A 1 hour warm time will count down . ...
...Press OFF/CANCEL when finished. Press the desired cook function. Press the TEMP "up " or "down " arrow pad to the display. The warm range is 170°F-200°F (75°C-93°C). 3. The display will light up " or "down " arrow pad to set a temperature other...displayed. 4. The temperature and/or time settings can result in 5°F (5°C) amounts to set . 6. Press WARM. 2. Set the temperature (optional). The warm range is 170°F-200°F (75°C-93°C). 7. Style 2 - Electronic Oven Control To Use: 1. A 1 hour warm time will count down . ...
Use and Care Guide
Page 24
... inside door edge and the 1½" (3.8 cm) area around the inside surfaces until the oven has completely cooled down any pad on the oven display. RANGE CARE Self-Cleaning Cycle (on some models) The Precise Clean™ self-cleaning cycle is complete and the oven cools, "DOOR LOCKED" will disappear from...
... inside door edge and the 1½" (3.8 cm) area around the inside surfaces until the oven has completely cooled down any pad on the oven display. RANGE CARE Self-Cleaning Cycle (on some models) The Precise Clean™ self-cleaning cycle is complete and the oven cools, "DOOR LOCKED" will disappear from...
Use and Care Guide
Page 27
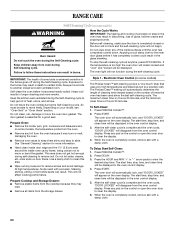
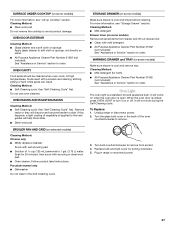
...5. STORAGE DRAWER (on some models) For more information, see "Lift-up Cooktop" section. For more information, see "Storage Drawer" section. Unplug range or disconnect power. 2. Plug in the Self-Cleaning cycle. When the oven door is closed, press OVEN LIGHT to remove. 3. Turn the glass ... etching, pitting or faint white spots can result. Do not use oven cleaners. Porcelain enamel only ■ Dishwasher Do not clean in range or reconnect power. 27 SURFACE UNDER COOKTOP (on when the oven door is open. Cleaning Method: ■ Mild detergent Drawer Liner (on...
...5. STORAGE DRAWER (on some models) For more information, see "Lift-up Cooktop" section. For more information, see "Storage Drawer" section. Unplug range or disconnect power. 2. Plug in the Self-Cleaning cycle. When the oven door is closed, press OVEN LIGHT to remove. 3. Turn the glass ... etching, pitting or faint white spots can result. Do not use oven cleaners. Porcelain enamel only ■ Dishwasher Do not clean in range or reconnect power. 27 SURFACE UNDER COOKTOP (on when the oven door is open. Cleaning Method: ■ Mild detergent Drawer Liner (on...
Use and Care Guide
Page 28
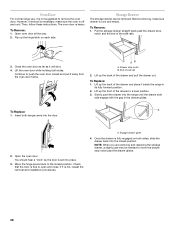
Flip up the back of the drawer and place it inside the range in the drawer glides. End of the side rails. 3. Lift up the hinge latch ...straight back past the drawer glides. 28 Close the oven door as far as the door is set into the range until the drawer side rails engage with the gap in its fully forward position. 2. Lift up the front of...needed to push the oven door closed position. You should hear a "click" as it will shut. 4. Oven Door For normal range use, it is not suggested to a level position. 3. The oven door is cool and empty. Open oven door all the way...
Flip up the back of the drawer and place it inside the range in the drawer glides. End of the side rails. 3. Lift up the hinge latch ...straight back past the drawer glides. 28 Close the oven door as far as the door is set into the range until the drawer side rails engage with the gap in its fully forward position. 2. Lift up the front of...needed to push the oven door closed position. You should hear a "click" as it will shut. 4. Oven Door For normal range use, it is not suggested to a level position. 3. The oven door is cool and empty. Open oven door all the way...
Use and Care Guide
Page 29
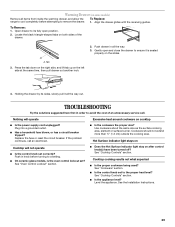
... what expected ■ Is the proper cookware being used? Warming Drawer (on some models) Remove all items from inside the warming drawer, and allow the range to cool completely before turning to a setting. ■ On ceramic glass models, is seated properly on the slides. 4. See "Oven Control Lockout" section. ■ Is...
... what expected ■ Is the proper cookware being used? Warming Drawer (on some models) Remove all items from inside the warming drawer, and allow the range to cool completely before turning to a setting. ■ On ceramic glass models, is seated properly on the slides. 4. See "Oven Control Lockout" section. ■ Is...


