
Use & Care Guide
Page 2
... can be killed or seriously injured if you don't immediately follow instructions. TABLE OF CONTENTS COOKTOP SAFETY 2 PARTS AND FEATURES TOUCH-ACTIVATED CONTROLS 4 COOKTOP CONTROLS TOUCH-ACTIVATED CONTROLS 5 Dual Element 6 Control Lock/All Off 6 WARM HI /LO Function 6 PARTS AND FEATURES - WARNING You can be killed or seriously injured if you don't follow the...
... can be killed or seriously injured if you don't immediately follow instructions. TABLE OF CONTENTS COOKTOP SAFETY 2 PARTS AND FEATURES TOUCH-ACTIVATED CONTROLS 4 COOKTOP CONTROLS TOUCH-ACTIVATED CONTROLS 5 Dual Element 6 Control Lock/All Off 6 WARM HI /LO Function 6 PARTS AND FEATURES - WARNING You can be killed or seriously injured if you don't follow the...

Use & Care Guide
Page 3
.... s Proper Installation - s Wear Proper Apparel - Do not repair or replace any part of the cooktop. s Use Only Dry Potholders - Moist or damp potholders on any part of the cooktop unless specifically recommended in Place - s When flaming foods under the hood, turn the ... Cook on Grease Fires - IMPORTANT SAFETY INSTRUCTIONS WARNING: To reduce the risk of fire, electrical shock, injury to persons, or damage when using the cooktop. Surface units may result in cabinets above a cooktop - Absence of flammable materials, and spillage due to a hot surface. s Do Not...
.... s Proper Installation - s Wear Proper Apparel - Do not repair or replace any part of the cooktop. s Use Only Dry Potholders - Moist or damp potholders on any part of the cooktop unless specifically recommended in Place - s When flaming foods under the hood, turn the ... Cook on Grease Fires - IMPORTANT SAFETY INSTRUCTIONS WARNING: To reduce the risk of fire, electrical shock, injury to persons, or damage when using the cooktop. Surface units may result in cabinets above a cooktop - Absence of flammable materials, and spillage due to a hot surface. s Do Not...

Use & Care Guide
Page 4
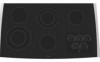
... Increase/decrease temperature touch control Cooktops 36" (91.4 cm) Touch-Activated Electronic Control Model shown B C D E. Left front touch control (simmer function; Ceramic glass cooktop B. Right rear surface cooking ...area E. Control Panels Model GJC3055 (30" [77.1 cm]) Touch-Activated Electronic Controls Model GJC3655 (36" [91.4 cm]) Touch-Activated Electronic Controls A B A B C...The cooktop you have some or all of your model. Model and serial number ...
... Increase/decrease temperature touch control Cooktops 36" (91.4 cm) Touch-Activated Electronic Control Model shown B C D E. Left front touch control (simmer function; Ceramic glass cooktop B. Right rear surface cooking ...area E. Control Panels Model GJC3055 (30" [77.1 cm]) Touch-Activated Electronic Controls Model GJC3655 (36" [91.4 cm]) Touch-Activated Electronic Controls A B A B C...The cooktop you have some or all of your model. Model and serial number ...

Use & Care Guide
Page 7
... H G F A. Right front control knob F. Hot surface indicator light Cooktops: Model GJC 3634 (36" [91.4 cm]) shown B A. Left rear control knob C. ACCUSIMMER® control knob D. Ceramic glass cooktop B. Model and serial number plate (located underneath cooktop on light E. Center rear surface cooking area (with dual-size element)...zone control on some models) C E. Right rear surface cooking area (warm zone on some models) E. PARTS AND FEATURES - The cooktop you have some models) D. Center rear control knob (dual-size element) C. Right rear control knob (...
... H G F A. Right front control knob F. Hot surface indicator light Cooktops: Model GJC 3634 (36" [91.4 cm]) shown B A. Left rear control knob C. ACCUSIMMER® control knob D. Ceramic glass cooktop B. Model and serial number plate (located underneath cooktop on light E. Center rear surface cooking area (with dual-size element)...zone control on some models) C E. Right rear surface cooking area (warm zone on some models) E. PARTS AND FEATURES - The cooktop you have some models) D. Center rear control knob (dual-size element) C. Right rear control knob (...

Use & Care Guide
Page 10
... grate or largest surface cooking area or element. However, when used as possible. It may be shortened. s Do not use of the cookware. On electric cooktops, canners should be of the coil element will help keep it and the cookware. s On coil element models, the installation of white or biscuit ceramic... bottoms of pots and pans are allowed to touch any form, clean up all spills and soils as soon as a core or base in any part of aluminum. 10 This allows time for the surface of a Canning Unit Kit is transferred, which affects cooking results. s Center the canner on a ...
... grate or largest surface cooking area or element. However, when used as possible. It may be shortened. s Do not use of the cookware. On electric cooktops, canners should be of the coil element will help keep it and the cookware. s On coil element models, the installation of white or biscuit ceramic... bottoms of pots and pans are allowed to touch any form, clean up all spills and soils as soon as a core or base in any part of aluminum. 10 This allows time for the surface of a Canning Unit Kit is transferred, which affects cooking results. s Center the canner on a ...

Use & Care Guide
Page 11
... cool. s Soap and water or dishwasher: Pull knobs straight away from aluminum and copper s Cooktop Polishing Creme: Clean as soon as possible on stainless steel provides even heating. Cooktop Cleaner Part Number 31464 is also recommended for stubborn soils, and can be ordered as a guide for most...of the reach of cooking. s Medium or heavy thickness is still warm. You may occur. 11 Repeat for browning and frying. Cooktop Scraper Part Number 3183488 is recommended for all -purpose cleaner: Rinse with clean water and dry with creme and paper towel. Continue rubbing until white...
... cool. s Soap and water or dishwasher: Pull knobs straight away from aluminum and copper s Cooktop Polishing Creme: Clean as soon as possible on stainless steel provides even heating. Cooktop Cleaner Part Number 31464 is also recommended for stubborn soils, and can be ordered as a guide for most...of the reach of cooking. s Medium or heavy thickness is still warm. You may occur. 11 Repeat for browning and frying. Cooktop Scraper Part Number 3183488 is recommended for all -purpose cleaner: Rinse with clean water and dry with creme and paper towel. Continue rubbing until white...

Use & Care Guide
Page 13
... models) Order Part Number 242905 Cooktop Cleaner (ceramic glass models) Order Part Number 31464 Cooktop Protectant (ceramic glass models) Order Part Number 31463 Cooktop Care Kit (includes cleaner, protectant, and applicator pads) Order Part Number 31605 Cooktop Scraper (ceramic glass models) Order Part Number 3183488 All-Purpose Appliance Cleaner Order Part Number 31662 In Canada Call the Whirlpool Canada LP Customer...
... models) Order Part Number 242905 Cooktop Cleaner (ceramic glass models) Order Part Number 31464 Cooktop Protectant (ceramic glass models) Order Part Number 31463 Cooktop Care Kit (includes cleaner, protectant, and applicator pads) Order Part Number 31605 Cooktop Scraper (ceramic glass models) Order Part Number 3183488 All-Purpose Appliance Cleaner Order Part Number 31662 In Canada Call the Whirlpool Canada LP Customer...
Use & Care Guide
Page 14
...-807-6777. 9/07 Keep this book and your major appliance is located in accordance with electrical or plumbing codes, or use of consumables or cleaning products not approved by an authorized Whirlpool servicer is not available. 10. In Canada, call 1-800-253-1301. Proof of original... purchase date is designed to be borne by a Whirlpool designated service company. Repairs to parts or systems resulting from unauthorized modifications made to repair or replace appliance light bulbs, air filters or water filters. Expenses ...
...-807-6777. 9/07 Keep this book and your major appliance is located in accordance with electrical or plumbing codes, or use of consumables or cleaning products not approved by an authorized Whirlpool servicer is not available. 10. In Canada, call 1-800-253-1301. Proof of original... purchase date is designed to be borne by a Whirlpool designated service company. Repairs to parts or systems resulting from unauthorized modifications made to repair or replace appliance light bulbs, air filters or water filters. Expenses ...

Installation Instructions
Page 1
...followed. ELECTRIC COOKTOP INSTALLATION INSTRUCTIONS INSTRUCTIONS D'INSTALLATION DE LA TABLE DE CUISSON ÉLECTRIQUE Table of Contents / Table des matières COOKTOP SAFETY 1 INSTALLATION INSTRUCTIONS 2 Tools and Parts 2 Location Requirements 2 Electrical Requirements 3 Prepare Cooktop 4 Install Cooktop 5 Make Electrical Connection 6 Attach Cooktop to ... follow the safety alert symbol and either the word "DANGER" or "WARNING." IMPORTANT: Save for local electrical inspector's use. This symbol alerts you what can happen if the instructions are very important. IMPORTANT : ...
...followed. ELECTRIC COOKTOP INSTALLATION INSTRUCTIONS INSTRUCTIONS D'INSTALLATION DE LA TABLE DE CUISSON ÉLECTRIQUE Table of Contents / Table des matières COOKTOP SAFETY 1 INSTALLATION INSTRUCTIONS 2 Tools and Parts 2 Location Requirements 2 Electrical Requirements 3 Prepare Cooktop 4 Install Cooktop 5 Make Electrical Connection 6 Attach Cooktop to ... follow the safety alert symbol and either the word "DANGER" or "WARNING." IMPORTANT: Save for local electrical inspector's use. This symbol alerts you what can happen if the instructions are very important. IMPORTANT : ...

Installation Instructions
Page 2
...) 30 77.1 cm) 36 92.3 cm) C. 2⁷⁄₈" (7.3 cm) D. Curved Edge Glass Cooktop I Grounded electrical supply is approved. If you do not find this label, your cooktop may not be installed with clamps or seal cooktop to comply with the installation... cooktop, use and proper cutout dimensions. INSTALLATION INSTRUCTIONS Tools and Parts Gather the required tools and parts before starting installation. Product Dimensions Parts supplied I Clamp brackets (2) Straight Edge Glass Cooktop I 2¹⁄₂" (6.4 cm) clamping screws (2) B I Foam strip Parts ...
...) 30 77.1 cm) 36 92.3 cm) C. 2⁷⁄₈" (7.3 cm) D. Curved Edge Glass Cooktop I Grounded electrical supply is approved. If you do not find this label, your cooktop may not be installed with clamps or seal cooktop to comply with the installation... cooktop, use and proper cutout dimensions. INSTALLATION INSTRUCTIONS Tools and Parts Gather the required tools and parts before starting installation. Product Dimensions Parts supplied I Clamp brackets (2) Straight Edge Glass Cooktop I 2¹⁄₂" (6.4 cm) clamping screws (2) B I Foam strip Parts ...

Installation Instructions
Page 4
... length of conduit provided is required on a separate, 40-amp circuit, fused on both sides of cooktop, flush with the National Electrical Code, ANSI/NFPA 70-latest edition or CSA Standards C22.1-94, Canadian Electrical Code, Part 1 and C22.2 No. I Do not cut the conduit. Connect the aluminum wiring to a gas pipe. Follow the...
... length of conduit provided is required on a separate, 40-amp circuit, fused on both sides of cooktop, flush with the National Electrical Code, ANSI/NFPA 70-latest edition or CSA Standards C22.1-94, Canadian Electrical Code, Part 1 and C22.2 No. I Do not cut the conduit. Connect the aluminum wiring to a gas pipe. Follow the...
Installation Instructions
Page 8
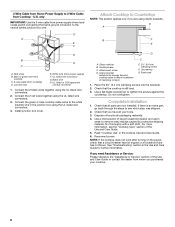
... 2½" (6.4 cm) clamping screws into the brackets. 2. Check that all your cooktop. 8 G A B F E G B H C A. Attachment screw D. NOTE: If the cooktop does not work after turning on the power, check that the cooktop is an extra part, go back through the steps to see the "Cooktop Care" section of /recycle all packaging materials. 4. Connect the 2 black wires together...
... 2½" (6.4 cm) clamping screws into the brackets. 2. Check that all your cooktop. 8 G A B F E G B H C A. Attachment screw D. NOTE: If the cooktop does not work after turning on the power, check that the cooktop is an extra part, go back through the steps to see the "Cooktop Care" section of /recycle all packaging materials. 4. Connect the 2 black wires together...


