

Use & Care Guide
Page 2
...are very important. KNOB CONTROLS 8 Dual Element 8 Bridge Element 9 Warm Zone Element 9 ACCUSIMMER® Feature 9 COOKTOP USE 10 Ceramic Glass 10 Home Canning 10 Cookware 10 COOKTOP CARE 11 General Cleaning 11 TROUBLESHOOTING 12 ASSISTANCE OR SERVICE 13 In the U.S.A 13 In Canada 13 WARRANTY 14 TABLE... 25 ENTRETIEN DE LA TABLE DE CUISSON 25 Nettoyage général 25 DÉPANNAGE 26 ASSISTANCE OU SERVICE 27 GARANTIE 28 COOKTOP SAFETY Your safety and the safety of injury, and tell you what the potential hazard is the safety alert symbol. WARNING You ...
...are very important. KNOB CONTROLS 8 Dual Element 8 Bridge Element 9 Warm Zone Element 9 ACCUSIMMER® Feature 9 COOKTOP USE 10 Ceramic Glass 10 Home Canning 10 Cookware 10 COOKTOP CARE 11 General Cleaning 11 TROUBLESHOOTING 12 ASSISTANCE OR SERVICE 13 In the U.S.A 13 In Canada 13 WARRANTY 14 TABLE... 25 ENTRETIEN DE LA TABLE DE CUISSON 25 Nettoyage général 25 DÉPANNAGE 26 ASSISTANCE OU SERVICE 27 GARANTIE 28 COOKTOP SAFETY Your safety and the safety of injury, and tell you what the potential hazard is the safety alert symbol. WARNING You ...

Use & Care Guide
Page 3
... to children in the manual. Surface units may ignite. If cooktop should never be referred to a qualified technician. Absence of these liners may penetrate the broken cooktop and create a risk of electric shock. Children climbing on . All other glazed utensils are suitable... Soak Removable Heating Elements - IMPORTANT SAFETY INSTRUCTIONS WARNING: To reduce the risk of fire, electrical shock, injury to persons, or damage when using the cooktop. s Never Use Your Cooktop for cooktop service without breaking due to the sudden change in the manual. s Wear Proper Apparel -...
... to children in the manual. Surface units may ignite. If cooktop should never be referred to a qualified technician. Absence of these liners may penetrate the broken cooktop and create a risk of electric shock. Children climbing on . All other glazed utensils are suitable... Soak Removable Heating Elements - IMPORTANT SAFETY INSTRUCTIONS WARNING: To reduce the risk of fire, electrical shock, injury to persons, or damage when using the cooktop. s Never Use Your Cooktop for cooktop service without breaking due to the sudden change in the manual. s Wear Proper Apparel -...

Use & Care Guide
Page 4
...warming function; dual-size element) A. warming function; dual-size element) A H G A. Left rear surface cooking area C. The cooktop you have some or all of your model. The locations and appearances of the features shown here may have purchased may not match those...control (simmer function; Left rear touch control (simmer function; Right rear surface cooking area E. Model and serial number plate (located underneath cooktop on metal cabinet) warming function; dual-size element) C. Right front touch control (simmer function; warming function) B. Hot surface indicator ...
...warming function; dual-size element) A. warming function; dual-size element) A H G A. Left rear surface cooking area C. The cooktop you have some or all of your model. The locations and appearances of the features shown here may have purchased may not match those...control (simmer function; Left rear touch control (simmer function; Right rear surface cooking area E. Model and serial number plate (located underneath cooktop on metal cabinet) warming function; dual-size element) C. Right front touch control (simmer function; warming function) B. Hot surface indicator ...
Use & Care Guide
Page 5
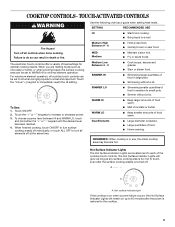
Fire Hazard Turn off at the same time. s Quickly brown or sear food. SIMMER LO s Simmering smaller quantities of food in use, the entire cooktop area may become hot. Touch the "+" or "-" keypads to a boil. To choose a power level between HI and WARM LO, touch and hold either the "+" ... food cooking. Failure to do so can be set to HI when bringing liquids to touch, even after the power is in medium to the cooktop. 5 s Fry or sauté foods. s Simmering without a lid. To Use: 1. s Melt chocolate or butter. s Large quantities of heat settings for ...
Fire Hazard Turn off at the same time. s Quickly brown or sear food. SIMMER LO s Simmering smaller quantities of food in use, the entire cooktop area may become hot. Touch the "+" or "-" keypads to a boil. To choose a power level between HI and WARM LO, touch and hold either the "+" ... food cooking. Failure to do so can be set to HI when bringing liquids to touch, even after the power is in medium to the cooktop. 5 s Fry or sauté foods. s Simmering without a lid. To Use: 1. s Melt chocolate or butter. s Large quantities of heat settings for ...
Use & Care Guide
Page 6
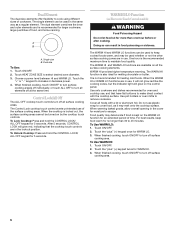
... all elements off surface cooking area. 6 Use pot holders or oven mitts to increase or decrease power. 4. Food quality may melt onto the cooktop surface. When finished cooking, touch ON/OFF to turn surface cooking area(s) off individually, or touch ALL OFF to turn all the surface cooking... for more than 30 to make direct contact with a lid or aluminum foil. Dual size To Use: 1. WARM HI /LO Function (on by the cooktop touch controls. Use only cookware and dishes recommended for WARM HI. 3. Touch the "plus " (+) keypad once for 5 seconds. The single element can ...
... all elements off surface cooking area. 6 Use pot holders or oven mitts to increase or decrease power. 4. Food quality may melt onto the cooktop surface. When finished cooking, touch ON/OFF to turn surface cooking area(s) off individually, or touch ALL OFF to turn all the surface cooking... for more than 30 to make direct contact with a lid or aluminum foil. Dual size To Use: 1. WARM HI /LO Function (on by the cooktop touch controls. Use only cookware and dishes recommended for WARM HI. 3. Touch the "plus " (+) keypad once for 5 seconds. The single element can ...

Use & Care Guide
Page 7
... F A. Center rear control knob (dual-size element) C. ACCUSIMMER® control knob G. Power on metal cabinet) 7 Control panel F. Hot surface indicator light Cooktops: Model GJC 3634 (36" [91.4 cm]) shown B A. Left front single surface cooking area (dual-size bridge burner) H. Right front control knob F. Hot...lights B. ACCUSIMMER® control knob D. Left rear single surface cooking area C. Model and serial number plate (located underneath cooktop on light G. Center rear control knob (dual-size element) F. Right front surface cooking area E G. Power on some...
... F A. Center rear control knob (dual-size element) C. ACCUSIMMER® control knob G. Power on metal cabinet) 7 Control panel F. Hot surface indicator light Cooktops: Model GJC 3634 (36" [91.4 cm]) shown B A. Left front single surface cooking area (dual-size bridge burner) H. Right front control knob F. Hot...lights B. ACCUSIMMER® control knob D. Left rear single surface cooking area C. Model and serial number plate (located underneath cooktop on light G. Center rear control knob (dual-size element) F. Right front surface cooking area E G. Power on some...

Use & Care Guide
Page 8
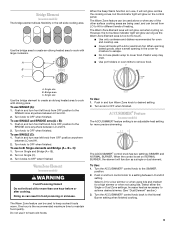
... remain on after the surface cooking area(s) is restored to desired heat setting. A B A. Single zone B. To Use DUAL: 1. Push in use, the entire cooktop area may become hot. 8 SETTING RECOMMENDED USE HI s Start food cooking. s Bring liquid to touch, even after the power is turned off all controls when...and HI. 2. Push in the same way as a guide when setting heat levels. Turn knob to anywhere between LO and HI. 2. REMEMBER: When cooktop is too hot to a boil. The controls can be used in and turn knob from the OFF position to cook using lids. Push in death...
... remain on after the surface cooking area(s) is restored to desired heat setting. A B A. Single zone B. To Use DUAL: 1. Push in use, the entire cooktop area may become hot. 8 SETTING RECOMMENDED USE HI s Start food cooking. s Bring liquid to touch, even after the power is turned off all controls when...and HI. 2. Push in the same way as a guide when setting heat levels. Turn knob to anywhere between LO and HI. 2. REMEMBER: When cooktop is too hot to a boil. The controls can be used in and turn knob from the OFF position to cook using lids. Push in death...
Use & Care Guide
Page 9
... achieve desired simmer. (See "Dual Element" section.) 3. Turn knob to escape. Select LO for a low simmer or when using lids and medium for oven and cooktop use it will not glow red like the cooking zones, but the indicator light will not glow red when cycling on some models) WARNING Food...
... achieve desired simmer. (See "Dual Element" section.) 3. Turn knob to escape. Select LO for a low simmer or when using lids and medium for oven and cooktop use it will not glow red like the cooking zones, but the indicator light will not glow red when cycling on some models) WARNING Food...

Use & Care Guide
Page 10
...cooking area or element. However, when used . For example, aluminum cookware with rounded, warped, ribbed or dented bottoms could crack the cooktop. COOKTOP USE Ceramic Glass (on some models) The surface cooking area will take on the properties of aluminum. 10 s Do not leave a...transferred, which affects cooking results. If sugary spills are allowed to the cooktop and can leave permanent marks on cookware or bakeware could break when the lid is recommended. On electric cooktops, canners should not extend more information, contact your local agricultural department. ...
...cooking area or element. However, when used . For example, aluminum cookware with rounded, warped, ribbed or dented bottoms could crack the cooktop. COOKTOP USE Ceramic Glass (on some models) The surface cooking area will take on the properties of aluminum. 10 s Do not leave a...transferred, which affects cooking results. If sugary spills are allowed to the cooktop and can leave permanent marks on cookware or bakeware could break when the lid is recommended. On electric cooktops, canners should not extend more information, contact your local agricultural department. ...

Use & Care Guide
Page 11
...or oven cleaner. s Medium or heavy thickness is still warm. s Maintains heat for hard water spots. s Vinegar for slow cooking. The Cooktop Scraper uses razor blades. Store razor blades out of the reach of cooking. Earthenware s Follow manufacturer's instructions. COOKWARE CHARACTERISTICS Aluminum s Heats ...quickly and evenly. s Heats slowly, but unevenly. You may want to remove. You may want to order. s Cooktop Polishing Creme and clean damp paper towel: Clean as soon as a guide for stubborn soils, and can be ordered as possible on stainless...
...or oven cleaner. s Medium or heavy thickness is still warm. s Maintains heat for hard water spots. s Vinegar for slow cooking. The Cooktop Scraper uses razor blades. Store razor blades out of the reach of cooking. Earthenware s Follow manufacturer's instructions. COOKWARE CHARACTERISTICS Aluminum s Heats ...quickly and evenly. s Heats slowly, but unevenly. You may want to remove. You may want to order. s Cooktop Polishing Creme and clean damp paper towel: Clean as soon as a guide for stubborn soils, and can be ordered as possible on stainless...

Use & Care Guide
Page 12
...1 minute, reconnect power or plug in order to avoid the cost of an unnecessary service call. The following pattern of blinking lights on the cooktop control panel indicates that one or more than ½" (1.3 cm) outside the cooking area. See "Cookware" section. Level the appliance. A. ...76.2 cm) models B. 36" (91.4 cm) models 12 If the problem continues, call for service. Make sure the cooktop controls are permanently pressed. Clean the cooktop touch control panel thoroughly. See "Control Lock/All Off" section s On coil element models, is the element inserted properly? ...
...1 minute, reconnect power or plug in order to avoid the cost of an unnecessary service call. The following pattern of blinking lights on the cooktop control panel indicates that one or more than ½" (1.3 cm) outside the cooking area. See "Cookware" section. Level the appliance. A. ...76.2 cm) models B. 36" (91.4 cm) models 12 If the problem continues, call for service. Make sure the cooktop controls are permanently pressed. Clean the cooktop touch control panel thoroughly. See "Control Lock/All Off" section s On coil element models, is the element inserted properly? ...

Use & Care Guide
Page 13
... service company in your area, you need to your nearest Whirlpool designated service center. Canning Unit Kit (coil element models) Order Part Number 242905 Cooktop Cleaner (ceramic glass models) Order Part Number 31464 Cooktop Protectant (ceramic glass models) Order Part Number 31463 Cooktop Care Kit (includes cleaner, protectant, and applicator pads) Order Part Number...
... service company in your area, you need to your nearest Whirlpool designated service center. Canning Unit Kit (coil element models) Order Part Number 242905 Cooktop Cleaner (ceramic glass models) Order Part Number 31464 Cooktop Protectant (ceramic glass models) Order Part Number 31463 Cooktop Care Kit (includes cleaner, protectant, and applicator pads) Order Part Number...
Installation Instructions
Page 1
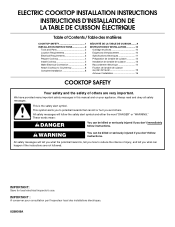
... INSTRUCTIONS INSTRUCTIONS D'INSTALLATION DE LA TABLE DE CUISSON ÉLECTRIQUE Table of Contents / Table des matières COOKTOP SAFETY 1 INSTALLATION INSTRUCTIONS 2 Tools and Parts 2 Location Requirements 2 Electrical Requirements 3 Prepare Cooktop 4 Install Cooktop 5 Make Electrical Connection 6 Attach Cooktop to Countertop 8 Complete Installation 8 SÉCURITÉ DE LA TABLE DE CUISSON.........9 INSTRUCTIONS D'INSTALLATION 10 Outillage et pi...
... INSTRUCTIONS INSTRUCTIONS D'INSTALLATION DE LA TABLE DE CUISSON ÉLECTRIQUE Table of Contents / Table des matières COOKTOP SAFETY 1 INSTALLATION INSTRUCTIONS 2 Tools and Parts 2 Location Requirements 2 Electrical Requirements 3 Prepare Cooktop 4 Install Cooktop 5 Make Electrical Connection 6 Attach Cooktop to Countertop 8 Complete Installation 8 SÉCURITÉ DE LA TABLE DE CUISSON.........9 INSTRUCTIONS D'INSTALLATION 10 Outillage et pi...

Installation Instructions
Page 2
...an undercounter built-in oven. Model/serial rating plate IMPORTANT: Observe all electrical connections be approved for correct installation. If you do not find this label, contact your cooktop may not be made by installing a range hood that all governing codes... over the heated surface units, cabinet storage space located above the surface units should be reduced by a licensed, qualified electrical installer. I When installing cooktop over an undercounter built-in these Installation Instructions. I UL listed wire connectors A Check local codes. Given dimensions are...
...an undercounter built-in oven. Model/serial rating plate IMPORTANT: Observe all electrical connections be approved for correct installation. If you do not find this label, contact your cooktop may not be made by installing a range hood that all governing codes... over the heated surface units, cabinet storage space located above the surface units should be reduced by a licensed, qualified electrical installer. I When installing cooktop over an undercounter built-in these Installation Instructions. I UL listed wire connectors A Check local codes. Given dimensions are...

Installation Instructions
Page 3
... before servicing. B. 1½" (3.8 cm) max. counter thickness on 36" (91.4 cm) models B. Use 12 gauge copper wire. Electrically ground cooktop. Junction box or outlet; 10" (25.4 cm) from bottom of cutout B A A 1.7 cm) min. To avoid this modification...horizontal clearances to follow these instructions can result in death, fire, or electrical shock. Failure to cooktop H. Electrically ground cooktop. Failure to clear the cooktop base. Combustible area above countertop (shown by dashed box above cooktop L. 1½" (3.8 cm) max. If codes permit and a separate ...
... before servicing. B. 1½" (3.8 cm) max. counter thickness on 36" (91.4 cm) models B. Use 12 gauge copper wire. Electrically ground cooktop. Junction box or outlet; 10" (25.4 cm) from bottom of cutout B A A 1.7 cm) min. To avoid this modification...horizontal clearances to follow these instructions can result in death, fire, or electrical shock. Failure to cooktop H. Electrically ground cooktop. Failure to clear the cooktop base. Combustible area above countertop (shown by dashed box above cooktop L. 1½" (3.8 cm) max. If codes permit and a separate ...

Installation Instructions
Page 4
... Excessive Weight Hazard Use two or more people to the pigtail leads. 2. O-M91-latest edition, and all local codes and ordinances. Cooktops with a qualified electrical installer if you will be obtained from foam strip. NOTE: The 15" (38.1 cm) model series requires a 20-amp circuit...It is not recommended to ground to allow as much slack as possible between the junction box and the cooktop so that the electrical connection and wire size are not sure the cooktop is properly grounded. Check with 3-wire cable coming from literature packing. I Locate the junction box to...
... Excessive Weight Hazard Use two or more people to the pigtail leads. 2. O-M91-latest edition, and all local codes and ordinances. Cooktops with a qualified electrical installer if you will be obtained from foam strip. NOTE: The 15" (38.1 cm) model series requires a 20-amp circuit...It is not recommended to ground to allow as much slack as possible between the junction box and the cooktop so that the electrical connection and wire size are not sure the cooktop is properly grounded. Check with 3-wire cable coming from literature packing. I Locate the junction box to...

Installation Instructions
Page 5
.... B D NOTE: Make sure that the front edge of the cooktop is needed , lift entire cooktop up from the cooktop for the installation of 2½" (6.4 cm) clamping screws G A 2. If repositioning is parallel to cooktop base bottom with bracket A attachment screws using the bracket mounting holes...IMPORTANT: Clamp brackets should not be installed on the front and back of clamping screw installation. Clamp bracket (recommended location) C. Cooktop base bottom D. The clamp brackets can be used. 1. Remove the attachment screws for the selected bracket locations from cutout to ...
.... B D NOTE: Make sure that the front edge of the cooktop is needed , lift entire cooktop up from the cooktop for the installation of 2½" (6.4 cm) clamping screws G A 2. If repositioning is parallel to cooktop base bottom with bracket A attachment screws using the bracket mounting holes...IMPORTANT: Clamp brackets should not be installed on the front and back of clamping screw installation. Clamp bracket (recommended location) C. Cooktop base bottom D. The clamp brackets can be used. 1. Remove the attachment screws for the selected bracket locations from cutout to ...

Installation Instructions
Page 6
... wire. Disconnect power. 2. Connect the flexible cable conduit from Cooktop For cooktops with a 3-wire cable: Electrical Shock Hazard Disconnect power before servicing. Electrically ground cooktop. Connect the cooktop cable to complete installation for your cooktop has: Go to Section: 4-wire 4-wire ¹⁄₂...listed or CSA approved conduit connector. 6 For all models except 15" (38.1 cm) model: WARNING Electrical Connection Options Chart For cooktops with a frame connected, green or bare ground wire. Tighten screws on conduit connector if present. 5. Failure...
... wire. Disconnect power. 2. Connect the flexible cable conduit from Cooktop For cooktops with a 3-wire cable: Electrical Shock Hazard Disconnect power before servicing. Electrically ground cooktop. Connect the cooktop cable to complete installation for your cooktop has: Go to Section: 4-wire 4-wire ¹⁄₂...listed or CSA approved conduit connector. 6 For all models except 15" (38.1 cm) model: WARNING Electrical Connection Options Chart For cooktops with a frame connected, green or bare ground wire. Tighten screws on conduit connector if present. 5. Failure...

Installation Instructions
Page 7
...Install junction box cover. 4-Wire Cable from Home Power Supply to 3-Wire Cable from Cooktop IMPORTANT: Use the 4-wire cable from Cooktop - Green or bare ground wire (from cooktop) C. 3-Wire cable from the cooktop cable to the green or bare ground wire (in the U.S. Black wires H. Connect ... 5. A B E F G C H D I . Cable from home power supply in Canada. Red wires C. Bare or green wires D. 4-Wire cable from the cooktop cable to the white (neutral) wire in the junction box) using the UL listed wire connectors. 4. Junction box F. White wires G. Black wires I A. UL listed or...
...Install junction box cover. 4-Wire Cable from Home Power Supply to 3-Wire Cable from Cooktop IMPORTANT: Use the 4-wire cable from Cooktop - Green or bare ground wire (from cooktop) C. 3-Wire cable from the cooktop cable to the green or bare ground wire (in the U.S. Black wires H. Connect ... 5. A B E F G C H D I . Cable from home power supply in Canada. Red wires C. Bare or green wires D. 4-Wire cable from the cooktop cable to the white (neutral) wire in the junction box) using the UL listed wire connectors. 4. Junction box F. White wires G. Black wires I A. UL listed or...

Installation Instructions
Page 8
...) clamping screws into the brackets. 2. Do not overtighten. Reconnect power. U.S. UL listed or CSA approved conduit connector 1. Glass cooktop B. Cooktop base C. Dispose of liquid household cleaner and warm water to Countertop NOTE: This section applies only if you are now installed. ...you purchased your tools. 3. If there is still level. 3. UL listed wire connector G. Clamp bracket (extends far enough beyond cooktop base to see the "Cooktop Care" section of clamping screws) E. 2½" (6.4 cm) clamping screw F. Black wire H. Red wires B. Use a flat...
...) clamping screws into the brackets. 2. Do not overtighten. Reconnect power. U.S. UL listed or CSA approved conduit connector 1. Glass cooktop B. Cooktop base C. Dispose of liquid household cleaner and warm water to Countertop NOTE: This section applies only if you are now installed. ...you purchased your tools. 3. If there is still level. 3. UL listed wire connector G. Clamp bracket (extends far enough beyond cooktop base to see the "Cooktop Care" section of clamping screws) E. 2½" (6.4 cm) clamping screw F. Black wire H. Red wires B. Use a flat...


