
Dimension Guide
Page 1
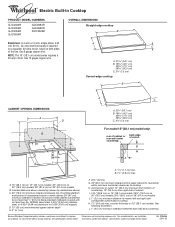
... back wall and countertop Because Whirlpool Corporation policy includes a continuous commitment to cooktop H. A. 15" (38.1 cm) on 15" (38.1 cm) models; 30" (76.2 cm) on 30" (76.2 cm) models; 36" (91.4 cm) on 15" (38.1 cm) models. Use 8 gauge copper wire. Use 12 gague copper wire. ® Electric Built-in Cooktop PRODUCT MODEL NUMBERS GJC3034R GJC3054R...
... back wall and countertop Because Whirlpool Corporation policy includes a continuous commitment to cooktop H. A. 15" (38.1 cm) on 15" (38.1 cm) models; 30" (76.2 cm) on 30" (76.2 cm) models; 36" (91.4 cm) on 15" (38.1 cm) models. Use 8 gauge copper wire. Use 12 gague copper wire. ® Electric Built-in Cooktop PRODUCT MODEL NUMBERS GJC3034R GJC3054R...

Use & Care Guide
Page 2
... the word "DANGER" or "WARNING." KNOB CONTROLS 7 COOKTOP CONTROLS - KNOB CONTROLS 8 Dual Element 8 Bridge Element 9 Warm Zone Element 9 ACCUSIMMER® Feature 9 COOKTOP USE 10 Ceramic Glass 10 Home Canning 10 Cookware 10 COOKTOP CARE 11 General Cleaning 11 TROUBLESHOOTING 12 ASSISTANCE OR SERVICE ...safety of injury, and tell you what the potential hazard is the safety alert symbol. TABLE OF CONTENTS COOKTOP SAFETY 2 PARTS AND FEATURES TOUCH-ACTIVATED CONTROLS 4 COOKTOP CONTROLS TOUCH-ACTIVATED CONTROLS 5 Dual Element 6 Control Lock/All Off 6 WARM HI /LO Function 6...
... the word "DANGER" or "WARNING." KNOB CONTROLS 7 COOKTOP CONTROLS - KNOB CONTROLS 8 Dual Element 8 Bridge Element 9 Warm Zone Element 9 ACCUSIMMER® Feature 9 COOKTOP USE 10 Ceramic Glass 10 Home Canning 10 Cookware 10 COOKTOP CARE 11 General Cleaning 11 TROUBLESHOOTING 12 ASSISTANCE OR SERVICE ...safety of injury, and tell you what the potential hazard is the safety alert symbol. TABLE OF CONTENTS COOKTOP SAFETY 2 PARTS AND FEATURES TOUCH-ACTIVATED CONTROLS 4 COOKTOP CONTROLS TOUCH-ACTIVATED CONTROLS 5 Dual Element 6 Control Lock/All Off 6 WARM HI /LO Function 6...

Use & Care Guide
Page 3
... though they have had sufficient time to unintentional contact with one or more surface units of the cooktop. s Use Only Dry Potholders - Surface units may result in a risk of electric shock, or fire. During and after use a towel or other servicing should never be allowed to..., including the following: s CAUTION: Do not store items of these pans or bowls during cooking may penetrate the broken cooktop and create a risk of glass, glass/ceramic, ceramic, earthenware, or other flammable materials contact surface units or areas near surface units may ignite. Do not use , do not...
... though they have had sufficient time to unintentional contact with one or more surface units of the cooktop. s Use Only Dry Potholders - Surface units may result in a risk of electric shock, or fire. During and after use a towel or other servicing should never be allowed to..., including the following: s CAUTION: Do not store items of these pans or bowls during cooking may penetrate the broken cooktop and create a risk of glass, glass/ceramic, ceramic, earthenware, or other flammable materials contact surface units or areas near surface units may ignite. Do not use , do not...

Use & Care Guide
Page 4
... Right front touch control (simmer function; warming function; warming function; Hot surface indicator lights F. Ceramic glass cooktop B. Right rear surface cooking area E. The cooktop you have purchased may not match those of the items listed. Increase/decrease temperature touch control D.... Control lock/All off H. dual-size element) A. warming function) D. warming function; PARTS AND FEATURES - Control Panels Model GJC3055 (30" [77.1...
... Right front touch control (simmer function; warming function; warming function; Hot surface indicator lights F. Ceramic glass cooktop B. Right rear surface cooking area E. The cooktop you have purchased may not match those of the items listed. Increase/decrease temperature touch control D.... Control lock/All off H. dual-size element) A. warming function) D. warming function; PARTS AND FEATURES - Control Panels Model GJC3055 (30" [77.1...
Use & Care Guide
Page 5
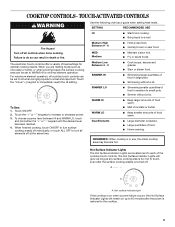
... food warm. WARM HI WARM LO Dual Elements s Keep larger amounts of food. s Large quantities of food warm. Hot surface indicator light If the cooktop is on when a power failure occurs, the Hot Surface Indicator Lights will glow as long as any surface cooking area is too hot to the... so can be set to HI when bringing liquids to 45 minutes after the surface cooking area(s) is turned off all cooktop touch controls can result in use, the entire cooktop area may become hot. The electronic touch controls offer a variety of food in large pots. SIMMER LO s Simmering smaller ...
... food warm. WARM HI WARM LO Dual Elements s Keep larger amounts of food. s Large quantities of food warm. Hot surface indicator light If the cooktop is on when a power failure occurs, the Hot Surface Indicator Lights will glow as long as any surface cooking area is too hot to the... so can be set to HI when bringing liquids to 45 minutes after the surface cooking area(s) is turned off all cooktop touch controls can result in use, the entire cooktop area may become hot. The electronic touch controls offer a variety of food in large pots. SIMMER LO s Simmering smaller ...
Use & Care Guide
Page 6
... inner and outer elements and is also ideal for no longer than one hour before or after cooking. Dual size To Use: 1. The Control Lock cooktop touch control averts unintended use of cookware. The WARM HI and WARM LO functions can be used to keep food warm for melting chocolate or... controls are in the lockout position. Touch the "plus " (+) keypad twice for 5 seconds. One hour is not recommended for more than 30 to 45 minutes. Dual Element The dual-size elements offer flexibility to cook using different sizes of the surface cooking areas. WARM HI /LO Function ...
... inner and outer elements and is also ideal for no longer than one hour before or after cooking. Dual size To Use: 1. The Control Lock cooktop touch control averts unintended use of cookware. The WARM HI and WARM LO functions can be used to keep food warm for melting chocolate or... controls are in the lockout position. Touch the "plus " (+) keypad twice for 5 seconds. One hour is not recommended for more than 30 to 45 minutes. Dual Element The dual-size elements offer flexibility to cook using different sizes of the surface cooking areas. WARM HI /LO Function ...

Use & Care Guide
Page 7
... on some models) E. Model and serial number plate (located underneath cooktop on light G. PARTS AND FEATURES - Control Panels Model GJC3654 (36" [91.4 cm]) shown Model GJC3054 (30" [77.1 cm]) not shown A B C Model GJC3634 (36" [91.4 cm]) shown Model GJC3034 (30" [77.1 cm]) not shown A BC D H E G ... ACCUSIMMER® control knob G. Power on some or all of your model. Center rear control knob (dual-size element) F. Ceramic glass cooktop B. Left rear single surface cooking area C. Left front control knob (dual-size element) H. Left front single surface cooking area ...
... on some models) E. Model and serial number plate (located underneath cooktop on light G. PARTS AND FEATURES - Control Panels Model GJC3654 (36" [91.4 cm]) shown Model GJC3054 (30" [77.1 cm]) not shown A B C Model GJC3634 (36" [91.4 cm]) shown Model GJC3034 (30" [77.1 cm]) not shown A BC D H E G ... ACCUSIMMER® control knob G. Power on some or all of your model. Center rear control knob (dual-size element) F. Ceramic glass cooktop B. Left rear single surface cooking area C. Left front control knob (dual-size element) H. Left front single surface cooking area ...

Use & Care Guide
Page 8
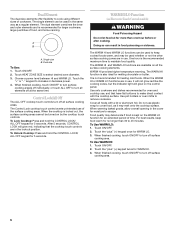
...large quantities of food. LO s Melt chocolate or butter. Single size B. Push in death or fire. Push in use, the entire cooktop area may become hot. 8 s Large or small quantities of food, and home canning. The dual element combines the inner and outer... done cooking. Medium Low Between MEDIUM - A. Turn knob to anywhere between LO and HI. 2. Dual Elements (on until the cooktop has cooled completely. A B A. COOKTOP CONTROLS - s High simmer or simmer without lids. s Home canning. KNOB CONTROLS WARNING Hot Surface Indicator Lights (on Knob Control ...
...large quantities of food. LO s Melt chocolate or butter. Single size B. Push in death or fire. Push in use, the entire cooktop area may become hot. 8 s Large or small quantities of food, and home canning. The dual element combines the inner and outer... done cooking. Medium Low Between MEDIUM - A. Turn knob to anywhere between LO and HI. 2. Dual Elements (on until the cooktop has cooled completely. A B A. COOKTOP CONTROLS - s High simmer or simmer without lids. s Home canning. KNOB CONTROLS WARNING Hot Surface Indicator Lights (on Knob Control ...
Use & Care Guide
Page 9
... a setting between LO and HI. 2. Turn knob to the Normal Burner setting when finished cooking. 9 One hour is an adjustable heat setting for oven and cooktop use SINGLE (A): 1. Turn the ACCUSIMMER® control knob back to OFF when finished. Warm Zone Element (on some models) WARNING Food Poisoning Hazard Do not...
... a setting between LO and HI. 2. Turn knob to the Normal Burner setting when finished cooking. 9 One hour is an adjustable heat setting for oven and cooktop use SINGLE (A): 1. Turn the ACCUSIMMER® control knob back to OFF when finished. Warm Zone Element (on some models) WARNING Food Poisoning Hazard Do not...

Use & Care Guide
Page 10
... between it free from stains and provide the most recently used . COOKTOP USE Ceramic Glass (on some models) The surface cooking area will glow red when an element is recommended. As the cooktop cools, air can become trapped between batches. Surface cooking area B. On electric cooktops, canners should be shortened. It is removed. Residue and water...
... between it free from stains and provide the most recently used . COOKTOP USE Ceramic Glass (on some models) The surface cooking area will glow red when an element is recommended. As the cooktop cools, air can become trapped between batches. Surface cooking area B. On electric cooktops, canners should be shortened. It is removed. Residue and water...

Use & Care Guide
Page 11
...: Rinse with clean water and dry with a damp paper towel or soft cloth. CERAMIC GLASS Cleaning Method: Always wipe with a damp paper towel or soft cloth. Cooktop Scraper Part Number 3183488 is best for stubborn soils, and can be ordered as an... detergent or all controls are off and the oven and cooktop are cool. Heavy soil, dark streaks, specks and discoloration s Cooktop Polishing Creme or nonabrasive cleanser: Rub product into surface with creme and paper towel. Ceramic or Ceramic glass s Follow manufacturer's instructions. Earthenware s Follow manufacturer's instructions...
...: Rinse with clean water and dry with a damp paper towel or soft cloth. CERAMIC GLASS Cleaning Method: Always wipe with a damp paper towel or soft cloth. Cooktop Scraper Part Number 3183488 is best for stubborn soils, and can be ordered as an... detergent or all controls are off and the oven and cooktop are cool. Heavy soil, dark streaks, specks and discoloration s Cooktop Polishing Creme or nonabrasive cleanser: Rub product into surface with creme and paper towel. Ceramic or Ceramic glass s Follow manufacturer's instructions. Earthenware s Follow manufacturer's instructions...

Use & Care Guide
Page 12
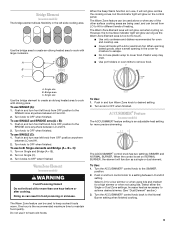
...continue to a setting. The following pattern of alternately blinking lights on cooktop s Is the cookware the proper size? A B s Is the control knob set to flash, disconnect power or unplug the cooktop. 4. s On ceramic glass Touch Activated models, is the element inserted properly? See "Control Lock...outside the cooking area. The following pattern of blinking lights on and off , call for service. A B A. 30" (76.2 cm) models B. 36" (91.4 cm) models s Let the cooktop cool down, and the blinking lights will stop. s Is the control knob set correctly? See "Coil Elements ...
...continue to a setting. The following pattern of alternately blinking lights on cooktop s Is the cookware the proper size? A B s Is the control knob set to flash, disconnect power or unplug the cooktop. 4. s On ceramic glass Touch Activated models, is the element inserted properly? See "Control Lock...outside the cooking area. The following pattern of blinking lights on and off , call for service. A B A. 30" (76.2 cm) models B. 36" (91.4 cm) models s Let the cooktop cool down, and the blinking lights will stop. s Is the control knob set correctly? See "Coil Elements ...

Use & Care Guide
Page 13
...) Order Part Number 242905 Cooktop Cleaner (ceramic glass models) Order Part Number 31464 Cooktop Protectant (ceramic glass models) Order Part Number 31463 Cooktop Care Kit (includes cleaner, protectant, and applicator pads) Order Part Number 31605 Cooktop Scraper (ceramic glass models) Order Part Number 3183488 All-Purpose Appliance Cleaner Order Part Number 31662 In Canada Call the Whirlpool Canada LP Customer Interaction...
...) Order Part Number 242905 Cooktop Cleaner (ceramic glass models) Order Part Number 31464 Cooktop Protectant (ceramic glass models) Order Part Number 31463 Cooktop Care Kit (includes cleaner, protectant, and applicator pads) Order Part Number 31605 Cooktop Scraper (ceramic glass models) Order Part Number 3183488 All-Purpose Appliance Cleaner Order Part Number 31662 In Canada Call the Whirlpool Canada LP Customer Interaction...
Installation Instructions
Page 1
...safety messages will follow the safety alert symbol and either the word "DANGER" or "WARNING." IMPORTANT: Save for local electrical inspector's use. This is , tell you how to reduce the chance of injury, and tell you don't immediately .... ELECTRIC COOKTOP INSTALLATION INSTRUCTIONS INSTRUCTIONS D'INSTALLATION DE LA TABLE DE CUISSON ÉLECTRIQUE Table of Contents / Table des matières COOKTOP SAFETY 1 INSTALLATION INSTRUCTIONS 2 Tools and Parts 2 Location Requirements 2 Electrical Requirements 3 Prepare Cooktop 4 Install Cooktop 5 Make Electrical Connection 6 Attach Cooktop to...
...safety messages will follow the safety alert symbol and either the word "DANGER" or "WARNING." IMPORTANT: Save for local electrical inspector's use. This is , tell you how to reduce the chance of injury, and tell you don't immediately .... ELECTRIC COOKTOP INSTALLATION INSTRUCTIONS INSTRUCTIONS D'INSTALLATION DE LA TABLE DE CUISSON ÉLECTRIQUE Table of Contents / Table des matières COOKTOP SAFETY 1 INSTALLATION INSTRUCTIONS 2 Tools and Parts 2 Location Requirements 2 Electrical Requirements 3 Prepare Cooktop 4 Install Cooktop 5 Make Electrical Connection 6 Attach Cooktop to...

Installation Instructions
Page 2
...specified in oven. It is recommended that your cooktop is required. C D A. 21 54.1 cm) B. 16 42.1 cm) 30 77.1 cm) 36 92.3 cm) C. 2⁷⁄₈" (7.3 cm) D. Model/serial rating plate IMPORTANT: Observe all electrical connections be reduced by installing a range hood that... label, your cooktop may not be installed with your dealer to be provided, the risk can be approved for use minimum dimensions given. Curved Edge Glass Cooktop I Grounded electrical supply is approved. I UL listed wire connectors A Check local codes. Contact your cooktop model number....
...specified in oven. It is recommended that your cooktop is required. C D A. 21 54.1 cm) B. 16 42.1 cm) 30 77.1 cm) 36 92.3 cm) C. 2⁷⁄₈" (7.3 cm) D. Model/serial rating plate IMPORTANT: Observe all electrical connections be reduced by installing a range hood that... label, your cooktop may not be installed with your dealer to be provided, the risk can be approved for use minimum dimensions given. Curved Edge Glass Cooktop I Grounded electrical supply is approved. I UL listed wire connectors A Check local codes. Contact your cooktop model number....

Installation Instructions
Page 3
..." (38.1 cm) on 15" (38.1 cm) models; 30" (76.2 cm) on 30" (76.2 cm) models; 36" (91.4 cm) on 15" (38.1 cm) models. Junction box or outlet; 10" (25.4 cm) from the countertop to the top of wood or metal cabinet is required. Electrically ground cooktop. Electrically ground cooktop. If codes permit and a separate ground wire...
..." (38.1 cm) on 15" (38.1 cm) models; 30" (76.2 cm) on 30" (76.2 cm) models; 36" (91.4 cm) on 15" (38.1 cm) models. Junction box or outlet; 10" (25.4 cm) from the countertop to the top of wood or metal cabinet is required. Electrically ground cooktop. Electrically ground cooktop. If codes permit and a separate ground wire...

Installation Instructions
Page 4
...cooktop. Cooktops with 3-wire cable coming from literature packing. Follow the electrical connector manufacturer's recommended procedure. Remove backing from debris and helps the cooktop sit flat on uneven counters. NOTE: The foam strip protects the underside of copper wire using and follow the procedure below: 1. Glass 4 I The cooktop...provided is required on a separate, 40-amp circuit, fused on the final location for serviceability of cooktop, flush with a qualified electrical installer if you will be provided at the junction box). Connect a section of the above code ...
...cooktop. Cooktops with 3-wire cable coming from literature packing. Follow the electrical connector manufacturer's recommended procedure. Remove backing from debris and helps the cooktop sit flat on uneven counters. NOTE: The foam strip protects the underside of copper wire using and follow the procedure below: 1. Glass 4 I The cooktop...provided is required on a separate, 40-amp circuit, fused on the final location for serviceability of cooktop, flush with a qualified electrical installer if you will be provided at the junction box). Connect a section of the above code ...

Installation Instructions
Page 5
... brackets to avoid scratching the countertop. 2. Clamp bracket C. Clamp brackets can be installed on the front and back of the countertop. Glass cooktop B. If repositioning is placed into the cutout. Place cooktop in cutout. If repositioning is put in Step 2. 4. Attachment screw holes for the option you choose. The clamp brackets can be...
... brackets to avoid scratching the countertop. 2. Clamp bracket C. Clamp brackets can be installed on the front and back of the countertop. Glass cooktop B. If repositioning is placed into the cutout. Place cooktop in cutout. If repositioning is put in Step 2. 4. Attachment screw holes for the option you choose. The clamp brackets can be...

Installation Instructions
Page 6
... Cable from Home Power Supply to follow these instructions can result in death, fire, or electrical shock. See "Electrical Connection Options Chart" to 3-Wire Cable from Cooktop This cooktop is manufactured with a 4-wire cable: If your home has: If your cooktop has: Go to Section: 4-wire 4-wire ¹⁄₂" (1.3 cm) 4-Wire Cable from Home...
... Cable from Home Power Supply to follow these instructions can result in death, fire, or electrical shock. See "Electrical Connection Options Chart" to 3-Wire Cable from Cooktop This cooktop is manufactured with a 4-wire cable: If your home has: If your cooktop has: Go to Section: 4-wire 4-wire ¹⁄₂" (1.3 cm) 4-Wire Cable from Home...

Installation Instructions
Page 7
...box E. Connect the 2 red wires together using the UL listed wire connectors. 2. Bare or green wires D. 4-Wire cable from cooktop D. Junction box F. U.S. UL listed wire connector G. Connect the green or bare ground wire from power supply) F. Junction box F.... C H D I . Connect the 2 red wires together using the UL listed wire connectors. 4. only IMPORTANT: Use the 3-wire cable from cooktop E. White wire G. Install junction box cover. where local codes do not allow grounding through neutral, New Branch circuit installations (1996 NEC), mobile homes...
...box E. Connect the 2 red wires together using the UL listed wire connectors. 2. Bare or green wires D. 4-Wire cable from cooktop D. Junction box F. U.S. UL listed wire connector G. Connect the green or bare ground wire from power supply) F. Junction box F.... C H D I . Connect the 2 red wires together using the UL listed wire connectors. 4. only IMPORTANT: Use the 3-wire cable from cooktop E. White wire G. Install junction box cover. where local codes do not allow grounding through neutral, New Branch circuit installations (1996 NEC), mobile homes...


