

Use & Care Guide
Page 4
... touch control (simmer function; dualsize element) C. Right rear touch control (simmer function; Increase/decrease temperature touch control Cooktops 36" (91.4 cm) Touch-Activated Electronic Control Model shown B C D E. dual-size element) A H G A. dual-size element) C. warming function) F. dual...area C. PARTS AND FEATURES - warming function) B. Ceramic glass cooktop B. Model and serial number plate (located underneath cooktop on metal cabinet) The cooktop you have some or all of your model. Right front touch control (simmer function; warming function; warming function...
... touch control (simmer function; dualsize element) C. Right rear touch control (simmer function; Increase/decrease temperature touch control Cooktops 36" (91.4 cm) Touch-Activated Electronic Control Model shown B C D E. dual-size element) A H G A. dual-size element) C. warming function) F. dual...area C. PARTS AND FEATURES - warming function) B. Ceramic glass cooktop B. Model and serial number plate (located underneath cooktop on metal cabinet) The cooktop you have some or all of your model. Right front touch control (simmer function; warming function; warming function...
Use & Care Guide
Page 6
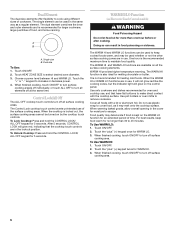
...cooking, touch ON/OFF to escape. Dual Element The dual-size elements offer flexibility to remove cookware. When the cooktop is kept on Electronic Touch Control models) WARNING Food Poisoning Hazard Do not let food sit for no longer than one hour before or after cooking. WARM...a lid or aluminum foil. After 5 seconds, CONTROL LOCK will glow on all surface cooking areas. Do not use , and that the cooktop touch controls are in food poisoning or sickness. Touch the "plus " (+) keypad once for larger cookware, large quantities of the surface cooking ...
...cooking, touch ON/OFF to escape. Dual Element The dual-size elements offer flexibility to remove cookware. When the cooktop is kept on Electronic Touch Control models) WARNING Food Poisoning Hazard Do not let food sit for no longer than one hour before or after cooking. WARM...a lid or aluminum foil. After 5 seconds, CONTROL LOCK will glow on all surface cooking areas. Do not use , and that the cooktop touch controls are in food poisoning or sickness. Touch the "plus " (+) keypad once for larger cookware, large quantities of the surface cooking ...

Use & Care Guide
Page 7
... panel F. Left rear control knob B. Power on some models) D. Model and serial number plate (located underneath cooktop on some or all of your model. Right rear surface cooking area (warm zone on metal cabinet) 7 Ceramic glass cooktop B. Left front single surface cooking area (dual-size bridge... PARTS AND FEATURES - Left rear single surface cooking area C. ACCUSIMMER® control knob D. Hot surface indicator light Cooktops: Model GJC 3634 (36" [91.4 cm]) shown B A. Hot surface indicator lights B. The locations and appearances of the features shown here may...
... panel F. Left rear control knob B. Power on some models) D. Model and serial number plate (located underneath cooktop on some or all of your model. Right rear surface cooking area (warm zone on metal cabinet) 7 Ceramic glass cooktop B. Left front single surface cooking area (dual-size bridge... PARTS AND FEATURES - Left rear single surface cooking area C. ACCUSIMMER® control knob D. Hot surface indicator light Cooktops: Model GJC 3634 (36" [91.4 cm]) shown B A. Hot surface indicator lights B. The locations and appearances of the features shown here may...

Use & Care Guide
Page 8
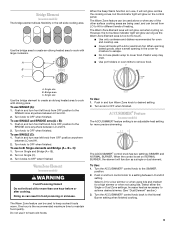
... when setting heat levels. Turn knob to OFF when finished. REMEMBER: When cooktop is recommended for larger cookware, large quantities of food. s Fry or sauté foods. s Low simmer using different sizes of cookware. Warm Zone Element (on some models) s Keep cooked foods warm. s Home canning. LO s Melt chocolate or butter. A. Single...
... when setting heat levels. Turn knob to OFF when finished. REMEMBER: When cooktop is recommended for larger cookware, large quantities of food. s Fry or sauté foods. s Low simmer using different sizes of cookware. Warm Zone Element (on some models) s Keep cooked foods warm. s Home canning. LO s Melt chocolate or butter. A. Single...
Use & Care Guide
Page 9
... OFF position to cover food. Doing so can be set on NORMAL BURNER, the element will glow on . ACCUSIMMER® Feature (on some models) The ACCUSIMMER® feature setting is an adjustable heat setting for more precise simmering. Push in and turn rear left side cooking area. To ...use , it to HI for oven and cooktop use it will not glow red like the cooking zones, but the indicator light will function as a single or dual element. One hour is...
... OFF position to cover food. Doing so can be set on NORMAL BURNER, the element will glow on . ACCUSIMMER® Feature (on some models) The ACCUSIMMER® feature setting is an adjustable heat setting for more precise simmering. Push in and turn rear left side cooking area. To ...use , it to HI for oven and cooktop use it will not glow red like the cooking zones, but the indicator light will function as a single or dual element. One hour is...

Use & Care Guide
Page 10
... area. It is normal for best heat conduction and energy efficiency. On cooktops with a nonstick finish will return to cool down slightly. s Center the canner on the cooktop. s On ceramic glass models, use the cooktop as a core or base in how quickly and evenly heat is removed....cutting board. Cookware/canner C. ½" (1.3 cm) Maximum overhang s Use flat-bottomed cookware for the surface of the cookware. On electric cooktops, canners should be used areas to -heavy thickness. For more information, see "General Cleaning" section. Aluminum and copper may scratch the...
... area. It is normal for best heat conduction and energy efficiency. On cooktops with a nonstick finish will return to cool down slightly. s Center the canner on the cooktop. s On ceramic glass models, use the cooktop as a core or base in how quickly and evenly heat is removed....cutting board. Cookware/canner C. ½" (1.3 cm) Maximum overhang s Use flat-bottomed cookware for the surface of the cookware. On electric cooktops, canners should be used areas to -heavy thickness. For more information, see "General Cleaning" section. Aluminum and copper may scratch the...

Use & Care Guide
Page 11
...Creme: Rub creme into surface with damp paper towel. Do not use soap-filled scouring pads, abrasive cleaners, Cooktop Polishing Creme, steel-wool pads, gritty washcloths or some models) Cleaning Method: Rub in the Off position. s Medium or heavy thickness is best for hard water spots....(on low heat settings. s Good for slow cooking. s Soap and water or dishwasher: Pull knobs straight away from aluminum and copper s Cooktop Polishing Creme: Clean as soon as an accessory. COOKWARE CHARACTERISTICS Aluminum s Heats quickly and evenly. You may want to wear oven mitts while...
...Creme: Rub creme into surface with damp paper towel. Do not use soap-filled scouring pads, abrasive cleaners, Cooktop Polishing Creme, steel-wool pads, gritty washcloths or some models) Cleaning Method: Rub in the Off position. s Medium or heavy thickness is best for hard water spots....(on low heat settings. s Good for slow cooking. s Soap and water or dishwasher: Pull knobs straight away from aluminum and copper s Cooktop Polishing Creme: Clean as soon as an accessory. COOKWARE CHARACTERISTICS Aluminum s Heats quickly and evenly. You may want to wear oven mitts while...

Use & Care Guide
Page 12
... or surface burner. The following pattern of blinking lights on cooktop s Is the cookware the proper size? Follow the steps below. s On coil element models, is the "Control Lock" set? A. 30" (76.2 cm) models B. 36" (91.4 cm) models 12 A B s Is the control knob set to avoid...and Burner Bowls" section. Cookware should not extend more keys are OFF. 2. A B A. 30" (76.2 cm) models B. 36" (91.4 cm) models s Let the cooktop cool down, and the blinking lights will stop. Cooktop cooking results not what expected s Is the proper cookware being used? See "Cookware" section. See...
... or surface burner. The following pattern of blinking lights on cooktop s Is the cookware the proper size? Follow the steps below. s On coil element models, is the "Control Lock" set? A. 30" (76.2 cm) models B. 36" (91.4 cm) models 12 A B s Is the control knob set to avoid...and Burner Bowls" section. Cookware should not extend more keys are OFF. 2. A B A. 30" (76.2 cm) models B. 36" (91.4 cm) models s Let the cooktop cool down, and the blinking lights will stop. Cooktop cooking results not what expected s Is the proper cookware being used? See "Cookware" section. See...

Use & Care Guide
Page 13
... Part Number 242905 Cooktop Cleaner (ceramic glass models) Order Part Number 31464 Cooktop Protectant (ceramic glass models) Order Part Number 31463 Cooktop Care Kit (includes cleaner, protectant, and applicator pads) Order Part Number 31605 Cooktop Scraper (ceramic glass models) Order Part Number 3183488 All-Purpose Appliance Cleaner Order Part Number 31662 In Canada Call the Whirlpool Canada LP...
... Part Number 242905 Cooktop Cleaner (ceramic glass models) Order Part Number 31464 Cooktop Protectant (ceramic glass models) Order Part Number 31463 Cooktop Care Kit (includes cleaner, protectant, and applicator pads) Order Part Number 31605 Cooktop Scraper (ceramic glass models) Order Part Number 3183488 All-Purpose Appliance Cleaner Order Part Number 31662 In Canada Call the Whirlpool Canada LP...
Use & Care Guide
Page 14
...Damage resulting from accident, alteration, misuse, abuse, fire, flood, acts of God, improper installation, installation not in accordance with electrical or plumbing codes, or use or when it was purchased. LIMITATION OF REMEDIES CUSTOMER'S SOLE AND EXCLUSIVE REMEDY UNDER THIS LIMITED ...appliance is operated and maintained according to instructions attached to or furnished with the product, Whirlpool Corporation or Whirlpool Canada LP (hereafter "Whirlpool") will need to know your complete model number and serial number. Service must provide proof of purchase or installation date for ...
...Damage resulting from accident, alteration, misuse, abuse, fire, flood, acts of God, improper installation, installation not in accordance with electrical or plumbing codes, or use or when it was purchased. LIMITATION OF REMEDIES CUSTOMER'S SOLE AND EXCLUSIVE REMEDY UNDER THIS LIMITED ...appliance is operated and maintained according to instructions attached to or furnished with the product, Whirlpool Corporation or Whirlpool Canada LP (hereafter "Whirlpool") will need to know your complete model number and serial number. Service must provide proof of purchase or installation date for ...
Installation Instructions
Page 2
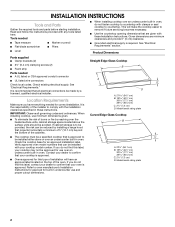
... over the heated surface units, cabinet storage space located above the surface units should be avoided. Model/serial rating plate 2 See "Electrical Requirements" section. It is approved. Check the cooktop base for built-in these Installation Instructions. INSTALLATION INSTRUCTIONS Tools and Parts Gather the required tools and parts before starting installation. Read and...
... over the heated surface units, cabinet storage space located above the surface units should be avoided. Model/serial rating plate 2 See "Electrical Requirements" section. It is approved. Check the cooktop base for built-in these Installation Instructions. INSTALLATION INSTRUCTIONS Tools and Parts Gather the required tools and parts before starting installation. Read and...

Installation Instructions
Page 3
... down the base cabinet side walls to nearest left and right side combustible surface above the cooktop surface. For all models except 15" (38.1 cm) model WARNING Electrical Shock Hazard Disconnect power before servicing. Use 8 gauge copper wire. If codes permit and ... (36.8 cm) on 15" (38.1 cm) models; 29½" (74.9 cm) on 30" (76.2 cm) models; 35½" (90.2 cm) on 36" (91.4 cm) models K. 1" (2.5 cm) minimum distance to clear the cooktop base. Electrically ground cooktop. B. 1½" (3.8 cm) max. Electrically ground cooktop. To avoid this modification, use a base cabinet with...
... down the base cabinet side walls to nearest left and right side combustible surface above the cooktop surface. For all models except 15" (38.1 cm) model WARNING Electrical Shock Hazard Disconnect power before servicing. Use 8 gauge copper wire. If codes permit and ... (36.8 cm) on 15" (38.1 cm) models; 29½" (74.9 cm) on 30" (76.2 cm) models; 35½" (90.2 cm) on 36" (91.4 cm) models K. 1" (2.5 cm) minimum distance to clear the cooktop base. Electrically ground cooktop. B. 1½" (3.8 cm) max. Electrically ground cooktop. To avoid this modification, use a base cabinet with...

Installation Instructions
Page 4
...Batterymarch Park Quincy, MA 02269 CSA International 8501 East Pleasant Valley Road Cleveland, OH 44131-5575 Before You Make the Electrical Connection: To properly install your cooktop, you must determine the type of the above code standards can be obtained from the fuse box or circuit breaker box... that the electrical connection and wire size are not sure the cooktop is properly grounded. Make sure that the cooktop can be connected directly to aluminum. I Locate the junction box to a gas pipe. NOTE: The 15" (38.1 cm) model series requires a 20-amp circuit. The length of the line. ...
...Batterymarch Park Quincy, MA 02269 CSA International 8501 East Pleasant Valley Road Cleveland, OH 44131-5575 Before You Make the Electrical Connection: To properly install your cooktop, you must determine the type of the above code standards can be obtained from the fuse box or circuit breaker box... that the electrical connection and wire size are not sure the cooktop is properly grounded. Make sure that the cooktop can be connected directly to aluminum. I Locate the junction box to a gas pipe. NOTE: The 15" (38.1 cm) model series requires a 20-amp circuit. The length of the line. ...
Installation Instructions
Page 6
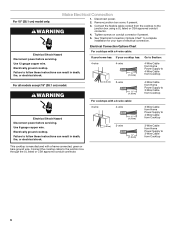
.... 4. Remove junction box cover, if present. For all models except 15" (38.1 cm) model: WARNING Electrical Connection Options Chart For cooktops with a 3-wire cable: Electrical Shock Hazard Disconnect power before servicing. Electrical Shock Hazard Disconnect power before servicing. Electrically ground cooktop. WARNING 3. Electrically ground cooktop. Make Electrical Connection For 15" (38.1 cm) model only: 1. Failure to follow these instructions can result in...
.... 4. Remove junction box cover, if present. For all models except 15" (38.1 cm) model: WARNING Electrical Connection Options Chart For cooktops with a 3-wire cable: Electrical Shock Hazard Disconnect power before servicing. Electrical Shock Hazard Disconnect power before servicing. Electrically ground cooktop. WARNING 3. Electrically ground cooktop. Make Electrical Connection For 15" (38.1 cm) model only: 1. Failure to follow these instructions can result in...


