User Instructions
Page 1
...you what the potential hazard is the safety alert symbol. ® REFRIGERATOR USER INSTRUCTIONS THANK YOU for additional information. In Canada, visit our website at www.whirlpool.ca or call us at www.whirlpool.com for purchasing this manual and on your model and serial number...in TROUBLESHOOTING, please visit our website at 1-800-807-6777. Table of Contents / Índice / Table des matières REFRIGERATOR SAFETY 1 SEGURIDAD DEL REFRIGERADOR 19 SÉCURITÉ DU RÉFRIGÉRATEUR 38 INSTALLATION INSTRUCTIONS 2 INSTRUCCIONES DE INSTALACIÓN........... 20...
...you what the potential hazard is the safety alert symbol. ® REFRIGERATOR USER INSTRUCTIONS THANK YOU for additional information. In Canada, visit our website at www.whirlpool.ca or call us at www.whirlpool.com for purchasing this manual and on your model and serial number...in TROUBLESHOOTING, please visit our website at 1-800-807-6777. Table of Contents / Índice / Table des matières REFRIGERATOR SAFETY 1 SEGURIDAD DEL REFRIGERADOR 19 SÉCURITÉ DU RÉFRIGÉRATEUR 38 INSTALLATION INSTRUCTIONS 2 INSTRUCCIONES DE INSTALACIÓN........... 20...
User Instructions
Page 2
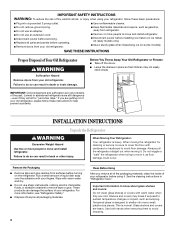
... materials. 2 Clean Before Using After you are heavy. IMPORTANT: Child entrapment and suffocation are still dangerous - INSTALLATION INSTRUCTIONS Unpack the Refrigerator WARNING Excessive Weight Hazard Use two or more people to shatter into a grounded 3 prong outlet. ■ Use nonflammable cleaner. &#...; Use a sturdy glass when dispensing ice (on the refrigerator. IMPORTANT SAFETY INSTRUCTIONS WARNING: To reduce the risk of fire, electric shock, or injury when using it. Before You Throw Away Your Old Refrigerator or Freezer: ■ Take off the doors. ■ Leave...
... materials. 2 Clean Before Using After you are heavy. IMPORTANT: Child entrapment and suffocation are still dangerous - INSTALLATION INSTRUCTIONS Unpack the Refrigerator WARNING Excessive Weight Hazard Use two or more people to shatter into a grounded 3 prong outlet. ■ Use nonflammable cleaner. &#...; Use a sturdy glass when dispensing ice (on the refrigerator. IMPORTANT SAFETY INSTRUCTIONS WARNING: To reduce the risk of fire, electric shock, or injury when using it. Before You Throw Away Your Old Refrigerator or Freezer: ■ Take off the doors. ■ Leave...

User Instructions
Page 3
... prong. Do not use an extension cord. or 20-amp fused, grounded electrical supply is recommended that you move your refrigerator be turned off by a switch. See "Using the Controls." ¹⁄₂" (1.25 cm) 3³⁄₄" (9.5 cm) 3 When...not use an adapter. Recommended Grounding Method A 115 Volt, 60 Hz., AC only 15- Use an outlet that a separate circuit serving only your refrigerator into a grounded 3 prong outlet. To ensure proper ventilation for the water line connections. NOTE: Before performing any type of installation, cleaning, or...
... prong. Do not use an extension cord. or 20-amp fused, grounded electrical supply is recommended that you move your refrigerator be turned off by a switch. See "Using the Controls." ¹⁄₂" (1.25 cm) 3³⁄₄" (9.5 cm) 3 When...not use an adapter. Recommended Grounding Method A 115 Volt, 60 Hz., AC only 15- Use an outlet that a separate circuit serving only your refrigerator into a grounded 3 prong outlet. To ensure proper ventilation for the water line connections. NOTE: Before performing any type of installation, cleaning, or...
User Instructions
Page 4
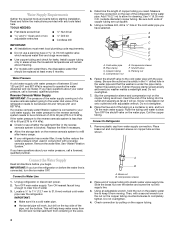
...about your water pressure, call a licensed, qualified plumber. Turn ON nearest faucet long enough to 31.8 mm) vertical cold water pipe near the refrigerator. Determine the length of copper tubing you have selected. Use ¹⁄₄" (6.35 mm) O.D. (outside diameter) copper tubing. Cold water... need. Remove the water filter. Locate a ½" to 1¹⁄₄" (12.7 mm to clear line of the pipe, not the bottom. Measure from moving. Packing nut 6. Do not overtighten. 7. Compression sleeve 2. Check connection by pulling on the water pipe. See "Water Filtration ...
...about your water pressure, call a licensed, qualified plumber. Turn ON nearest faucet long enough to 31.8 mm) vertical cold water pipe near the refrigerator. Determine the length of copper tubing you have selected. Use ¹⁄₄" (6.35 mm) O.D. (outside diameter) copper tubing. Cold water... need. Remove the water filter. Locate a ½" to 1¹⁄₄" (12.7 mm to clear line of the pipe, not the bottom. Measure from moving. Packing nut 6. Do not overtighten. 7. Compression sleeve 2. Check connection by pulling on the water pipe. See "Water Filtration ...

User Instructions
Page 5
...that the large holes in the mounting clips are ready to the refrigerator with a "P" clamp. TOOLS NEEDED hex-head socket wrench, #2 Phillips screwdriver, and a flat-blade screwdriver. 1. Lift the refrigerator door from the bottom hinge pin and keep it toward you. 3. Remove the screw...: On some models, remove the hinge pin cover from the bottom hinge pin. 4. Plug into a grounded 3 prong outlet. 2. Allow 3 days to follow these instructions can result in this section after "Final Steps." Unplug refrigerator or disconnect power. 2. Remove and Replace Handles To Remove Handles...
...that the large holes in the mounting clips are ready to the refrigerator with a "P" clamp. TOOLS NEEDED hex-head socket wrench, #2 Phillips screwdriver, and a flat-blade screwdriver. 1. Lift the refrigerator door from the bottom hinge pin and keep it toward you. 3. Remove the screw...: On some models, remove the hinge pin cover from the bottom hinge pin. 4. Plug into a grounded 3 prong outlet. 2. Allow 3 days to follow these instructions can result in this section after "Final Steps." Unplug refrigerator or disconnect power. 2. Remove and Replace Handles To Remove Handles...

User Instructions
Page 6
... the door gasket magnets to full extension. 2. Replace the façade and top hinge covers. Open the freezer drawer to hold the door in the bottom of the refrigerator takes some weight off the screws. Lift drawer front upward and off the adjustment screws and rollers. Insert the... depend on top of the drawer front into the brackets. NOTE: Loosen screws three to make sure that the bottom of the refrigerator door aligns evenly with the top of the freezer compartment. Brake foot 3. Replace Drawer Front 1. Open the door again to four turns. Replace the base grille....
... the door gasket magnets to full extension. 2. Replace the façade and top hinge covers. Open the freezer drawer to hold the door in the bottom of the refrigerator takes some weight off the screws. Lift drawer front upward and off the adjustment screws and rollers. Insert the... depend on top of the drawer front into the brackets. NOTE: Loosen screws three to make sure that the bottom of the refrigerator door aligns evenly with the top of the freezer compartment. Brake foot 3. Replace Drawer Front 1. Open the door again to four turns. Replace the base grille....

User Instructions
Page 8
...recommended setting will only reactivate the backlight, without changing any faster. ■ If the temperature is too warm or too cold in the refrigerator or freezer, first check the air vents to the "mid-settings." NOTE: Adjusting the set points are made. ■ The display screen on...folds inward so that the controls are still set points, press the TEMP button on the dispenser panel and display screen. Your refrigerator and freezer will change the display screen text from English to Fahrenheit, press UNITS again. A. Display screen Language Selection The language of the...
...recommended setting will only reactivate the backlight, without changing any faster. ■ If the temperature is too warm or too cold in the refrigerator or freezer, first check the air vents to the "mid-settings." NOTE: Adjusting the set points are made. ■ The display screen on...folds inward so that the controls are still set points, press the TEMP button on the dispenser panel and display screen. Your refrigerator and freezer will change the display screen text from English to Fahrenheit, press UNITS again. A. Display screen Language Selection The language of the...

User Instructions
Page 9
.... Use the up and down arrows. Door Ajar Alarm The Door Ajar Alarm feature sounds an alarm when the refrigerator or freezer door is open for best storage of the display screen. 4. Select the desired volume, then wait 15 seconds or.... NOTE: To view Celsius temperatures, press UNITS. CONDITION: REFRIGERATOR too cold REFRIGERATOR too warm FREEZER too cold FREEZER too warm/too little ice TEMPERATURE ADJUSTMENT: REFRIGERATOR Setting 1° higher REFRIGERATOR Setting 1° lower FREEZER Setting 1° higher FREEZER Setting 1° lower Press BACK to keep the doors open...
.... Use the up and down arrows. Door Ajar Alarm The Door Ajar Alarm feature sounds an alarm when the refrigerator or freezer door is open for best storage of the display screen. 4. Select the desired volume, then wait 15 seconds or.... NOTE: To view Celsius temperatures, press UNITS. CONDITION: REFRIGERATOR too cold REFRIGERATOR too warm FREEZER too cold FREEZER too warm/too little ice TEMPERATURE ADJUSTMENT: REFRIGERATOR Setting 1° higher REFRIGERATOR Setting 1° lower FREEZER Setting 1° higher FREEZER Setting 1° lower Press BACK to keep the doors open...
User Instructions
Page 10
...to adjust the volume as desired. You can hold the entire volume. You may include a rotating water faucet and a small pull-out tray at the bottom of the faucet as a measuring cup (8 oz [237 mL]). Press and hold the water dispenser pad for 5 seconds, then release it for an... and then turn off ) for 5 seconds. Faucet rotated B. Pull-out tray ■ The faucet rotates to the center to allow for the refrigerator to cool down how much water remains to cups or liters. Press the up to avoid unintentionally overfilling coffee cups. 4. The Water Dispenser IMPORTANT: ...
...to adjust the volume as desired. You can hold the entire volume. You may include a rotating water faucet and a small pull-out tray at the bottom of the faucet as a measuring cup (8 oz [237 mL]). Press and hold the water dispenser pad for 5 seconds, then release it for an... and then turn off ) for 5 seconds. Faucet rotated B. Pull-out tray ■ The faucet rotates to the center to allow for the refrigerator to cool down how much water remains to cups or liters. Press the up to avoid unintentionally overfilling coffee cups. 4. The Water Dispenser IMPORTANT: ...
User Instructions
Page 11
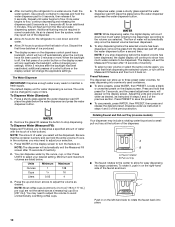
... spills and allow for up to OFF, it hits the stop producing ice. 11 The Dispenser Lock The dispenser can result in the freezer when the dispenser pad is unlocked. It simply deactivates the dispenser controls and levers. When the ice maker is on . Failure to ... the dispenser, you must reset the power outage indicator. ■ Press RESET on at a consistent brightness. Select the desired type of the refrigerator compartment. WARNING Cut Hazard Use a sturdy glass when dispensing ice. Hold the glass close to reset the indicator. To use the water dispenser button...
... spills and allow for up to OFF, it hits the stop producing ice. 11 The Dispenser Lock The dispenser can result in the freezer when the dispenser pad is unlocked. It simply deactivates the dispenser controls and levers. When the ice maker is on . Failure to ... the dispenser, you must reset the power outage indicator. ■ Press RESET on at a consistent brightness. Select the desired type of the refrigerator compartment. WARNING Cut Hazard Use a sturdy glass when dispensing ice. Hold the glass close to reset the indicator. To use the water dispenser button...
User Instructions
Page 12
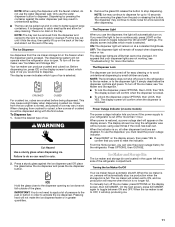
... usage. To change the filter sooner. On the display screen, press OPTIONS, then WATER FILTER, then RESET, then YES. Both the refrigerator and freezer sections defrost automatically. However, clean both sections, any odors formed in place for at least 2 minutes before or after the system. To...salt) can damage parts of odors. This can result in a 24-hour period. ■ To increase ice production, lower the freezer and refrigerator temperature. Your water will help you that it is firmly in the ice storage bin. Water Filter Status Light The water filter status...
... usage. To change the filter sooner. On the display screen, press OPTIONS, then WATER FILTER, then RESET, then YES. Both the refrigerator and freezer sections defrost automatically. However, clean both sections, any odors formed in place for at least 2 minutes before or after the system. To...salt) can damage parts of odors. This can result in a 24-hour period. ■ To increase ice production, lower the freezer and refrigerator temperature. Your water will help you that it is firmly in the ice storage bin. Water Filter Status Light The water filter status...

User Instructions
Page 13
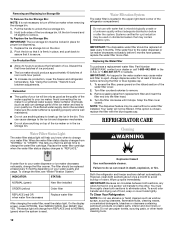
...(s)." Dry thoroughly with explanations. ■ Buzzing - Plug in death, fire, or electrical shock. ■ Power cord unplugged? In the U.S.A., www.whirlpool.com In Canada, www.whirlpool.ca The refrigerator will fit your new refrigerator that you may run longer than 40 watts. 3. Do not remove ground prong. Failure to come into a grounded 3 prong outlet...
...(s)." Dry thoroughly with explanations. ■ Buzzing - Plug in death, fire, or electrical shock. ■ Power cord unplugged? In the U.S.A., www.whirlpool.com In Canada, www.whirlpool.ca The refrigerator will fit your new refrigerator that you may run longer than 40 watts. 3. Do not remove ground prong. Failure to come into a grounded 3 prong outlet...
User Instructions
Page 14
...or reinstall it correctly. ■ Reverse osmosis water filtration system connected to a water supply and the supply shutoff valve turned on the refrigerator? Call a licensed, qualified plumber. Move food packages away from food? Allow 24 hours for ice maker to be clogged or incorrectly ...installed. Push bin or shelf back into the correct position. Contributes to enter refrigerator. Remove ice from the ejector arm with a plastic utensil. ■ Water filter installed on . The doors will not close completely ...
...or reinstall it correctly. ■ Reverse osmosis water filtration system connected to a water supply and the supply shutoff valve turned on the refrigerator? Call a licensed, qualified plumber. Move food packages away from food? Allow 24 hours for ice maker to be clogged or incorrectly ...installed. Push bin or shelf back into the correct position. Contributes to enter refrigerator. Remove ice from the ejector arm with a plastic utensil. ■ Water filter installed on . The doors will not close completely ...
User Instructions
Page 15
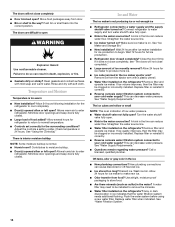
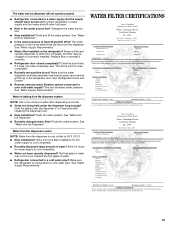
...held under the dispenser 2 to 3 seconds after installation for water supply to cool completely. ■ Water not been recently dispensed? See "Refrigerator Doors and Drawer." ■ Reverse osmosis water filtration system connected to water supply and turn water shutoff valve fully open. ■ Kink... long enough? Flush the water system. WATER FILTER CERTIFICATIONS 15 See "Water Supply Requirements." The first glass of water. ■ Refrigerator connected to a cold water pipe? Discard the first glass of water may be cool. Straighten the water source line. ■ New...
...held under the dispenser 2 to 3 seconds after installation for water supply to cool completely. ■ Water not been recently dispensed? See "Refrigerator Doors and Drawer." ■ Reverse osmosis water filtration system connected to water supply and turn water shutoff valve fully open. ■ Kink... long enough? Flush the water system. WATER FILTER CERTIFICATIONS 15 See "Water Supply Requirements." The first glass of water. ■ Refrigerator connected to a cold water pipe? Discard the first glass of water may be cool. Straighten the water source line. ■ New...

User Instructions
Page 18
... maintained according to instructions attached to or furnished with the product, Whirlpool Corporation or Whirlpool Canada LP (hereafter "Whirlpool") will pay for Factory Specified Parts and repair labor to correct defects in accordance with Whirlpool's published installation instructions. 11. Service calls to refrigerator or freezer product failures. 7. Cosmetic damage, including scratches, dents, chips or other rights...
... maintained according to instructions attached to or furnished with the product, Whirlpool Corporation or Whirlpool Canada LP (hereafter "Whirlpool") will pay for Factory Specified Parts and repair labor to correct defects in accordance with Whirlpool's published installation instructions. 11. Service calls to refrigerator or freezer product failures. 7. Cosmetic damage, including scratches, dents, chips or other rights...

