Owners Manual
Page 1
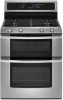
or visit our website at... ® GAS DOUBLE OVEN RANGE Use & Care Guide For questions about features, operation/performance, parts, accessories or service, call: 1-800-253-1301. www.whirlpool.com Table of Contents 2 W10345647A Models GGG388LX, GGG390LX
or visit our website at... ® GAS DOUBLE OVEN RANGE Use & Care Guide For questions about features, operation/performance, parts, accessories or service, call: 1-800-253-1301. www.whirlpool.com Table of Contents 2 W10345647A Models GGG388LX, GGG390LX

Owners Manual
Page 14
... air circulation throughout the oven. NOTE: If the upper oven is displayed and then press START. 9. When prompted in 2 or 3 different places, including the thickest part. ■ Before convection cooking, position the rack(s) according to the standard preheat/multi-rack baking option. 5. Broiler grid B. Press CONVECT twice. When the preheat cycle...
... air circulation throughout the oven. NOTE: If the upper oven is displayed and then press START. 9. When prompted in 2 or 3 different places, including the thickest part. ■ Before convection cooking, position the rack(s) according to the standard preheat/multi-rack baking option. 5. Broiler grid B. Press CONVECT twice. When the preheat cycle...
Owners Manual
Page 18
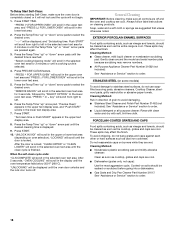
...otherwise noted. STAINLESS STEEL (on soils should be soaked or scrubbed before going into a dishwasher. ■ Gas Grate and Drip Pan Cleaner Part Number 31617: See "Assistance or Service" section to order. To avoid chipping, do not use soapfilled scouring pads, abrasive cleaners, Cooktop ...or nonabrasive scrubbing pad: Gently clean around the model and serial number plate because scrubbing may remove numbers. ■ All-Purpose Appliance Cleaner Part Number 31682 (not included): See "Assistance or Service" section to order. 18 Press START TIME. "Select cooking/cleaning mode" will ...
...otherwise noted. STAINLESS STEEL (on soils should be soaked or scrubbed before going into a dishwasher. ■ Gas Grate and Drip Pan Cleaner Part Number 31617: See "Assistance or Service" section to order. To avoid chipping, do not use soapfilled scouring pads, abrasive cleaners, Cooktop ...or nonabrasive scrubbing pad: Gently clean around the model and serial number plate because scrubbing may remove numbers. ■ All-Purpose Appliance Cleaner Part Number 31682 (not included): See "Assistance or Service" section to order. 18 Press START TIME. "Select cooking/cleaning mode" will ...
Owners Manual
Page 19
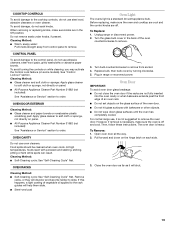
... Glass cleaner and soft cloth or sponge: Apply glass cleaner to soft cloth or sponge, not directly on panel. ■ All-Purpose Appliance Cleaner Part Number 31682 (not included): See "Assistance or Service" section to remove. To Replace: 1. Unplug range or disconnect power. 2. Turn bulb counterclockwise to... bakeware extends past the front edge of an oven rack. ■ Do not set objects on panel. ■ All-Purpose Appliance Cleaner Part Number 31682 (not included): See "Assistance or Service" section to the cooktop controls, do not soak knobs. COOKTOP CONTROLS To avoid damage ...
... Glass cleaner and soft cloth or sponge: Apply glass cleaner to soft cloth or sponge, not directly on panel. ■ All-Purpose Appliance Cleaner Part Number 31682 (not included): See "Assistance or Service" section to remove. To Replace: 1. Unplug range or disconnect power. 2. Turn bulb counterclockwise to... bakeware extends past the front edge of an oven rack. ■ Do not set objects on panel. ■ All-Purpose Appliance Cleaner Part Number 31682 (not included): See "Assistance or Service" section to the cooktop controls, do not soak knobs. COOKTOP CONTROLS To avoid damage ...

Owners Manual
Page 22
... include a daytime phone number in your area, you can write to build every new WHIRLPOOL® appliance. Broiler Pan and Grid Order Part Number 4396923 Stainless Steel Cleaner and Polish (stainless steel models) Order Part Number 31462 All-Purpose Appliance Cleaner Order Part Number 31682 22 If you can also look in your nearest...
... include a daytime phone number in your area, you can write to build every new WHIRLPOOL® appliance. Broiler Pan and Grid Order Part Number 4396923 Stainless Steel Cleaner and Polish (stainless steel models) Order Part Number 31462 All-Purpose Appliance Cleaner Order Part Number 31682 22 If you can also look in your nearest...
Owners Manual
Page 23
...it is designed to know your sales slip together for Factory Specified Parts and repair labor to correct defects in a manner that have been removed, altered or cannot be provided by an authorized Whirlpool servicer is not installed in an inaccessible location or is not ... associated with the removal from the date of the Use & Care Guide. After checking "Troubleshooting," you ever need to be borne by Whirlpool. 5. Proof of repair or replacement under this major appliance is located in -home service is required to correct house wiring or plumbing....
...it is designed to know your sales slip together for Factory Specified Parts and repair labor to correct defects in a manner that have been removed, altered or cannot be provided by an authorized Whirlpool servicer is not installed in an inaccessible location or is not ... associated with the removal from the date of the Use & Care Guide. After checking "Troubleshooting," you ever need to be borne by Whirlpool. 5. Proof of repair or replacement under this major appliance is located in -home service is required to correct house wiring or plumbing....
Installation Instructions
Page 3
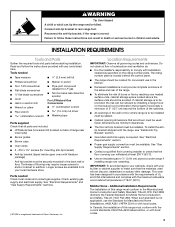
...Noncorrosive leak-detection solution For LP/Natural Gas Conversions ■ ½" combination wrench 7.0 mm) nut driver ■ Masking tape Parts supplied Check that the materials used . See "Electrical Requirements" and "Gas Supply Requirements" sections. †®TORX is the ... caps ■ Oven racks ■ 2 - #12 x 1⁵⁄₈" screws (for Mobile Home Construction and Safety, Title 24, HUD Part 280). Parts needed ■ Tape measure 3.2 mm) drill bit ■ Phillips screwdriver ■ Marker or pencil ■ Torx† T-20 screwdriver ■...
...Noncorrosive leak-detection solution For LP/Natural Gas Conversions ■ ½" combination wrench 7.0 mm) nut driver ■ Masking tape Parts supplied Check that the materials used . See "Electrical Requirements" and "Gas Supply Requirements" sections. †®TORX is the ... caps ■ Oven racks ■ 2 - #12 x 1⁵⁄₈" screws (for Mobile Home Construction and Safety, Title 24, HUD Part 280). Parts needed ■ Tape measure 3.2 mm) drill bit ■ Phillips screwdriver ■ Marker or pencil ■ Torx† T-20 screwdriver ■...
Installation Instructions
Page 7
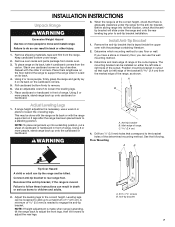
... serious burns to adjust the rear legs. NOTE: To place range back up to move and install range. Anti-tip bracket B. Remove oven racks and parts package from the marked edge of the cutout. Stack one cardboard corner on the cardboard corners. 5. Install Anti-Tip Bracket 1. Using 2 or more people to...
... serious burns to adjust the rear legs. NOTE: To place range back up to move and install range. Anti-tip bracket B. Remove oven racks and parts package from the marked edge of the cutout. Stack one cardboard corner on the cardboard corners. 5. Install Anti-Tip Bracket 1. Using 2 or more people to...
Installation Instructions
Page 9
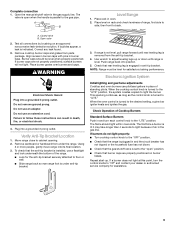
... extension cord. Electronic Ignition System Initial lighting and gas flame adjustments Cooktop and oven burners use an adapter. When the oven control is removed from parts package. If burners do not light properly: ■ Turn cooktop control knob to the "OFF" position. ■ Check that the range is plugged in and...
... extension cord. Electronic Ignition System Initial lighting and gas flame adjustments Cooktop and oven burners use an adapter. When the oven control is removed from parts package. If burners do not light properly: ■ Turn cooktop control knob to the "OFF" position. ■ Check that the range is plugged in and...
Installation Instructions
Page 11
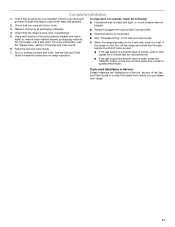
... of the Use and Care Guide or contact the dealer from whom you have all of your range. 11 If there is an extra part, go back through the steps to remove waxy residue caused by shipping material. Check that the range is intact and tight, or circuit breaker...button on surface burners and oven. Use a mild solution of liquid household cleaner and warm water to see the "Range Care" section of /recycle all parts are now installed. Turn on the oven control panel and contact a qualified technician. Dry thoroughly with a soft cloth. Complete Installation 1. Check that the ...
... of the Use and Care Guide or contact the dealer from whom you have all of your range. 11 If there is an extra part, go back through the steps to remove waxy residue caused by shipping material. Check that the range is intact and tight, or circuit breaker...button on surface burners and oven. Use a mild solution of liquid household cleaner and warm water to see the "Range Care" section of /recycle all parts are now installed. Turn on the oven control panel and contact a qualified technician. Dry thoroughly with a soft cloth. Complete Installation 1. Check that the ...
Installation Instructions
Page 15
... onto the Natural gas orifice spud and remove by turning it . See the "LP Gas Orifice Spud Chart." 6. Place Natural gas orifice spuds in plastic parts bag for each burner. The small inner cone should have a very distinct blue flame ¼" to the model/serial rating plate behind the control panel...
... onto the Natural gas orifice spud and remove by turning it . See the "LP Gas Orifice Spud Chart." 6. Place Natural gas orifice spuds in plastic parts bag for each burner. The small inner cone should have a very distinct blue flame ¼" to the model/serial rating plate behind the control panel...

Installation Instructions
Page 18
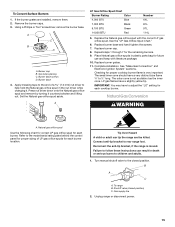
... cone is very important. Do not overtighten. .054 A A. Place the broil burner on the broil burner orifice hood. Place LP gas orifice spuds in plastic parts bag for the remaining burners. 9. Checking for each burner location. Number 0.037 LP gas broil burner orifice hood 4.
... cone is very important. Do not overtighten. .054 A A. Place the broil burner on the broil burner orifice hood. Place LP gas orifice spuds in plastic parts bag for the remaining burners. 9. Checking for each burner location. Number 0.037 LP gas broil burner orifice hood 4.

Warranty
Page 1
...parts are excluded from unauthorized modifications made to the appliance. 9. This major appliance is required to published user or operator instructions and/or installation instructions. 4. Outside the 50 United States and Canada, this book and your major appliance is contrary to obtain service under these excluded circumstances shall be provided by Whirlpool...Expenses for travel and transportation for in accordance with the product, Whirlpool Corporation or Whirlpool Canada LP (hereafter "Whirlpool") will need service, first see the "Troubleshooting" section of ...
...parts are excluded from unauthorized modifications made to the appliance. 9. This major appliance is required to published user or operator instructions and/or installation instructions. 4. Outside the 50 United States and Canada, this book and your major appliance is contrary to obtain service under these excluded circumstances shall be provided by Whirlpool...Expenses for travel and transportation for in accordance with the product, Whirlpool Corporation or Whirlpool Canada LP (hereafter "Whirlpool") will need service, first see the "Troubleshooting" section of ...


