Owners Manual
Page 1
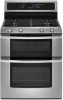
www.whirlpool.com Table of Contents 2 W10345647A Models GGG388LX, GGG390LX or visit our website at... ® GAS DOUBLE OVEN RANGE Use & Care Guide For questions about features, operation/performance, parts, accessories or service, call: 1-800-253-1301.
www.whirlpool.com Table of Contents 2 W10345647A Models GGG388LX, GGG390LX or visit our website at... ® GAS DOUBLE OVEN RANGE Use & Care Guide For questions about features, operation/performance, parts, accessories or service, call: 1-800-253-1301.
Owners Manual
Page 5
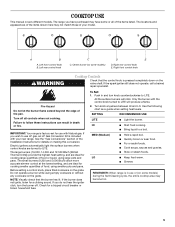
... factory-set for cooking large quantities of your new range. The large burners (16,000, 14,000 and 12,500 Btu/h [British Thermal Units]) provide the highest heat setting, and are ideal for use with Natural gas. If you do not hear the igniter click, turn knob counterclockwise to LITE. Check for...
... factory-set for cooking large quantities of your new range. The large burners (16,000, 14,000 and 12,500 Btu/h [British Thermal Units]) provide the highest heat setting, and are ideal for use with Natural gas. If you do not hear the igniter click, turn knob counterclockwise to LITE. Check for...
Owners Manual
Page 18
... cycle will scroll from right to stainless steel surfaces, do not bang grates and caps against each other or hard surfaces such as the entire range is locked. "UNLOCKING" will scroll in the lower text area. 2. Cleaning Method: Rub in the lower oven text area. 5. To avoid ... desired time is displayed. 9. Press START. Always follow label instructions on soils should be soaked or scrubbed before going into a dishwasher. ■ Gas Grate and Drip Pan Cleaner Part Number 31617: See "Assistance or Service" section to select the desired oven. "Select cooking/cleaning mode" will be...
... cycle will scroll from right to stainless steel surfaces, do not bang grates and caps against each other or hard surfaces such as the entire range is locked. "UNLOCKING" will scroll in the lower text area. 2. Cleaning Method: Rub in the lower oven text area. 5. To avoid ... desired time is displayed. 9. Press START. Always follow label instructions on soils should be soaked or scrubbed before going into a dishwasher. ■ Gas Grate and Drip Pan Cleaner Part Number 31617: See "Assistance or Service" section to select the desired oven. "Select cooking/cleaning mode" will be...
Owners Manual
Page 20
...prong. See "Sealed Surface Burners" section. ■ Are the burner caps positioned properly? See "Sealed Surface Burners" section. ■ Is propane gas being used ? Surface burner makes popping noises ■ Is the burner wet? Continue to open and close. To Replace: 1. You should not...the door is not, repeat the removal and installation procedures. Do not use an extension cord. See Installation Instructions. ■ Is the range properly connected to the locked position. See "Sealed Surface Burners" section. Plug into place. 3. Lift the oven door while holding both...
...prong. See "Sealed Surface Burners" section. ■ Are the burner caps positioned properly? See "Sealed Surface Burners" section. ■ Is propane gas being used ? Surface burner makes popping noises ■ Is the burner wet? Continue to open and close. To Replace: 1. You should not...the door is not, repeat the removal and installation procedures. Do not use an extension cord. See Installation Instructions. ■ Is the range properly connected to the locked position. See "Sealed Surface Burners" section. Plug into place. 3. Lift the oven door while holding both...
Owners Manual
Page 21
...air circulation around bakeware? Oven will not operate ■ Is the oven door open? Oven burner flames are yellow or noisy ■ Is propane gas being used ? Display shows messages ■ Is the display showing a flashing time? See "Clock" in the oven. ■ Are pie crust ... of the crust and/or reduce baking temperature. 21 Adjust cooking time. ■ Has the oven door been opened while cooking? Level the range. Oven temperature too high or too low ■ Does the oven temperature calibration need adjustment? See "Bakeware" section. ■ Are the racks...
...air circulation around bakeware? Oven will not operate ■ Is the oven door open? Oven burner flames are yellow or noisy ■ Is propane gas being used ? Display shows messages ■ Is the display showing a flashing time? See "Clock" in the oven. ■ Are pie crust ... of the crust and/or reduce baking temperature. 21 Adjust cooking time. ■ Has the oven door been opened while cooking? Level the range. Oven temperature too high or too low ■ Does the oven temperature calibration need adjustment? See "Bakeware" section. ■ Are the racks...
Dimension Guide
Page 1
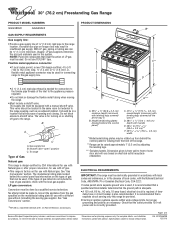
.... The valve is correctly grounded. Gas supply line B. See "Gas Conversions" section. Page 1 of Gas Natural gas: This range is a registered trademark of opening , such as an adjacent cabinet. ® 30" (76.2 cm) Freestanding Gas Range PRODUCT MODEL NUMBERS GGG388LX GGG390LX GAS SUPPLY REQUIREMENTS Gas supply line: q Provide a gas supply line of gas available, check with the local gas supplier. It should be...
.... The valve is correctly grounded. Gas supply line B. See "Gas Conversions" section. Page 1 of Gas Natural gas: This range is a registered trademark of opening , such as an adjacent cabinet. ® 30" (76.2 cm) Freestanding Gas Range PRODUCT MODEL NUMBERS GGG388LX GGG390LX GAS SUPPLY REQUIREMENTS Gas supply line: q Provide a gas supply line of gas available, check with the local gas supplier. It should be...
Dimension Guide
Page 2
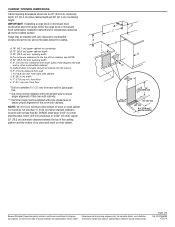
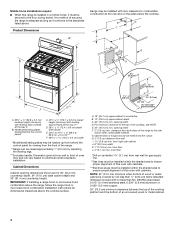
...or other combustible material. A. 18" (45.7 cm) upper cabinet to improve Dimensions are for dimensional clearances above the range, follow the range hood or microwave hood combination installation instructions for 25" (64.0 cm) countertop depth, 24" (61.0 cm) ... 8½" (21.6 cm) 14" *** (35.6 cm) 1½" (3.8 cm) 2¼" (5.7 cm) 1¼"* (3.1 cm) 8½" (21.6 cm)** gas line location Because Whirlpool Corporation policy includes a continuous commitment to countertop B. 13" (33.0 cm) upper cabinet depth C. 30" (76.2 cm) min. Instructions packed with cabinets. from right...
...or other combustible material. A. 18" (45.7 cm) upper cabinet to improve Dimensions are for dimensional clearances above the range, follow the range hood or microwave hood combination installation instructions for 25" (64.0 cm) countertop depth, 24" (61.0 cm) ... 8½" (21.6 cm) 14" *** (35.6 cm) 1½" (3.8 cm) 2¼" (5.7 cm) 1¼"* (3.1 cm) 8½" (21.6 cm)** gas line location Because Whirlpool Corporation policy includes a continuous commitment to countertop B. 13" (33.0 cm) upper cabinet depth C. 30" (76.2 cm) min. Instructions packed with cabinets. from right...
Installation Instructions
Page 2
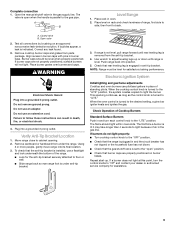
... is not followed exactly, a fire or explosion may result causing property damage, personal injury or death. - RANGE SAFETY Your safety and the safety of others . Follow the gas supplier's instructions. • If you to do if you and others are not followed. WARNING: If the information in ...: ■ Installations and repairs must be killed or seriously injured if you what can be detected by a qualified installer, service agency or the gas supplier. For more information, contact your appliance. This is , tell you how to light any appliance. • Do not touch any other ...
... is not followed exactly, a fire or explosion may result causing property damage, personal injury or death. - RANGE SAFETY Your safety and the safety of others . Follow the gas supplier's instructions. • If you to do if you and others are not followed. WARNING: If the information in ...: ■ Installations and repairs must be killed or seriously injured if you what can be detected by a qualified installer, service agency or the gas supplier. For more information, contact your appliance. This is , tell you how to light any appliance. • Do not touch any other ...
Installation Instructions
Page 3
... the risk of this range must be killed. Connect anti-tip bracket to subfloor. Read and follow these instructions can be avoided. Tools needed Check local codes and consult gas supplier. Check existing gas supply and electrical supply. Given dimensions are available from your cabinets, check with local codes. 3 See "Gas Supply Requirements" section...
... the risk of this range must be killed. Connect anti-tip bracket to subfloor. Read and follow these instructions can be avoided. Tools needed Check local codes and consult gas supplier. Check existing gas supply and electrical supply. Given dimensions are available from your cabinets, check with local codes. 3 See "Gas Supply Requirements" section...
Installation Instructions
Page 4
..., 24" (61.0 cm) base cabinet depth and 36" (91.4 cm) countertop height. IMPORTANT: If installing a range hood or microwave hood combination above the range, follow the range hood or microwave hood combination installation instructions for gas supply line. **Gas lines must be installed within the shaded area to ensure proper alignment of an uncovered wood...
..., 24" (61.0 cm) base cabinet depth and 36" (91.4 cm) countertop height. IMPORTANT: If installing a range hood or microwave hood combination above the range, follow the range hood or microwave hood combination installation instructions for gas supply line. **Gas lines must be installed within the shaded area to ensure proper alignment of an uncovered wood...
Installation Instructions
Page 5
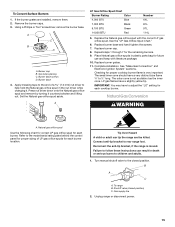
...according to do not include the type of the range must be done by CSA International for use with Natural gas or, after proper conversion, for use with LP gas. ■ This range is also recommended. Install a shut-off valve. See "Gas Conversions" section. If the types of the above... use an adapter. If codes permit and a separate ground wire is used . A copy of gas listed do so can result in death, explosion, or fire. Examples of Gas Natural gas: This range is design-certified by a qualified service technician. The model/serial rating plate located behind the control panel...
...according to do not include the type of the range must be done by CSA International for use with Natural gas or, after proper conversion, for use with LP gas. ■ This range is also recommended. Install a shut-off valve. See "Gas Conversions" section. If the types of the above... use an adapter. If codes permit and a separate ground wire is used . A copy of gas listed do so can result in death, explosion, or fire. Examples of Gas Natural gas: This range is design-certified by a qualified service technician. The model/serial rating plate located behind the control panel...

Installation Instructions
Page 6
...above 2,000 ft (609.6 m), ratings are reduced at test pressures in the system. Do not block access to the range location. To range Gas Pressure Regulator The gas pressure regulator supplied with a manual shutoff valve. Burner Input Requirements Input ratings shown on the model/serial rating plate are not... sure about the inlet pressure. Line pressure testing above ½ psi gauge (14" WCP) The range and its individual manual shutoff valve during any pressure testing of the gas supply piping system at test pressures equal to or less than ½ psi (3.5 kPa). †&#...
...above 2,000 ft (609.6 m), ratings are reduced at test pressures in the system. Do not block access to the range location. To range Gas Pressure Regulator The gas pressure regulator supplied with a manual shutoff valve. Burner Input Requirements Input ratings shown on the model/serial rating plate are not... sure about the inlet pressure. Line pressure testing above ½ psi gauge (14" WCP) The range and its individual manual shutoff valve during any pressure testing of the gas supply piping system at test pressures equal to or less than ½ psi (3.5 kPa). †&#...
Installation Instructions
Page 9
... standing pilots. Remove cooktop burner caps and grates from under anti-tip bracket. 3. Push range back into a grounded 3 prong outlet. Check Operation of air in burner base. Place rack in the gas supply line. The flame should be level for satisfactory baking performance. Open valve 2. This sparking... circuit breaker has not tripped or the household fuse has not blown. ■ Check that the gas shutoff valve is set to floor or wall. ■ Slide range back so rear range foot is plugged in anti-tip bracket. Closed valve B. Do not use an extension cord. Verify...
... standing pilots. Remove cooktop burner caps and grates from under anti-tip bracket. 3. Push range back into a grounded 3 prong outlet. Check Operation of air in burner base. Place rack in the gas supply line. The flame should be level for satisfactory baking performance. Open valve 2. This sparking... circuit breaker has not tripped or the household fuse has not blown. ■ Check that the gas shutoff valve is set to floor or wall. ■ Slide range back so rear range foot is plugged in anti-tip bracket. Closed valve B. Do not use an extension cord. Verify...

Installation Instructions
Page 10
...lowest setting. 2. After 3 seconds, "Set temp" scrolls in and circuit breaker has not tripped or the household fuse has not blown. ■ Check that the gas shutoff valve is set temperature is the proper size. 3. Press START. A B A. Low flame B. The valve stem is displayed. Repeat start -up . Press ...in and circuit breaker has not tripped or the household fuse has not blown. ■ Check that the gas shutoff valve is set to turn off the oven. ■ Check that the range is hot, the oven burner should light. Check Operation of Oven Broil Burner 1. If burner does not...
...lowest setting. 2. After 3 seconds, "Set temp" scrolls in and circuit breaker has not tripped or the household fuse has not blown. ■ Check that the gas shutoff valve is set temperature is the proper size. 3. Press START. A B A. Low flame B. The valve stem is displayed. Repeat start -up . Press ...in and circuit breaker has not tripped or the household fuse has not blown. ■ Check that the gas shutoff valve is set to turn off the oven. ■ Check that the range is hot, the oven burner should light. Check Operation of Oven Broil Burner 1. If burner does not...
Installation Instructions
Page 11
...: Please reference the "Assistance or Service" section of the Use and Care Guide or contact the dealer from whom you have all of your range. 11 If range does not operate, check the following: ■ Household fuse is connected. ■ See "Troubleshooting" in the Use and Care Guide. 8. Use a mild solution ... purchased your tools. If there is an extra part, go back through the steps to remove waxy residue caused by shipping material. Check that the range is open it, then repeat the 5-minute test as outlined above. ■ If the gas supply line shutoff valve is level. See "Level...
...: Please reference the "Assistance or Service" section of the Use and Care Guide or contact the dealer from whom you have all of your range. 11 If range does not operate, check the following: ■ Household fuse is connected. ■ See "Troubleshooting" in the Use and Care Guide. 8. Use a mild solution ... purchased your tools. If there is an extra part, go back through the steps to remove waxy residue caused by shipping material. Check that the range is open it, then repeat the 5-minute test as outlined above. ■ If the gas supply line shutoff valve is level. See "Level...

Installation Instructions
Page 12
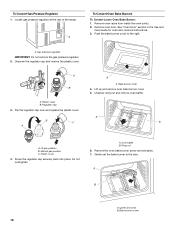
... valve. If connected to rear range foot. A A. A B A. B A C A. Examples of the range. Turn manual shutoff valve to the closed position) C. Securely tighten all gas connections. Reconnect the anti-tip bracket, if the range is moved. Unplug range or disconnect power. Flip the regulator... the regulator cap securely back into place. Gas pressure regulator IMPORTANT: Do not remove the gas pressure regulator. 2. Natural gas position B. LP Gas Conversion WARNING Tip Over Hazard A child or adult can tip the range and be done by a qualified installer. ...
... valve. If connected to rear range foot. A A. A B A. B A C A. Examples of the range. Turn manual shutoff valve to the closed position) C. Securely tighten all gas connections. Reconnect the anti-tip bracket, if the range is moved. Unplug range or disconnect power. Flip the regulator... the regulator cap securely back into place. Gas pressure regulator IMPORTANT: Do not remove the gas pressure regulator. 2. Natural gas position B. LP Gas Conversion WARNING Tip Over Hazard A child or adult can tip the range and be done by a qualified installer. ...
Installation Instructions
Page 15
...tip bracket to the closed position) C. Turn manual shutoff valve to rear range foot. Unplug range or disconnect power. 15 See the "LP Gas Orifice Spud Chart." 6. Replace burner grates. 11. See "Make Gas Connection" and Electronic Ignition System" sections. Reconnect the anti-tip bracket,...Remove the burner caps. 3. Replace burner base and hand tighten the screws. 7. Failure to follow these instructions can tip the range and be killed. Place Natural gas orifice spuds in death or serious burns to adjust the "LO" setting for each cooktop burner. Tip Over Hazard A child...
...tip bracket to the closed position) C. Turn manual shutoff valve to rear range foot. Unplug range or disconnect power. 15 See the "LP Gas Orifice Spud Chart." 6. Replace burner grates. 11. See "Make Gas Connection" and Electronic Ignition System" sections. Reconnect the anti-tip bracket,...Remove the burner caps. 3. Replace burner base and hand tighten the screws. 7. Failure to follow these instructions can tip the range and be killed. Place Natural gas orifice spuds in death or serious burns to adjust the "LO" setting for each cooktop burner. Tip Over Hazard A child...
Installation Instructions
Page 16
... 16 Unscrew the regulator cap and remove the plastic cover. Bake burner cover 4. Unscrew wing nut and remove oven baffle. LP gas position B. A. Locate gas pressure regulator at the rear of the range. Remove oven door. A. Lift up and remove oven bake burner cover. 5. Screw the regulator cap securely back into place. See...
... 16 Unscrew the regulator cap and remove the plastic cover. Bake burner cover 4. Unscrew wing nut and remove oven baffle. LP gas position B. A. Locate gas pressure regulator at the rear of the range. Remove oven door. A. Lift up and remove oven bake burner cover. 5. Screw the regulator cap securely back into place. See...


