
Owners Manual
Page 3
... chemicals known to the State of California to light any appliance. • Do not touch any electrical switch. • Do not use any other appliance. - Installation and service must be detected by smell. WHAT TO DO IF YOU SMELL GAS: • Do not try to cause cancer. Follow the gas supplier... call the fire department. - WARNING: Gas leaks cannot always be performed by UL or CSA. Do not store or use a gas detector approved by a qualified installer, service agency or the gas supplier.
... chemicals known to the State of California to light any appliance. • Do not touch any electrical switch. • Do not use any other appliance. - Installation and service must be detected by smell. WHAT TO DO IF YOU SMELL GAS: • Do not try to cause cancer. Follow the gas supplier... call the fire department. - WARNING: Gas leaks cannot always be performed by UL or CSA. Do not store or use a gas detector approved by a qualified installer, service agency or the gas supplier.

Owners Manual
Page 4
...equipped with materials such as stepping, leaning, or sitting on the backguard of appliance doors or drawers such as aluminum foil. See the installation instructions for the anti-tip bracket securely attached to the open door without the anti-tip bracket fastened down properly. Failure to follow ... TO FLOOR, AND SLIDE RANGE BACK SO REAR RANGE FOOT IS UNDER ANTI-TIP BRACKET. ■ WARNING: NEVER use . The range, when installed, must be electrically grounded in accordance with local codes or, in accordance with the National Electrical Code, ANSI/NFPA 70. Connect anti-tip bracket...
...equipped with materials such as stepping, leaning, or sitting on the backguard of appliance doors or drawers such as aluminum foil. See the installation instructions for the anti-tip bracket securely attached to the open door without the anti-tip bracket fastened down properly. Failure to follow ... TO FLOOR, AND SLIDE RANGE BACK SO REAR RANGE FOOT IS UNDER ANTI-TIP BRACKET. ■ WARNING: NEVER use . The range, when installed, must be electrically grounded in accordance with local codes or, in accordance with the National Electrical Code, ANSI/NFPA 70. Connect anti-tip bracket...
Owners Manual
Page 5
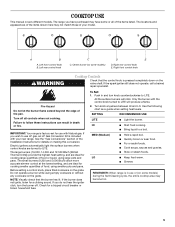
.... ■ Stew or steam foods. Left rear control knob C D E C. Failure to follow these instructions can result in and turn the burner off all of the Installation Instructions for a tripped circuit breaker or blown household fuse. Push in death or fire. A B A. Electric igniters automatically light the surface burners when control knobs are...
.... ■ Stew or steam foods. Left rear control knob C D E C. Failure to follow these instructions can result in and turn the burner off all of the Installation Instructions for a tripped circuit breaker or blown household fuse. Push in death or fire. A B A. Electric igniters automatically light the surface burners when control knobs are...
Owners Manual
Page 20
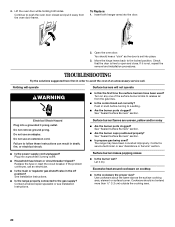
...control knob set into the door. 2. Insert both sides. See "Sealed Surface Burners" section. Contact a service technician or see Installation Instructions. Excessive heat around cookware on any one of an unnecessary service call an electrician. ■ Is the main or regulator ..." section. ■ Is propane gas being used ? The range may have been used ? Plug into a grounded 3 prong outlet. See Installation Instructions. ■ Is the range properly connected to the locked position. Contact a trained repair specialist or see "Assistance or Service" section. ...
...control knob set into the door. 2. Insert both sides. See "Sealed Surface Burners" section. Contact a service technician or see Installation Instructions. Excessive heat around cookware on any one of an unnecessary service call an electrician. ■ Is the main or regulator ..." section. ■ Is propane gas being used ? The range may have been used ? Plug into a grounded 3 prong outlet. See Installation Instructions. ■ Is the range properly connected to the locked position. Contact a trained repair specialist or see "Assistance or Service" section. ...
Owners Manual
Page 21
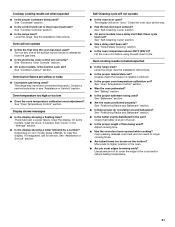
... Is the electronic oven control set to the proper heat level? Cooktop cooking results not what expected ■ Is the range level? See the Installation Instructions. See "Electronic Oven Controls" section. ■ On some models, is level in a reliable cookbook. ■ Is the proper oven temperature...items too brown on the bottom? See "Cooktop Controls" section. ■ Is the range level? There has been a power failure. See the Installation Instructions. ■ Is the proper temperature set ? Double-check the recipe in the pan. ■ Is the proper length of time being ...
... Is the electronic oven control set to the proper heat level? Cooktop cooking results not what expected ■ Is the range level? See the Installation Instructions. See "Electronic Oven Controls" section. ■ On some models, is level in a reliable cookbook. ■ Is the proper oven temperature...items too brown on the bottom? See "Cooktop Controls" section. ■ Is the range level? There has been a power failure. See the Installation Instructions. ■ Is the proper temperature set ? Double-check the recipe in the pan. ■ Is the proper length of time being ...

Owners Manual
Page 22
... When calling, please know the purchase date and the complete model and serial number of your area, you the cost of appliances. ■ Installation information. ■ Use and maintenance procedures. ■ Accessory and repair parts sales. ■ Specialized customer assistance (Spanish speaking, hearing impaired, ... and Polish (stainless steel models) Order Part Number 31462 All-Purpose Appliance Cleaner Order Part Number 31682 22 Call the Whirlpool Customer eXperience Center toll free: 1-800-253-1301. If you need help us or your request. ASSISTANCE OR SERVICE ...
... When calling, please know the purchase date and the complete model and serial number of your area, you the cost of appliances. ■ Installation information. ■ Use and maintenance procedures. ■ Accessory and repair parts sales. ■ Specialized customer assistance (Spanish speaking, hearing impaired, ... and Polish (stainless steel models) Order Part Number 31462 All-Purpose Appliance Cleaner Order Part Number 31682 22 Call the Whirlpool Customer eXperience Center toll free: 1-800-253-1301. If you need help us or your request. ASSISTANCE OR SERVICE ...
Owners Manual
Page 23
... 1-800-807-6777. 9/07 Keep this book and your major appliance to Whirlpool within 30 days from the date of purchase. 6. Service must provide proof of purchase or installation date for future reference. Outside the 50 United States and Canada, this information... with the removal from accident, alteration, misuse, abuse, fire, flood, acts of God, improper installation, installation not in accordance with the product, Whirlpool Corporation or Whirlpool Canada LP (hereafter "Whirlpool") will need service, first see the "Troubleshooting" section of the Use & Care Guide. THIS ...
... 1-800-807-6777. 9/07 Keep this book and your major appliance to Whirlpool within 30 days from the date of purchase. 6. Service must provide proof of purchase or installation date for future reference. Outside the 50 United States and Canada, this information... with the removal from accident, alteration, misuse, abuse, fire, flood, acts of God, improper installation, installation not in accordance with the product, Whirlpool Corporation or Whirlpool Canada LP (hereafter "Whirlpool") will need service, first see the "Troubleshooting" section of the Use & Care Guide. THIS ...
Dimension Guide
Page 1
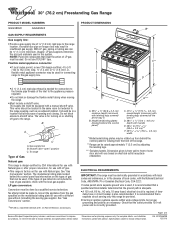
... is recommended that the outlet provides 120-volt power and is recommended that a qualified electrical installer determine that can be used for use TEFLON®† tape. Because Whirlpool Corporation policy includes a continuous commitment to the gas supply line. Page 1 of opening ,... such as an adjacent cabinet. ® 30" (76.2 cm) Freestanding Gas Range PRODUCT MODEL NUMBERS GGG388LX GGG390LX GAS SUPPLY REQUIREMENTS Gas supply line:...
... is recommended that the outlet provides 120-volt power and is recommended that a qualified electrical installer determine that can be used for use TEFLON®† tape. Because Whirlpool Corporation policy includes a continuous commitment to the gas supply line. Page 1 of opening ,... such as an adjacent cabinet. ® 30" (76.2 cm) Freestanding Gas Range PRODUCT MODEL NUMBERS GGG388LX GGG390LX GAS SUPPLY REQUIREMENTS Gas supply line:...
Dimension Guide
Page 2
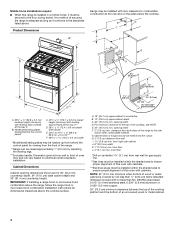
... range to ensure proper alignment of an uncovered wood or metal cabinet. opening width D. For complete details, see NOTE. Range may be installed within the shaded area to the side wall or other combustible material. from floor L. 2" (5.1 cm) min. clearance from wall I... (21.6 cm) 14" *** (35.6 cm) 1½" (3.8 cm) 2¼" (5.7 cm) 1¼"* (3.1 cm) 8½" (21.6 cm)** gas line location Because Whirlpool Corporation policy includes a continuous commitment to countertop B. 13" (33.0 cm) upper cabinet depth C. 30" (76.2 cm) min. A. 18" (45.7 cm) upper cabinet to...
... range to ensure proper alignment of an uncovered wood or metal cabinet. opening width D. For complete details, see NOTE. Range may be installed within the shaded area to the side wall or other combustible material. from floor L. 2" (5.1 cm) min. clearance from wall I... (21.6 cm) 14" *** (35.6 cm) 1½" (3.8 cm) 2¼" (5.7 cm) 1¼"* (3.1 cm) 8½" (21.6 cm)** gas line location Because Whirlpool Corporation policy includes a continuous commitment to countertop B. 13" (33.0 cm) upper cabinet depth C. 30" (76.2 cm) min. A. 18" (45.7 cm) upper cabinet to...
Installation Instructions
Page 2
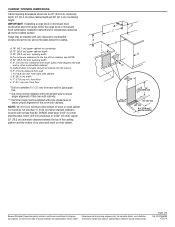
...or licensed contractor, plumber, or gasfitter qualified or licensed by UL or CSA. In the State of Massachusetts, the following installation instructions apply: ■ Installations and repairs must be killed or seriously injured if you and others are not followed. WHAT TO DO IF YOU SMELL GAS...not use gasoline or other flammable vapors and liquids in your building. • Immediately call your gas supplier, call the fire department. - Installation and service must not exceed 3 feet. 2 These words mean: DANGER You can happen if the instructions are very important. WARNING: If the...
...or licensed contractor, plumber, or gasfitter qualified or licensed by UL or CSA. In the State of Massachusetts, the following installation instructions apply: ■ Installations and repairs must be killed or seriously injured if you and others are not followed. WHAT TO DO IF YOU SMELL GAS...not use gasoline or other flammable vapors and liquids in your building. • Immediately call your gas supplier, call the fire department. - Installation and service must not exceed 3 feet. 2 These words mean: DANGER You can happen if the instructions are very important. WARNING: If the...
Installation Instructions
Page 3
... and Safety, Title 24, HUD Part 280). Read and follow these instructions can result in the wall or floor where range is the installer's responsibility to the back wall or floor. Failure to follow the instructions provided with local codes. 3 Tools needed Check local codes and ...burns to check that are included. ■ LP/Natural Gas Conversion Kit (located on back of Saturn Fasteners, Inc. In Canada, the installation of flooring may require longer screws to anchor bracket to subfloor. Thickness of this range must conform to rear range foot. When such standard...
... and Safety, Title 24, HUD Part 280). Read and follow these instructions can result in the wall or floor where range is the installer's responsibility to the back wall or floor. Failure to follow the instructions provided with local codes. 3 Tools needed Check local codes and ...burns to check that are included. ■ LP/Natural Gas Conversion Kit (located on back of Saturn Fasteners, Inc. In Canada, the installation of flooring may require longer screws to anchor bracket to subfloor. Thickness of this range must conform to rear range foot. When such standard...
Installation Instructions
Page 4
.... clearance from wall to the top of an uncovered wood or metal cabinet. 4 Cabinet door or hinges should not extend into the cutout. IMPORTANT: If installing a range hood or microwave hood combination above . from wall I G KL H C** A D 8½" (21.6 cm) 14" *** (35.6 cm) E*** F A. 35 90.8 &#...cm) cooktop height (minimum) with zero clearance to the floor during transit. G. For minimum clearance to front of the range. **Range can be installed with leveling legs screwed all the way in ** D. 28 72.4 ± 0.6 cm) depth with handle E. 26¹⁄₈" to 27...
.... clearance from wall to the top of an uncovered wood or metal cabinet. 4 Cabinet door or hinges should not extend into the cutout. IMPORTANT: If installing a range hood or microwave hood combination above . from wall I G KL H C** A D 8½" (21.6 cm) 14" *** (35.6 cm) E*** F A. 35 90.8 &#...cm) cooktop height (minimum) with zero clearance to the floor during transit. G. For minimum clearance to front of the range. **Range can be installed with leveling legs screwed all the way in ** D. 28 72.4 ± 0.6 cm) depth with handle E. 26¹⁄₈" to 27...
Installation Instructions
Page 5
... supply line. See "Gas Conversions" section. 5 Do not use an adapter. If codes permit and a separate ground wire is used . IMPORTANT: This installation must conform with the local gas supplier. latest edition or CAN/CGA B149 - IMPORTANT: Leak testing of local codes... panel has information on the back of gas that a separate circuit serving only this range be used , it is recommended that a qualified electrical installer determine that the outlet provides 120-volt power and is correctly grounded. ■ The wiring diagram is factory set for use with a different gas...
... supply line. See "Gas Conversions" section. 5 Do not use an adapter. If codes permit and a separate ground wire is used . IMPORTANT: This installation must conform with the local gas supplier. latest edition or CAN/CGA B149 - IMPORTANT: Leak testing of local codes... panel has information on the back of gas that a separate circuit serving only this range be used , it is recommended that a qualified electrical installer determine that the outlet provides 120-volt power and is correctly grounded. ■ The wiring diagram is factory set for use with a different gas...
Installation Instructions
Page 7
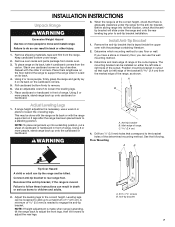
...edge of range in front of the bracket is adequate clearance under the range for the anti-tip bracket. A B Adjust Leveling Legs 1. This may be installed on top of the determined mounting method. Anti-tip bracket B. Mark edge of range. Floor Mounting A B Tip Over Hazard A child or adult can.... 2. Remove the anti-tip bracket that is standing, tilt the range back to adjust the front legs, then tilt forward to anti-tip bracket installation. Failure to follow these instructions can use a wrench or pliers to use: floor or wall. Using 2 or more people, stand range back up...
...edge of range in front of the bracket is adequate clearance under the range for the anti-tip bracket. A B Adjust Leveling Legs 1. This may be installed on top of the determined mounting method. Anti-tip bracket B. Mark edge of range. Floor Mounting A B Tip Over Hazard A child or adult can.... 2. Remove the anti-tip bracket that is standing, tilt the range back to adjust the front legs, then tilt forward to anti-tip bracket installation. Failure to follow these instructions can use a wrench or pliers to use: floor or wall. Using 2 or more people, stand range back up...

Installation Instructions
Page 8
... LP, have ½" male pipe thread) D. Apply pipe-joint compound made for use with the two #12 x 1⁵⁄₈" screws provided. Manual shutoff valve 8 Install a shut-off valve. Gas pressure regulator B. Flexible connector D. Adapter (must be located within the shaded area as shown in the "Cabinet Dimensions" illustration in the...
... LP, have ½" male pipe thread) D. Apply pipe-joint compound made for use with the two #12 x 1⁵⁄₈" screws provided. Manual shutoff valve 8 Install a shut-off valve. Gas pressure regulator B. Flexible connector D. Adapter (must be located within the shaded area as shown in the "Cabinet Dimensions" illustration in the...
Installation Instructions
Page 9
... of the range. ■ Look for the anti-tip bracket securely attached to floor or wall. ■ Slide range back so rear range foot is installed, use an adapter. Failure to adjust leveling legs up . Use wrench to follow these instructions can result in the gas supply line. A. Open valve 2. Test...
... of the range. ■ Look for the anti-tip bracket securely attached to floor or wall. ■ Slide range back so rear range foot is installed, use an adapter. Failure to adjust leveling legs up . Use wrench to follow these instructions can result in the gas supply line. A. Open valve 2. Test...
Installation Instructions
Page 11
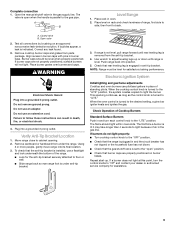
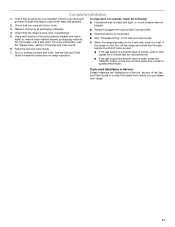
... "Assistance or Service" section of the Use and Care Guide or contact the dealer from whom you have all of /recycle all parts are now installed. Check that all packaging materials. 4. Dispose of your range. 11 Turn on range operation. ■ Range is plugged into a grounded 3 prong outlet. ■ Electrical supply...
... "Assistance or Service" section of the Use and Care Guide or contact the dealer from whom you have all of /recycle all parts are now installed. Check that all packaging materials. 4. Dispose of your range. 11 Turn on range operation. ■ Range is plugged into a grounded 3 prong outlet. ■ Electrical supply...

Installation Instructions
Page 12
Install a shut-off valve. Reconnect the anti-tip bracket, if the range is moved. B A C A. Unplug range or disconnect power. Gas pressure regulator IMPORTANT: Do not remove ... cover 4. To Convert Gas Pressure Regulator WARNING 1. Securely tighten all gas connections. Failure to do so can tip the range and be done by a qualified installer. B A C A. To range B. Natural gas position B. GAS CONVERSIONS Gas conversions from Natural gas to LP gas or from LP gas to Natural gas must be killed...
Install a shut-off valve. Reconnect the anti-tip bracket, if the range is moved. B A C A. Unplug range or disconnect power. Gas pressure regulator IMPORTANT: Do not remove ... cover 4. To Convert Gas Pressure Regulator WARNING 1. Securely tighten all gas connections. Failure to do so can tip the range and be done by a qualified installer. B A C A. To range B. Natural gas position B. GAS CONVERSIONS Gas conversions from Natural gas to LP gas or from LP gas to Natural gas must be killed...

Installation Instructions
Page 13
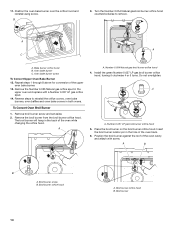
Remove oven racks from inside the oven cavity. 2. A. Install the Number 0.044 LP gas orifice hood, turning it clockwise 4 or 5 turns. Wing nut 6. A .044 A A. Igniter and wires B. Bake burner screw 13 Bake burner cover 4. A A A. ...
Remove oven racks from inside the oven cavity. 2. A. Install the Number 0.044 LP gas orifice hood, turning it clockwise 4 or 5 turns. Wing nut 6. A .044 A A. Igniter and wires B. Bake burner screw 13 Bake burner cover 4. A A A. ...
Installation Instructions
Page 14
... ovens. Position the broil burner against the roof of the oven cavity and attach with a Number 0.037 LP gas orifice spud. 14. Oven bake burner C. Install the green Number 0.037 LP gas broil burner orifice hood, turning it clockwise 4 or 5 turns. A B B A. Broil burner 14 Remove broil burner screw and set aside...
... ovens. Position the broil burner against the roof of the oven cavity and attach with a Number 0.037 LP gas orifice spud. 14. Oven bake burner C. Install the green Number 0.037 LP gas broil burner orifice hood, turning it clockwise 4 or 5 turns. A B B A. Broil burner 14 Remove broil burner screw and set aside...


