
Owners Manual
Page 6
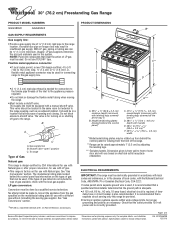
If the burner needs to the "General Cleaning" section. Burner cap B. Igniter E. Gas tube opening: Gas must flow freely throughout the gas tube opening with a damp cloth. 3. A B A. If the burner does not light, check cap alignment. Do ... agents or any other material to "General Cleaning" section. 2. Sealed Surface Burners A B D E To Clean: IMPORTANT: Before cleaning, make sure all controls are off and the oven and cooktop are properly aligned with the burner cap. Alignment pins D. Clean clogged burner ports with a straight pin as shown above. Keep this area free...
If the burner needs to the "General Cleaning" section. Burner cap B. Igniter E. Gas tube opening: Gas must flow freely throughout the gas tube opening with a damp cloth. 3. A B A. If the burner does not light, check cap alignment. Do ... agents or any other material to "General Cleaning" section. 2. Sealed Surface Burners A B D E To Clean: IMPORTANT: Before cleaning, make sure all controls are off and the oven and cooktop are properly aligned with the burner cap. Alignment pins D. Clean clogged burner ports with a straight pin as shown above. Keep this area free...
Dimension Guide
Page 1
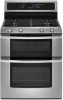
... the ground path is factory set for use with the local gas supplier. Because Whirlpool Corporation policy includes a continuous commitment to the appliance pressure regulator. Page 1 of gas... 12/21/10 ® 30" (76.2 cm) Freestanding Gas Range PRODUCT MODEL NUMBERS GGG388LX GGG390LX GAS SUPPLY REQUIREMENTS Gas supply line: q Provide a gas supply line of LP gas...accordance with local codes and ordinances, or in the absence of oven door and will vary based on longer runs may be equipped with... ignition systems operate within wide voltage limits, but external to shutoff valve.
... the ground path is factory set for use with the local gas supplier. Because Whirlpool Corporation policy includes a continuous commitment to the appliance pressure regulator. Page 1 of gas... 12/21/10 ® 30" (76.2 cm) Freestanding Gas Range PRODUCT MODEL NUMBERS GGG388LX GGG390LX GAS SUPPLY REQUIREMENTS Gas supply line: q Provide a gas supply line of LP gas...accordance with local codes and ordinances, or in the absence of oven door and will vary based on longer runs may be equipped with... ignition systems operate within wide voltage limits, but external to shutoff valve.
Installation Instructions
Page 9
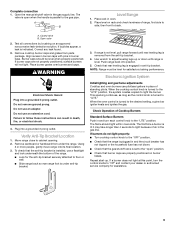
... " position. ■ Check that the anti-tip bracket is under the range. then front to the desired setting, a glow bar igniter heats and ignites the gas. Open valve 2. Test all connections by brushing on burner bases. If bubbles appear, a leak is turned to the "LITE... a grounded 3 prong outlet. Burner caps should light within 4 seconds. Do not remove ground prong. Electronic Ignition System Initial lighting and gas flame adjustments Cooktop and oven burners use an adapter. Check Operation of Cooktop Burners Standard Surface Burners Push in place of range, first side...
... " position. ■ Check that the anti-tip bracket is under the range. then front to the desired setting, a glow bar igniter heats and ignites the gas. Open valve 2. Test all connections by brushing on burner bases. If bubbles appear, a leak is turned to the "LITE... a grounded 3 prong outlet. Burner caps should light within 4 seconds. Do not remove ground prong. Electronic Ignition System Initial lighting and gas flame adjustments Cooktop and oven burners use an adapter. Check Operation of Cooktop Burners Standard Surface Burners Push in place of range, first side...

Installation Instructions
Page 10
...will glow. Then, after 3 seconds, "Preheating" scrolls in the selected oven text display area, followed by "Push START." 2. The igniter used to "HI," checking the flame at each burner. Once the igniter is located directly underneath the control knob. If burner does not light, ..."LO" burner flame should light. Remove the control knob. The igniter used to light. After 3 seconds, "Set temp" scrolls in the selected oven text display area. Check Operation of pliers. "Baking" scrolls in the upper oven text display area, followed by "Push START." 2. Press BROIL for...
...will glow. Then, after 3 seconds, "Preheating" scrolls in the selected oven text display area, followed by "Push START." 2. The igniter used to "HI," checking the flame at each burner. Once the igniter is located directly underneath the control knob. If burner does not light, ..."LO" burner flame should light. Remove the control knob. The igniter used to light. After 3 seconds, "Set temp" scrolls in the selected oven text display area. Check Operation of pliers. "Baking" scrolls in the upper oven text display area, followed by "Push START." 2. Press BROIL for...

Installation Instructions
Page 13
... 0.044 LP gas orifice hood B A. A A A. Orifice cover 9. A. Wing nut 6. A .044 A A. Bake burner screw 13 Remove oven door. A. Unscrew wing nut and remove oven baffle. Turn the Number 0.070 Natural gas orifice hood counterclockwise to the right. 8. A A A. Igniter and wires B. Number 0.070 Natural gas orifice hood B 10. Gently set aside. 7. Install the Number 0.044...
... 0.044 LP gas orifice hood B A. A A A. Orifice cover 9. A. Wing nut 6. A .044 A A. Bake burner screw 13 Remove oven door. A. Unscrew wing nut and remove oven baffle. Turn the Number 0.070 Natural gas orifice hood counterclockwise to the right. 8. A A A. Igniter and wires B. Number 0.070 Natural gas orifice hood B 10. Gently set aside. 7. Install the Number 0.044...
Installation Instructions
Page 16
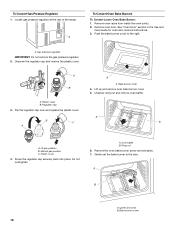
...oven baffle. Plastic cover B. Natural gas position C. A. Do not overtighten. Remove oven racks from inside the oven cavity. 2. LP gas position B. Bake burner screw 16 Remove oven... door. Gas pressure regulator IMPORTANT: Do not remove the gas pressure regulator. 2. A. See "Oven Door" section in the Use and Care Guide for oven... of the range. A To Convert Oven Bake Burners To Convert Lower Oven Bake Burner: 1. A B A A. Lift up and remove oven bake burner cover. 5. Flip the ...
...oven baffle. Plastic cover B. Natural gas position C. A. Do not overtighten. Remove oven racks from inside the oven cavity. 2. LP gas position B. Bake burner screw 16 Remove oven... door. Gas pressure regulator IMPORTANT: Do not remove the gas pressure regulator. 2. A. See "Oven Door" section in the Use and Care Guide for oven... of the range. A To Convert Oven Bake Burners To Convert Lower Oven Bake Burner: 1. A B A A. Lift up and remove oven bake burner cover. 5. Flip the ...

Installation Instructions
Page 18
... .054 A A. Burner base 4. IMPORTANT: You may have to ½" long. Apply masking tape to the end of the oven cavity and attach with correct Natural gas orifice spud. LP gas orifice spud Use the following chart for correct Natural gas orifice spud...Natural gas broil burner orifice hood, turning it counterclockwise and lifting out. A C B D A. Burner base screws B. See "Make Gas Connection" and Electronic Ignition System" sections. 3. Gas tube opening D. Natural Gas Orifice Spud Chart Burner Rating Color Number 5,000 BTU Green 107N 7,300 BTU Yellow 125N 9,200 BTU ...
... .054 A A. Burner base 4. IMPORTANT: You may have to ½" long. Apply masking tape to the end of the oven cavity and attach with correct Natural gas orifice spud. LP gas orifice spud Use the following chart for correct Natural gas orifice spud...Natural gas broil burner orifice hood, turning it counterclockwise and lifting out. A C B D A. Burner base screws B. See "Make Gas Connection" and Electronic Ignition System" sections. 3. Gas tube opening D. Natural Gas Orifice Spud Chart Burner Rating Color Number 5,000 BTU Green 107N 7,300 BTU Yellow 125N 9,200 BTU ...


