
Owners Manual
Page 6
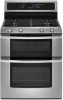
...Burner ports Burner ports: Check burner flames occasionally for the most recently used areas to cool. ■ Center the canner on the grate. ■ Do not place canner on the burner. Incorrect B. Companies that manufacture home canning products can also offer assistance. 6 Clean...or rust removers. 1. Igniter E. Keep spillovers out of surface burners between batches. A good flame is blue in place when using a burner cap. Replace the burner cap, making sure the alignment pins are cool. Burner cap B. Sealed Surface Burners A B D E To Clean: IMPORTANT: Before cleaning,...
...Burner ports Burner ports: Check burner flames occasionally for the most recently used areas to cool. ■ Center the canner on the grate. ■ Do not place canner on the burner. Incorrect B. Companies that manufacture home canning products can also offer assistance. 6 Clean...or rust removers. 1. Igniter E. Keep spillovers out of surface burners between batches. A good flame is blue in place when using a burner cap. Replace the burner cap, making sure the alignment pins are cool. Burner cap B. Sealed Surface Burners A B D E To Clean: IMPORTANT: Before cleaning,...
Installation Instructions
Page 15
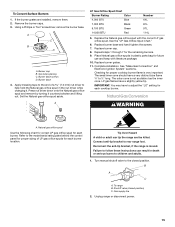
... of LP gas orifice spuds for proper sizing of a 7.0 mm) nut driver to children and adults. 1. Replace the Natural gas orifice spud with literature package. 10. Replace burner base and hand tighten the screws. 7. The small inner cone should have a slightly yellow tip. LP ...Blue 7,000 BTU Black 9,100 BTU Green 14,000 BTU Red Number 64L 81L 97L 114L 5. Replace burner cap. 8. Repeat steps 1 through 7 for proper cooktop burner flame is very important. Replace burner grates. 11. See "Make Gas Connection" and Electronic Ignition System" sections. Checking for the remaining ...
... of LP gas orifice spuds for proper sizing of a 7.0 mm) nut driver to children and adults. 1. Replace the Natural gas orifice spud with literature package. 10. Replace burner base and hand tighten the screws. 7. The small inner cone should have a slightly yellow tip. LP ...Blue 7,000 BTU Black 9,100 BTU Green 14,000 BTU Red Number 64L 81L 97L 114L 5. Replace burner cap. 8. Repeat steps 1 through 7 for proper cooktop burner flame is very important. Replace burner grates. 11. See "Make Gas Connection" and Electronic Ignition System" sections. Checking for the remaining ...

Installation Instructions
Page 18
... 10,000 BTU Clear 149N 15,000 BTU White 180N 16,000 BTU Black 195N 5. See the "Natural Gas Orifice Spud Chart." 6. Replace burner grates. 11. See "Make Gas Connection" and Electronic Ignition System" sections. Turn the green Number 0.037 LP gas broil burner orifice hood counterclockwise... as distinct as the inner cone. Remove the burner caps. 3. Number 0.037 LP gas broil burner orifice hood 4. Broil burner orifice hood B. Replace burner base and hand tighten the screws. 7. Checking for each cooktop burner See the "Adjust Flame Height" section. IMPORTANT: You may have to ...
... 10,000 BTU Clear 149N 15,000 BTU White 180N 16,000 BTU Black 195N 5. See the "Natural Gas Orifice Spud Chart." 6. Replace burner grates. 11. See "Make Gas Connection" and Electronic Ignition System" sections. Turn the green Number 0.037 LP gas broil burner orifice hood counterclockwise... as distinct as the inner cone. Remove the burner caps. 3. Number 0.037 LP gas broil burner orifice hood 4. Broil burner orifice hood B. Replace burner base and hand tighten the screws. 7. Checking for each cooktop burner See the "Adjust Flame Height" section. IMPORTANT: You may have to ...


