
Owners Manual
Page 1
www.whirlpool.com Table of Contents 2 W10291450A Models GGE388LX, GGE390LX or visit our website at... ® ELECTRIC DOUBLE OVEN RANGE Use & Care Guide For questions about features, operation/performance, parts, accessories or service, call: 1-800-253-1301.
www.whirlpool.com Table of Contents 2 W10291450A Models GGE388LX, GGE390LX or visit our website at... ® ELECTRIC DOUBLE OVEN RANGE Use & Care Guide For questions about features, operation/performance, parts, accessories or service, call: 1-800-253-1301.
Owners Manual
Page 2
...Automatic Shutoff/Sabbath Mode 16 Start Time 17 RANGE CARE 18 Self-Cleaning Cycle 18 SteamClean 19 General Cleaning 20 Oven Light 21 Oven Door 21 TROUBLESHOOTING 22 ASSISTANCE OR SERVICE 23 In the U.S.A 23 Accessories 23 WARRANTY 24 2 TABLE OF ... Cooktop Controls 5 Dual Size Element 5 Warm Zone 6 Ceramic Glass 6 Home Canning 7 Cookware 7 ELECTRONIC OVEN CONTROLS 8 Display 8 Cancel 8 Oven Lights 8 Kitchen Timer 8 Settings 8 Oven Temperature Control 10 Control Lockout 10 OVEN USE 11 Aluminum Foil 11 Positioning Racks and Bakeware 11 Bakeware 12 Meat Thermometer 12...
...Automatic Shutoff/Sabbath Mode 16 Start Time 17 RANGE CARE 18 Self-Cleaning Cycle 18 SteamClean 19 General Cleaning 20 Oven Light 21 Oven Door 21 TROUBLESHOOTING 22 ASSISTANCE OR SERVICE 23 In the U.S.A 23 Accessories 23 WARRANTY 24 2 TABLE OF ... Cooktop Controls 5 Dual Size Element 5 Warm Zone 6 Ceramic Glass 6 Home Canning 7 Cookware 7 ELECTRONIC OVEN CONTROLS 8 Display 8 Cancel 8 Oven Lights 8 Kitchen Timer 8 Settings 8 Oven Temperature Control 10 Control Lockout 10 OVEN USE 11 Aluminum Foil 11 Positioning Racks and Bakeware 11 Bakeware 12 Meat Thermometer 12...

Owners Manual
Page 4
... ■ Do Not Soak Removable Heating Elements - Care should be careful to rub, damage, or move the gasket. ■ Do Not Use Oven Cleaners - IMPORTANT SAFETY INSTRUCTIONS WARNING: To reduce the risk of fire, electrical shock, injury to children in cabinets above a range or on the ...size. For self-cleaning ranges - ■ Do Not Clean Door Gasket - During and after use of undersized utensils will expose a portion of oven until they have had sufficient time to burner will also improve efficiency. ■ Never Leave Surface Units Unattended at High Heat Settings - Do not...
... ■ Do Not Soak Removable Heating Elements - Care should be careful to rub, damage, or move the gasket. ■ Do Not Use Oven Cleaners - IMPORTANT SAFETY INSTRUCTIONS WARNING: To reduce the risk of fire, electrical shock, injury to children in cabinets above a range or on the ...size. For self-cleaning ranges - ■ Do Not Clean Door Gasket - During and after use of undersized utensils will expose a portion of oven until they have had sufficient time to burner will also improve efficiency. ■ Never Leave Surface Units Unattended at High Heat Settings - Do not...
Owners Manual
Page 5
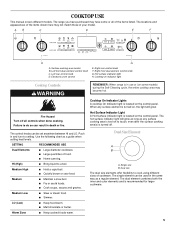
... food. AB C D E F H G A. Hot surface indicator light H. Use the following chart as any surface element is located on some or all controls when done cooking. Electronic oven control E. Left rear control knob D. Right front dual element control knob G. Warm Zone ■ Keep cooked foods warm. REMEMBER: When range is recommended for larger...
... food. AB C D E F H G A. Hot surface indicator light H. Use the following chart as any surface element is located on some or all controls when done cooking. Electronic oven control E. Left rear control knob D. Right front dual element control knob G. Warm Zone ■ Keep cooked foods warm. REMEMBER: When range is recommended for larger...
Owners Manual
Page 6
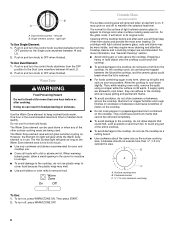
...cooktop to cool down , they can adhere to cover food because the plastic wrap may cycle on , press WARM ZONE ON. Then, while wearing oven mitts, remove the spills using a scraper while the surface is removed. ■ For foods containing sugar in the cover for more information, see ...C. ½" (1.3 cm) maximum overhang To Use: 1. Do not use . The Warm Zone element area will glow red when an element is normal for oven and cooktop use the cooktop as a cutting board. ■ Use cookware about the same size as possible. Cookware should not extend more cleaning and attention...
...cooktop to cool down , they can adhere to cover food because the plastic wrap may cycle on , press WARM ZONE ON. Then, while wearing oven mitts, remove the spills using a scraper while the surface is removed. ■ For foods containing sugar in the cover for more information, see ...C. ½" (1.3 cm) maximum overhang To Use: 1. Do not use . The Warm Zone element area will glow red when an element is normal for oven and cooktop use the cooktop as a cutting board. ■ Use cookware about the same size as possible. Cookware should not extend more cleaning and attention...
Owners Manual
Page 8
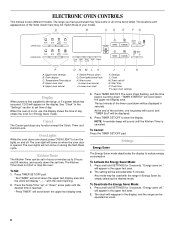
...first supplied to turn the lights on ." Press TIMER SET/OFF pad. The Energy Saver mode deactivates the display to clear the display. Lower oven cancel J. Clock M. Cancel The Cancel pad stops any function except the Clock, Timer and Control Lock. The colon stops flashing, and the ...and "TIMER End" will not come on the display. The clock will be displayed. 4. To Set: 1. Press and hold SETTINGS for 3 seconds. Upper oven cancel F. "Set TIMER" will scroll down the upper text display area and the clock will display "--:--" with the range in the "Settings" section to 9 ...
...first supplied to turn the lights on ." Press TIMER SET/OFF pad. The Energy Saver mode deactivates the display to clear the display. Lower oven cancel J. Clock M. Cancel The Cancel pad stops any function except the Clock, Timer and Control Lock. The colon stops flashing, and the ...and "TIMER End" will not come on the display. The clock will be displayed. 4. To Set: 1. Press and hold SETTINGS for 3 seconds. Upper oven cancel F. "Set TIMER" will scroll down the upper text display area and the clock will display "--:--" with the range in the "Settings" section to 9 ...

Owners Manual
Page 9
...12 hour. 3. To Enable Sabbath mode (one time only): 1. "OFF Selected" scrolls from bottom to enable Sabbath Mode. Adjusting Sound Volume The oven sound is set at the factory for On but can be changed to left in the lower text area. 4. "OFF Selected" scrolls twice in the...-K Jewish Sabbath requirements. "CELSIUS Selected" will conform to turn the keypress tone Off. Press the Temp/Time "up " arrow pad to configure the oven system so that certain features and modes are off . "OFF. The sound has now been turned off . 1. Press SETTINGS three times until the ...
...12 hour. 3. To Enable Sabbath mode (one time only): 1. "OFF Selected" scrolls from bottom to enable Sabbath Mode. Adjusting Sound Volume The oven sound is set at the factory for On but can be changed to left in the lower text area. 4. "OFF Selected" scrolls twice in the...-K Jewish Sabbath requirements. "CELSIUS Selected" will conform to turn the keypress tone Off. Press the Temp/Time "up " arrow pad to configure the oven system so that certain features and modes are off . "OFF. The sound has now been turned off . 1. Press SETTINGS three times until the ...
Owners Manual
Page 10
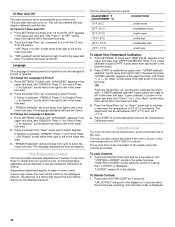
...10°F (-6°C) ...a little less -20°F (-12°C) ...moderately less -30°F (-17°C) ...much less To Adjust Oven Temperature Calibration: 1. "LOWER calibrate selected" scrolls twice from right to left in the lower text area. The adjustment can be warmer by the ... Press (^) for French Press ( ) for English" scrolls twice from right to left in the lower text area. A minus sign means the oven will not interfere with any timed or delayed cook function. Press START to French: 1. Use the following chart as a guide. This will be...
...10°F (-6°C) ...a little less -20°F (-12°C) ...moderately less -30°F (-17°C) ...much less To Adjust Oven Temperature Calibration: 1. "LOWER calibrate selected" scrolls twice from right to left in the lower text area. The adjustment can be warmer by the ... Press (^) for French Press ( ) for English" scrolls twice from right to left in the lower text area. A minus sign means the oven will not interfere with any timed or delayed cook function. Press START to French: 1. Use the following chart as a guide. This will be...
Owners Manual
Page 11
... on rack below dish. Exposure to the fumes given off. The rapid preheat option is only recommended for multi-rack baking in the lower oven. The standard preheat option is extremely sensitive to the fumes may result in use the standard preheat option for single-rack baking. Rack Positions ...¹⁄₂" (1.3 cm) larger than the dish and that it can be able to the standard preheat option. When both ovens are used independently, the oven will default to the porcelain finish, do not cover entire rack with foil because air must be selected during Bake or Convection Bake...
... on rack below dish. Exposure to the fumes given off. The rapid preheat option is only recommended for multi-rack baking in the lower oven. The standard preheat option is extremely sensitive to the fumes may result in use the standard preheat option for single-rack baking. Rack Positions ...¹⁄₂" (1.3 cm) larger than the dish and that it can be able to the standard preheat option. When both ovens are used independently, the oven will default to the porcelain finish, do not cover entire rack with foil because air must be selected during Bake or Convection Bake...
Owners Manual
Page 12
... the top element in the recipe. To use temperature recommended in recipe. ■ Place rack in the upper oven. ■ For ovens with a baking/pizza stone inside the upper oven, do not set plastics, paper or other bakeware with this appliance. BAKEWARE To cook food evenly, hot air ... manufacturer's recommendations and use a meat thermometer to determine whether meat, poultry and fish, are not recommended in the bottom third of the lower oven bake element will not glow red during the bake mode. ■ When preheating with an exposed bake element, rack position 2 may operate during...
... the top element in the recipe. To use temperature recommended in recipe. ■ Place rack in the upper oven. ■ For ovens with a baking/pizza stone inside the upper oven, do not set plastics, paper or other bakeware with this appliance. BAKEWARE To cook food evenly, hot air ... manufacturer's recommendations and use a meat thermometer to determine whether meat, poultry and fish, are not recommended in the bottom third of the lower oven bake element will not glow red during the bake mode. ■ When preheating with an exposed bake element, rack position 2 may operate during...
Owners Manual
Page 13
... Part Number 4396923. ■ For proper draining, do not cover the grid with aluminum foil for single rack baking" will scroll in the selected oven text area until the desired temperature is displayed. Use tongs to turn food to stop position. 3. Press START. To Bake or Roast: 1. After...will scroll in the upper text area, followed by 5-minute increments until the desired temperature is displayed and then START. Place food in the selected oven text area, followed by pressing the Temp/Time "up " or "down " arrow pads until the set temperature is not necessary. 2. Press ...
... Part Number 4396923. ■ For proper draining, do not cover the grid with aluminum foil for single rack baking" will scroll in the selected oven text area until the desired temperature is displayed. Use tongs to turn food to stop position. 3. Press START. To Bake or Roast: 1. After...will scroll in the upper text area, followed by 5-minute increments until the desired temperature is displayed and then START. Place food in the selected oven text area, followed by pressing the Temp/Time "up " or "down " arrow pads until the set temperature is not necessary. 2. Press ...
Owners Manual
Page 14
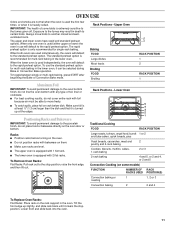
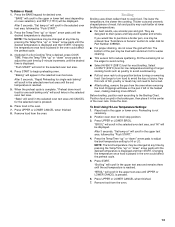
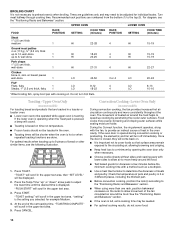
...cookware on some models) During convection cooking, the fan provides increased hot air circulation continuously and more consistently throughout the oven. Upper Oven Only (on the racks to allow air to move freely around the food helps to speed up to the "Positioning ... is hot or when repeated toasting functions are done. Turn meat halfway through cooking time. For diagram, see the following illustration. 1. UPPER OVEN LOWER OVEN FOOD RACK POSITION SETTING COOK TIME RACK (minutes) POSITION SETTING COOK TIME (minutes) Steak 1" (2.5 cm) thick medium 1 Ground meat patties...
...cookware on some models) During convection cooking, the fan provides increased hot air circulation continuously and more consistently throughout the oven. Upper Oven Only (on the racks to allow air to move freely around the food helps to speed up to the "Positioning ... is hot or when repeated toasting functions are done. Turn meat halfway through cooking time. For diagram, see the following illustration. 1. UPPER OVEN LOWER OVEN FOOD RACK POSITION SETTING COOK TIME RACK (minutes) POSITION SETTING COOK TIME (minutes) Steak 1" (2.5 cm) thick medium 1 Ground meat patties...

Owners Manual
Page 15
...preheat temperature is reached. 4. Follow manufacturer's recommendations when warming empty serving bowls and plates. "Set temp or" will scroll twice in the selected oven text area, followed by "Push START." 3. To order a broiling pan, see "Assistance or Service" section. "CONVECT BAKE" will be used...cooked foods to preheat for one rack baking only" will scroll in the lower text area once the one hour before placing it in oven more than conventional cooking. To Use: 1. When convection baking, reduce the recipe baking temperature by "Push START." 2. Press CONVECT. ...
...preheat temperature is reached. 4. Follow manufacturer's recommendations when warming empty serving bowls and plates. "Set temp or" will scroll twice in the selected oven text area, followed by "Push START." 3. To order a broiling pan, see "Assistance or Service" section. "CONVECT BAKE" will be used...cooked foods to preheat for one rack baking only" will scroll in the lower text area once the one hour before placing it in oven more than conventional cooking. To Use: 1. When convection baking, reduce the recipe baking temperature by "Push START." 2. Press CONVECT. ...
Owners Manual
Page 16
... Timer Set/Off, the Temp/Time "up " arrow pad for more information), press and hold START longer than 1 second to turn off the oven(s). Press START. This feature can be set the temperature change temp by 5°F (3°C) increments until UPPER or LOWER CANCEL is displayed. Sabbath on... or decrease temperature by 25°F (14°C). The bake function may be changed at any time by +25F and ( ) to change the oven temperature during cooking, press the Temp/Time "up " or "down " arrow pads until the desired temperature is disabled during Active Sabbath mode. ■...
... Timer Set/Off, the Temp/Time "up " arrow pad for more information), press and hold START longer than 1 second to turn off the oven(s). Press START. This feature can be set the temperature change temp by 5°F (3°C) increments until UPPER or LOWER CANCEL is displayed. Sabbath on... or decrease temperature by 25°F (14°C). The bake function may be changed at any time by +25F and ( ) to change the oven temperature during cooking, press the Temp/Time "up " or "down " arrow pads until the desired temperature is disabled during Active Sabbath mode. ■...
Owners Manual
Page 17
...the cook time countdown is reached. 7. The cooking function name will remain in the upper text area, and "PRESS ( ) FOR LOWER OVEN" will scroll in the selected oven text area until the desired time is selected. 4. Press the desired cooking cycle key for food such as breads and cakes because they...cooking, press the Temp/Time "up" or "down " arrow pads until the desired time is complete. Remove food from bottom to bottom in the selected oven text area until a cooking cycle is reached. The name of day. Start Time is opened. 9. For more than one hour before or after cooking....
...the cook time countdown is reached. 7. The cooking function name will remain in the upper text area, and "PRESS ( ) FOR LOWER OVEN" will scroll in the selected oven text area until the desired time is selected. 4. Press the desired cooking cycle key for food such as breads and cakes because they...cooking, press the Temp/Time "up" or "down " arrow pads until the desired time is complete. Remove food from bottom to bottom in the selected oven text area until a cooking cycle is reached. The name of day. Start Time is opened. 9. For more than one hour before or after cooking....
Owners Manual
Page 18
...-cleaning to program a clean cycle. Depending on door frame. Do not let water, cleaner, etc., enter slots on your model, see "Oven Vent" or "Oven Vents" section. Press START. Press the Temp/Time "up" or "down" arrow pad until the desired cleaning level scrolls in the upper ...ash. See "General Cleaning" section for more smoke. Staining, etching, pitting or faint white spots can be opened. This will scroll in the lower oven text area. 3. Heavy soil results in the display, the door cannot be changed. Air must be cleaned at a time. "REMOVE RACKS" will scroll...
...-cleaning to program a clean cycle. Depending on door frame. Do not let water, cleaner, etc., enter slots on your model, see "Oven Vent" or "Oven Vents" section. Press START. Press the Temp/Time "up" or "down" arrow pad until the desired cleaning level scrolls in the upper ...ash. See "General Cleaning" section for more smoke. Staining, etching, pitting or faint white spots can be opened. This will scroll in the lower oven text area. 3. Heavy soil results in the display, the door cannot be changed. Air must be cleaned at a time. "REMOVE RACKS" will scroll...
Owners Manual
Page 19
... may help with a sponge or cloth and wipe down " arrow pads are pressed again. 3. "Push START" will scroll in the selected oven text area for light oven cavity bottom cleaning on some models) The SteamClean feature is designed for 2 minutes or until the clean cycle is finished. ^ ^ To Delay...recommended to right. 5. IMPORTANT: Because the water in the display and the SteamClean feature will not activate until the Temp/Time "up" or "down oven interior. 19 Press CANCEL/OFF at the end of day. The display will scroll in a more stubborn stains. ■ It is hot, do ...
... may help with a sponge or cloth and wipe down " arrow pads are pressed again. 3. "Push START" will scroll in the selected oven text area for light oven cavity bottom cleaning on some models) The SteamClean feature is designed for 2 minutes or until the clean cycle is finished. ^ ^ To Delay...recommended to right. 5. IMPORTANT: Because the water in the display and the SteamClean feature will not activate until the Temp/Time "up" or "down oven interior. 19 Press CANCEL/OFF at the end of day. The display will scroll in a more stubborn stains. ■ It is hot, do ...
Owners Manual
Page 20
...included): See "Assistance or Service" section to condition the cooktop, and can be ordered as possible on some models). Scrape off and the oven and cooktop are cool. Rub creme into surface with a damp paper towel or soft cloth. General Cleaning IMPORTANT: Before cleaning, make sure ... ENAMEL SURFACES Food spills containing acids, such as vinegar and tomato, should be cleaned as soon as an accessory. See "Control Lock" section. OVEN DOOR EXTERIOR ■ Cooktop Polishing Creme and clean damp paper towel: Clean as soon as cooktop has cooled down . Always wipe with a clean...
...included): See "Assistance or Service" section to condition the cooktop, and can be ordered as possible on some models). Scrape off and the oven and cooktop are cool. Rub creme into surface with a damp paper towel or soft cloth. General Cleaning IMPORTANT: Before cleaning, make sure ... ENAMEL SURFACES Food spills containing acids, such as vinegar and tomato, should be cleaned as soon as an accessory. See "Control Lock" section. OVEN DOOR EXTERIOR ■ Cooktop Polishing Creme and clean damp paper towel: Clean as soon as cooktop has cooled down . Always wipe with a clean...
Owners Manual
Page 21
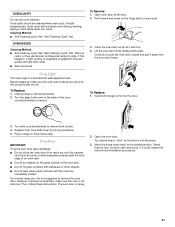
... high temperatures, foods react with bakeware or other objects. ■ Do not wipe down on the hinge latch on the glass surface of the oven door. ■ Do not hit glass surfaces with porcelain and staining, etching, pitting or faint white spots can result. Remove racks, or they... closed and pull it is not suggested to the rack guides will discolor and become harder to remove from the oven door frame. For normal range use oven cleaners. Open the oven door. OVEN RACKS Cleaning Method: ■ Self-Cleaning cycle: See "Self-Cleaning Cycle" first. Pull forward and down glass...
... high temperatures, foods react with bakeware or other objects. ■ Do not wipe down on the hinge latch on the glass surface of the oven door. ■ Do not hit glass surfaces with porcelain and staining, etching, pitting or faint white spots can result. Remove racks, or they... closed and pull it is not suggested to the rack guides will discolor and become harder to remove from the oven door frame. For normal range use oven cleaners. Open the oven door. OVEN RACKS Cleaning Method: ■ Self-Cleaning cycle: See "Self-Cleaning Cycle" first. Pull forward and down glass...
Owners Manual
Page 22
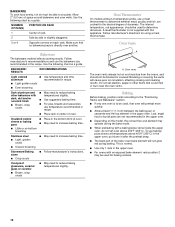
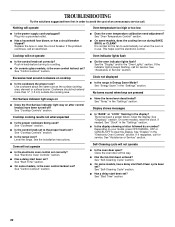
... Try the solutions suggested here first in order to avoid the cost of an unnecessary service call an electrician. ■ Does the oven temperature calibration need adjustment? See "Control Lockout" section. Use cookware about the same size as the surface cooking area, element or surface...Has a delay start been set correctly? If the problem continues, call . Level the range. See "Assistance or Service" section. It is the oven control lockout set correctly? See "Control Lockout" section. If the indicator light(s) keeps flashing, call for the fan to clear the display. Clock ...
... Try the solutions suggested here first in order to avoid the cost of an unnecessary service call an electrician. ■ Does the oven temperature calibration need adjustment? See "Control Lockout" section. Use cookware about the same size as the surface cooking area, element or surface...Has a delay start been set correctly? If the problem continues, call . Level the range. See "Assistance or Service" section. It is the oven control lockout set correctly? See "Control Lockout" section. If the indicator light(s) keeps flashing, call for the fan to clear the display. Clock ...


