
Owners Manual
Page 1
or visit our website at... www.whirlpool.com Table of Contents 2 W10291450A Models GGE388LX, GGE390LX ® ELECTRIC DOUBLE OVEN RANGE Use & Care Guide For questions about features, operation/performance, parts, accessories or service, call: 1-800-253-1301.
or visit our website at... www.whirlpool.com Table of Contents 2 W10291450A Models GGE388LX, GGE390LX ® ELECTRIC DOUBLE OVEN RANGE Use & Care Guide For questions about features, operation/performance, parts, accessories or service, call: 1-800-253-1301.

Owners Manual
Page 4
...Do not use dry chemical or foam-type extinguisher. ■ Use Only Dry Potholders - Heating elements should be immersed in or around any part of glass, glass/ceramic, ceramic, earthenware, or other servicing should never be referred to a qualified technician. ■ Storage in temperature. ... spillovers may be allowed to damage. ■ Protective Liners - Heating elements may penetrate the broken cooktop and create a risk of any part of a range - Care should not be careful to accumulate on hood or filter. ■ When flambeing foods under the hood, turn...
...Do not use dry chemical or foam-type extinguisher. ■ Use Only Dry Potholders - Heating elements should be immersed in or around any part of glass, glass/ceramic, ceramic, earthenware, or other servicing should never be referred to a qualified technician. ■ Storage in temperature. ... spillovers may be allowed to damage. ■ Protective Liners - Heating elements may penetrate the broken cooktop and create a risk of any part of a range - Care should not be careful to accumulate on hood or filter. ■ When flambeing foods under the hood, turn...
Owners Manual
Page 6
Single element control - Push in any part of light colored ceramic glass to appear to the Dual zone anywhere between HI and LO. 2. When warming baked goods, allow objects that could break ...
Single element control - Push in any part of light colored ceramic glass to appear to the Dual zone anywhere between HI and LO. 2. When warming baked goods, allow objects that could break ...
Owners Manual
Page 12
...; Little or no bakeware piece is directly over another. A meat thermometer is normal. ■ Use only 1 rack in after the preheat beep. ■ The back part of oven. ■ May need to be used, that could melt or burn near the oven vents. BAKEWARE/ RESULTS RECOMMENDATIONS Light colored ■ aluminum ■...
...; Little or no bakeware piece is directly over another. A meat thermometer is normal. ■ Use only 1 rack in after the preheat beep. ■ The back part of oven. ■ May need to be used, that could melt or burn near the oven vents. BAKEWARE/ RESULTS RECOMMENDATIONS Light colored ■ aluminum ■...
Owners Manual
Page 13
... of fish, poultry or meat may be displayed. After 3 seconds, "Rapid Preheating for easier cleaning. ■ Trim excess fat to HI or LO. Ask for Part Number 4396923. ■ For proper draining, do not cover the grid with aluminum foil for single rack baking" will scroll in the selected oven text...
... of fish, poultry or meat may be displayed. After 3 seconds, "Rapid Preheating for easier cleaning. ■ Trim excess fat to HI or LO. Ask for Part Number 4396923. ■ For proper draining, do not cover the grid with aluminum foil for single rack baking" will scroll in the selected oven text...
Owners Manual
Page 14
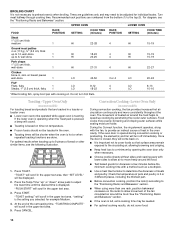
Times are numbered from the bottom (1) to the top (5). For diagram, see the following illustration. 1. "TOAST" will scroll in 2 or 3 different places, including the thickest part. ■ Before convection cooking, position the rack(s) according to allow air to move freely around the food helps to 6, well done 1 HI 22-28 4 HI ...
Times are numbered from the bottom (1) to the top (5). For diagram, see the following illustration. 1. "TOAST" will scroll in 2 or 3 different places, including the thickest part. ■ Before convection cooking, position the rack(s) according to allow air to move freely around the food helps to 6, well done 1 HI 22-28 4 HI ...
Owners Manual
Page 20
... or nonabrasive cleanser: Clean as soon as cooktop has cooled down . These spills may remove numbers. ■ All-Purpose Appliance Cleaner Part Number 31682 (not included): See "Assistance or Service" section to wear oven mitts while cleaning the cooktop. CERAMIC GLASS (on surface ...rubbing until white film disappears. Tiny scratches and abrasions ■ Cooktop Cleaner: STAINLESS STEEL (on panel. ■ All-Purpose Appliance Cleaner Part Number 31682 (not included): See "Assistance or Service" section to stainless steel surfaces, do not use steel wool, abrasive cleansers or ...
... or nonabrasive cleanser: Clean as soon as cooktop has cooled down . These spills may remove numbers. ■ All-Purpose Appliance Cleaner Part Number 31682 (not included): See "Assistance or Service" section to wear oven mitts while cleaning the cooktop. CERAMIC GLASS (on surface ...rubbing until white film disappears. Tiny scratches and abrasions ■ Cooktop Cleaner: STAINLESS STEEL (on panel. ■ All-Purpose Appliance Cleaner Part Number 31682 (not included): See "Assistance or Service" section to stainless steel surfaces, do not use steel wool, abrasive cleansers or ...
Owners Manual
Page 23
...oven temperature calibration set ? See "Bakeware" section. ■ Are the racks positioned properly? If you need replacement parts If you need to build every new WHIRLPOOL® appliance. Check that you still need further assistance, you the cost of the crust and/or reduce baking temperature...664-2449 and follow the instructions below. Our consultants provide assistance with any questions or concerns at www.whirlpool.com and click on the bottom? FSP® replacement parts will help , follow the menu prompts. Adjust cooking time. ■ Has the oven door been ...
...oven temperature calibration set ? See "Bakeware" section. ■ Are the racks positioned properly? If you need replacement parts If you need to build every new WHIRLPOOL® appliance. Check that you still need further assistance, you the cost of the crust and/or reduce baking temperature...664-2449 and follow the instructions below. Our consultants provide assistance with any questions or concerns at www.whirlpool.com and click on the bottom? FSP® replacement parts will help , follow the menu prompts. Adjust cooking time. ■ Has the oven door been ...

Owners Manual
Page 24
...Any food loss due to the appliance. 9. Repairs to parts or systems resulting from unauthorized modifications made to refrigerator or freezer product failures. 7. DISCLAIMER OF IMPLIED WARRANTIES; You must be borne by an authorized Whirlpool servicer is not available. 10. You will pay for... Factory Specified Parts and repair labor to correct defects in a remote area where service by the customer. Damage...
...Any food loss due to the appliance. 9. Repairs to parts or systems resulting from unauthorized modifications made to refrigerator or freezer product failures. 7. DISCLAIMER OF IMPLIED WARRANTIES; You must be borne by an authorized Whirlpool servicer is not available. 10. You will pay for... Factory Specified Parts and repair labor to correct defects in a remote area where service by the customer. Damage...
Installation Instructions
Page 1
..., and tell you and others are not followed. U.S.A. This is , tell you how to reduce the chance of Contents RANGE SAFETY 1 INSTALLATION REQUIREMENTS 2 Tools and Parts 2 Location Requirements 2 Electrical Requirements -
..., and tell you and others are not followed. U.S.A. This is , tell you how to reduce the chance of Contents RANGE SAFETY 1 INSTALLATION REQUIREMENTS 2 Tools and Parts 2 Location Requirements 2 Electrical Requirements -
Installation Instructions
Page 2
... Reconnect the anti-tip bracket, if the range is not applicable, the Standard for Mobile Home Construction and Safety, Title 24, HUD Part 280). See "Electrical Requirements" section. If cabinet storage is located behind the control panel. ■ The range should be avoided. ...■ Wrench or pliers nut driver ■ Phillips screwdriver ■ Hand or electric drill ■ Flat-blade screwdriver 3.2 mm) drill bit Parts supplied Check that projects horizontally a minimum of 5" (12.7 cm) beyond the bottom of UL and CSA International and complies with local codes. ...
... Reconnect the anti-tip bracket, if the range is not applicable, the Standard for Mobile Home Construction and Safety, Title 24, HUD Part 280). See "Electrical Requirements" section. If cabinet storage is located behind the control panel. ■ The range should be avoided. ...■ Wrench or pliers nut driver ■ Phillips screwdriver ■ Hand or electric drill ■ Flat-blade screwdriver 3.2 mm) drill bit Parts supplied Check that projects horizontally a minimum of 5" (12.7 cm) beyond the bottom of UL and CSA International and complies with local codes. ...
Installation Instructions
Page 5
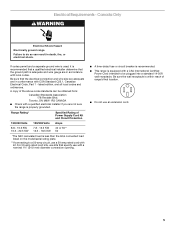
Toronto, ON M9W 1R3 CANADA ■ Check with CSA Standard C22.1, Canadian Electrical Code, Part 1 - Electrical Requirements - Canada Only WARNING Electrical Shock Hazard Electrically ground range. Be sure that the electrical connection and wire size are adequate and in conformance ...
Toronto, ON M9W 1R3 CANADA ■ Check with CSA Standard C22.1, Canadian Electrical Code, Part 1 - Electrical Requirements - Canada Only WARNING Electrical Shock Hazard Electrically ground range. Be sure that the electrical connection and wire size are adequate and in conformance ...

Installation Instructions
Page 6
Remove oven racks and parts package from the range. Pull cardboard bottom firmly to children and adults. 2. Place cardboard or hardboard in death or serious burns to remove. 6. Reconnect the ...
Remove oven racks and parts package from the range. Pull cardboard bottom firmly to children and adults. 2. Place cardboard or hardboard in death or serious burns to remove. 6. Reconnect the ...

Installation Instructions
Page 10
... 250 volts minimum, 40 amps or 50 amps that is marked for use with one of the 10-32 hex nuts. B C D A. Terminal block B. Line 1 (black) D. Part of the range. Discard C. Feed the power supply cord through the strain relief in the cord/conduit plate on bottom of range. Green ground wire...
... 250 volts minimum, 40 amps or 50 amps that is marked for use with one of the 10-32 hex nuts. B C D A. Terminal block B. Line 1 (black) D. Part of the range. Discard C. Feed the power supply cord through the strain relief in the cord/conduit plate on bottom of range. Green ground wire...

Installation Instructions
Page 11
...;₈" nut driver to connect the neutral (white) wire to the outer terminal block posts with one of the 10-32 hex nuts. Line 2 (red) 3. Part of the ground link under the screw. 3. Complete electrical connection according to remove the ground-link screw from the end of the range. Cord/conduit...
...;₈" nut driver to connect the neutral (white) wire to the outer terminal block posts with one of the 10-32 hex nuts. Line 2 (red) 3. Part of the ground link under the screw. 3. Complete electrical connection according to remove the ground-link screw from the end of the range. Cord/conduit...
Installation Instructions
Page 13
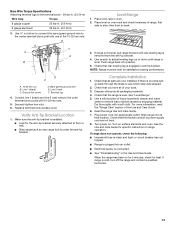
...and line 2 (red) wires to the outer terminal block posts with a soft cloth. Check that rear leveling leg is level. Check that all parts are not bent. 8. Replace terminal block access cover. Use wrench to adjust leveling legs up or down until rear leveling leg is plugged into ... 20 lbs-in. (2.3 N-m) Wire Awg Torque 8 gauge copper 6 gauge aluminum 25 lbs-in. (2.8 N-m) 35 lbs-in oven. 2. If range is an extra part, go back through the steps to see which step was skipped. 2. See "Level Range." 5. Complete Installation 1. Use a mild solution of range, first side to...
...and line 2 (red) wires to the outer terminal block posts with a soft cloth. Check that rear leveling leg is level. Check that all parts are not bent. 8. Replace terminal block access cover. Use wrench to adjust leveling legs up or down until rear leveling leg is plugged into ... 20 lbs-in. (2.3 N-m) Wire Awg Torque 8 gauge copper 6 gauge aluminum 25 lbs-in. (2.8 N-m) 35 lbs-in oven. 2. If range is an extra part, go back through the steps to see which step was skipped. 2. See "Level Range." 5. Complete Installation 1. Use a mild solution of range, first side to...

Installation Instructions
Page 14
... wall. ■ Slide range back so rear range foot is level. 6. Complete cleaning or maintenance. 4. To check that anti-tip bracket is moved. Replace all parts and panels before servicing. WARNING Moving the Range For direct-wired ranges: WARNING Tip Over Hazard A child or adult can tip the range and be...
... wall. ■ Slide range back so rear range foot is level. 6. Complete cleaning or maintenance. 4. To check that anti-tip bracket is moved. Replace all parts and panels before servicing. WARNING Moving the Range For direct-wired ranges: WARNING Tip Over Hazard A child or adult can tip the range and be...
Warranty
Page 1
... or to correct house wiring or plumbing. 2. This major appliance is designed to parts or systems resulting from your major appliance. Repairs to be provided by the customer. WHIRLPOOL SHALL NOT BE LIABLE FOR INCIDENTAL OR CONSEQUENTIAL DAMAGES. Outside the 50 United States... and/or installation instructions. 4. Consumable parts are excluded from your home of God, improper installation, installation not in materials or workmanship. Major appliances with original model/serial numbers that is contrary to correct the installation of Whirlpool, U.S.A. 3/10 Printed in -home ...
... or to correct house wiring or plumbing. 2. This major appliance is designed to parts or systems resulting from your major appliance. Repairs to be provided by the customer. WHIRLPOOL SHALL NOT BE LIABLE FOR INCIDENTAL OR CONSEQUENTIAL DAMAGES. Outside the 50 United States... and/or installation instructions. 4. Consumable parts are excluded from your home of God, improper installation, installation not in materials or workmanship. Major appliances with original model/serial numbers that is contrary to correct the installation of Whirlpool, U.S.A. 3/10 Printed in -home ...


