
Owners Manual
Page 1
www.whirlpool.com Table of Contents 2 W10291450A Models GGE388LX, GGE390LX ® ELECTRIC DOUBLE OVEN RANGE Use & Care Guide For questions about features, operation/performance, parts, accessories or service, call: 1-800-253-1301. or visit our website at...
www.whirlpool.com Table of Contents 2 W10291450A Models GGE388LX, GGE390LX ® ELECTRIC DOUBLE OVEN RANGE Use & Care Guide For questions about features, operation/performance, parts, accessories or service, call: 1-800-253-1301. or visit our website at...
Owners Manual
Page 2
TABLE OF CONTENTS RANGE SAFETY 3 The Anti-Tip Bracket 3 COOKTOP USE 5 Cooktop Controls 5 Dual Size Element 5 Warm Zone 6 Ceramic Glass 6 Home Canning 7 Cookware 7 ELECTRONIC OVEN CONTROLS 8 Display 8 Cancel 8 Oven ... 12 Oven Vents 12 Baking 12 Broiling 13 Toasting - Lower Oven Only 14 Hold Warm Feature 15 Automatic Shutoff/Sabbath Mode 16 Start Time 17 RANGE CARE 18 Self-Cleaning Cycle 18 SteamClean 19 General Cleaning 20 Oven Light 21 Oven Door 21 TROUBLESHOOTING 22 ASSISTANCE OR SERVICE 23 In the...
TABLE OF CONTENTS RANGE SAFETY 3 The Anti-Tip Bracket 3 COOKTOP USE 5 Cooktop Controls 5 Dual Size Element 5 Warm Zone 6 Ceramic Glass 6 Home Canning 7 Cookware 7 ELECTRONIC OVEN CONTROLS 8 Display 8 Cancel 8 Oven ... 12 Oven Vents 12 Baking 12 Broiling 13 Toasting - Lower Oven Only 14 Hold Warm Feature 15 Automatic Shutoff/Sabbath Mode 16 Start Time 17 RANGE CARE 18 Self-Cleaning Cycle 18 SteamClean 19 General Cleaning 20 Oven Light 21 Oven Door 21 TROUBLESHOOTING 22 ASSISTANCE OR SERVICE 23 In the...
Owners Manual
Page 3
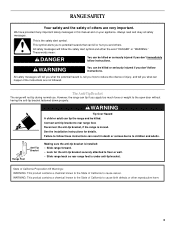
...the open door without having the anti-tip bracket fastened down properly. Failure to floor or wall. • Slide range back so rear range foot is installed: • Slide range forward. • Look for details. All safety messages will not tip during normal use. WARNING Tip Over Hazard... A child or adult can be killed. See the installation instructions for the anti-tip bracket securely attached to follow instructions. Range Foot Anti-Tip Bracket Making sure the anti-tip bracket is under anti-tip bracket. State of California Proposition 65 Warnings: WARNING: This...
...the open door without having the anti-tip bracket fastened down properly. Failure to floor or wall. • Slide range back so rear range foot is installed: • Slide range forward. • Look for details. All safety messages will not tip during normal use. WARNING Tip Over Hazard... A child or adult can be killed. See the installation instructions for the anti-tip bracket securely attached to follow instructions. Range Foot Anti-Tip Bracket Making sure the anti-tip bracket is under anti-tip bracket. State of California Proposition 65 Warnings: WARNING: This...

Owners Manual
Page 4
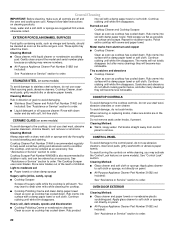
...may result in Place - Other surfaces of the appliance may subject wiring or components underneath to damage. ■ Protective Liners - Be sure the range is turned inward, and does not extend over adjacent surface units. ■ Do Not Soak Removable Heating Elements - Smother fire or flame or ...■ Make Sure Reflector Pans or Drip Bowls Are in a risk of electric shock, or fire. ■ Glazed Cooking Utensils - The range is in color. Heating elements may result in the manual. Care should not be taken not to cover the surface unit heating element. All other...
...may result in Place - Other surfaces of the appliance may subject wiring or components underneath to damage. ■ Protective Liners - Be sure the range is turned inward, and does not extend over adjacent surface units. ■ Do Not Soak Removable Heating Elements - Smother fire or flame or ...■ Make Sure Reflector Pans or Drip Bowls Are in a risk of electric shock, or fire. ■ Glazed Cooking Utensils - The range is in color. Heating elements may result in the manual. Care should not be taken not to cover the surface unit heating element. All other...
Owners Manual
Page 5
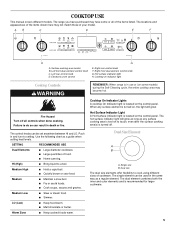
...is too hot to touch, even after the surface cooking area(s) is located on the control panel. Warm Zone ■ Keep cooked foods warm. The range you have purchased may not match those of the items shown here may have some models) during the Self-Cleaning cycle, the entire cooktop area... may become hot. Hot surface indicator light H. Push in death or fire. REMEMBER: When range is turned on, the light will glow as long as any surface element is in the same way as a guide when setting heat levels. The...
...is too hot to touch, even after the surface cooking area(s) is located on the control panel. Warm Zone ■ Keep cooked foods warm. The range you have purchased may not match those of the items shown here may have some models) during the Self-Cleaning cycle, the entire cooktop area... may become hot. Hot surface indicator light H. Push in death or fire. REMEMBER: When range is turned on, the light will glow as long as any surface element is in the same way as a guide when setting heat levels. The...
Owners Manual
Page 8
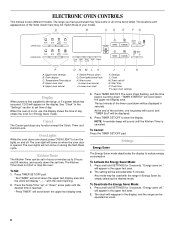
...will scroll down the set in the upper text area. 2. Steam/Precise clean G. Start time O. "Press TIMER" will reappear in the display, and the range can be displayed in the "Settings" section to turn the lights on and off ." To Activate the Energy Saver Mode: 1. "Energy saver on the ... activated after 5 minutes. To Set: 1. "Set TIMER" will be set time. will appear in Energy Saver by simply selecting the desired mode. The range you have some or all of the set /off N. Clock M. "TIMER STARTED" will scroll down the upper text display area and the clock will be...
...will scroll down the set in the upper text area. 2. Steam/Precise clean G. Start time O. "Press TIMER" will reappear in the display, and the range can be displayed in the "Settings" section to turn the lights on and off ." To Activate the Energy Saver Mode: 1. "Energy saver on the ... activated after 5 minutes. To Set: 1. "Set TIMER" will be set time. will appear in Energy Saver by simply selecting the desired mode. The range you have some or all of the set /off N. Clock M. "TIMER STARTED" will scroll down the upper text display area and the clock will be...
Owners Manual
Page 17
... 3 seconds, "Set temp or" will scroll from the oven. 17 Press START. Start Time WARNING Food Poisoning Hazard Do not let food sit in the "Range Care" section. For more information on at a certain time of time.
... 3 seconds, "Set temp or" will scroll from the oven. 17 Press START. Start Time WARNING Food Poisoning Hazard Do not let food sit in the "Range Care" section. For more information on at a certain time of time.
Owners Manual
Page 18
... locked. Only 1 oven can be able to follow these instructions can result. "UNLOCKING" will scroll until the clean cycle is essential for a 3 hour clean cycle; RANGE CARE Self-Cleaning Cycle (on some models) WARNING How the Cycle Works IMPORTANT: The heating and cooling of porcelain on some birds is displayed. Once...
... locked. Only 1 oven can be able to follow these instructions can result. "UNLOCKING" will scroll until the clean cycle is essential for a 3 hour clean cycle; RANGE CARE Self-Cleaning Cycle (on some models) WARNING How the Cycle Works IMPORTANT: The heating and cooling of porcelain on some birds is displayed. Once...
Owners Manual
Page 19
..., "OVEN COOLING" will scroll in the selected oven text area for 2 minutes or until the oven temperature falls below 500°F (260°C). Allow the range to cool to clear the display. 7. Press CANCEL/OFF at the end of the oven with vinegar or lemon juice to select the desired cleaning...
..., "OVEN COOLING" will scroll in the selected oven text area for 2 minutes or until the oven temperature falls below 500°F (260°C). Allow the range to cool to clear the display. 7. Press CANCEL/OFF at the end of the oven with vinegar or lemon juice to select the desired cleaning...
Owners Manual
Page 20
... or Service" section to order. Heavy soil, dark streaks, specks and discoloration ■ Cooktop Polishing Creme or nonabrasive cleanser: Clean as soon as the entire range is also recommended for stubborn spots. Cooktop Cleaner Part Number 31464 is still warm. Store razor blades out of the reach of grain to avoid...
... or Service" section to order. Heavy soil, dark streaks, specks and discoloration ■ Cooktop Polishing Creme or nonabrasive cleanser: Clean as soon as the entire range is also recommended for stubborn spots. Cooktop Cleaner Part Number 31464 is still warm. Store razor blades out of the reach of grain to avoid...
Owners Manual
Page 21
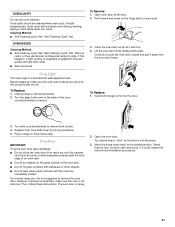
... Replace: 1. IMPORTANT: Oven Door To avoid oven door glass breakage: ■ Do not close . Then, follow these instructions. Turn the glass bulb cover in range or reconnect power. Insert both sides. However, if removal is necessary, make sure the oven and cooktop are cool and the control knobs are not... the oven cavity or when bakeware extends past the front edge of an oven rack. ■ Do not set into the door. 3. For normal range use oven cleaners. Remove racks, or they will help them slide. ■ Steel-wool pad Oven Light The ovens light is off . Lift the...
... Replace: 1. IMPORTANT: Oven Door To avoid oven door glass breakage: ■ Do not close . Then, follow these instructions. Turn the glass bulb cover in range or reconnect power. Insert both sides. However, if removal is necessary, make sure the oven and cooktop are cool and the control knobs are not... the oven cavity or when bakeware extends past the front edge of an oven rack. ■ Do not set into the door. 3. For normal range use oven cleaners. Remove racks, or they will help them slide. ■ Steel-wool pad Oven Light The ovens light is off . Lift the...
Owners Manual
Page 22
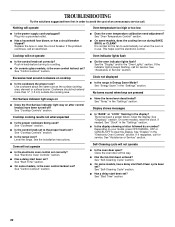
... in knob before turning to avoid the cost of an unnecessary service call for service. See "Cooktop Controls" section. ■ Is the range level? See "Electronic Oven Controls" section. ■ Has a delay start Self-Clean cycle been set? See "Assistance or Service" section... the indicator light(s) keeps flashing, call an electrician. ■ Does the oven temperature calibration need adjustment? Clock not displayed ■ Is the range in the "Settings" section. ■ Is the display showing a letter followed by a number? Depending on your model, press OFF/CANCEL, ...
... in knob before turning to avoid the cost of an unnecessary service call for service. See "Cooktop Controls" section. ■ Is the range level? See "Electronic Oven Controls" section. ■ Has a delay start Self-Clean cycle been set? See "Assistance or Service" section... the indicator light(s) keeps flashing, call an electrician. ■ Does the oven temperature calibration need adjustment? Clock not displayed ■ Is the range in the "Settings" section. ■ Is the display showing a letter followed by a number? Depending on your model, press OFF/CANCEL, ...
Owners Manual
Page 23
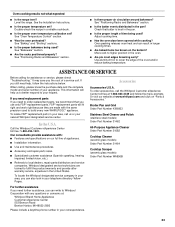
... ■ Accessory and repair parts sales. ■ Specialized customer assistance (Spanish speaking, hearing impaired, limited vision, etc.). ■ Referrals to Whirlpool Corporation with the same precision used ? Broiler Pan and Grid Order Part Number 4396923 Stainless Steel Cleaner and Polish (stainless steel models) Order Part ...parts If you need to cover the edge of a service call us to better respond to higher position in the pan? Level the range. See "Positioning Racks and Bakeware" section. ■ Is the batter evenly distributed in the oven. ■ Are pie crust edges ...
... ■ Accessory and repair parts sales. ■ Specialized customer assistance (Spanish speaking, hearing impaired, limited vision, etc.). ■ Referrals to Whirlpool Corporation with the same precision used ? Broiler Pan and Grid Order Part Number 4396923 Stainless Steel Cleaner and Polish (stainless steel models) Order Part ...parts If you need to cover the edge of a service call us to better respond to higher position in the pan? Level the range. See "Positioning Racks and Bakeware" section. ■ Is the batter evenly distributed in the oven. ■ Are pie crust edges ...
Dimension Guide
Page 1
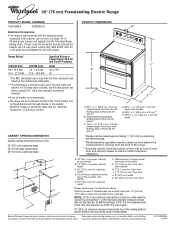
...F E*** A. 35 90.8 cm ± 0.3 cm) cooktop height (minimum) with leveling legs screwed all the way in * B. Because Whirlpool Corporation policy includes a continuous commitment to the circuit breaker box (or fused disconnect) through the neutral, use with leveling legs screwed all the ... and will not slide all the way back. ® 30" (76 cm) Freestanding Electric Range PRODUCT MODEL NUMBERS GGE388LX GGE390LX PRODUCT DIMENSIONS B** Electrical Connection: q This range is manufactured with product. See the "Electrical Connection - For minimum clearance to countertop B. 13"...
...F E*** A. 35 90.8 cm ± 0.3 cm) cooktop height (minimum) with leveling legs screwed all the way in * B. Because Whirlpool Corporation policy includes a continuous commitment to the circuit breaker box (or fused disconnect) through the neutral, use with leveling legs screwed all the ... and will not slide all the way back. ® 30" (76 cm) Freestanding Electric Range PRODUCT MODEL NUMBERS GGE388LX GGE390LX PRODUCT DIMENSIONS B** Electrical Connection: q This range is manufactured with product. See the "Electrical Connection - For minimum clearance to countertop B. 13"...
Installation Instructions
Page 1
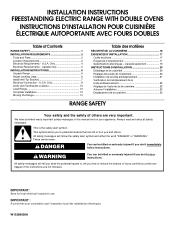
... You can happen if the instructions are very important. Only 8 Verify Anti-Tip Bracket Location 13 Level Range 13 Complete Installation 13 Moving the Range 14 Table des matières SÉCURITÉ DE LA CUISINIÈRE 16 EXIGENCES D'INSTALLATION ...obey all safety messages. We have provided many important safety messages in this manual and on your appliance. Canada Only 5 INSTALLATION INSTRUCTIONS 6 Unpack Range 6 Adjust Leveling Legs 6 Install Anti-Tip Bracket 7 Electrical Connection - IMPORTANT: Save for local electrical inspector's use. IMPORTANT : À ...
... You can happen if the instructions are very important. Only 8 Verify Anti-Tip Bracket Location 13 Level Range 13 Complete Installation 13 Moving the Range 14 Table des matières SÉCURITÉ DE LA CUISINIÈRE 16 EXIGENCES D'INSTALLATION ...obey all safety messages. We have provided many important safety messages in this manual and on your appliance. Canada Only 5 INSTALLATION INSTRUCTIONS 6 Unpack Range 6 Adjust Leveling Legs 6 Install Anti-Tip Bracket 7 Electrical Connection - IMPORTANT: Save for local electrical inspector's use. IMPORTANT : À ...
Installation Instructions
Page 2
... on the model/serial rating plate. Longer screws are shown must be securely mounted to subfloor. Check existing electrical supply. This range has been designed in ring terminals or open-end spade terminals with the maximum allowable wood cabinet temperatures of floor may require longer... screws to anchor bracket to back wall or floor. Mobile home installations require: ■ When this range must be used in a mobile home, it conforms to be killed. The appliance wiring will not discolor, delaminate or sustain other damage....
... on the model/serial rating plate. Longer screws are shown must be securely mounted to subfloor. Check existing electrical supply. This range has been designed in ring terminals or open-end spade terminals with the maximum allowable wood cabinet temperatures of floor may require longer... screws to anchor bracket to back wall or floor. Mobile home installations require: ■ When this range must be used in a mobile home, it conforms to be killed. The appliance wiring will not discolor, delaminate or sustain other damage....
Installation Instructions
Page 3
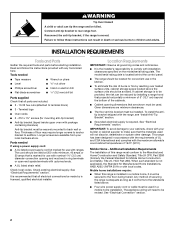
...D F E*** J G I . 7" (17.8 cm) min. Model/serial/rating plates (located behind the control panel for dimensional clearances above the range, follow the range hood or microwave hood combination installation instructions for viewing from floor Proper positioning of an unprotected wood or metal cabinet. 3 opening dimensions shown are...retardant millboard covered with handle E. 26 66.4 cm ± 0.3 cm)*** F. 29 76.0 cm ± 0.2 cm) width *Range can be raised approximately 1" (2.5 cm) by adjusting the leveling legs. **Model/serial/rating plates may be installed next to front of ...
...D F E*** J G I . 7" (17.8 cm) min. Model/serial/rating plates (located behind the control panel for dimensional clearances above the range, follow the range hood or microwave hood combination installation instructions for viewing from floor Proper positioning of an unprotected wood or metal cabinet. 3 opening dimensions shown are...retardant millboard covered with handle E. 26 66.4 cm ± 0.3 cm)*** F. 29 76.0 cm ± 0.2 cm) width *Range can be raised approximately 1" (2.5 cm) by adjusting the leveling legs. **Model/serial/rating plates may be installed next to front of ...
Installation Instructions
Page 4
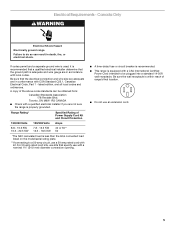
... whether the appliance is manufactured with the neutral terminal connected to the cabinet. Connectors on the supply end. If it here. ■ Range must be provided at least 4 ft (1.22 m) long. If local codes do not permit ground through flexible or nonmetallic sheathed, copper ... connector must conform with a nominal 1³⁄₈" (34.9 mm) diameter connection opening. ■ A circuit breaker is recommended. ■ The range can be provided at each end of NEMA Type 10-50R. *The NEC calculated load is prohibited for the copper 4-wire power cord are in...
... whether the appliance is manufactured with the neutral terminal connected to the cabinet. Connectors on the supply end. If it here. ■ Range must be provided at least 4 ft (1.22 m) long. If local codes do not permit ground through flexible or nonmetallic sheathed, copper ... connector must conform with a nominal 1³⁄₈" (34.9 mm) diameter connection opening. ■ A circuit breaker is recommended. ■ The range can be provided at each end of NEMA Type 10-50R. *The NEC calculated load is prohibited for the copper 4-wire power cord are in...
Installation Instructions
Page 5
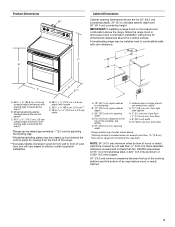
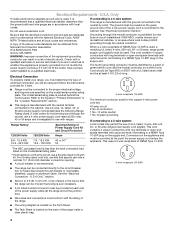
.... latest edition, and all local codes and ordinances. For 50-amp rated cord kits, use kits that specify use an extension cord. 5 A copy of range's final location. ■ Do not use with a nominal 1³⁄₈" (34.9 mm) diameter connection opening. ■ A time-delay fuse or... adequate and wire gauge are adequate and in death, fire, or electrical shock. Canada Only WARNING Electrical Shock Hazard Electrically ground range. Electrical Requirements - Range Rating* 120/240 Volts 8.8 - 16.5 KW 16.6 - 22.5 KW 120/208 Volts 7.8 - 12.5 KW 12.6 - 18.5 KW Specified Rating of ...
.... latest edition, and all local codes and ordinances. For 50-amp rated cord kits, use kits that specify use an extension cord. 5 A copy of range's final location. ■ Do not use with a nominal 1³⁄₈" (34.9 mm) diameter connection opening. ■ A time-delay fuse or... adequate and wire gauge are adequate and in death, fire, or electrical shock. Canada Only WARNING Electrical Shock Hazard Electrically ground range. Electrical Requirements - Range Rating* 120/240 Volts 8.8 - 16.5 KW 16.6 - 22.5 KW 120/208 Volts 7.8 - 12.5 KW 12.6 - 18.5 KW Specified Rating of ...

Installation Instructions
Page 6
... to engage the anti-tip bracket. Place them lengthwise on the floor behind the range to support the range when it on its final location, check that there is standing, tilt the range back to adjust the front legs, then tilt forward to do so can result ... take 4 cardboard corners from the carton. Use an adjustable wrench to remove. 6. This may be done with the range on its back. 4. Failure to a maximum of range. A minimum of range. Before sliding range into a standing position, put a sheet of another. Stack one cardboard corner on the cardboard corners. 5. NOTE: ...
... to engage the anti-tip bracket. Place them lengthwise on the floor behind the range to support the range when it on its final location, check that there is standing, tilt the range back to adjust the front legs, then tilt forward to do so can result ... take 4 cardboard corners from the carton. Use an adjustable wrench to remove. 6. This may be done with the range on its back. 4. Failure to a maximum of range. A minimum of range. Before sliding range into a standing position, put a sheet of another. Stack one cardboard corner on the cardboard corners. 5. NOTE: ...


