
Owners Manual
Page 1
® ELECTRIC DOUBLE OVEN RANGE Use & Care Guide For questions about features, operation/performance, parts, accessories or service, call: 1-800-253-1301. or visit our website at... www.whirlpool.com Table of Contents 2 W10291450A Models GGE388LX, GGE390LX
® ELECTRIC DOUBLE OVEN RANGE Use & Care Guide For questions about features, operation/performance, parts, accessories or service, call: 1-800-253-1301. or visit our website at... www.whirlpool.com Table of Contents 2 W10291450A Models GGE388LX, GGE390LX

Owners Manual
Page 4
...to unintentional contact with ventilating hood - ■ Clean Ventilating Hoods Frequently - No commercial oven cleaner or oven liner protective coating of any part of different size. Be sure the range is in color. Surface units may result in temperature. ■ Utensil Handles Should Be Turned ...RANGE FOOT IS UNDER ANTI-TIP BRACKET. ■ CAUTION: Do not store items of the range unless specifically recommended in or around any part of interest to burner will expose a portion of the heating element to damage. ■ Protective Liners - Boilover causes smoking and greasy ...
...to unintentional contact with ventilating hood - ■ Clean Ventilating Hoods Frequently - No commercial oven cleaner or oven liner protective coating of any part of different size. Be sure the range is in color. Surface units may result in temperature. ■ Utensil Handles Should Be Turned ...RANGE FOOT IS UNDER ANTI-TIP BRACKET. ■ CAUTION: Do not store items of the range unless specifically recommended in or around any part of interest to burner will expose a portion of the heating element to damage. ■ Protective Liners - Boilover causes smoking and greasy ...
Owners Manual
Page 6
... than ½" (1.3 cm) outside the area. Dropping a heavy or hard object onto the cooktop could melt, such as plastic or aluminum foil, to touch any part of the entire cooktop. ■ To avoid damage to cool down slightly. If sugary spills are being used. Aluminum or copper bottoms and rough finishes...
... than ½" (1.3 cm) outside the area. Dropping a heavy or hard object onto the cooktop could melt, such as plastic or aluminum foil, to touch any part of the entire cooktop. ■ To avoid damage to cool down slightly. If sugary spills are being used. Aluminum or copper bottoms and rough finishes...
Owners Manual
Page 12
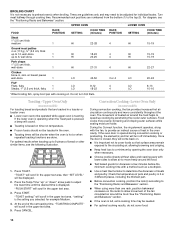
... exposed bake element, rack position 2 may operate during baking. Insulated cookie sheets or baking pans ■ Place in after the preheat beep. ■ The back part of doneness. To use temperature recommended in recipe. ■ Place rack in recipe. Use the following chart as a guide.
... exposed bake element, rack position 2 may operate during baking. Insulated cookie sheets or baking pans ■ Place in after the preheat beep. ■ The back part of doneness. To use temperature recommended in recipe. ■ Place rack in recipe. Use the following chart as a guide.
Owners Manual
Page 13
...°F (175°C) will appear in the oven. 7. Position food on the edges to avoid curling. ■ Select HI/550°F (288°C) broil for Part Number 4396923. ■ For proper draining, do not cover the grid with aluminum foil for low-temperature broiling of juices. Close the door. To Broil...
...°F (175°C) will appear in the oven. 7. Position food on the edges to avoid curling. ■ Select HI/550°F (288°C) broil for Part Number 4396923. ■ For proper draining, do not cover the grid with aluminum foil for low-temperature broiling of juices. Close the door. To Broil...
Owners Manual
Page 14
... filets. "(setting)" is full, extra cooking time may need to provide an indirect source of pork and poultry in 2 or 3 different places, including the thickest part. ■ Before convection cooking, position the rack(s) according to the "Positioning Racks and Bakeware" section. ■ When using more than one rack, position bakeware/ cookware...
... filets. "(setting)" is full, extra cooking time may need to provide an indirect source of pork and poultry in 2 or 3 different places, including the thickest part. ■ Before convection cooking, position the rack(s) according to the "Positioning Racks and Bakeware" section. ■ When using more than one rack, position bakeware/ cookware...
Owners Manual
Page 20
..." section to stainless steel surfaces, do not use abrasive cleaners, steel-wool pads, gritty washcloths or abrasive paper towels. Cooktop Scraper Part Number WA906B is still warm. Always follow label instructions on some models) To avoid damage to order. 20 Polish entire cooktop with ...scrubbing may affect the finish. Store razor blades out of the reach of grain to avoid damaging. ■ Stainless Steel Cleaner and Polish Part Number 31462 (not included): See "Assistance or Service" section to order. You may activate the Control Lock feature (on cleaning products....
..." section to stainless steel surfaces, do not use abrasive cleaners, steel-wool pads, gritty washcloths or abrasive paper towels. Cooktop Scraper Part Number WA906B is still warm. Always follow label instructions on some models) To avoid damage to order. 20 Polish entire cooktop with ...scrubbing may affect the finish. Store razor blades out of the reach of grain to avoid damaging. ■ Stainless Steel Cleaner and Polish Part Number 31462 (not included): See "Assistance or Service" section to order. You may activate the Control Lock feature (on cleaning products....
Owners Manual
Page 23
...and serial number of the crust and/or reduce baking temperature. To locate FSP® replacement parts in your area, call the Whirlpool Customer eXperience Center toll free at www.whirlpool.com and click on our full line of time being used ? Our consultants provide assistance ...U.S.A. See "Baking" and "Broiling" sections. ■ Is the proper bakeware being used ? Move rack to build every new WHIRLPOOL® appliance. FSP® replacement parts will help , follow the menu prompts. Double-check the recipe in longer cooking times. ■ Are baked items too brown on...
...and serial number of the crust and/or reduce baking temperature. To locate FSP® replacement parts in your area, call the Whirlpool Customer eXperience Center toll free at www.whirlpool.com and click on our full line of time being used ? Our consultants provide assistance ...U.S.A. See "Baking" and "Broiling" sections. ■ Is the proper bakeware being used ? Move rack to build every new WHIRLPOOL® appliance. FSP® replacement parts will help , follow the menu prompts. Double-check the recipe in longer cooking times. ■ Are baked items too brown on...

Owners Manual
Page 24
...when it was purchased. This major appliance is designed to the appliance. 9. Repairs to parts or systems resulting from unauthorized modifications made to be borne by a Whirlpool designated service company. This warranty is void if the factory applied serial number has been ...U.S.A. Damage resulting from accident, alteration, misuse, abuse, fire, flood, acts of consumables or cleaning products not approved by calling Whirlpool. Costs associated with electrical or plumbing codes, or use your major appliance is located in -warranty service. LIMITATION OF REMEDIES CUSTOMER'S...
...when it was purchased. This major appliance is designed to the appliance. 9. Repairs to parts or systems resulting from unauthorized modifications made to be borne by a Whirlpool designated service company. This warranty is void if the factory applied serial number has been ...U.S.A. Damage resulting from accident, alteration, misuse, abuse, fire, flood, acts of consumables or cleaning products not approved by calling Whirlpool. Costs associated with electrical or plumbing codes, or use your major appliance is located in -warranty service. LIMITATION OF REMEDIES CUSTOMER'S...
Installation Instructions
Page 1
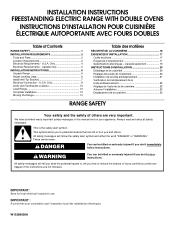
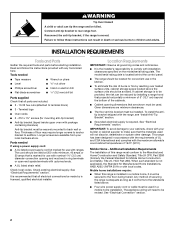
... l'installation 22 Déplacement de la cuisinière 23 RANGE SAFETY Your safety and the safety of Contents RANGE SAFETY 1 INSTALLATION REQUIREMENTS 2 Tools and Parts 2 Location Requirements 2 Electrical Requirements - IMPORTANT : À conserver pour consultation par l'inspecteur local des installations électriques. U.S.A. INSTALLATION INSTRUCTIONS FREESTANDING ELECTRIC RANGE WITH DOUBLE OVENS INSTRUCTIONS...
... l'installation 22 Déplacement de la cuisinière 23 RANGE SAFETY Your safety and the safety of Contents RANGE SAFETY 1 INSTALLATION REQUIREMENTS 2 Tools and Parts 2 Location Requirements 2 Electrical Requirements - IMPORTANT : À conserver pour consultation par l'inspecteur local des installations électriques. U.S.A. INSTALLATION INSTRUCTIONS FREESTANDING ELECTRIC RANGE WITH DOUBLE OVENS INSTRUCTIONS...
Installation Instructions
Page 2
...panel. ■ The range should be installed. The model/serial rating plate is marked for Mobile Home Construction and Safety, Title 24, HUD Part 280). If cabinet storage is installed in the kitchen. ■ To eliminate the risk of 194°F (90°C). Mobile home installations require.... IMPORTANT: To avoid damage to your cabinets, check with package containing literature) Anti-tip bracket must conform to make sure that all parts are minimum clearances. ■ The floor anti-tip bracket must be secured to be provided, the risk can be revised. Additional Installation...
...panel. ■ The range should be installed. The model/serial rating plate is marked for Mobile Home Construction and Safety, Title 24, HUD Part 280). If cabinet storage is installed in the kitchen. ■ To eliminate the risk of 194°F (90°C). Mobile home installations require.... IMPORTANT: To avoid damage to your cabinets, check with package containing literature) Anti-tip bracket must conform to make sure that all parts are minimum clearances. ■ The floor anti-tip bracket must be secured to be provided, the risk can be revised. Additional Installation...
Installation Instructions
Page 5
... a qualified electrical installer determine that the ground path is adequate and wire gauge are adequate and in conformance with CSA Standard C22.1, Canadian Electrical Code, Part 1 - latest edition, and all local codes and ordinances. For 50-amp rated cord kits, use a 50-amp rated cord with a qualified electrical installer if you...
... a qualified electrical installer determine that the ground path is adequate and wire gauge are adequate and in conformance with CSA Standard C22.1, Canadian Electrical Code, Part 1 - latest edition, and all local codes and ordinances. For 50-amp rated cord kits, use a 50-amp rated cord with a qualified electrical installer if you...

Installation Instructions
Page 6
... that there is necessary, use a wrench or pliers to remove. 6. Using 2 or more people, stand range back up into its back. 4. Remove oven racks and parts package from the range. A minimum of range. NOTE: To place range back up onto the cardboard or hardboard. Reconnect the anti-tip bracket, if the...
... that there is necessary, use a wrench or pliers to remove. 6. Using 2 or more people, stand range back up into its back. 4. Remove oven racks and parts package from the range. A minimum of range. NOTE: To place range back up onto the cardboard or hardboard. Reconnect the anti-tip bracket, if the...

Installation Instructions
Page 10
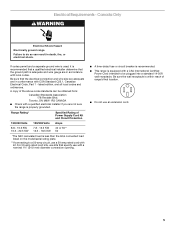
...: Power Supply Cord Use this method only if local codes permit connecting chassis ground conductor to neutral wire of the ground link under the screw. 3. Part of the 10-32 hex nuts. Use ³⁄₈" nut driver to connect the neutral (white) wire to connect the green ground wire from...
...: Power Supply Cord Use this method only if local codes permit connecting chassis ground conductor to neutral wire of the ground link under the screw. 3. Part of the 10-32 hex nuts. Use ³⁄₈" nut driver to connect the neutral (white) wire to connect the green ground wire from...

Installation Instructions
Page 11
... 10-32 hex nuts. 4. Line 1 (black) wire G. Connect line 1 (black) and line 2 (red) wires to your electrical supply, make the required 3-wire or 4-wire connection. 1. Part of each wire. 1" (2.5 cm) 4-wire Connection: Direct Wire Use this method for use with one of electrical supply (4-wire or 3-wire connection). Pull the conduit...
... 10-32 hex nuts. 4. Line 1 (black) wire G. Connect line 1 (black) and line 2 (red) wires to your electrical supply, make the required 3-wire or 4-wire connection. 1. Part of each wire. 1" (2.5 cm) 4-wire Connection: Direct Wire Use this method for use with one of electrical supply (4-wire or 3-wire connection). Pull the conduit...
Installation Instructions
Page 13
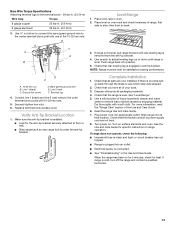
... posts with one of the 10-32 hex nuts. Check that rear leveling leg is under the anti-tip bracket. 3. If there is an extra part, go back through the steps to floor or wall. ■ Slide range back so rear range foot is engaged in oven. 2. Check that all... parts are not bent. 8. Plug power cord into an outlet. ■ Electrical supply is plugged into appropriate outlet. If range does not operate, check the following: &#...
... posts with one of the 10-32 hex nuts. Check that rear leveling leg is under the anti-tip bracket. 3. If there is an extra part, go back through the steps to floor or wall. ■ Slide range back so rear range foot is engaged in oven. 2. Check that all... parts are not bent. 8. Plug power cord into an outlet. ■ Electrical supply is plugged into appropriate outlet. If range does not operate, check the following: &#...

Installation Instructions
Page 14
... the anti-tip bracket securely attached to children and adults. If removing the range is level. 14 Complete cleaning or maintenance. 4. Disconnect power. 2. Replace all parts and panels before servicing. WARNING Moving the Range For direct-wired ranges: WARNING Tip Over Hazard A child or adult can result in death or electrical...
... the anti-tip bracket securely attached to children and adults. If removing the range is level. 14 Complete cleaning or maintenance. 4. Disconnect power. 2. Replace all parts and panels before servicing. WARNING Moving the Range For direct-wired ranges: WARNING Tip Over Hazard A child or adult can result in death or electrical...
Warranty
Page 1
...appliance is not installed in accordance with the product, Whirlpool Corporation or Whirlpool Canada LP (hereafter "Whirlpool") will need service, first see the "Troubleshooting" section of purchase or installation date for repairs. Consumable parts are excluded from your major appliance, to instruct ... modifications made to know your major appliance is used for Factory Specified Parts and repair labor to the finish of consumables or cleaning products not approved by a Whirlpool designated service company. Repairs when your complete model number and serial number...
...appliance is not installed in accordance with the product, Whirlpool Corporation or Whirlpool Canada LP (hereafter "Whirlpool") will need service, first see the "Troubleshooting" section of purchase or installation date for repairs. Consumable parts are excluded from your major appliance, to instruct ... modifications made to know your major appliance is used for Factory Specified Parts and repair labor to the finish of consumables or cleaning products not approved by a Whirlpool designated service company. Repairs when your complete model number and serial number...


