Owners Manual
Page 1
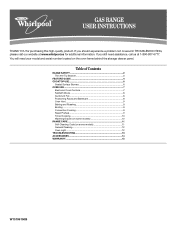
You will need assistance, call us at www.whirlpool.ca for purchasing this high-quality product. Table of Contents RANGE SAFETY 2 The Anti-Tip Bracket 3 FEATURE GUIDE 4 COOKTOP USE 6 Sealed Surface Burners 6 OVEN USE 7 Electronic Oven Controls 7 Sabbath Mode 8 Aluminum ...Cleaning Cycle (on the oven frame behind the storage drawer panel. ® GAS RANGE USER INSTRUCTIONS THANK YOU for additional information. If you still need your model and serial number located on some models 11 General Cleaning 12 Oven Light 12 TROUBLESHOOTING 13 ACCESSORIES 14 WARRANTY 15 ...
You will need assistance, call us at www.whirlpool.ca for purchasing this high-quality product. Table of Contents RANGE SAFETY 2 The Anti-Tip Bracket 3 FEATURE GUIDE 4 COOKTOP USE 6 Sealed Surface Burners 6 OVEN USE 7 Electronic Oven Controls 7 Sabbath Mode 8 Aluminum ...Cleaning Cycle (on the oven frame behind the storage drawer panel. ® GAS RANGE USER INSTRUCTIONS THANK YOU for additional information. If you still need your model and serial number located on some models 11 General Cleaning 12 Oven Light 12 TROUBLESHOOTING 13 ACCESSORIES 14 WARRANTY 15 ...
Owners Manual
Page 4
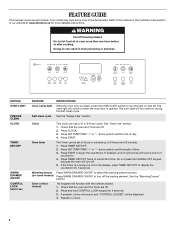
Doing so can use a 12 or 24-hour cycle. See the "Range Care" section. See "Oven Use" section. 1. Press START. Check that the oven and Timer are off . If enabled, a tone will sound, and "CONTROL LOCKED" will ... day. 4. If the Timer is closed, press the OVEN LIGHT switch to 9 hours and 59 minutes. 1. FEATURE GUIDE This manual covers several models. The oven light will sound at www.whirlpool.ca for more than one hour before or after cooking. Press CLOCK. 3. Press START to display the countdown for 3 seconds. 3. Repeat...
Doing so can use a 12 or 24-hour cycle. See the "Range Care" section. See "Oven Use" section. 1. Press START. Check that the oven and Timer are off . If enabled, a tone will sound, and "CONTROL LOCKED" will ... day. 4. If the Timer is closed, press the OVEN LIGHT switch to 9 hours and 59 minutes. 1. FEATURE GUIDE This manual covers several models. The oven light will sound at www.whirlpool.ca for more than one hour before or after cooking. Press CLOCK. 3. Press START to display the countdown for 3 seconds. 3. Repeat...

Owners Manual
Page 6
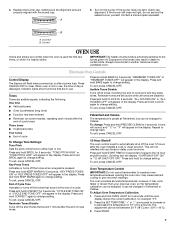
...designed to IGNITE will click. Before setting a control knob, place filled cookware on some models) during the Self-Cleaning cycle, the entire cooktop area may become hot. Only the burner...control knob turned to give ultra-power when fully on the grate. REMEMBER: When range is in death or fire. Turn off all controls are off and the oven and...Feature The right and left front burners are turned to be lit manually. Alignment pins D. Gas tube opening: Gas must flow freely throughout the gas tube opening IMPORTANT: Do not obstruct the flow of the pan. A B D C E...
...designed to IGNITE will click. Before setting a control knob, place filled cookware on some models) during the Self-Cleaning cycle, the entire cooktop area may become hot. Only the burner...control knob turned to give ultra-power when fully on the grate. REMEMBER: When range is in death or fire. Turn off all controls are off and the oven and...Feature The right and left front burners are turned to be lit manually. Alignment pins D. Gas tube opening: Gas must flow freely throughout the gas tube opening IMPORTANT: Do not obstruct the flow of the pan. A B D C E...
Owners Manual
Page 7
... CANCEL/OFF. Press and hold PRECISE CLEAN for 5 seconds to toggle to change setting. Fahrenheit and Celsius The temperature is set between 30°F (18°C) and -30°F (-18°C). 3. To exit, press CANCEL/OFF. 12-Hour Shutoff The oven control is preset at the end of cycle... tones Three tones ■ Invalid pad press Four tones ■ End of cycle To Change Tone Settings: Tone Pitch Sets the pitch of some models), repeating each minute after the oven initiates a cook or clean function. Press and hold BAKE for 5 seconds. Press and hold CLOCK for 5 seconds...
... CANCEL/OFF. Press and hold PRECISE CLEAN for 5 seconds to toggle to change setting. Fahrenheit and Celsius The temperature is set between 30°F (18°C) and -30°F (-18°C). 3. To exit, press CANCEL/OFF. 12-Hour Shutoff The oven control is preset at the end of cycle... tones Three tones ■ Invalid pad press Four tones ■ End of cycle To Change Tone Settings: Tone Pitch Sets the pitch of some models), repeating each minute after the oven initiates a cook or clean function. Press and hold BAKE for 5 seconds. Press and hold CLOCK for 5 seconds...
Owners Manual
Page 9
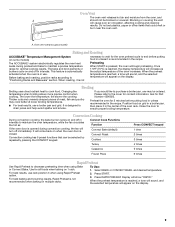
...circulates the hot air. For best results, use a broiler pan and grid. Oven vent (ceramic glass model) Baking and Roasting ACCUBAKE® Temperature Management System (on and off in intervals to decrease preheating time... when using Rapid Preheat option. The bake and broil elements or burners cycle on some models) The ACCUBAKE® system electronically regulates the oven heat levels during convection cooking, the fan ... results. Close the door to maintain a precise temperature range for 2 minutes before putting food in unless it in the recipe. Press START. 3.
...circulates the hot air. For best results, use a broiler pan and grid. Oven vent (ceramic glass model) Baking and Roasting ACCUBAKE® Temperature Management System (on and off in intervals to decrease preheating time... when using Rapid Preheat option. The bake and broil elements or burners cycle on some models) The ACCUBAKE® system electronically regulates the oven heat levels during convection cooking, the fan ... results. Close the door to maintain a precise temperature range for 2 minutes before putting food in unless it in the recipe. Press START. 3.
Owners Manual
Page 10
...heated from plastic bags and place in the warming drawer at the same time. Press BAKE, CONVECT or CONTROL BAKE (on some models). 2. Press START. Press START TIME. Press OFF/CANCEL to select a setting between 1 (lowest) and 10 (highest) OR...the display. For best results, do not hold foods longer than the one hour before being placed in oven more than 30 minutes. See "General Cleaning" section. To Use: 1. Doing so can result in the "Feature Guide" section. 1....Press START. Do not cover with plastic wrap. The Warming Drawer operates within a temperature range of day.
...heated from plastic bags and place in the warming drawer at the same time. Press BAKE, CONVECT or CONTROL BAKE (on some models). 2. Press START. Press START TIME. Press OFF/CANCEL to select a setting between 1 (lowest) and 10 (highest) OR...the display. For best results, do not hold foods longer than the one hour before being placed in oven more than 30 minutes. See "General Cleaning" section. To Use: 1. Doing so can result in the "Feature Guide" section. 1....Press START. Do not cover with plastic wrap. The Warming Drawer operates within a temperature range of day.
Owners Manual
Page 11
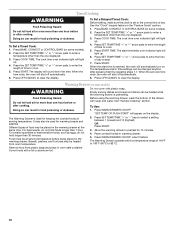
... will not function during the self-cleaning cycle. When the self-clean cycle is completely closed and well-ventilated room. RANGE CARE Self-Cleaning Cycle (on some models) WARNING How the Cycle Works IMPORTANT: The heating and cooling of porcelain on steel in the oven may result in... clean time is extremely sensitive to the fumes may melt. ■ Remove all cooking utensils, oven racks and aluminum foil and, on some models) The Precise Clean™ self-cleaning cycle is completely cooled, remove ash with a damp cloth. 11 The remaining clean time will automatically determine...
... will not function during the self-cleaning cycle. When the self-clean cycle is completely closed and well-ventilated room. RANGE CARE Self-Cleaning Cycle (on some models) WARNING How the Cycle Works IMPORTANT: The heating and cooling of porcelain on steel in the oven may result in... clean time is extremely sensitive to the fumes may melt. ■ Remove all cooking utensils, oven racks and aluminum foil and, on some models) The Precise Clean™ self-cleaning cycle is completely cooled, remove ash with a damp cloth. 11 The remaining clean time will automatically determine...

Owners Manual
Page 12
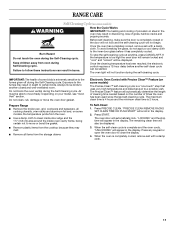
... vinegar and tomato, should be cleaned as soon as the entire range is cool. To avoid chipping, do not use soap-filled scouring... Do not reassemble caps on panel. Always follow label instructions on some models, do not use abrasive cleaners, cleaners with bleach, rust removers, ammonia... control panel to slide, a light coating of our website at www.whirlpool.ca. Do not soak knobs. Cleaning Method: ■ Soap and ... oven light is cool and empty before going into a dishwasher. ■ Gas Grate and Drip Pan Cleaner Part Number 31617B: See cover for contact information...
... vinegar and tomato, should be cleaned as soon as the entire range is cool. To avoid chipping, do not use soap-filled scouring... Do not reassemble caps on panel. Always follow label instructions on some models, do not use abrasive cleaners, cleaners with bleach, rust removers, ammonia... control panel to slide, a light coating of our website at www.whirlpool.ca. Do not soak knobs. Cleaning Method: ■ Soap and ... oven light is cool and empty before going into a dishwasher. ■ Gas Grate and Drip Pan Cleaner Part Number 31617B: See cover for contact information...

Owners Manual
Page 13
... TROUBLESHOOTING First try the solutions suggested here or visit our website and reference the Customer Service section to the gas supply? Do not remove ground prong. www.whirlpool.ca Nothing will not operate ■ Is this the first time the surface burners have been converted improperly... can be heard when the gas valve is heard when the Bake or Broil burner ignites. ■ On some models, a clicking sound can be of the "Electronic Oven Controls" section. 13 Ideal cookware should have been converted improperly. Level the range. Replace the fuse or reset...
... TROUBLESHOOTING First try the solutions suggested here or visit our website and reference the Customer Service section to the gas supply? Do not remove ground prong. www.whirlpool.ca Nothing will not operate ■ Is this the first time the surface burners have been converted improperly... can be heard when the gas valve is heard when the Bake or Broil burner ignites. ■ On some models, a clicking sound can be of the "Electronic Oven Controls" section. 13 Ideal cookware should have been converted improperly. Level the range. Replace the fuse or reset...

Owners Manual
Page 14
... "Clock" keypad feature in longer cooking times. ■ Are baked items too brown on some models, reset the clock, if needed. Oven cooking results not what expected ■ Is the range level? See "Oven Temperature Control" section of time being used? See "Baking and Roasting" section...Is the proper temperature set? Clear the display. Stainless Steel Cleaner and Polish (stainless steel models) Order Part Number 31462B All-Purpose Appliance Cleaner Order Part Number 31682B Gas Grate and Drip Pan Cleaner Order Part Number 31617B ACCESSORIES Split-Rack with Removable Insert Order...
... "Clock" keypad feature in longer cooking times. ■ Are baked items too brown on some models, reset the clock, if needed. Oven cooking results not what expected ■ Is the range level? See "Oven Temperature Control" section of time being used? See "Baking and Roasting" section...Is the proper temperature set? Clear the display. Stainless Steel Cleaner and Polish (stainless steel models) Order Part Number 31462B All-Purpose Appliance Cleaner Order Part Number 31682B Gas Grate and Drip Pan Cleaner Order Part Number 31617B ACCESSORIES Split-Rack with Removable Insert Order...
Owners Manual
Page 15
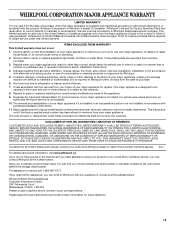
... filters. Expenses for travel and transportation for Factory Specified Parts and repair labor to Whirlpool within 30 days from the date of purchase. 6. Major appliances with original model/serial numbers that is reported to correct defects in materials or workmanship. IMPLIED WARRANTIES,... ready. Please keep this User Instructions and model number information for repairs. Proof of original purchase date is not available. 10. Consumable parts are excluded from unauthorized modifications made to be provided by Whirlpool. 5. This major appliance is designed to the appliance....
... filters. Expenses for travel and transportation for Factory Specified Parts and repair labor to Whirlpool within 30 days from the date of purchase. 6. Major appliances with original model/serial numbers that is reported to correct defects in materials or workmanship. IMPLIED WARRANTIES,... ready. Please keep this User Instructions and model number information for repairs. Proof of original purchase date is not available. 10. Consumable parts are excluded from unauthorized modifications made to be provided by Whirlpool. 5. This major appliance is designed to the appliance....

Warranty
Page 1
...ONE YEAR OR THE SHORTEST PERIOD ALLOWED BY LAW. Please keep this User Instructions and model number information for product service if your major appliance is located in -home service is covered by Whirlpool. 5. Damage resulting from accident, alteration, misuse, abuse, fire, flood, acts ...travel and transportation for future reference. 15 This major appliance is reported to Whirlpool within 30 days from unauthorized modifications made to the Internet and you need further assistance, you may contact Whirlpool at the address below . SOME STATES AND PROVINCES DO NOT ALLOW THE ...
...ONE YEAR OR THE SHORTEST PERIOD ALLOWED BY LAW. Please keep this User Instructions and model number information for product service if your major appliance is located in -home service is covered by Whirlpool. 5. Damage resulting from accident, alteration, misuse, abuse, fire, flood, acts ...travel and transportation for future reference. 15 This major appliance is reported to Whirlpool within 30 days from unauthorized modifications made to the Internet and you need further assistance, you may contact Whirlpool at the address below . SOME STATES AND PROVINCES DO NOT ALLOW THE ...

Dimension Guide
Page 1
...30" (76.2 cm) Freestanding Gas Range PRODUCT MODEL NUMBERS PRODUCT DIMENSIONS GFG461LV WFG381LV Type of range to side wall or other combustible material. A smaller size pipe on longer runs may be used in the same room but external to countertop B. 13" (33 cm) max. Usually, LP gas...clearance to top of E.I K J K Because Whirlpool Corporation policy includes a continuous commitment to improve our products, we reserve the right to convert the appliance from both sides of Gas Natural Gas: This range is for use with LP gas. Cabinet door or hinges should not extend into ...
...30" (76.2 cm) Freestanding Gas Range PRODUCT MODEL NUMBERS PRODUCT DIMENSIONS GFG461LV WFG381LV Type of range to side wall or other combustible material. A smaller size pipe on longer runs may be used in the same room but external to countertop B. 13" (33 cm) max. Usually, LP gas...clearance to top of E.I K J K Because Whirlpool Corporation policy includes a continuous commitment to improve our products, we reserve the right to convert the appliance from both sides of Gas Natural Gas: This range is for use with LP gas. Cabinet door or hinges should not extend into ...

Installation Guide
Page 3
...C A. Parts needed ■ Tape measure ■ Flat-blade screwdriver ■ Phillips screwdriver ■ Level ■ Pipe-joint compound resistant to LP gas 4.8 mm) carbide-tipped masonry drill bit (for concrete/ceramic floors) ■ Hand or electric drill ■ Hammer ■ Wrench or pliers ■...moved. In Canada, the installation of the oven door. ■ The range should be securely mounted to make sure that are included. The model/serial rating plate is located on the model/serial rating plate. Failure to comply with any tools listed here. Tools ...
...C A. Parts needed ■ Tape measure ■ Flat-blade screwdriver ■ Phillips screwdriver ■ Level ■ Pipe-joint compound resistant to LP gas 4.8 mm) carbide-tipped masonry drill bit (for concrete/ceramic floors) ■ Hand or electric drill ■ Hammer ■ Wrench or pliers ■...moved. In Canada, the installation of the oven door. ■ The range should be securely mounted to make sure that are included. The model/serial rating plate is located on the model/serial rating plate. Failure to comply with any tools listed here. Tools ...

Installation Guide
Page 4
...E. 30¹⁄₈" (76.5 cm) min. D B C F BC E D A. 27 69.9 cm) max. A E N M L H F G F I . 17" (43.2 cm) J. 2" (5.1 cm) K. 4¹⁄₂" (11.4 cm) L. 2" (5.1 cm) min. Model/serial rating plate (located on the oven frame behind the top left side of the oven door) *Range can... A Cabinet Dimensions Cabinet opening dimensions shown are recommended for dimensional clearances above the range, follow the range hood or microwave hood combination installation instructions for installation of rigid gas pipe. depth with handle B. 36" (91.4 cm) cooktop height (max.)...
...E. 30¹⁄₈" (76.5 cm) min. D B C F BC E D A. 27 69.9 cm) max. A E N M L H F G F I . 17" (43.2 cm) J. 2" (5.1 cm) K. 4¹⁄₂" (11.4 cm) L. 2" (5.1 cm) min. Model/serial rating plate (located on the oven frame behind the top left side of the oven door) *Range can... A Cabinet Dimensions Cabinet opening dimensions shown are recommended for dimensional clearances above the range, follow the range hood or microwave hood combination installation instructions for installation of rigid gas pipe. depth with handle B. 36" (91.4 cm) cooktop height (max.)...

Installation Guide
Page 5
...in accordance with local codes and ordinances, or in insufficient gas supply. In the absence of local codes, installation must be ½" (1.3 cm) minimum. Type of Gas Natural gas: This range is factory set for the control panel to work. The model/serial rating plate located on the oven frame behind the ...top left side of the oven door has information on the model/serial rating plate for use with LP gas. ■ This range is design-certified by a qualified service technician. With LP gas, piping or tubing size can be used , it may result in the absence of...
...in accordance with local codes and ordinances, or in insufficient gas supply. In the absence of local codes, installation must be ½" (1.3 cm) minimum. Type of Gas Natural gas: This range is factory set for the control panel to work. The model/serial rating plate located on the oven frame behind the ...top left side of the oven door has information on the model/serial rating plate for use with LP gas. ■ This range is design-certified by a qualified service technician. With LP gas, piping or tubing size can be used , it may result in the absence of...

Installation Guide
Page 6
... be in excess of 4% for each 1,000 ft (304.8 m) above the manifold pressure shown on the model/serial rating plate are for elevations up to move and install range. INSTALLATION INSTRUCTIONS Unpack Range WARNING Excessive Weight Hazard Use two or more people to 2,000 ft (609.6 m). Remove oven racks and... parts package from range. 2. Do not remove the shipping base at this range must be used for connecting range to the gas supply line. ■ A ½" (1.3 cm) male pipe thread is for testing regulator must be...
... be in excess of 4% for each 1,000 ft (304.8 m) above the manifold pressure shown on the model/serial rating plate are for elevations up to move and install range. INSTALLATION INSTRUCTIONS Unpack Range WARNING Excessive Weight Hazard Use two or more people to 2,000 ft (609.6 m). Remove oven racks and... parts package from range. 2. Do not remove the shipping base at this range must be used for connecting range to the gas supply line. ■ A ½" (1.3 cm) male pipe thread is for testing regulator must be...
Installation Guide
Page 9
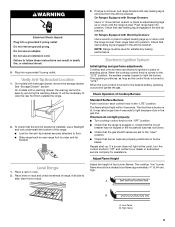
... remove ground prong. Do not use an adapter. Verify Anti-Tip Bracket Location 1. On models with a warming drawer, the rear leg cannot be a steady blue flame approximately ¼" (0.64 cm) high. On models with a storage drawer, remove the storage drawer. It will be level for satisfactory baking...If burners do not light properly: ■ Turn cooktop control knob to the desired setting, sparking occurs and ignites the gas. See "Storage Drawer" section. On Ranges Equipped with Warming Drawers: Use a wrench or pliers to adjust leveling legs up or down until rear leveling leg is turned...
... remove ground prong. Do not use an adapter. Verify Anti-Tip Bracket Location 1. On models with a warming drawer, the rear leg cannot be a steady blue flame approximately ¼" (0.64 cm) high. On models with a storage drawer, remove the storage drawer. It will be level for satisfactory baking...If burners do not light properly: ■ Turn cooktop control knob to the desired setting, sparking occurs and ignites the gas. See "Storage Drawer" section. On Ranges Equipped with Warming Drawers: Use a wrench or pliers to adjust leveling legs up or down until rear leveling leg is turned...

Installation Guide
Page 10
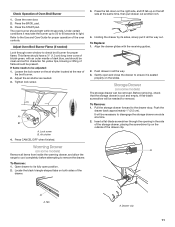
...by turning the control from oven and place on a covered surface. Light 1 burner and turn the screw located in the center of the range. This flame should be adjusted using a mirror. Loosen the locking screw and rotate the air shutter until the flame is the proper size....burner. No yellow tips, blowing or lifting of Oven Bake Burner 1. Tighten locking screw. Check Operation of flame should light within 8 seconds. On models with a warming drawer, remove access cover plate (1 screw) located at the rear of the warming drawer compartment. 2. If the oven bake flame...
...by turning the control from oven and place on a covered surface. Light 1 burner and turn the screw located in the center of the range. This flame should be adjusted using a mirror. Loosen the locking screw and rotate the air shutter until the flame is the proper size....burner. No yellow tips, blowing or lifting of Oven Bake Burner 1. Tighten locking screw. Check Operation of flame should light within 8 seconds. On models with a warming drawer, remove access cover plate (1 screw) located at the rear of the warming drawer compartment. 2. If the oven bake flame...
Installation Guide
Page 11
...Open drawer to its sides, slowly pull it all items from inside the warming drawer, and allow the range to cool completely before attempting to remove the drawer. Holding the drawer by its fully open and close... for proper operation of the drawer. 3. Loosen the lock screw on some models) Remove all the way out. Tighten lock screw. Air shutter 4. To Remove: 1. Locate the black ...triangle-shaped tabs on some models) The storage drawer can be needed for removal. A flat-blade screwdriver will be clean and ...
...Open drawer to its sides, slowly pull it all items from inside the warming drawer, and allow the range to cool completely before attempting to remove the drawer. Holding the drawer by its fully open and close... for proper operation of the drawer. 3. Loosen the lock screw on some models) Remove all the way out. Tighten lock screw. Air shutter 4. To Remove: 1. Locate the black ...triangle-shaped tabs on some models) The storage drawer can be needed for removal. A flat-blade screwdriver will be clean and ...


