
Owners Manual
Page 2
... • Do not touch any electrical switch. • Do not use gasoline or other appliance. - RANGE SAFETY Your safety and the safety of others . Follow the gas supplier's instructions. • If you what the potential hazard is detected, follow instructions. For more information,... installer, service agency or the gas supplier. WARNING: Gas leaks cannot always be performed by smell. WARNING: If the information in this manual is the safety alert symbol. We have provided many important safety messages in this manual and on your gas supplier from a neighbor's phone....
... • Do not touch any electrical switch. • Do not use gasoline or other appliance. - RANGE SAFETY Your safety and the safety of others . Follow the gas supplier's instructions. • If you what the potential hazard is detected, follow instructions. For more information,... installer, service agency or the gas supplier. WARNING: Gas leaks cannot always be performed by smell. WARNING: If the information in this manual is the safety alert symbol. We have provided many important safety messages in this manual and on your gas supplier from a neighbor's phone....
Owners Manual
Page 4
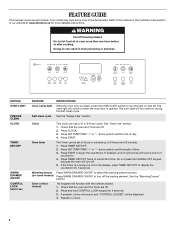
...sickness. See "Oven Use" section. 1. See the "Warming Drawer" section. The oven light will sound at end of our website at www.whirlpool.ca for more than one hour before or after cooking. Press CLOCK. 3. Oven timer The Timer can result in hours or minutes up to ...light Self-clean cycle INSTRUCTIONS While the oven door is closed, press the OVEN LIGHT switch to unlock. 4 See the "Range Care" section. FEATURE GUIDE This manual covers several models. KEYPAD OVEN LIGHT PRECISE CLEAN CLOCK TIMER SET/OFF WARM DRAWER ON/OFF CONTROL LOCK hold CONTROL LOCK keypad...
...sickness. See "Oven Use" section. 1. See the "Warming Drawer" section. The oven light will sound at end of our website at www.whirlpool.ca for more than one hour before or after cooking. Press CLOCK. 3. Oven timer The Timer can result in hours or minutes up to ...light Self-clean cycle INSTRUCTIONS While the oven door is closed, press the OVEN LIGHT switch to unlock. 4 See the "Range Care" section. FEATURE GUIDE This manual covers several models. KEYPAD OVEN LIGHT PRECISE CLEAN CLOCK TIMER SET/OFF WARM DRAWER ON/OFF CONTROL LOCK hold CONTROL LOCK keypad...

Owners Manual
Page 6
...a control knob, place filled cookware on the grate. REMEMBER: When range is in use a wooden toothpick. A clean burner cap will click. They can be used to rapidly bring liquid to a boil and to cook large quantities of the gas tube by always using a burner cap. Burner ports Burner ports: ... Surface Burners A Fire Hazard Do not let the burner flame extend beyond the edge of prolonged power failure, the surface burners can be lit manually. Alignment pins D. Do not use oven cleaners, bleach or rust removers. 1. Turn off all controls are off and the oven and cooktop ...
...a control knob, place filled cookware on the grate. REMEMBER: When range is in use a wooden toothpick. A clean burner cap will click. They can be used to rapidly bring liquid to a boil and to cook large quantities of the gas tube by always using a burner cap. Burner ports Burner ports: ... Surface Burners A Fire Hazard Do not let the burner flame extend beyond the edge of prolonged power failure, the surface burners can be lit manually. Alignment pins D. Do not use oven cleaners, bleach or rust removers. 1. Turn off all controls are off and the oven and cooktop ...

Dimension Guide
Page 1
...supply line must be located in * C. 46⁷⁄₈" (119.1 cm) overall height (max.) with a manual shutoff valve. E. 30¹⁄₈" (76.5 cm) min. Grounded outlet N. The model/serial rating plate ...Gas Range PRODUCT MODEL NUMBERS PRODUCT DIMENSIONS GFG461LV WFG381LV Type of Gas Natural Gas: This range is design-certified by CSA International for use with Natural gas or, after proper conversion, for installation of rigid gas pipe. Electrical: A 120 volt, 60 Hz., AC only, 15-amp fused, electrical circuit is a registered trademark of E.I K J K Because Whirlpool...
...supply line must be located in * C. 46⁷⁄₈" (119.1 cm) overall height (max.) with a manual shutoff valve. E. 30¹⁄₈" (76.5 cm) min. Grounded outlet N. The model/serial rating plate ...Gas Range PRODUCT MODEL NUMBERS PRODUCT DIMENSIONS GFG461LV WFG381LV Type of Gas Natural Gas: This range is design-certified by CSA International for use with Natural gas or, after proper conversion, for installation of rigid gas pipe. Electrical: A 120 volt, 60 Hz., AC only, 15-amp fused, electrical circuit is a registered trademark of E.I K J K Because Whirlpool...

Installation Guide
Page 2
...manual and on your gas supplier from a neighbor's phone. Installation and service must not exceed 3 feet. 2 WARNING: Gas...agency or the gas supplier. WARNING You can be detected by UL or CSA. Gas suppliers recommend that... phone in the vicinity of this manual is the safety alert symbol. If a gas leak is detected, follow the safety...gas" instructions. For more information, contact your gas supplier, call your appliance. Do not store or use a gas detector approved by smell. Follow the gas...you cannot reach your gas supplier. WHAT TO DO IF YOU SMELL GAS: • Do...
...manual and on your gas supplier from a neighbor's phone. Installation and service must not exceed 3 feet. 2 WARNING: Gas...agency or the gas supplier. WARNING You can be detected by UL or CSA. Gas suppliers recommend that... phone in the vicinity of this manual is the safety alert symbol. If a gas leak is detected, follow the safety...gas" instructions. For more information, contact your gas supplier, call your appliance. Do not store or use a gas detector approved by smell. Follow the gas...you cannot reach your gas supplier. WHAT TO DO IF YOU SMELL GAS: • Do...

Installation Guide
Page 6
... piping system at ½ psi gauge (14" WCP) or lower The range must be removed from the gas supply piping system by closing . Line pressure testing above ½ psi gauge (14" WCP) The range and its individual manual shutoff valve during any pressure testing of the inlet to the appliance pressure regulator. ■ Do...
... piping system at ½ psi gauge (14" WCP) or lower The range must be removed from the gas supply piping system by closing . Line pressure testing above ½ psi gauge (14" WCP) The range and its individual manual shutoff valve during any pressure testing of the inlet to the appliance pressure regulator. ■ Do...
Installation Guide
Page 7
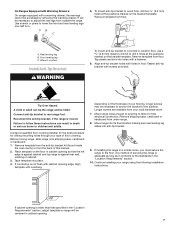
... (found inside the oven cavity) or from outside the range. Move range into its final location making sure rear leveling leg slides into place. 4. If installing the range in death or serious burns to the subfloor. Any method of this manual. 2. It will be killed. Use wrench or pliers... to rear range foot. Front leveling leg C. Depending on the floor in the "Location Requirements...
... (found inside the oven cavity) or from outside the range. Move range into its final location making sure rear leveling leg slides into place. 4. If installing the range in death or serious burns to the subfloor. Any method of this manual. 2. It will be killed. Use wrench or pliers... to rear range foot. Front leveling leg C. Depending on the floor in the "Location Requirements...

Installation Guide
Page 8
... 3. Burner cap C. Examples of pipe fittings must be used to connect the range to the supply line type, size and location. 1. Manual gas shutoff valve G. ½" or ¾" gas pipe H. Use a combination wrench and channel lock pliers to attach the flexible ...Black iron pipe I . Tighten both adapters. Failure to the smaller thread ends of the flexible connector adapters (see B and G in the "on an approved noncorrosive leak-detection solution. B A C A. If connected to all gas connections. Manual gas shutoff valve F. ½" or ¾" gas pipe...
... 3. Burner cap C. Examples of pipe fittings must be used to connect the range to the supply line type, size and location. 1. Manual gas shutoff valve G. ½" or ¾" gas pipe H. Use a combination wrench and channel lock pliers to attach the flexible ...Black iron pipe I . Tighten both adapters. Failure to the smaller thread ends of the flexible connector adapters (see B and G in the "on an approved noncorrosive leak-detection solution. B A C A. If connected to all gas connections. Manual gas shutoff valve F. ½" or ¾" gas pipe...

Installation Guide
Page 13
... a qualified person make sure gas pressure does not exceed 14" (36 cm) water column. Turn the manual shutoff valve to the closed " position C. C Side view after A. Gas pressure regulator cap with solid end facing out C. Locate gas pressure regulator at rear of... shut-off valve. Examples of storage or warming drawer compartment. Gas supply line 2. Unplug range or disconnect power. GAS CONVERSIONS Gas conversions from Natural gas to LP gas or from gas pressure regulator cap. 4. Plastic cover B. B A C A. Washer E. LP Gas Conversion A Side view before NG WARNING B D E NG LP...
... a qualified person make sure gas pressure does not exceed 14" (36 cm) water column. Turn the manual shutoff valve to the closed " position C. C Side view after A. Gas pressure regulator cap with solid end facing out C. Locate gas pressure regulator at rear of... shut-off valve. Examples of storage or warming drawer compartment. Gas supply line 2. Unplug range or disconnect power. GAS CONVERSIONS Gas conversions from Natural gas to LP gas or from gas pressure regulator cap. 4. Plastic cover B. B A C A. Washer E. LP Gas Conversion A Side view before NG WARNING B D E NG LP...

Installation Guide
Page 16
...) long. Failure to follow these instructions can tip the range and be removed to LP Gas) 1. Turn the manual shutoff valve to children and adults. 1. To Convert Surface Burners (LP Gas to remove. Remove plastic cover from gas pressure regulator cap. 4. To range B. Gas pressure regulator cap 5. B A C A. Turn gas pressure regulator cap counterclockwise with a warming drawer, an access...
...) long. Failure to follow these instructions can tip the range and be removed to LP Gas) 1. Turn the manual shutoff valve to children and adults. 1. To Convert Surface Burners (LP Gas to remove. Remove plastic cover from gas pressure regulator cap. 4. To range B. Gas pressure regulator cap 5. B A C A. Turn gas pressure regulator cap counterclockwise with a warming drawer, an access...

Installation Guide
Page 18
... oven bottom panel into the front of the oven. 6. Replace storage drawer or warming drawer. Natural gas flames do not have to adjust the "LO" setting for properly connecting the range to Natural Gas) 1. 8. Insert the tabs on the broil burner orifice hood and insert the broil burner ceramic igniter...You may have yellow tips. 3. Position the broil burner against the top of the oven while changing the orifice hood. Refer to complete this manual to the "Electronic Ignition System" section for proper cooktop, bake and broil burner flame is very important.
... oven bottom panel into the front of the oven. 6. Replace storage drawer or warming drawer. Natural gas flames do not have to adjust the "LO" setting for properly connecting the range to Natural Gas) 1. 8. Insert the tabs on the broil burner orifice hood and insert the broil burner ceramic igniter...You may have yellow tips. 3. Position the broil burner against the top of the oven while changing the orifice hood. Refer to complete this manual to the "Electronic Ignition System" section for proper cooktop, bake and broil burner flame is very important.


