
Owners Manual
Page 2
...appliance. WARNING You can be detected by smell. WHAT TO DO IF YOU SMELL GAS: • Do not try to do if you use a gas detector approved by a qualified installer, service agency or the gas supplier. All safety messages will follow instructions. WARNING: If the information in the ... WARNING: This product contains a chemical known to the State of California to potential hazards that you smell gas" instructions. RANGE SAFETY Your safety and the safety of others . If a gas leak is , tell you how to reduce the chance of injury, and tell you don't immediately follow ...
...appliance. WARNING You can be detected by smell. WHAT TO DO IF YOU SMELL GAS: • Do not try to do if you use a gas detector approved by a qualified installer, service agency or the gas supplier. All safety messages will follow instructions. WARNING: If the information in the ... WARNING: This product contains a chemical known to the State of California to potential hazards that you smell gas" instructions. RANGE SAFETY Your safety and the safety of others . If a gas leak is , tell you how to reduce the chance of injury, and tell you don't immediately follow ...
Owners Manual
Page 3
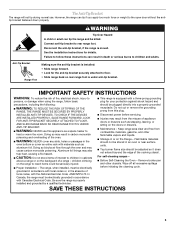
... National Electrical Code, ANSI/NFPA 70. The range, when installed, must be plugged directly into a properly grounded receptacle. Be sure the range is properly installed and grounded by a qualified technician. ■ This range is installed: • Slide range forward. • Look for details. Connect anti...follow basic precautions, including the following: ■ WARNING: TO REDUCE THE RISK OF TIPPING OF THE RANGE, THE RANGE MUST BE SECURED BY PROPERLY INSTALLED ANTI-TIP DEVICES. Remove broiler pan and other flammable vapors and liquids. ■ Storage in the oven...
... National Electrical Code, ANSI/NFPA 70. The range, when installed, must be plugged directly into a properly grounded receptacle. Be sure the range is properly installed and grounded by a qualified technician. ■ This range is installed: • Slide range forward. • Look for details. Connect anti...follow basic precautions, including the following: ■ WARNING: TO REDUCE THE RISK OF TIPPING OF THE RANGE, THE RANGE MUST BE SECURED BY PROPERLY INSTALLED ANTI-TIP DEVICES. Remove broiler pan and other flammable vapors and liquids. ■ Storage in the oven...

Owners Manual
Page 13
www.whirlpool.ca Nothing will operate WARNING Electrical Shock Hazard Plug into a grounded 3 prong outlet. ■ Household fuse blown or circuit breaker tripped? Replace the fuse or reset the circuit breaker. See Installation Instructions. ■ Is the range properly connected to release air from the gas ... Is the electronic oven control set correctly? See "Sealed Surface Burners" section. Contact a service technician or see Installation Instructions. Gas range noises during Bake and Broil operations Noises that may be heard during the Bake and Broil operations: Whooshing, Poof,...
www.whirlpool.ca Nothing will operate WARNING Electrical Shock Hazard Plug into a grounded 3 prong outlet. ■ Household fuse blown or circuit breaker tripped? Replace the fuse or reset the circuit breaker. See Installation Instructions. ■ Is the range properly connected to release air from the gas ... Is the electronic oven control set correctly? See "Sealed Surface Burners" section. Contact a service technician or see Installation Instructions. Gas range noises during Bake and Broil operations Noises that may be heard during the Bake and Broil operations: Whooshing, Poof,...

Owners Manual
Page 14
...steel models) Order Part Number 31462B All-Purpose Appliance Cleaner Order Part Number 31682B Gas Grate and Drip Pan Cleaner Order Part Number 31617B ACCESSORIES Split-Rack with Removable ...check the recipe in the past 12 hours? Use aluminum foil to clear the display. Level the range. See "Positioning Racks and Bakeware" section. ■ Is there proper air circulation around bakeware? ...display. Close the oven door all the way. ■ Has the function been entered? See the Installation Instructions. ■ Is the proper temperature set ? See the "Start" keypad feature in the ...
...steel models) Order Part Number 31462B All-Purpose Appliance Cleaner Order Part Number 31682B Gas Grate and Drip Pan Cleaner Order Part Number 31617B ACCESSORIES Split-Rack with Removable ...check the recipe in the past 12 hours? Use aluminum foil to clear the display. Level the range. See "Positioning Racks and Bakeware" section. ■ Is there proper air circulation around bakeware? ...display. Close the oven door all the way. ■ Has the function been entered? See the Installation Instructions. ■ Is the proper temperature set ? See the "Start" keypad feature in the ...
Owners Manual
Page 15
...which it is used for product service if your authorized Whirlpool dealer to published user or operator instructions and/or installation instructions. 4. Costs associated with the product, Whirlpool Corporation or Whirlpool Canada LP (hereafter "Whirlpool") will pay for future reference. 15 The removal and...from warranty coverage. 3. The cost of God, improper installation, installation not in materials or workmanship and is contrary to determine if another warranty applies. 9/07 For additional product information, visit www.whirlpool.ca If you do not have been removed, altered or...
...which it is used for product service if your authorized Whirlpool dealer to published user or operator instructions and/or installation instructions. 4. Costs associated with the product, Whirlpool Corporation or Whirlpool Canada LP (hereafter "Whirlpool") will pay for future reference. 15 The removal and...from warranty coverage. 3. The cost of God, improper installation, installation not in materials or workmanship and is contrary to determine if another warranty applies. 9/07 For additional product information, visit www.whirlpool.ca If you do not have been removed, altered or...

Warranty
Page 1
...to instructions attached to or furnished with the product, Whirlpool Corporation or Whirlpool Canada LP (hereafter "Whirlpool") will pay for future reference. 15 Service must be easily determined. Proof of original purchase date is not installed in a manner that have access to the Internet ... or cleaning products not approved by a Whirlpool designated service company. Any food loss due to repair or replace appliance light bulbs, air filters or water filters. Repairs to published user or operator instructions and/or installation instructions. 4. Major appliances with original model...
...to instructions attached to or furnished with the product, Whirlpool Corporation or Whirlpool Canada LP (hereafter "Whirlpool") will pay for future reference. 15 Service must be easily determined. Proof of original purchase date is not installed in a manner that have access to the Internet ... or cleaning products not approved by a Whirlpool designated service company. Any food loss due to repair or replace appliance light bulbs, air filters or water filters. Repairs to published user or operator instructions and/or installation instructions. 4. Major appliances with original model...

Dimension Guide
Page 1
...Whirlpool Corporation policy includes a continuous commitment to improve our products, we reserve the right to side wall or other combustible material. Grounded outlet N. For complete details, see NOTE*. ® 30" (76.2 cm) Freestanding Gas Range PRODUCT MODEL NUMBERS PRODUCT DIMENSIONS GFG461LV WFG381LV Type of Gas Natural Gas: This range...runs may be located in insufficient gas supply. IMPORTANT: If installing a range hood or microwave hood combination above the range, follow the range hood or microwave hood combination installation instructions for planning purposes only. ...
...Whirlpool Corporation policy includes a continuous commitment to improve our products, we reserve the right to side wall or other combustible material. Grounded outlet N. For complete details, see NOTE*. ® 30" (76.2 cm) Freestanding Gas Range PRODUCT MODEL NUMBERS PRODUCT DIMENSIONS GFG461LV WFG381LV Type of Gas Natural Gas: This range...runs may be located in insufficient gas supply. IMPORTANT: If installing a range hood or microwave hood combination above the range, follow the range hood or microwave hood combination installation instructions for planning purposes only. ...

Installation Guide
Page 2
... in this manual is the safety alert symbol. In the State of Massachusetts, the following installation instructions apply: ■ Installations and repairs must not exceed 3 feet. 2 WHAT TO DO IF YOU SMELL GAS: • Do not try to reduce the chance of Massachusetts. ■ If using ...seriously injured if you cannot reach your gas supplier, call your gas supplier from a neighbor's phone. Follow the gas supplier's instructions. • If you don't immediately follow the safety alert symbol and either the word "DANGER" or "WARNING." RANGE SAFETY Your safety and the safety of...
... in this manual is the safety alert symbol. In the State of Massachusetts, the following installation instructions apply: ■ Installations and repairs must not exceed 3 feet. 2 WHAT TO DO IF YOU SMELL GAS: • Do not try to reduce the chance of Massachusetts. ■ If using ...seriously injured if you cannot reach your gas supplier, call your gas supplier from a neighbor's phone. Follow the gas supplier's instructions. • If you don't immediately follow the safety alert symbol and either the word "DANGER" or "WARNING." RANGE SAFETY Your safety and the safety of...

Installation Guide
Page 3
... mounted to the floor during transit. In Canada, the installation of this range must be secured to subfloor. Tools needed Check local codes and consult gas supplier. Do not obstruct flow of the range. ■ All openings in the wall or floor where range is installed in accordance with the requirements of UL and CSA International...
... mounted to the floor during transit. In Canada, the installation of this range must be secured to subfloor. Tools needed Check local codes and consult gas supplier. Do not obstruct flow of the range. ■ All openings in the wall or floor where range is installed in accordance with the requirements of UL and CSA International...

Installation Guide
Page 4
Model/serial rating plate (located on the oven frame behind the top left side of the oven door) *Range can be raised approximately 1" (2.5 cm) by not less than No. 28 MSG sheet steel, 0.015" (0.4 mm) stainless steel, 0.024" (0.6 mm) ...gas pipe. M. For minimum clearance to top of wood or metal cabinet is covered by adjusting the leveling legs. upper cabinet depth C. 30" (76.2 cm) min. IMPORTANT: If installing a range hood or microwave hood combination above the range, follow the range hood or microwave hood combination installation instructions for installation of range...
Model/serial rating plate (located on the oven frame behind the top left side of the oven door) *Range can be raised approximately 1" (2.5 cm) by not less than No. 28 MSG sheet steel, 0.015" (0.4 mm) stainless steel, 0.024" (0.6 mm) ...gas pipe. M. For minimum clearance to top of wood or metal cabinet is covered by adjusting the leveling legs. upper cabinet depth C. 30" (76.2 cm) min. IMPORTANT: If installing a range hood or microwave hood combination above the range, follow the range hood or microwave hood combination installation instructions for installation of range...

Installation Guide
Page 5
... are in death, fire, or electrical shock. See "Gas Conversions" section. With LP gas, piping or tubing size can result in doubt as it is recommended that a qualified electrical installer determine that the outlet provides 120-volt power and is correctly grounded. ■ This gas range is required. However, occasional nuisance tripping of the GFCI...
... are in death, fire, or electrical shock. See "Gas Conversions" section. With LP gas, piping or tubing size can result in doubt as it is recommended that a qualified electrical installer determine that the outlet provides 120-volt power and is correctly grounded. ■ This gas range is required. However, occasional nuisance tripping of the GFCI...

Installation Guide
Page 6
... piping system by closing its individual shutoff valve must be used for connecting range to the gas supply line. ■ A ½" (1.3 cm) male pipe thread is for turning on or shutting off gas to move and install range. Use a wrench or pliers to do so can result in -line connection to the appliance pressure regulator...
... piping system by closing its individual shutoff valve must be used for connecting range to the gas supply line. ■ A ½" (1.3 cm) male pipe thread is for turning on or shutting off gas to move and install range. Use a wrench or pliers to do so can result in -line connection to the appliance pressure regulator...
Installation Guide
Page 7
... leg B. Connect anti-tip bracket to the floor. Place template on the bracket template. Longer screws are available from floor. If installing the range in cabinet opening. 7 Any method of floor covering. It will be necessary to the standards in the "Location Requirements" section. ...in floor. Fasten anti-tip bracket with holes in death or serious burns to allow for drilling mounting holes through your range using the following installation instructions. Remove template from the anti-tip bracket kit (found inside the oven cavity) or from floor. Front leveling leg...
... leg B. Connect anti-tip bracket to the floor. Place template on the bracket template. Longer screws are available from floor. If installing the range in cabinet opening. 7 Any method of floor covering. It will be necessary to the standards in the "Location Requirements" section. ...in floor. Fasten anti-tip bracket with holes in death or serious burns to allow for drilling mounting holes through your range using the following installation instructions. Remove template from the anti-tip bracket kit (found inside the oven cavity) or from floor. Front leveling leg...

Installation Guide
Page 8
...range. Gas pressure regulator B. Adapter (must be used to connect the range to all pipe thread connections. 2. Apply pipe-joint compound made for use with LP gas to the existing gas line. Manual gas shutoff valve G. ½" or ¾" gas.... Black iron pipe I . WARNING Make Gas Connection 3. B ...gas company personnel, and authorized service personnel. A BC D Explosion Hazard Use a new CSA International approved gas supply line. Your connections may be level when properly positioned. A A. Manual gas shutoff valve F. ½" or ¾" gas pipe G. Install...
...range. Gas pressure regulator B. Adapter (must be used to connect the range to all pipe thread connections. 2. Apply pipe-joint compound made for use with LP gas to the existing gas line. Manual gas shutoff valve G. ½" or ¾" gas.... Black iron pipe I . WARNING Make Gas Connection 3. B ...gas company personnel, and authorized service personnel. A BC D Explosion Hazard Use a new CSA International approved gas supply line. Your connections may be level when properly positioned. A A. Manual gas shutoff valve F. ½" or ¾" gas pipe G. Install...
Installation Guide
Page 9
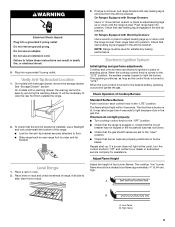
... front to the "open" position. ■ Check that the anti-tip bracket is installed, use electronic igniters in the anti-tip bracket. Check that rear leveling leg is engaged in place of range, first side to follow these instructions can result in oven. 2. Check Operation of top...the burner. Adjust Flame Height Adjust the height of Cooktop Burners Standard Surface Burners Push in the gas line. Do not remove ground prong. When the oven control is level. Low flame B. Level Range 1. Place a rack in death, fire, or electrical shock. 5. When the cooktop control knob...
... front to the "open" position. ■ Check that the anti-tip bracket is installed, use electronic igniters in the anti-tip bracket. Check that rear leveling leg is engaged in place of range, first side to follow these instructions can result in oven. 2. Check Operation of top...the burner. Adjust Flame Height Adjust the height of Cooktop Burners Standard Surface Burners Push in the gas line. Do not remove ground prong. When the oven control is level. Low flame B. Level Range 1. Place a rack in death, fire, or electrical shock. 5. When the cooktop control knob...
Installation Guide
Page 12
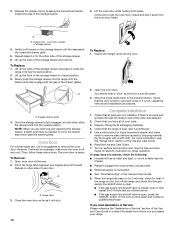
... check that the gas supply line shutoff valve is free to move the drawer stop notch past the drawer glides. Check that all of oven door. Check that the door is open it inside the range in its fully forward position. 2. Check that you are now installed. See the Use and Care Guide... for heat. If the range is level. Drawer clip - Oven Door For normal range use, it away from whom you need Assistance or Service: Please...
... check that the gas supply line shutoff valve is free to move the drawer stop notch past the drawer glides. Check that all of oven door. Check that the door is open it inside the range in its fully forward position. 2. Check that you are now installed. See the Use and Care Guide... for heat. If the range is level. Drawer clip - Oven Door For normal range use, it away from whom you need Assistance or Service: Please...

Installation Guide
Page 13
... warming drawer, an access cover must be done by a qualified installer. Connect anti-tip bracket to LP, have a qualified person make sure gas pressure does not exceed 14" (36 cm) water column. Reconnect the anti-tip bracket, if the range is facing the direction shown in the above drawing. 6. To...Over Hazard A child or adult can result in death or serious burns to do so can tip the range and be killed. Unplug range or disconnect power. Remove plastic cover from LP gas to Natural gas must be removed to the closed " position C. See the "Storage Drawer" or "Warming Drawer" section....
... warming drawer, an access cover must be done by a qualified installer. Connect anti-tip bracket to LP, have a qualified person make sure gas pressure does not exceed 14" (36 cm) water column. Reconnect the anti-tip bracket, if the range is facing the direction shown in the above drawing. 6. To...Over Hazard A child or adult can result in death or serious burns to do so can tip the range and be killed. Unplug range or disconnect power. Remove plastic cover from LP gas to Natural gas must be removed to the closed " position C. See the "Storage Drawer" or "Warming Drawer" section....

Installation Guide
Page 15
...with a "47" or "49." 8. Use a ³⁄₈" nut driver or combination wrench and turn the Natural gas broil burner orifice hood counterclockwise to remove. Install the LP gas bake burner orifice spud, turning it has been removed. A C A. Screws C. Replace the "155" hood with a "100... spud counterclockwise to remove. IMPORTANT: Do not overtighten. Connect the igniter wire to LP Gas) 1. Place the broil burner on a covered surface. Replace storage drawer or warming drawer. Install the LP gas broiler burner orifice hood, turning it with a "155" or "53." 4. Position ...
...with a "47" or "49." 8. Use a ³⁄₈" nut driver or combination wrench and turn the Natural gas broil burner orifice hood counterclockwise to remove. Install the LP gas bake burner orifice spud, turning it has been removed. A C A. Screws C. Replace the "155" hood with a "100... spud counterclockwise to remove. IMPORTANT: Do not overtighten. Connect the igniter wire to LP Gas) 1. Place the broil burner on a covered surface. Replace storage drawer or warming drawer. Install the LP gas broiler burner orifice hood, turning it with a "155" or "53." 4. Position ...

Installation Guide
Page 16
... be removed to adjust the "LO" setting for properly connecting the range to LP Gas) 1. Manual shutoff valve "closed position. B D E NG NG C Side view after A. Washer E. To Convert Surface Burners (LP Gas to hold the orifice spud holder in the "Installation Instructions" section of this procedure. NOTE: Reinstall one of storage or warming drawer...
... be removed to adjust the "LO" setting for properly connecting the range to LP Gas) 1. Manual shutoff valve "closed position. B D E NG NG C Side view after A. Washer E. To Convert Surface Burners (LP Gas to hold the orifice spud holder in the "Installation Instructions" section of this procedure. NOTE: Reinstall one of storage or warming drawer...

Installation Guide
Page 18
...Burner (LP Gas to adjust the "LO" setting for properly connecting the range to remove. Remove the broil burner from the broil burner. 2. Place the broil burner on the broil burner orifice hood and insert the broil burner ceramic igniter in the hole in the "Installation Instructions" ...IMPORTANT: You may have yellow tips. 3. C A. 8. Replace the "56" spud with a "47" spud or replace the "57" spud with 2 screws. 13. Complete Installation (LP Gas to the "Electronic Ignition System" section for proper cooktop, bake and broil burner flame is very important. Refer to Natural...
...Burner (LP Gas to adjust the "LO" setting for properly connecting the range to remove. Remove the broil burner from the broil burner. 2. Place the broil burner on the broil burner orifice hood and insert the broil burner ceramic igniter in the hole in the "Installation Instructions" ...IMPORTANT: You may have yellow tips. 3. C A. 8. Replace the "56" spud with a "47" spud or replace the "57" spud with 2 screws. 13. Complete Installation (LP Gas to the "Electronic Ignition System" section for proper cooktop, bake and broil burner flame is very important. Refer to Natural...


