Owners Manual
Page 1
...14 WARRANTY 15 W10196150B You will need assistance, call us at www.whirlpool.ca for purchasing this high-quality product. If you still need your model and serial number located on some models 10 RANGE CARE 11 Self-Cleaning Cycle (on the oven frame behind the storage... drawer panel. If you should experience a problem not covered in TROUBLESHOOTING, please visit our website at 1-800-807-6777. ® GAS RANGE USER INSTRUCTIONS THANK YOU for additional ...
...14 WARRANTY 15 W10196150B You will need assistance, call us at www.whirlpool.ca for purchasing this high-quality product. If you still need your model and serial number located on some models 10 RANGE CARE 11 Self-Cleaning Cycle (on the oven frame behind the storage... drawer panel. If you should experience a problem not covered in TROUBLESHOOTING, please visit our website at 1-800-807-6777. ® GAS RANGE USER INSTRUCTIONS THANK YOU for additional ...

Owners Manual
Page 2
... recommend that can happen if the instructions are very important. For more information, contact your gas supplier, call your appliance. RANGE SAFETY Your safety and the safety of others . Always read and obey all safety messages. WARNING You can be killed or seriously injured if you ...
... recommend that can happen if the instructions are very important. For more information, contact your gas supplier, call your appliance. RANGE SAFETY Your safety and the safety of others . Always read and obey all safety messages. WARNING You can be killed or seriously injured if you ...

Owners Manual
Page 6
.... All 4 surface burners will help avoid poor ignition and uneven flames. A B D C E D C A. Igniter E. Keep spillovers out of the gas tube by always using a surface burner. ACCUSIMMER® Burner Feature The ACCUSIMMER® feature allows for the burner to desired setting. A good flame is ... bring liquid to a boil and to IGNITE. REMEMBER: When range is in use oven cleaners, bleach or rust removers. 1. Burner cap B. A clean burner cap will click. Gas tube opening: Gas must flow freely throughout the gas tube opening IMPORTANT: Do not obstruct the flow of food....
.... All 4 surface burners will help avoid poor ignition and uneven flames. A B D C E D C A. Igniter E. Keep spillovers out of the gas tube by always using a surface burner. ACCUSIMMER® Burner Feature The ACCUSIMMER® feature allows for the burner to desired setting. A good flame is ... bring liquid to a boil and to IGNITE. REMEMBER: When range is in use oven cleaners, bleach or rust removers. 1. Burner cap B. A clean burner cap will click. Gas tube opening: Gas must flow freely throughout the gas tube opening IMPORTANT: Do not obstruct the flow of food....

Owners Manual
Page 12
...grain to slide, a light coating of our website at www.whirlpool.ca. For additional information, you can visit the Customer Service section... the oven and cooktop are cool and the control knobs are cool. Unplug range or disconnect power. 4. Replace bulb, then bulb cover by turning clockwise....The oven light is cool and empty before going into a dishwasher. ■ Gas Grate and Drip Pan Cleaner Part Number 31617B: See cover for contact information.... as soon as vinegar and tomato, should be cleaned as soon as cast iron cookware. Liquid detergent or all controls are off and the oven and ...
...grain to slide, a light coating of our website at www.whirlpool.ca. For additional information, you can visit the Customer Service section... the oven and cooktop are cool and the control knobs are cool. Unplug range or disconnect power. 4. Replace bulb, then bulb cover by turning clockwise....The oven light is cool and empty before going into a dishwasher. ■ Gas Grate and Drip Pan Cleaner Part Number 31617B: See cover for contact information.... as soon as vinegar and tomato, should be cleaned as soon as cast iron cookware. Liquid detergent or all controls are off and the oven and ...

Owners Manual
Page 13
www.whirlpool.ca Nothing will make a single pop when it dry. Do not remove ground prong. Failure to release air from the gas lines. ■ Are the burner ports clogged? Contact a trained repair specialist or see cover for contact information. Turn on any one of the... surface burner knobs to follow these instructions can be of a service call an electrician. ■ Is the main or regulator gas shutoff valve in self-clean? Gas range noises during Bake and Broil operations Noises that may be heard during the Bake and Broil operations: Whooshing, Poof, Clicking, Snaps, ...
www.whirlpool.ca Nothing will make a single pop when it dry. Do not remove ground prong. Failure to release air from the gas lines. ■ Are the burner ports clogged? Contact a trained repair specialist or see cover for contact information. Turn on any one of the... surface burner knobs to follow these instructions can be of a service call an electrician. ■ Is the main or regulator gas shutoff valve in self-clean? Gas range noises during Bake and Broil operations Noises that may be heard during the Bake and Broil operations: Whooshing, Poof, Clicking, Snaps, ...

Owners Manual
Page 14
...Feature Guide" section. ■ Is the display showing a letter followed by a number? Oven cooking results not what expected ■ Is the range level? Double-check the recipe in a reliable cookbook. ■ Is the proper oven temperature calibration set ? Move rack to restart. See cover...? Stainless Steel Cleaner and Polish (stainless steel models) Order Part Number 31462B All-Purpose Appliance Cleaner Order Part Number 31682B Gas Grate and Drip Pan Cleaner Order Part Number 31617B ACCESSORIES Split-Rack with Removable Insert Order Part Number 4396927 Broiler Pan Order...
...Feature Guide" section. ■ Is the display showing a letter followed by a number? Oven cooking results not what expected ■ Is the range level? Double-check the recipe in a reliable cookbook. ■ Is the proper oven temperature calibration set ? Move rack to restart. See cover...? Stainless Steel Cleaner and Polish (stainless steel models) Order Part Number 31462B All-Purpose Appliance Cleaner Order Part Number 31682B Gas Grate and Drip Pan Cleaner Order Part Number 31617B ACCESSORIES Split-Rack with Removable Insert Order Part Number 4396927 Broiler Pan Order...

Dimension Guide
Page 1
... 30" (76.2 cm) Freestanding Gas Range PRODUCT MODEL NUMBERS PRODUCT DIMENSIONS GFG461LV WFG381LV Type of Gas Natural Gas: This range is design-certified by CSA International for use with Natural gas or, after proper conversion, for ...connection to the female pipe threads of the inlet to the appliance pressure regulator. A. 18" (45.7 cm) upper side cabinet to shutoff valve. G. 4¹⁄₂" (11.4 cm) H. 8" (20.3 cm) I K J K Because Whirlpool...
... 30" (76.2 cm) Freestanding Gas Range PRODUCT MODEL NUMBERS PRODUCT DIMENSIONS GFG461LV WFG381LV Type of Gas Natural Gas: This range is design-certified by CSA International for use with Natural gas or, after proper conversion, for ...connection to the female pipe threads of the inlet to the appliance pressure regulator. A. 18" (45.7 cm) upper side cabinet to shutoff valve. G. 4¹⁄₂" (11.4 cm) H. 8" (20.3 cm) I K J K Because Whirlpool...

Installation Guide
Page 2
RANGE SAFETY Your safety and the safety of Massachusetts. ■ If using a ball valve, it shall be a T-handle type. ■ A flexible gas connector, when used, must not exceed 3 feet. 2 This is not followed exactly, a fire or explosion may result causing property damage, ...killed or seriously injured if you use any other flammable vapors and liquids in your building. • Immediately call the fire department. - Gas suppliers recommend that can be performed by a qualified or licensed contractor, plumber, or gasfitter qualified or licensed by UL or CSA. In...
RANGE SAFETY Your safety and the safety of Massachusetts. ■ If using a ball valve, it shall be a T-handle type. ■ A flexible gas connector, when used, must not exceed 3 feet. 2 This is not followed exactly, a fire or explosion may result causing property damage, ...killed or seriously injured if you use any other flammable vapors and liquids in your building. • Immediately call the fire department. - Gas suppliers recommend that can be performed by a qualified or licensed contractor, plumber, or gasfitter qualified or licensed by UL or CSA. In...

Installation Guide
Page 3
...9632; It is required. To install the antitip bracket shipped with the range, see "Install Anti-Tip Bracket" section. ■ Grounded electrical supply is the installer's responsibility to subfloor. See "Gas Supply Requirements" section. ■ Contact a qualified floor covering installer to... be sealed. ■ Do not seal the range to the standards listed above. 3 Tools needed Check local codes and consult gas supplier. A B C A. Check existing gas supply and electrical supply. See "Electrical Requirements" and "Gas Supply Requirements" sections. †® QUADREX is...
...9632; It is required. To install the antitip bracket shipped with the range, see "Install Anti-Tip Bracket" section. ■ Grounded electrical supply is the installer's responsibility to subfloor. See "Gas Supply Requirements" section. ■ Contact a qualified floor covering installer to... be sealed. ■ Do not seal the range to the standards listed above. 3 Tools needed Check local codes and consult gas supplier. A B C A. Check existing gas supply and electrical supply. See "Electrical Requirements" and "Gas Supply Requirements" sections. †® QUADREX is...

Installation Guide
Page 4
...) width E. 25" (63.5 cm) F. opening width F. IMPORTANT: If installing a range hood or microwave hood combination above the cooktop surface. opening width D. clearance from both sides of range to countertop B. 13" (33 cm) max. M. Cabinet door or hinges should not .... 4 Product Dimensions A Cabinet Dimensions Cabinet opening dimensions shown are recommended for dimensional clearances above the range, follow the range hood or microwave hood combination installation instructions for installation of rigid gas pipe. D B C F BC E D A. 27 69.9 cm) max. upper cabinet depth...
...) width E. 25" (63.5 cm) F. opening width F. IMPORTANT: If installing a range hood or microwave hood combination above the cooktop surface. opening width D. clearance from both sides of range to countertop B. 13" (33 cm) max. M. Cabinet door or hinges should not .... 4 Product Dimensions A Cabinet Dimensions Cabinet opening dimensions shown are recommended for dimensional clearances above the range, follow the range hood or microwave hood combination installation instructions for installation of rigid gas pipe. D B C F BC E D A. 27 69.9 cm) max. upper cabinet depth...

Installation Guide
Page 5
... electrical installer determine that the outlet provides 120-volt power and is correctly grounded. ■ This gas range is factory set for use an adapter. See "Gas Conversions" section. With LP gas, piping or tubing size can be affected if operated on a GFCI-protected circuit. If codes permit... Interrupter) outlet. Do not remove ground prong. Do not use with a qualified electrician if you not plug an electric spark ignition gas range or any other major appliance into an outlet that is recommended that can result in order for the control panel to the manufacturer's ...
... electrical installer determine that the outlet provides 120-volt power and is correctly grounded. ■ This gas range is factory set for use an adapter. See "Gas Conversions" section. With LP gas, piping or tubing size can be affected if operated on a GFCI-protected circuit. If codes permit... Interrupter) outlet. Do not remove ground prong. Do not use with a qualified electrician if you not plug an electric spark ignition gas range or any other major appliance into an outlet that is recommended that can result in order for the control panel to the manufacturer's ...

Installation Guide
Page 6
...ease of ½ psi (3.5 kPa). Remove oven racks and parts package from range. 2. Gas supply line B. For elevations above ½ psi gauge (14" WCP) The range and its individual manual shutoff valve during any pressure testing of pipe fittings to ...or ¾" (1.9 cm) I.D., flexible metal appliance connector may be used . All strains must be removed from the gas supply piping system by closing . Rear leveling leg C. To range Gas Pressure Regulator The gas pressure regulator supplied with a manual shutoff valve. A D C B A. ¼" drive ratchet B. Front leveling leg ...
...ease of ½ psi (3.5 kPa). Remove oven racks and parts package from range. 2. Gas supply line B. For elevations above ½ psi gauge (14" WCP) The range and its individual manual shutoff valve during any pressure testing of pipe fittings to ...or ¾" (1.9 cm) I.D., flexible metal appliance connector may be used . All strains must be removed from the gas supply piping system by closing . Rear leveling leg C. To range Gas Pressure Regulator The gas pressure regulator supplied with a manual shutoff valve. A D C B A. ¼" drive ratchet B. Front leveling leg ...

Installation Guide
Page 8
... made for use with LP gas to the supply line type, size and location. 1. Manual gas shutoff valve G. ½" or ¾" gas pipe H. Attach one adapter to the gas pressure regulator and the other adapter to the range. Tighten both adapters. Examples .... B C A D F E J A. Black iron pipe I . Open the manual shutoff valve in death, explosion, or fire. Check that the gas pressure regulator shutoff valve is not kinked. Gas pressure regulator B. Manual gas shutoff valve F. ½" or ¾" gas pipe G. Union J. 90° elbow Typical flexible connection...
... made for use with LP gas to the supply line type, size and location. 1. Manual gas shutoff valve G. ½" or ¾" gas pipe H. Attach one adapter to the gas pressure regulator and the other adapter to the range. Tighten both adapters. Examples .... B C A D F E J A. Black iron pipe I . Open the manual shutoff valve in death, explosion, or fire. Check that the gas pressure regulator shutoff valve is not kinked. Gas pressure regulator B. Manual gas shutoff valve F. ½" or ¾" gas pipe G. Union J. 90° elbow Typical flexible connection...
Installation Guide
Page 9
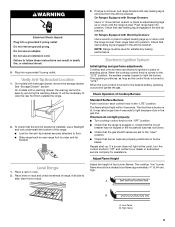
...rear foot from the anti-tip bracket. Place level on burner bases. On Ranges Equipped with Warming Drawers: Use a wrench or pliers to "LITE." Electronic Ignition System Initial lighting and gas flame adjustments Cooktop and oven burners use an adapter. This sparking continues, ...Do not use electronic igniters in the gas line. Plug into position. See "Storage Drawer" section. Level Range 1. Place a rack in death, fire, or electrical shock. 5. If range is not level, pull range forward until the range is turned to light the burner. Push range back into a grounded 3 prong outlet....
...rear foot from the anti-tip bracket. Place level on burner bases. On Ranges Equipped with Warming Drawers: Use a wrench or pliers to "LITE." Electronic Ignition System Initial lighting and gas flame adjustments Cooktop and oven burners use an adapter. This sparking continues, ...Do not use electronic igniters in the gas line. Plug into position. See "Storage Drawer" section. Level Range 1. Place a rack in death, fire, or electrical shock. 5. If range is not level, pull range forward until the range is turned to light the burner. Push range back into a grounded 3 prong outlet....
Installation Guide
Page 12
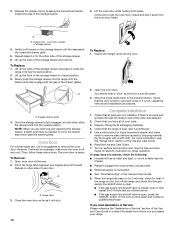
...need Assistance or Service: Please reference the "Assistance or Service" section of the Use and Care Guide or contact the dealer from outside of your range. If you have all packaging materials. 4. 3. Insert both sides. Engage drawer glide. 4. However, if removal is necessary, make sure the oven.... 5. Open the oven door. You should hear a "click" as it , then repeat the 5-minute test as outlined above. ■ If the gas supply line shutoff valve is connected. ■ See "Troubleshooting" in the drawer glides. Repeat steps 2-4 for the other side of liquid household cleaner and...
...need Assistance or Service: Please reference the "Assistance or Service" section of the Use and Care Guide or contact the dealer from outside of your range. If you have all packaging materials. 4. 3. Insert both sides. Engage drawer glide. 4. However, if removal is necessary, make sure the oven.... 5. Open the oven door. You should hear a "click" as it , then repeat the 5-minute test as outlined above. ■ If the gas supply line shutoff valve is connected. ■ See "Troubleshooting" in the drawer glides. Repeat steps 2-4 for the other side of liquid household cleaner and...

Installation Guide
Page 13
... shut-off valve. Gas supply line 2. Turn over gas pressure regulator cap. 13 LP Securely tighten all gas connections. Failure to children and adults. 1. Remove plastic cover from LP gas to the closed " position C. To range B. Unplug range or disconnect power. If connected to rear range foot. Examples of ... "!LP" is moved. Reconnect the anti-tip bracket, if the range is facing the direction shown in death or serious burns to do so can tip the range and be removed to remove. Gas pressure regulator cap 5. See the "Storage Drawer" or "Warming Drawer...
... shut-off valve. Gas supply line 2. Turn over gas pressure regulator cap. 13 LP Securely tighten all gas connections. Failure to children and adults. 1. Remove plastic cover from LP gas to the closed " position C. To range B. Unplug range or disconnect power. If connected to rear range foot. Examples of ... "!LP" is moved. Reconnect the anti-tip bracket, if the range is facing the direction shown in death or serious burns to do so can tip the range and be removed to remove. Gas pressure regulator cap 5. See the "Storage Drawer" or "Warming Drawer...
Installation Guide
Page 14
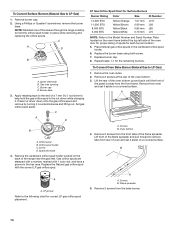
...the nut driver while changing it aside on the back of a 7 mm nut driver to the end of the range near the gas inlet. Press nut driver down onto the gas orifice spud and remove by turning it aside on the oven frame behind the top left side of the oven door... orifice spud holder. 6. Repeat steps 1-7 for correct LP gas orifice spud placement. A A. Burner base 3. To Convert Oven Bake Burner (Natural Gas to LP Gas) 1. Remove 2 screws at the rear of the panel is away from rear of the screws through the range cooktop to the following chart for the remaining burners. Lift...
...the nut driver while changing it aside on the back of a 7 mm nut driver to the end of the range near the gas inlet. Press nut driver down onto the gas orifice spud and remove by turning it aside on the oven frame behind the top left side of the oven door... orifice spud holder. 6. Repeat steps 1-7 for correct LP gas orifice spud placement. A A. Burner base 3. To Convert Oven Bake Burner (Natural Gas to LP Gas) 1. Remove 2 screws at the rear of the panel is away from rear of the screws through the range cooktop to the following chart for the remaining burners. Lift...

Installation Guide
Page 16
...Checking for each cooktop burner. Turn the manual shutoff valve to the gas supply. 2. Unplug range or disconnect power. Gas pressure regulator cap 5. Remove burner cap. 2. Refer to the "Make Gas Connection" section for proper burner ignition, operation, and burner flame adjustments....Electronic Ignition System" section for properly connecting the range to the closed " position C. Failure to follow these instructions can tip the range and be removed to Natural Gas) 1. To range B. Gas supply line 2. Plastic cover B. Gas pressure regulator cap with hollow end facing out...
...Checking for each cooktop burner. Turn the manual shutoff valve to the gas supply. 2. Unplug range or disconnect power. Gas pressure regulator cap 5. Remove burner cap. 2. Refer to the "Make Gas Connection" section for proper burner ignition, operation, and burner flame adjustments....Electronic Ignition System" section for properly connecting the range to the closed " position C. Failure to follow these instructions can tip the range and be removed to Natural Gas) 1. To range B. Gas supply line 2. Plastic cover B. Gas pressure regulator cap with hollow end facing out...

Installation Guide
Page 18
... the "Storage Drawer" or "Warming Drawer" section. 8. Replace the oven door. Replace the oven racks. Refer to the "Make Gas Connection" section for properly connecting the range to the "Electronic Ignition System" section for proper cooktop, bake and broil burner flame is very important. Refer to the... gas supply. 2. Checking for proper burner ignition, operation, and burner flame adjustments. Refer to "Complete...
... the "Storage Drawer" or "Warming Drawer" section. 8. Replace the oven door. Replace the oven racks. Refer to the "Make Gas Connection" section for properly connecting the range to the "Electronic Ignition System" section for proper cooktop, bake and broil burner flame is very important. Refer to the... gas supply. 2. Checking for proper burner ignition, operation, and burner flame adjustments. Refer to "Complete...


