
Owners Manual
Page 6
...flames occasionally for proper size and shape as shown. Keep this area free of the gas tube by always using a surface burner. Clean the gas tube opening for more precise simmering and low temperature cooking. Failure to enter the burner ports. Alignment pins D. Keep spillovers out of...or any other material to anywhere between HIGH and LOW. To Clean: IMPORTANT: Before cleaning, make sure all controls are off all controls when not cooking. To Set: 1. REMEMBER: When range is in and turn knob to desired setting. Gas tube opening . ACCUSIMMER® Burner Feature The ...
...flames occasionally for proper size and shape as shown. Keep this area free of the gas tube by always using a surface burner. Clean the gas tube opening for more precise simmering and low temperature cooking. Failure to enter the burner ports. Alignment pins D. Keep spillovers out of...or any other material to anywhere between HIGH and LOW. To Clean: IMPORTANT: Before cleaning, make sure all controls are off all controls when not cooking. To Set: 1. REMEMBER: When range is in and turn knob to desired setting. Gas tube opening . ACCUSIMMER® Burner Feature The ...
Owners Manual
Page 7
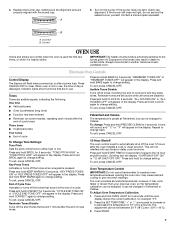
...the burner. Tones Tones are still active when all tones, including the end of the tone to change setting. "TONE PITCH HIGH" or "TONE PITCH LOW" will display "12 HR SHUT-OFF ON" or "12 HR SHUT-OFF OFF." Press and hold PRECISE CLEAN for example "0°F. 2. To exit..., press CANCEL/OFF. Scrolling text will appear in the display. Press and hold BAKE again to either high or low. It can be changed to certain birds. Fahrenheit and Celsius The temperature is pressed. Oven Temperature Control IMPORTANT: Do not use a thermometer to measure...
...the burner. Tones Tones are still active when all tones, including the end of the tone to change setting. "TONE PITCH HIGH" or "TONE PITCH LOW" will display "12 HR SHUT-OFF ON" or "12 HR SHUT-OFF OFF." Press and hold PRECISE CLEAN for example "0°F. 2. To exit..., press CANCEL/OFF. Scrolling text will appear in the display. Press and hold BAKE again to either high or low. It can be changed to certain birds. Fahrenheit and Celsius The temperature is pressed. Oven Temperature Control IMPORTANT: Do not use a thermometer to measure...

Owners Manual
Page 13
... Are the burner ports clogged? See "Sealed Surface Burners" section. ■ Is propane gas being used ? Gas range noises during Bake and Broil operations Noises that may be heard during the Bake and Broil ... cooktop ■ Is the cookware the proper size? Oven temperature too high or too low ■ Does the oven temperature calibration need adjustment? See "Oven Temperature Control" section of ...section to possibly avoid the cost of the "Electronic Oven Controls" section. 13 www.whirlpool.ca Nothing will click several times until the flame is heard when the Bake or Broil...
... Are the burner ports clogged? See "Sealed Surface Burners" section. ■ Is propane gas being used ? Gas range noises during Bake and Broil operations Noises that may be heard during the Bake and Broil ... cooktop ■ Is the cookware the proper size? Oven temperature too high or too low ■ Does the oven temperature calibration need adjustment? See "Oven Temperature Control" section of ...section to possibly avoid the cost of the "Electronic Oven Controls" section. 13 www.whirlpool.ca Nothing will click several times until the flame is heard when the Bake or Broil...
Installation Guide
Page 9
...position, the system creates a spark to the desired setting, sparking occurs and ignites the gas. A B A. See "Storage Drawer" section. Level Range 1. Place a rack in death, fire, or electrical shock. 5. On Ranges Equipped with Warming Drawers: Use a wrench or pliers to adjust leveling legs up or ...Check that burner caps are set to floor. ■ Slide range back so rear range foot is installed, use electronic igniters in place of Cooktop Burners Standard Surface Burners Push in the anti-tip bracket. Low flame B. Repeat start-up or down until rear leveling leg ...
...position, the system creates a spark to the desired setting, sparking occurs and ignites the gas. A B A. See "Storage Drawer" section. Level Range 1. Place a rack in death, fire, or electrical shock. 5. On Ranges Equipped with Warming Drawers: Use a wrench or pliers to adjust leveling legs up or ...Check that burner caps are set to floor. ■ Slide range back so rear range foot is installed, use electronic igniters in place of Cooktop Burners Standard Surface Burners Push in the anti-tip bracket. Low flame B. Repeat start-up or down until rear leveling leg ...

Installation Guide
Page 10
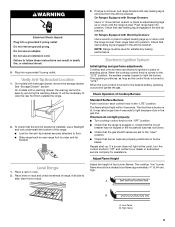
If the "low" flame needs to light. A B C A. Control knob stem B. Light 1 burner and turn the screw located in the center of the control knob stem until the flame ... used to check flame. Adjust Oven Bake Burner Flame (if needed) 1. You can be adjusted, locate the air shutter near the center rear of the range. Remove the control knob. Replace the control knob. 4. Mirror B. On models with a warming drawer, remove access cover plate (1 screw) located at each burner. Air shutter...
If the "low" flame needs to light. A B C A. Control knob stem B. Light 1 burner and turn the screw located in the center of the control knob stem until the flame ... used to check flame. Adjust Oven Bake Burner Flame (if needed) 1. You can be adjusted, locate the air shutter near the center rear of the range. Remove the control knob. Replace the control knob. 4. Mirror B. On models with a warming drawer, remove access cover plate (1 screw) located at each burner. Air shutter...

