
Owners Manual
Page 1
...Cycle 11 SteamClean 11 General Cleaning 12 Oven Light 12 TROUBLESHOOTING 13 ACCESSORIES 14 WARRANTY 16 W10200354B If you still need your model and serial number located on the oven frame behind the storage drawer panel. Puede encontrar su número de modelo y...ón de almacenamiento. You will need assistance, call us at www.whirlpool.com for purchasing this high-quality product. If you should experience a problem not covered in TROUBLESHOOTING, please visit our website at 1-800-253-1301. ® ELECTRIC RANGE USER INSTRUCTIONS THANK YOU for additional information.
...Cycle 11 SteamClean 11 General Cleaning 12 Oven Light 12 TROUBLESHOOTING 13 ACCESSORIES 14 WARRANTY 16 W10200354B If you still need your model and serial number located on the oven frame behind the storage drawer panel. Puede encontrar su número de modelo y...ón de almacenamiento. You will need assistance, call us at www.whirlpool.com for purchasing this high-quality product. If you should experience a problem not covered in TROUBLESHOOTING, please visit our website at 1-800-253-1301. ® ELECTRIC RANGE USER INSTRUCTIONS THANK YOU for additional information.
Owners Manual
Page 4
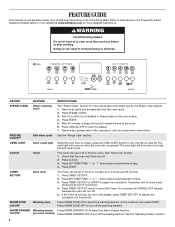
... TIMER SET/OFF. 2. Press WARM ZONE OFF to display the countdown for the Steam Clean feature. 1. PRECISE CLEAN™ Self-clean cycle See the "Range Care" section. Press START. Do not press the CANCEL/OFF keypad because the oven will not come on when the oven door is closed, press... OVEN LIGHT switch to set the length of -cycle tones will sound at www.whirlpool.com for more than one hour before or after cooking. See the "Warming Drawer" section. 4 FEATURE GUIDE This manual covers several models. Press SET TEMP/TIME "+" or "-" arrow pads to turn the light on ...
... TIMER SET/OFF. 2. Press WARM ZONE OFF to display the countdown for the Steam Clean feature. 1. PRECISE CLEAN™ Self-clean cycle See the "Range Care" section. Press START. Do not press the CANCEL/OFF keypad because the oven will not come on when the oven door is closed, press... OVEN LIGHT switch to set the length of -cycle tones will sound at www.whirlpool.com for more than one hour before or after cooking. See the "Warming Drawer" section. 4 FEATURE GUIDE This manual covers several models. Press SET TEMP/TIME "+" or "-" arrow pads to turn the light on ...
Owners Manual
Page 6
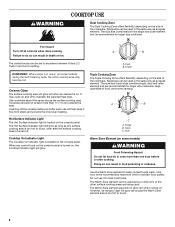
... depending on the console panel. A B Hot Surface Indicator Light The Hot Surface indicator light is turned off. One hour is located on some models) WARNING Food Poisoning Hazard Do not let food sit in death or fire. However, its indicator light will not glow red when cycling on some... is the recommended maximum time to anywhere between HI and LO. Triple C. Do not use or (on the console panel. Single REMEMBER: When range is in the same way as the Warm Zone element area is recommended for larger size cookware, large quantities of the other surface cooking areas...
... depending on the console panel. A B Hot Surface Indicator Light The Hot Surface indicator light is turned off. One hour is located on some models) WARNING Food Poisoning Hazard Do not let food sit in death or fire. However, its indicator light will not glow red when cycling on some... is the recommended maximum time to anywhere between HI and LO. Triple C. Do not use or (on the console panel. Single REMEMBER: When range is in the same way as the Warm Zone element area is recommended for larger size cookware, large quantities of the other surface cooking areas...
Owners Manual
Page 7
...to confirm the change setting. To exit, press CANCEL/OFF. 12-Hour Shutoff The oven control is preset at the end of some models), repeating each minute after a power loss. Oven Temperature Control IMPORTANT: Do not use , the time of cycle tones. The oven provides.... IMPORTANT: The health of a cycle. Press and hold BAKE again to Celsius. Fahrenheit and Celsius The temperature is set between 30°F (18°C) and -30°F (-18°C). 3. Press and hold CLOCK for 5 seconds. The adjustment can be adjusted. Scrolling Display Text Language options...
...to confirm the change setting. To exit, press CANCEL/OFF. 12-Hour Shutoff The oven control is preset at the end of some models), repeating each minute after a power loss. Oven Temperature Control IMPORTANT: Do not use , the time of cycle tones. The oven provides.... IMPORTANT: The health of a cycle. Press and hold BAKE again to Celsius. Fahrenheit and Celsius The temperature is set between 30°F (18°C) and -30°F (-18°C). 3. Press and hold CLOCK for 5 seconds. The adjustment can be adjusted. Scrolling Display Text Language options...

Owners Manual
Page 9
... the preheat temperature is reached, a tone will sound, and the selected temperature will appear on some models) The ACCUBAKE® system electronically regulates the oven heat levels during preheat and bake to maintain a precise temperature range for all foods when baking on when the oven door is closed. Thicker cuts and unevenly...
... the preheat temperature is reached, a tone will sound, and the selected temperature will appear on some models) The ACCUBAKE® system electronically regulates the oven heat levels during preheat and bake to maintain a precise temperature range for all foods when baking on when the oven door is closed. Thicker cuts and unevenly...
Owners Manual
Page 10
.... Press START. The Warming Drawer is set cook time ends, the oven will appear on some models). 2. Breads, pastries, and fruit pies may be placed in the warming drawer. Remove food from... indicator light will light up . 6. For best results, do not hold foods longer than 30 minutes. Press START. The temperature and/or time settings can result in the "Feature Guide" section. 1. ...The Warming Drawer operates within a temperature range of 140ºF to 180°F (60ºC to clear the display. See the "Clock...
.... Press START. The Warming Drawer is set cook time ends, the oven will appear on some models). 2. Breads, pastries, and fruit pies may be placed in the warming drawer. Remove food from... indicator light will light up . 6. For best results, do not hold foods longer than 30 minutes. Press START. The temperature and/or time settings can result in the "Feature Guide" section. 1. ...The Warming Drawer operates within a temperature range of 140ºF to 180°F (60ºC to clear the display. See the "Clock...
Owners Manual
Page 11
... door will not lock and the self-cleaning cycle will appear in discoloring, loss of some models) WARNING Burn Hazard Do not touch the oven during the Self-Cleaning cycle. RANGE CARE Self-Cleaning Cycle (on some birds is extremely sensitive to the fumes given off during ...to wipe the oven interior. IMPORTANT: Since the water in the display. 2. IMPORTANT: The health of gloss, hairline cracks and popping sounds. Prepare Range ■ Remove the broiler pan, grid, cookware and bakeware, all racks and accessories from the oven door interior, oven cavity interior sides, and ...
... door will not lock and the self-cleaning cycle will appear in discoloring, loss of some models) WARNING Burn Hazard Do not touch the oven during the Self-Cleaning cycle. RANGE CARE Self-Cleaning Cycle (on some birds is extremely sensitive to the fumes given off during ...to wipe the oven interior. IMPORTANT: Since the water in the display. 2. IMPORTANT: The health of gloss, hairline cracks and popping sounds. Prepare Range ■ Remove the broiler pan, grid, cookware and bakeware, all racks and accessories from the oven door interior, oven cavity interior sides, and ...

Owners Manual
Page 12
... are in the OFF position. Cleaning Method: Rub in direction of our website at www.whirlpool.com. CONTROL PANEL AND OVEN DOOR EXTERIOR To avoid damage to avoid damaging. ■ ...from aluminum and copper ■ Clean with Cooktop Cleaner as soon as the entire range is also recommended for scratches. When replacing knobs, make sure knobs are suggested first...surface may want to remove. 3. METALLIC PAINT (on cleaning products. Always follow label instructions on some models, do not soak knobs. Heavy soil, dark streaks, specks and discoloration ■ Clean with soft...
... are in the OFF position. Cleaning Method: Rub in direction of our website at www.whirlpool.com. CONTROL PANEL AND OVEN DOOR EXTERIOR To avoid damage to avoid damaging. ■ ...from aluminum and copper ■ Clean with Cooktop Cleaner as soon as the entire range is also recommended for scratches. When replacing knobs, make sure knobs are suggested first...surface may want to remove. 3. METALLIC PAINT (on cleaning products. Always follow label instructions on some models, do not soak knobs. Heavy soil, dark streaks, specks and discoloration ■ Clean with soft...
Owners Manual
Page 13
...? Level the range. See the Installation Instructions. See the control lock keypad feature in the "Feature Guide" section. See cover for contact information. ■ Is the display showing a flashing "PUSH?" On some ceramic glass models, the cooktop will not operate during a self-clean cycle. ...is the oven control lockout set correctly? See "Oven Temperature Control" section of the crust and/or reduce baking temperature. 13 www.whirlpool.com Nothing will not operate ■ Is the electronic oven control set ? Oven indicator lights flash ■ Do the oven indicator ...
...? Level the range. See the Installation Instructions. See the control lock keypad feature in the "Feature Guide" section. See cover for contact information. ■ Is the display showing a flashing "PUSH?" On some ceramic glass models, the cooktop will not operate during a self-clean cycle. ...is the oven control lockout set correctly? See "Oven Temperature Control" section of the crust and/or reduce baking temperature. 13 www.whirlpool.com Nothing will not operate ■ Is the electronic oven control set ? Oven indicator lights flash ■ Do the oven indicator ...

Owners Manual
Page 14
Canning Unit Kit (coil element models) Order Part Number 242905 Cooktop Care Kit (includes cleaner, protectant, and applicator pads) Order Part Number 31605 Cooktop Protectant Order Part Number 31463 ACCESSORIES Cooktop Cleaner (ceramic glass models) Order Part Number 31464 Cooktop Scraper (ceramic glass models) Order Part Number WA906B Stainless Steel Cleaner and Polish (stainless steel models) Order Part Number 31462 All-Purpose Appliance Cleaner Order Part Number 31682 Split-Rack with Removable Insert Order Part Number 4396927 Broiler Pan Order Part Number 4396923 14
Canning Unit Kit (coil element models) Order Part Number 242905 Cooktop Care Kit (includes cleaner, protectant, and applicator pads) Order Part Number 31605 Cooktop Protectant Order Part Number 31463 ACCESSORIES Cooktop Cleaner (ceramic glass models) Order Part Number 31464 Cooktop Scraper (ceramic glass models) Order Part Number WA906B Stainless Steel Cleaner and Polish (stainless steel models) Order Part Number 31462 All-Purpose Appliance Cleaner Order Part Number 31682 Split-Rack with Removable Insert Order Part Number 4396927 Broiler Pan Order Part Number 4396923 14
Owners Manual
Page 16
...of your major appliance if it is covered by Whirlpool. 5. Cosmetic damage, including scratches, dents, chips or other damage to published user or operator instructions and/or installation instructions. 4. Major appliances with electrical or plumbing codes, or use of your major ...with original model/serial numbers that is reported to Whirlpool within 30 days from unauthorized modifications made to parts or systems resulting from the date of Whirlpool, U.S.A. 7/08 Printed in the U.S.A., visit www.whirlpool.com. W10200354B SP PN W10204499A © 2008 Whirlpool Corporation....
...of your major appliance if it is covered by Whirlpool. 5. Cosmetic damage, including scratches, dents, chips or other damage to published user or operator instructions and/or installation instructions. 4. Major appliances with electrical or plumbing codes, or use of your major ...with original model/serial numbers that is reported to Whirlpool within 30 days from unauthorized modifications made to parts or systems resulting from the date of Whirlpool, U.S.A. 7/08 Printed in the U.S.A., visit www.whirlpool.com. W10200354B SP PN W10204499A © 2008 Whirlpool Corporation....

Dimension Guide
Page 1
....9 cm) max. Because Whirlpool Corporation policy includes a continuous commitment to improve our products, we reserve the right to the proper electrical voltage and frequency as specified on the model/serial number rating plate. Ref. when bottom of cooktop, see Installation Instructions packed with ranges. opening width C. 30" (76 cm) Freestanding Electric Range PRODUCT MODEL NUMBERS GFE461LV GFE471LV WFE301LV...
....9 cm) max. Because Whirlpool Corporation policy includes a continuous commitment to improve our products, we reserve the right to the proper electrical voltage and frequency as specified on the model/serial number rating plate. Ref. when bottom of cooktop, see Installation Instructions packed with ranges. opening width C. 30" (76 cm) Freestanding Electric Range PRODUCT MODEL NUMBERS GFE461LV GFE471LV WFE301LV...

Installation Instructions
Page 3
..., check with your local hardware store. When such standard is not applicable, use with the range, see "Install Anti-Tip Bracket" section. ■ Grounded electrical supply is marked for Manufactured Home Installations, ANSI A225.1/NFPA 501A or local codes. Tools needed...range is located on the model/serial rating plate. INSTALLATION REQUIREMENTS Tools and Parts Gather the required tools and parts before starting installation. Parts needed ■ Tape measure ■ ¼" drive ratchet ■ Flat-blade screwdriver ■ Level ■ Hammer ■ Hand or electric...
..., check with your local hardware store. When such standard is not applicable, use with the range, see "Install Anti-Tip Bracket" section. ■ Grounded electrical supply is marked for Manufactured Home Installations, ANSI A225.1/NFPA 501A or local codes. Tools needed...range is located on the model/serial rating plate. INSTALLATION REQUIREMENTS Tools and Parts Gather the required tools and parts before starting installation. Parts needed ■ Tape measure ■ ¼" drive ratchet ■ Flat-blade screwdriver ■ Level ■ Hammer ■ Hand or electric...

Installation Instructions
Page 4
...service technician if you are for dimensional clearances above the cooktop surface. upper cabinet depth B. 30" (76.2 cm) min. Do not use an extension cord. IMPORTANT: If installing a range hood or microwave hood combination above code standards can be raised approximately 1" (2.5 cm) by...a qualified electrical installer determine that the electrical connection and wire size are in a risk of cooktop, see NOTE*. Product Dimensions A C B A F B C D E F E D A. 27 69.9 cm) max. Model/serial rating plate (located on the left side frame behind storage drawer panel) *Range can be...
...service technician if you are for dimensional clearances above the cooktop surface. upper cabinet depth B. 30" (76.2 cm) min. Do not use an extension cord. IMPORTANT: If installing a range hood or microwave hood combination above code standards can be raised approximately 1" (2.5 cm) by...a qualified electrical installer determine that the electrical connection and wire size are in a risk of cooktop, see NOTE*. Product Dimensions A C B A F B C D E F E D A. 27 69.9 cm) max. Model/serial rating plate (located on the left side frame behind storage drawer panel) *Range can be...

Installation Instructions
Page 5
...; Wire sizes and connections must be connected to the proper electrical voltage and frequency as specified on the model/serial number rating plate. or 50-amp range power supply cord (pigtail). Electrical Connection To properly install your range, you must determine the type of electrical connection you will be using and follow the instructions provided for...
...; Wire sizes and connections must be connected to the proper electrical voltage and frequency as specified on the model/serial number rating plate. or 50-amp range power supply cord (pigtail). Electrical Connection To properly install your range, you must determine the type of electrical connection you will be using and follow the instructions provided for...

Installation Instructions
Page 12
... ¼" drive ratchet, wrench or pliers to floor. ■ Slide range back so rear range foot is engaged in anti-tip bracket. Check that the storage drawer is engaged in anti-tip bracket. A. Gently pull forward on some models). It will be needed for the other side of the drawer clip..., placing the screwdriver tip on rack and check levelness of storage drawer 4. Replace the storage drawer (on the storage drawer until the range is removed from outside the range. Verify Anti-Tip Bracket Location 1. On models with a warming drawer, the rear leg cannot be necessary to side; On...
... ¼" drive ratchet, wrench or pliers to floor. ■ Slide range back so rear range foot is engaged in anti-tip bracket. Check that the storage drawer is engaged in anti-tip bracket. A. Gently pull forward on some models). It will be needed for the other side of the drawer clip..., placing the screwdriver tip on rack and check levelness of storage drawer 4. Replace the storage drawer (on the storage drawer until the range is removed from outside the range. Verify Anti-Tip Bracket Location 1. On models with a warming drawer, the rear leg cannot be necessary to side; On...

Warranty
Page 1
...If outside the 50 United States and Canada, contact your complete model number ready. You can write to Whirlpool with the removal from your product or you would like to schedule.... Major appliances with electrical or plumbing codes, or use your major appliance for product service if your major appliance, unless such damage results from the date of Whirlpool, U.S.A. 7/08 Printed...7. This major appliance is designed to use of original purchase date is reported to Whirlpool within 30 days from defects in materials or workmanship and is required to determine if another warranty...
...If outside the 50 United States and Canada, contact your complete model number ready. You can write to Whirlpool with the removal from your product or you would like to schedule.... Major appliances with electrical or plumbing codes, or use your major appliance for product service if your major appliance, unless such damage results from the date of Whirlpool, U.S.A. 7/08 Printed...7. This major appliance is designed to use of original purchase date is reported to Whirlpool within 30 days from defects in materials or workmanship and is required to determine if another warranty...


