
Owners Manual
Page 3
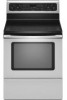
... Elements - Heating elements should not be immersed in or around any part of electric shock. Let hot air or steam escape before removing or replacing food. ■ Do Not Heat Unopened Food Containers - TO CHECK IF THE DEVICES ARE INSTALLED PROPERLY, SLIDE RANGE FORWARD, LOOK FOR ANTI-TIP BRACKET SECURELY ATTACHED TO FLOOR, AND...
... Elements - Heating elements should not be immersed in or around any part of electric shock. Let hot air or steam escape before removing or replacing food. ■ Do Not Heat Unopened Food Containers - TO CHECK IF THE DEVICES ARE INSTALLED PROPERLY, SLIDE RANGE FORWARD, LOOK FOR ANTI-TIP BRACKET SECURELY ATTACHED TO FLOOR, AND...

Owners Manual
Page 12
...not use steel wool, abrasive cleansers or oven cleaner. Before replacing, make sure knobs are in the off position. 2. Unplug range or disconnect power. 4. Always follow label instructions on panel. ■ All-Purpose Appliance Cleaner Part Number 31682 (not included): See cover for contact information. Burned...Rub in range or reconnect power. 12 Cleaning Method: ■ Glass cleaner and soft cloth or sponge: Apply glass cleaner to soft cloth or sponge, not directly on cleaning products. Store razor blades out of the reach of our website at www.whirlpool.com. ...
...not use steel wool, abrasive cleansers or oven cleaner. Before replacing, make sure knobs are in the off position. 2. Unplug range or disconnect power. 4. Always follow label instructions on panel. ■ All-Purpose Appliance Cleaner Part Number 31682 (not included): See cover for contact information. Burned...Rub in range or reconnect power. 12 Cleaning Method: ■ Glass cleaner and soft cloth or sponge: Apply glass cleaner to soft cloth or sponge, not directly on cleaning products. Store razor blades out of the reach of our website at www.whirlpool.com. ...
Owners Manual
Page 16
...parts or systems resulting from warranty coverage. 3. Please keep this warranty. 8. Expenses for travel and transportation for future reference. WHIRLPOOL CORPORATION MAJOR APPLIANCE WARRANTY LIMITED WARRANTY For one year from the date of purchase, when this major appliance is operated and maintained according to instructions attached to or furnished with electrical...in an inaccessible location or is reported to Whirlpool within 30 days from the date of your complete model number ready. Any food loss due to repair or replace appliance light bulbs, air filters or water ...
...parts or systems resulting from warranty coverage. 3. Please keep this warranty. 8. Expenses for travel and transportation for future reference. WHIRLPOOL CORPORATION MAJOR APPLIANCE WARRANTY LIMITED WARRANTY For one year from the date of purchase, when this major appliance is operated and maintained according to instructions attached to or furnished with electrical...in an inaccessible location or is reported to Whirlpool within 30 days from the date of your complete model number ready. Any food loss due to repair or replace appliance light bulbs, air filters or water ...

Installation Instructions
Page 13
... into an outlet. ■ Electrical supply is connected. ■ See "Troubleshooting" in the range Use and Care Guide. 7. Complete Installation 1. If there is intact and tight; Turn on for 5 minutes, check for specific instruction on . 8. When the range has been on surface burners and... Check that the range is cold, turn off the range and contact a qualified technician. 13 For more information, read the "Range Care" section of your tools. 3. Check that you are now installed. Use a mild solution of /recycle all parts are removing and replacing the storage drawer,...
... into an outlet. ■ Electrical supply is connected. ■ See "Troubleshooting" in the range Use and Care Guide. 7. Complete Installation 1. If there is intact and tight; Turn on for 5 minutes, check for specific instruction on . 8. When the range has been on surface burners and... Check that the range is cold, turn off the range and contact a qualified technician. 13 For more information, read the "Range Care" section of your tools. 3. Check that you are now installed. Use a mild solution of /recycle all parts are removing and replacing the storage drawer,...

Installation Instructions
Page 14
Unplug the power supply cord. 3. Electrical Shock Hazard Disconnect power before operating. Check that range is under anti-tip bracket. 5. Reconnect power. 6. Replace all parts and panels before servicing. Reconnect the anti-tip bracket, if the range is level. 6. Slide range forward. 3. Slide range forward. 2. Complete cleaning or maintenance. 4. Failure to do so can result in death or...
Unplug the power supply cord. 3. Electrical Shock Hazard Disconnect power before operating. Check that range is under anti-tip bracket. 5. Reconnect power. 6. Replace all parts and panels before servicing. Reconnect the anti-tip bracket, if the range is level. 6. Slide range forward. 3. Slide range forward. 2. Complete cleaning or maintenance. 4. Failure to do so can result in death or...

Warranty
Page 1
... 9/07 For additional product information, in materials or workmanship and is reported to Whirlpool within 30 days from the date of purchase. 6. The cost of repair or replacement under this limited warranty. WHIRLPOOL SHALL NOT BE LIABLE FOR INCIDENTAL OR CONSEQUENTIAL DAMAGES. THIS WARRANTY GIVES YOU SPECIFIC ...YOU. Have your major appliance. Please keep this User Instructions and model number information for Factory Specified Parts and repair labor to correct defects in accordance with electrical or plumbing codes, or use your model number and serial number on the label, located on ...
... 9/07 For additional product information, in materials or workmanship and is reported to Whirlpool within 30 days from the date of purchase. 6. The cost of repair or replacement under this limited warranty. WHIRLPOOL SHALL NOT BE LIABLE FOR INCIDENTAL OR CONSEQUENTIAL DAMAGES. THIS WARRANTY GIVES YOU SPECIFIC ...YOU. Have your major appliance. Please keep this User Instructions and model number information for Factory Specified Parts and repair labor to correct defects in accordance with electrical or plumbing codes, or use your model number and serial number on the label, located on ...


