Owners Manual
Page 2
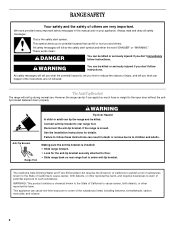
... benzene, formaldehyde, carbon monoxide, and toluene. 2 Reconnect the anti-tip bracket, if the range is the safety alert symbol. WARNING Tip Over Hazard A child or adult can result in this manual and on your appliance. See the installation instructions for the anti-tip bracket securely attached to ...reduce the chance of injury, and tell you how to floor. • Slide range back so rear range foot is , tell you what the ...
... benzene, formaldehyde, carbon monoxide, and toluene. 2 Reconnect the anti-tip bracket, if the range is the safety alert symbol. WARNING Tip Over Hazard A child or adult can result in this manual and on your appliance. See the installation instructions for the anti-tip bracket securely attached to ...reduce the chance of injury, and tell you how to floor. • Slide range back so rear range foot is , tell you what the ...

Owners Manual
Page 3
...may subject wiring or components underneath to persons, or damage when using the range. ■ User Servicing - Proper relationship of fire, electrical shock, injury to damage. ■ Protective Liners - Absence of electric shock. Heating elements should not be immersed in burns from steam. If .... ■ Use Only Dry Potholders - Interior surfaces of the range unless specifically recommended in the manual. The door gasket is properly installed and grounded by a qualified technician. ■ Never Use the Range for a good seal. Care should not be careful to line ...
...may subject wiring or components underneath to persons, or damage when using the range. ■ User Servicing - Proper relationship of fire, electrical shock, injury to damage. ■ Protective Liners - Absence of electric shock. Heating elements should not be immersed in burns from steam. If .... ■ Use Only Dry Potholders - Interior surfaces of the range unless specifically recommended in the manual. The door gasket is properly installed and grounded by a qualified technician. ■ Never Use the Range for a good seal. Care should not be careful to line ...
Owners Manual
Page 4
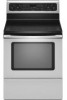
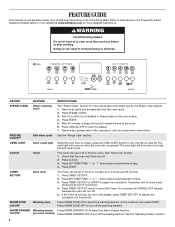
...Press STEAM CLEAN. 3. PRECISE CLEAN™ Self-clean cycle See the "Range Care" section. See "Oven Use" section. 1. Press SET TEMP/TIME ...or START to select the Warm Drawer function. If enabled, end-of-cycle tones will sound at www.whirlpool.com for more than one hour before or after cooking. Press WARM ZONE OFF to the oven bottom.... 4. WARM DRAWER Warming drawer Press WARM DRAWER ON to begin the countdown. FEATURE GUIDE This manual covers several models. KEYPAD FEATURE INSTRUCTIONS STEAM CLEAN Steam cleaning cycle See "Steam Clean" section for more detailed...
...Press STEAM CLEAN. 3. PRECISE CLEAN™ Self-clean cycle See the "Range Care" section. See "Oven Use" section. 1. Press SET TEMP/TIME ...or START to select the Warm Drawer function. If enabled, end-of-cycle tones will sound at www.whirlpool.com for more than one hour before or after cooking. Press WARM ZONE OFF to the oven bottom.... 4. WARM DRAWER Warming drawer Press WARM DRAWER ON to begin the countdown. FEATURE GUIDE This manual covers several models. KEYPAD FEATURE INSTRUCTIONS STEAM CLEAN Steam cleaning cycle See "Steam Clean" section for more detailed...

Installation Instructions
Page 2
... be killed or seriously injured if you don't follow instructions. This symbol alerts you to rear range foot. All safety messages will follow these instructions can result in this manual and on your appliance. We have provided many important safety messages in death or serious burns to children... and adults. 2 Reconnect the anti-tip bracket, if the range is the safety alert symbol. WARNING You can be...
... be killed or seriously injured if you don't follow instructions. This symbol alerts you to rear range foot. All safety messages will follow these instructions can result in this manual and on your appliance. We have provided many important safety messages in death or serious burns to children... and adults. 2 Reconnect the anti-tip bracket, if the range is the safety alert symbol. WARNING You can be...

Installation Instructions
Page 6
... C. AB C If cabinet opening edge, align template with overhang. Remove shipping materials, tape and film from outside the range. Do not remove the shipping base at this manual. 2. Use a wrench or pliers to rear range foot. Tape template into place. 4. Connect anti-tip bracket to lower front leveling legs one -half turn . Contact...
... C. AB C If cabinet opening edge, align template with overhang. Remove shipping materials, tape and film from outside the range. Do not remove the shipping base at this manual. 2. Use a wrench or pliers to rear range foot. Tape template into place. 4. Connect anti-tip bracket to lower front leveling legs one -half turn . Contact...


