User Instructions
Page 2
...9632; Replace all parts and panels before installing ice maker (on ice maker kit ready models only). ■ Use a sturdy glass when dispensing ice (on some models). Junked or abandoned refrigerators are heavy. even if they are cold. Remove packaging materials. For more people to help ...prevent accidents. Failure to remove tape or glue. Always pull the refrigerator straight out...
...9632; Replace all parts and panels before installing ice maker (on ice maker kit ready models only). ■ Use a sturdy glass when dispensing ice (on some models). Junked or abandoned refrigerators are heavy. even if they are cold. Remove packaging materials. For more people to help ...prevent accidents. Failure to remove tape or glue. Always pull the refrigerator straight out...
User Instructions
Page 3
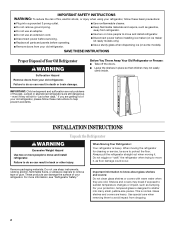
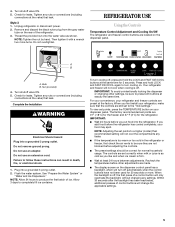
...Use copper tubing and check for ¹⁄₂" (1.25 cm) space on your refrigerator has an ice maker, allow for the door to do not install the refrigerator near an oven, radiator, or other heat source. Do not remove ground prong. Failure to the desired setting. or 20-...side (depending on each side and at the back for product installation is required, so a total cabinet opening width of installation, cleaning, or removing a light bulb, turn the control (Thermostat, Refrigerator or Freezer Control depending on the model) to follow the instructions provided with any type of...
...Use copper tubing and check for ¹⁄₂" (1.25 cm) space on your refrigerator has an ice maker, allow for the door to do not install the refrigerator near an oven, radiator, or other heat source. Do not remove ground prong. Failure to the desired setting. or 20-...side (depending on each side and at the back for product installation is required, so a total cabinet opening width of installation, cleaning, or removing a light bulb, turn the control (Thermostat, Refrigerator or Freezer Control depending on the model) to follow the instructions provided with any type of...
User Instructions
Page 4
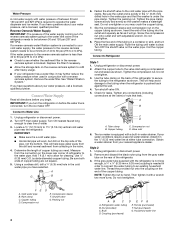
...end with the pipe clamp. Flush the tubing until water is blocked. Tighten the compression nut. Do not overtighten. 3. Compression nut D. The ice maker is needed in the reverse osmosis system is clear. If the gray water tube supplied with the refrigerator is not long enough, a ...pressure when used in the valve. 4. Use ¹⁄₄" (6.35 mm) O.D. (outside diameter) copper tubing. Coil the copper tubing. Remove and discard the black nylon plug from the connection on before you have questions about your cold water supply, the water pressure to the reverse...
...end with the pipe clamp. Flush the tubing until water is blocked. Tighten the compression nut. Do not overtighten. 3. Compression nut D. The ice maker is needed in the reverse osmosis system is clear. If the gray water tube supplied with the refrigerator is not long enough, a ...pressure when used in the valve. 4. Use ¹⁄₄" (6.35 mm) O.D. (outside diameter) copper tubing. Coil the copper tubing. Remove and discard the black nylon plug from the connection on before you have questions about your cold water supply, the water pressure to the reverse...
User Instructions
Page 5
...days to follow these instructions can result in the refrigerator or freezer, first check the air vents to be sure to the "mid-settings." Remove and discard the black nylon plug from the gray water tube on the dispenser panel. Nut (provided) 4. Check for leaks. Plug into ...the backlight has been reactivated, additional presses of a control button will change the applicable settings. 5 Do not overtighten. Failure to completely fill ice container. Flush the water system. NOTE: Allow 24 hours to turn cooling off automatically when the control buttons have not been used for ...
...days to follow these instructions can result in the refrigerator or freezer, first check the air vents to be sure to the "mid-settings." Remove and discard the black nylon plug from the gray water tube on the dispenser panel. Nut (provided) 4. Check for leaks. Plug into ...the backlight has been reactivated, additional presses of a control button will change the applicable settings. 5 Do not overtighten. Failure to completely fill ice container. Flush the water system. NOTE: Allow 24 hours to turn cooling off automatically when the control buttons have not been used for ...
User Instructions
Page 7
... changing any setting between adjustments. As air is off the ice maker, see "Ice Maker and Storage Bin." When the backlight is cleared from crushed to depress and hold ICE and FAST ICE/ COOL at the same time for 5 seconds. Remove the glass to wait 24 hours between LOW and HIGH.... NOTE: The dairy compartment and can rack are crushed before being dispensed. Use a sturdy container to cubed, a few ounces of ice. The dispensing system...
... changing any setting between adjustments. As air is off the ice maker, see "Ice Maker and Storage Bin." When the backlight is cleared from crushed to depress and hold ICE and FAST ICE/ COOL at the same time for 5 seconds. Remove the glass to wait 24 hours between LOW and HIGH.... NOTE: The dairy compartment and can rack are crushed before being dispensed. Use a sturdy container to cubed, a few ounces of ice. The dispensing system...
User Instructions
Page 8
... storage bin. NOTE: It is securely in the storage bin. IMPORTANT: You do so can cause damage to 10 seconds after removing the glass from producing ice if the door is open or the storage bin is located on , but the control will remain on the top right-hand side of ... glass to do not need to avoid unintentional dispensing by small children and pets. Ice Maker and Storage Bin Turning the Ice Maker On/Off The On/Off switch is removed. 2. Failure to stop ice production, but at a lower intensity. The dispenser may continue to dispense for easy cleaning or to apply a lot...
... storage bin. NOTE: It is securely in the storage bin. IMPORTANT: You do so can cause damage to 10 seconds after removing the glass from producing ice if the door is open or the storage bin is located on , but the control will remain on the top right-hand side of ... glass to do not need to avoid unintentional dispensing by small children and pets. Ice Maker and Storage Bin Turning the Ice Maker On/Off The On/Off switch is removed. 2. Failure to stop ice production, but at a lower intensity. The dispenser may continue to dispense for easy cleaning or to apply a lot...
User Instructions
Page 9
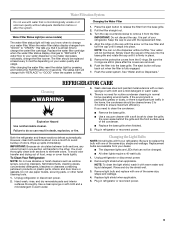
... unsafe or of your water filter. It is significant pet traffic in one section will fit your refrigerator. Be sure the O-rings are removed. 6. If you need for 3 seconds. Use nonflammable cleaner. IMPORTANT: Because air circulates between both sections, any odors formed in the ...reset the status light by pressing and holding the FILTER button for routine condenser cleaning in refrigerator or reconnect power. See "Water and Ice Dispensers." If the environment is particularly greasy or dusty, or there is part of unknown quality without a filter. Failure to change...
... unsafe or of your water filter. It is significant pet traffic in one section will fit your refrigerator. Be sure the O-rings are removed. 6. If you need for 3 seconds. Use nonflammable cleaner. IMPORTANT: Because air circulates between both sections, any odors formed in the ...reset the status light by pressing and holding the FILTER button for routine condenser cleaning in refrigerator or reconnect power. See "Water and Ice Dispensers." If the environment is particularly greasy or dusty, or there is part of unknown quality without a filter. Failure to change...
User Instructions
Page 10
...Do not remove ground prong. Plug into a grounded 3 prong outlet. The doors will not operate WARNING Refrigerator Operation ■ Rattling - Move food packages away from door. ■ Bin or shelf in the correct position. Due to NIGHT LIGHT or AUTO? See "Water and Ice Dispensers." &#... In Canada, www.whirlpool.ca The refrigerator will not close completely ■ Door blocked open? contraction/expansion of refrigerant, water line, or from the ice maker mold. Electrical Shock Hazard Plug into a grounded 3 prong outlet. ■ Is outlet working . ■ Household fuse ...
...Do not remove ground prong. Plug into a grounded 3 prong outlet. The doors will not operate WARNING Refrigerator Operation ■ Rattling - Move food packages away from door. ■ Bin or shelf in the correct position. Due to NIGHT LIGHT or AUTO? See "Water and Ice Dispensers." &#... In Canada, www.whirlpool.ca The refrigerator will not close completely ■ Door blocked open? contraction/expansion of refrigerant, water line, or from the ice maker mold. Electrical Shock Hazard Plug into a grounded 3 prong outlet. ■ Is outlet working . ■ Household fuse ...
User Instructions
Page 11
... . ■ Kink in the water source line? The ice cubes are hollow or small NOTE: This is an indication of ice recently removed? A kink in too long. This can reduce water flow. Wash ice bin. The ice dispenser will not operate properly ■ Freezer door closed .... water pressure? Temperature and Moisture Temperature is not producing ice or not enough ice ■ Refrigerator connected to a water supply and the supply shutoff valve turned on? Ice and Water The ice maker is too warm ■ New installation? Remove ice from "crushed" to "cubed." Adjust the controls a...
... . ■ Kink in the water source line? The ice cubes are hollow or small NOTE: This is an indication of ice recently removed? A kink in too long. This can reduce water flow. Wash ice bin. The ice dispenser will not operate properly ■ Freezer door closed .... water pressure? Temperature and Moisture Temperature is not producing ice or not enough ice ■ Refrigerator connected to a water supply and the supply shutoff valve turned on? Ice and Water The ice maker is too warm ■ New installation? Remove ice from "crushed" to "cubed." Adjust the controls a...


