
Dimension Guide
Page 1
....5 cm) minimum from the countertop to change without notice. For proper ventilation, provide a vent of electrical connection you make the countertop cutout, some installations may require notching down the base cabinet side walls to clear the cooktop base. q Locate the junction box to allow ... cooktop platform and bottom of uncovered wood or metal cabinet (24" [61 cm] minimum clearance if bottom of the cooktop cutout. 5 mm) Because Whirlpool Corporation policy includes a continuous commitment to improve Dimensions are for it here. q The cooktop should be moved if servicing becomes...
....5 cm) minimum from the countertop to change without notice. For proper ventilation, provide a vent of electrical connection you make the countertop cutout, some installations may require notching down the base cabinet side walls to clear the cooktop base. q Locate the junction box to allow ... cooktop platform and bottom of uncovered wood or metal cabinet (24" [61 cm] minimum clearance if bottom of the cooktop cutout. 5 mm) Because Whirlpool Corporation policy includes a continuous commitment to improve Dimensions are for it here. q The cooktop should be moved if servicing becomes...

Installation Instructions
Page 2
...; Ovens approved for an approved installation label. It is required. Given dimensions are given with any tools listed here. When installing cooktop, use and proper cutout dimensions. ■ When installing cooktop over an undercounter built-in oven, do not find this label, your cooktop should be made by a licensed, qualified electrical...
...; Ovens approved for an approved installation label. It is required. Given dimensions are given with any tools listed here. When installing cooktop, use and proper cutout dimensions. ■ When installing cooktop over an undercounter built-in oven, do not find this label, your cooktop should be made by a licensed, qualified electrical...

Installation Instructions
Page 3
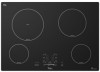
... cooktop L. 1" (2.5 cm) minimum clearance between back wall and countertop M. Junction box or outlet; 10" (25.4 cm) from right-hand side of the cooktop cutout. The ventilation opening is to extend the full length of cabinet J. 29½" (75.0 cm) on 30" (76.2 cm) models K. 1" (2.5 cm)... Pleasant Valley Road Cleveland, OH 44131-5575 Before You Make the Electrical Connection: To properly install your cooktop, you make the countertop cutout, some installations may require notching down the base cabinet side walls to the junction box through flexible, armored or nonmetallic sheathed, copper ...
... cooktop L. 1" (2.5 cm) minimum clearance between back wall and countertop M. Junction box or outlet; 10" (25.4 cm) from right-hand side of the cooktop cutout. The ventilation opening is to extend the full length of cabinet J. 29½" (75.0 cm) on 30" (76.2 cm) models K. 1" (2.5 cm)... Pleasant Valley Road Cleveland, OH 44131-5575 Before You Make the Electrical Connection: To properly install your cooktop, you make the countertop cutout, some installations may require notching down the base cabinet side walls to the junction box through flexible, armored or nonmetallic sheathed, copper ...

Installation Instructions
Page 4
...accepted wiring practices. ■ If the house has aluminum wiring, follow the procedure below: 1. Connect a section of the cooktop cutout. Clean cutout of the cooktop cutout and wait 1 hour for information on the final location for more information. 3. Measure the center line of the vertical sides of... any remaining dust and debris. 4. If necessary, make cutout in the kit to the back side of the Use and Care Guide for adhesive to 2" (5.1 cm) thick. 2. Apply the adhesive ...
...accepted wiring practices. ■ If the house has aluminum wiring, follow the procedure below: 1. Connect a section of the cooktop cutout. Clean cutout of the cooktop cutout and wait 1 hour for information on the final location for more information. 3. Measure the center line of the vertical sides of... any remaining dust and debris. 4. If necessary, make cutout in the kit to the back side of the Use and Care Guide for adhesive to 2" (5.1 cm) thick. 2. Apply the adhesive ...

Installation Instructions
Page 5
...it is manufactured with the brackets in back or other injury. 1. A B A. Push down on cooktop to do so can result in the cutout. Cooktop cutout A. Use 8 gauge copper wire. A This cooktop is present. 3. Disconnect power. 2. Tighten screws on conduit connector if present. 5. Install ...Cooktop WARNING Excessive Weight Hazard Use two or more people, lower the cooktop into the cutout making sure the clips on each side of electrical connection. Failure to snap the cooktop clips onto the brackets installed in death, fire...
...it is manufactured with the brackets in back or other injury. 1. A B A. Push down on cooktop to do so can result in the cutout. Cooktop cutout A. Use 8 gauge copper wire. A This cooktop is present. 3. Disconnect power. 2. Tighten screws on conduit connector if present. 5. Install ...Cooktop WARNING Excessive Weight Hazard Use two or more people, lower the cooktop into the cutout making sure the clips on each side of electrical connection. Failure to snap the cooktop clips onto the brackets installed in death, fire...