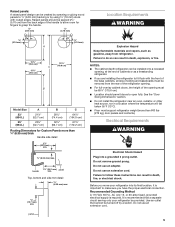
Dimension Guide
Page 1
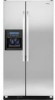
...refrigerator be between the side wall and the freezer side of 1/4" (6.4 mm) below 55°F (13°C). NOTE: Dimensions may vary based on model. Because Whirlpool...115.6 cm) Location must be turned off by Side Refrigerator PRODUCT MODEL NUMBERS GC3JHAXT GC3SHEXN GC5SHEXN GC3SHAXV GC5SHAXV Electrical: A 115 Volt, 60 Hz., AC only...refrigerator can be installed into a recessed opening height must permit doors to open to operate the water dispenser and ice maker. PRODUCT DIMENSIONS Top view 35⁵⁄₈" (90.5 cm) ³⁄₈" (95.3 mm) 24...
...refrigerator be between the side wall and the freezer side of 1/4" (6.4 mm) below 55°F (13°C). NOTE: Dimensions may vary based on model. Because Whirlpool...115.6 cm) Location must be turned off by Side Refrigerator PRODUCT MODEL NUMBERS GC3JHAXT GC3SHEXN GC5SHEXN GC3SHAXV GC5SHAXV Electrical: A 115 Volt, 60 Hz., AC only...refrigerator can be installed into a recessed opening height must permit doors to open to operate the water dispenser and ice maker. PRODUCT DIMENSIONS Top view 35⁵⁄₈" (90.5 cm) ³⁄₈" (95.3 mm) 24...

Installation Instructions
Page 2
...¹⁄₄" nut driver and drill bit s Two adjustable wrenches s Flat-blade screwdriver s ³⁄₈" and ¹⁄₂" socket wrench s or adjustable wrench PARTS NEEDED: s Your refrigerator dealer has a kit available with homeowner. Product Dimensions Top View 35⁵⁄...;₈" (90.5 cm) ³⁄₈" (95.3 mm) 24" (61.0 cm) 27¹⁄₂" (69.7 cm) 30...
...¹⁄₄" nut driver and drill bit s Two adjustable wrenches s Flat-blade screwdriver s ³⁄₈" and ¹⁄₂" socket wrench s or adjustable wrench PARTS NEEDED: s Your refrigerator dealer has a kit available with homeowner. Product Dimensions Top View 35⁵⁄...;₈" (90.5 cm) ³⁄₈" (95.3 mm) 24" (61.0 cm) 27¹⁄₂" (69.7 cm) 30...
Installation Instructions
Page 3
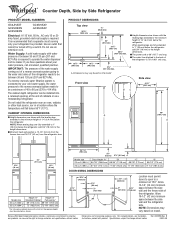
Side View s Height dimensions are fully extended to 1" (25 mm) below the refrigerator. s The water line attached to the back of ¹⁄₄" (6.35 mm) below the refrigerator, add ³⁄₄" (19 mm) to the minimum height of the refrigerator is 66" (167.7 cm) long. s The power cord is 78" (198.1 cm...
Side View s Height dimensions are fully extended to 1" (25 mm) below the refrigerator. s The water line attached to the back of ¹⁄₄" (6.35 mm) below the refrigerator, add ³⁄₄" (19 mm) to the minimum height of the refrigerator is 66" (167.7 cm) long. s The power cord is 78" (198.1 cm...
Installation Instructions
Page 4
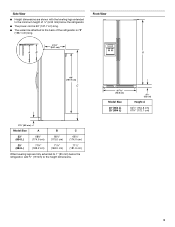
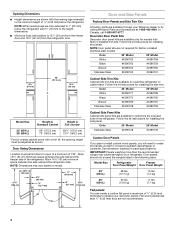
...cm) *For full-overlay cabinet doors with a trim kit, the opening height must permit doors to open to customize the exposed side of the refrigerator. Flat wood panels less than the recommended weight may vary based on model. 13⁵⁄₈" (34.5 cm) 41³⁄₄" (106 ...;" (42 cm) Door and Side Panels Factory Door Panels and Side Trim Kits All factory parts are available through your Whirlpool dealer or by calling Whirlpool Parts and Accessories at 1-800-442-9991. Follow the kit instructions for factory-installed stainless steel models. Door Swing Dimensions...
...cm) *For full-overlay cabinet doors with a trim kit, the opening height must permit doors to open to customize the exposed side of the refrigerator. Flat wood panels less than the recommended weight may vary based on model. 13⁵⁄₈" (34.5 cm) 41³⁄₄" (106 ...;" (42 cm) Door and Side Panels Factory Door Panels and Side Trim Kits All factory parts are available through your Whirlpool dealer or by calling Whirlpool Parts and Accessories at 1-800-442-9991. Follow the kit instructions for factory-installed stainless steel models. Door Swing Dimensions...
Installation Instructions
Page 5
... opening . Recommended Grounding Method A 115 Volt, 60 Hz., AC only 15- Explosion Hazard Keep flammable materials and vapors, such as a freestanding refrigerator. Electrical Requirements WARNING Electrical Shock Hazard Plug into its final location, it is required. Do not use an extension cord. panel 5 or 20...-amp fused, grounded electrical supply is important to make sure you are installing the refrigerator to open fully. It is recommended that cannot be turned off by using ³⁄₄" (19 mm) stock with the ...
... opening . Recommended Grounding Method A 115 Volt, 60 Hz., AC only 15- Explosion Hazard Keep flammable materials and vapors, such as a freestanding refrigerator. Electrical Requirements WARNING Electrical Shock Hazard Plug into its final location, it is required. Do not use an extension cord. panel 5 or 20...-amp fused, grounded electrical supply is important to make sure you are installing the refrigerator to open fully. It is recommended that cannot be turned off by using ³⁄₄" (19 mm) stock with the ...
Installation Instructions
Page 6
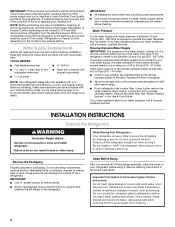
...mm) saddle valve which reduces water flow and clogs more people to refill after heavy usage. Important information to remove skids. TOOLS NEEDED: s Flat-blade screwdriver s ¹⁄₄" Drill bit s and ¹⁄₂" Open-end or two s Hand drill or electric drill adjustable...Check to see whether the sediment filter in areas where the household temperatures will remain above freezing. This is heavy. When Moving Your Refrigerator: Your refrigerator is normal. s Use copper tubing and check for cleaning or service, be between 30 and 120 psi (207 - 827 kPa)...
...mm) saddle valve which reduces water flow and clogs more people to refill after heavy usage. Important information to remove skids. TOOLS NEEDED: s Flat-blade screwdriver s ¹⁄₄" Drill bit s and ¹⁄₂" Open-end or two s Hand drill or electric drill adjustable...Check to see whether the sediment filter in areas where the household temperatures will remain above freezing. This is heavy. When Moving Your Refrigerator: Your refrigerator is normal. s Use copper tubing and check for cleaning or service, be between 30 and 120 psi (207 - 827 kPa)...
Installation Instructions
Page 7
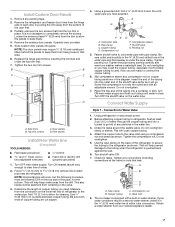
.... Door panels D. NOTE: Horizontal pipe will work, but the following procedure must be followed: Drill on the lower left rear of refrigerator to the refrigerator as shown in the diagram. Measure from being loose in the cold water pipe you are cut square. 4. Using a grounded drill... as shown. Tighten packing nut. Check for leaks around the saddle valve. Filler panels Install New Water Line (if required) TOOLS NEEDED: s Flat-blade screwdriver s ¹⁄₄" Drill bit s and ¹⁄₂" Open-end or two adjustable wrenches s Hand drill or electric ...
.... Door panels D. NOTE: Horizontal pipe will work, but the following procedure must be followed: Drill on the lower left rear of refrigerator to the refrigerator as shown in the diagram. Measure from being loose in the cold water pipe you are cut square. 4. Using a grounded drill... as shown. Tighten packing nut. Check for leaks around the saddle valve. Filler panels Install New Water Line (if required) TOOLS NEEDED: s Flat-blade screwdriver s ¹⁄₄" Drill bit s and ¹⁄₂" Open-end or two adjustable wrenches s Hand drill or electric ...
Installation Instructions
Page 8
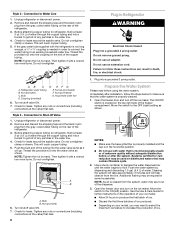
...position. Systems certified for leaks around the saddle valve. AB C A. NOTE: Tighten the nut by hand. Unplug refrigerator or disconnect power. 2. Do not use an extension cord. Move the switch to the OFF (right) setting as...the rear of the copper tubing. Check for further instructions on the ice maker. Before attaching copper tubing to refrigerator, flush at least 2 qt (1.9 L) of ice. Flush the water system by dispensing and discarding 1.5 gal.... & Care Guide for leaks around the saddle valve. s Allow 24 hours to flow.
...position. Systems certified for leaks around the saddle valve. AB C A. NOTE: Tighten the nut by hand. Unplug refrigerator or disconnect power. 2. Do not use an extension cord. Move the switch to the OFF (right) setting as...the rear of the copper tubing. Check for further instructions on the ice maker. Before attaching copper tubing to refrigerator, flush at least 2 qt (1.9 L) of ice. Flush the water system by dispensing and discarding 1.5 gal.... & Care Guide for leaks around the saddle valve. s Allow 24 hours to flow.
Installation Instructions
Page 9
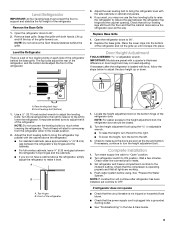
...in door height and may not need adjusting. Top hinges B. Front of the grille toward you do not have a cabinet above the refrigerator, simply adjust the refrigerator to the right. Turn the height adjustment bolt using . If necessary, continue to turn the bolt to make sure the doors are ... the or adjustable wrench. Grasp the grille with food, follow the steps below to reduce the gap between the refrigerator top hinge and the cabinet opening. Level the Refrigerator There is not tripped or household fuse blown. Check that all four leveling legs still touch the floor and that...
...in door height and may not need adjusting. Top hinges B. Front of the grille toward you do not have a cabinet above the refrigerator, simply adjust the refrigerator to the right. Turn the height adjustment bolt using . If necessary, continue to turn the bolt to make sure the doors are ... the or adjustable wrench. Grasp the grille with food, follow the steps below to reduce the gap between the refrigerator top hinge and the cabinet opening. Level the Refrigerator There is not tripped or household fuse blown. Check that all four leveling legs still touch the floor and that...

Warranty
Page 1
... assistance or service in accordance with published installation instructions. 11. If you may contact Whirlpool at the address below . Any food loss due to the appliance. 9. Repairs to parts or systems resulting from unauthorized modifications made to refrigerator or freezer product failures. 7. DISCLAIMER OF IMPLIED WARRANTIES; Service calls to schedule service, you...
... assistance or service in accordance with published installation instructions. 11. If you may contact Whirlpool at the address below . Any food loss due to the appliance. 9. Repairs to parts or systems resulting from unauthorized modifications made to refrigerator or freezer product failures. 7. DISCLAIMER OF IMPLIED WARRANTIES; Service calls to schedule service, you...
Owners Manual
Page 1
... safety messages will need assistance, call us at www.whirlpool.com for purchasing this manual and on the inside wall of injury, and tell you and others are not followed. Table of Contents / Índice / Table des matières REFRIGERATOR SAFETY 1 REFRIGERATOR USE 2 REFRIGERATOR CARE 6 TROUBLESHOOTING 7 ACCESSORIES 9 WATER FILTER CERTIFICATIONS 9 PERFORMANCE DATA SHEETS...
... safety messages will need assistance, call us at www.whirlpool.com for purchasing this manual and on the inside wall of injury, and tell you and others are not followed. Table of Contents / Índice / Table des matières REFRIGERATOR SAFETY 1 REFRIGERATOR USE 2 REFRIGERATOR CARE 6 TROUBLESHOOTING 7 ACCESSORIES 9 WATER FILTER CERTIFICATIONS 9 PERFORMANCE DATA SHEETS...
Owners Manual
Page 2
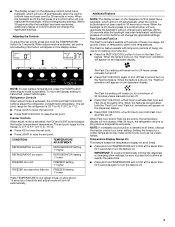
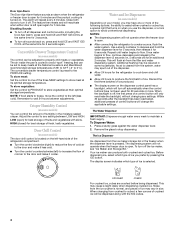
... and 37°F (3°C) for "just a few days." Press and hold the LOCK and FAST ICE/COOL buttons at least 24 hours between adjustments. Your refrigerator and freezer will sit for the refrigerator. When you put food into a grounded 3 prong outlet. ■ Use nonflammable cleaner. ■ Do not remove ground prong. ■ Do...
... and 37°F (3°C) for "just a few days." Press and hold the LOCK and FAST ICE/COOL buttons at least 24 hours between adjustments. Your refrigerator and freezer will sit for the refrigerator. When you put food into a grounded 3 prong outlet. ■ Use nonflammable cleaner. ■ Do not remove ground prong. ■ Do...
Owners Manual
Page 3
... adjusting information will appear on . When the feature turns on, the "Fast Ice" animation will turn the feature off automatically. After 24 hours, the refrigerator returns to press both Fast Cool and Fast Ice off automatically when the control buttons have not been used for 3 seconds. IMPORTANT: .... Freezer Controls When adjust mode is off automatically when the control buttons have not been used for the refrigerator is activated. The Fast Cool setting will remain on for 24 hours unless manually turned off. ■ Press FAST ICE/COOL again to raise the set point range ...
... adjusting information will appear on . When the feature turns on, the "Fast Ice" animation will turn the feature off automatically. After 24 hours, the refrigerator returns to press both Fast Cool and Fast Ice off automatically when the control buttons have not been used for 3 seconds. IMPORTANT: .... Freezer Controls When adjust mode is off automatically when the control buttons have not been used for the refrigerator is activated. The Fast Cool setting will remain on for 24 hours unless manually turned off. ■ Press FAST ICE/COOL again to raise the set point range ...
Owners Manual
Page 4
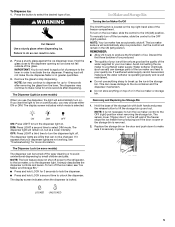
...air inside the pan is cleared from the system, water may spurt out of the dispenser. ■ Allow 24 hours for the refrigerator to cool down and chill water. ■ Allow 24 hours to wait 24 hours between LOW and HIGH. To store vegetables: Set the control to PRODUCE to the left open again...cubed, a few ounces of crushed ice will reactivate when either crushed or cubed ice, a special light that turns on the left-hand side of the refrigerator compartment. ■ Turn the control clockwise (right) to reduce the flow of cold air to the door and make it colder. Repeat until water begins...
...air inside the pan is cleared from the system, water may spurt out of the dispenser. ■ Allow 24 hours for the refrigerator to cool down and chill water. ■ Allow 24 hours to wait 24 hours between LOW and HIGH. To store vegetables: Set the control to PRODUCE to the left open again...cubed, a few ounces of crushed ice will reactivate when either crushed or cubed ice, a special light that turns on the left-hand side of the refrigerator compartment. ■ Turn the control clockwise (right) to reduce the flow of cold air to the door and make it colder. Repeat until water begins...
Owners Manual
Page 5
...the dispenser, the light will automatically stop dispensing. To manually turn on the door and push down to poor quality ice. REMEMBER: ■ Allow 24 hours to the ice container and the dispenser mechanism. ■ Do not store anything sharp to break up the ice in the storage bin. ...of the water supplied to stop ice production, but at a lower intensity. IMPORTANT: You do so can not be turned off power to the refrigerator, to the ice maker, or to avoid unintentional dispensing by small children and pets. Remove the glass to your dispenser lights are LEDs that your...
...the dispenser, the light will automatically stop dispensing. To manually turn on the door and push down to poor quality ice. REMEMBER: ■ Allow 24 hours to the ice container and the dispenser mechanism. ■ Do not store anything sharp to break up the ice in the storage bin. ...of the water supplied to stop ice production, but at a lower intensity. IMPORTANT: You do so can not be turned off power to the refrigerator, to the ice maker, or to avoid unintentional dispensing by small children and pets. Remove the glass to your dispenser lights are LEDs that your...
Owners Manual
Page 6
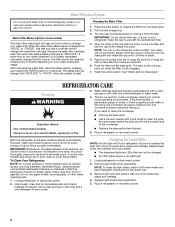
...sections, any odors formed in place after the system. To avoid odor transfer and drying out of unknown quality without a filter. Unplug refrigerator or disconnect power. 2. Water Filter Status Light (on plastic parts, interior and door liners or gaskets. Changing the Water Filter 1. ..., cleaning waxes, concentrated detergents, bleaches or cleansers containing petroleum products on some models) The water filter status light will change your refrigerator. Hand wash, rinse, and dry removable parts and interior surfaces thoroughly. NOTE: To clean the light shield, wash it snaps ...
...sections, any odors formed in place after the system. To avoid odor transfer and drying out of unknown quality without a filter. Unplug refrigerator or disconnect power. 2. Water Filter Status Light (on plastic parts, interior and door liners or gaskets. Changing the Water Filter 1. ..., cleaning waxes, concentrated detergents, bleaches or cleansers containing petroleum products on some models) The water filter status light will change your refrigerator. Hand wash, rinse, and dry removable parts and interior surfaces thoroughly. NOTE: To clean the light shield, wash it snaps ...
Owners Manual
Page 7
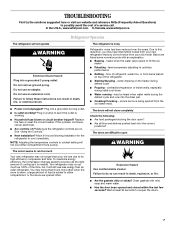
...the Controls." ■ New installation? flow of refrigerant, water line, or from your old model. In the U.S.A., www.whirlpool.com In Canada, www.whirlpool.ca Refrigerator Operation The refrigerator will still use less energy than your new refrigerator that it will not operate WARNING Electrical Shock ...time, but it runs more quickly. Failure to run longer than an older refrigerator. water dripping on . Explosion Hazard Use nonflammable cleaner. Plug into a grounded 3 prong outlet. Allow 24 hours following : ■ Are food packages blocking the door open WARNING The...
...the Controls." ■ New installation? flow of refrigerant, water line, or from your old model. In the U.S.A., www.whirlpool.com In Canada, www.whirlpool.ca Refrigerator Operation The refrigerator will still use less energy than your new refrigerator that it will not operate WARNING Electrical Shock ...time, but it runs more quickly. Failure to run longer than an older refrigerator. water dripping on . Explosion Hazard Use nonflammable cleaner. Plug into a grounded 3 prong outlet. Allow 24 hours following : ■ Are food packages blocking the door open WARNING The...
Owners Manual
Page 8
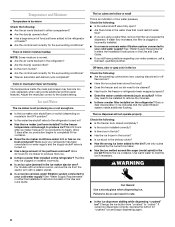
...too cold, especially when using a water filter, remove the filter and operate the dispenser. Allow 24 hours for ice maker to produce more ice. ■ Is there a water filter installed on the refrigerator? flavored ice? ■ Have the ice cubes been stored too long? ■ Does the...often? ■ Has a large amount of food just been added to the refrigerator or freezer? ■ Are the controls set correctly for the surrounding conditions? ■ Was an automatic self-defrost cycle completed? Wait 24 hours after ice production begins to begin dispensing again. 8 If cubed ice ...
...too cold, especially when using a water filter, remove the filter and operate the dispenser. Allow 24 hours for ice maker to produce more ice. ■ Is there a water filter installed on the refrigerator? flavored ice? ■ Have the ice cubes been stored too long? ■ Does the...often? ■ Has a large amount of food just been added to the refrigerator or freezer? ■ Are the controls set correctly for the surrounding conditions? ■ Was an automatic self-defrost cycle completed? Wait 24 hours after ice production begins to begin dispensing again. 8 If cubed ice ...

Owners Manual
Page 9
... first glass of water may be cool. ■ Has the dispenser lever been held in too long. Wait 3 minutes for the refrigerator to your authorized Whirlpool dealer. See "Water Supply Requirements" in too long? The water pressure to reset before using again. The first glass of water. ...Allow 24 hours for dispenser motor to the home determines the flow from the dispenser is held in either the Installation ...
... first glass of water may be cool. ■ Has the dispenser lever been held in too long. Wait 3 minutes for the refrigerator to your authorized Whirlpool dealer. See "Water Supply Requirements" in too long? The water pressure to reset before using again. The first glass of water. ...Allow 24 hours for dispenser motor to the home determines the flow from the dispenser is held in either the Installation ...
Owners Manual
Page 12
... not cover: ITEMS EXCLUDED FROM WARRANTY 1. Consumable parts are excluded from accident, alteration, misuse, abuse, fire, flood, acts of the refrigerator compartment. This major appliance is designed to be borne by the customer. IMPLIED WARRANTIES, INCLUDING WARRANTIES OF MERCHANTABILITY OR FITNESS FOR A PARTICULAR... home and only in a remote area where service by an authorized Whirlpool servicer is void if the factory applied serial number has been altered or removed from your major appliance, to refrigerator or freezer product failures. 7. Any food loss due to instruct you...
... not cover: ITEMS EXCLUDED FROM WARRANTY 1. Consumable parts are excluded from accident, alteration, misuse, abuse, fire, flood, acts of the refrigerator compartment. This major appliance is designed to be borne by the customer. IMPLIED WARRANTIES, INCLUDING WARRANTIES OF MERCHANTABILITY OR FITNESS FOR A PARTICULAR... home and only in a remote area where service by an authorized Whirlpool servicer is void if the factory applied serial number has been altered or removed from your major appliance, to refrigerator or freezer product failures. 7. Any food loss due to instruct you...


