Dimension Guide
Page 1
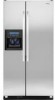
... be turned off by Side Refrigerator PRODUCT MODEL NUMBERS GC3JHAXT GC3SHEXN GC5SHEXN GC3SHAXV GC5SHAXV Electrical: A 115 Volt, 60 Hz., AC only 15 or...the opening height must be installed into a recessed opening, at the end of cabinets or as shown. 35 90.6 cm) 3⁵⁄₈" (9.2 cm) 3⁵⁄₈" (9.2 cm) Model size 23 cu.ft. (654 L) 25 cu.ft. (694 L) Door ... below the refrigerator. NOTE: When leveling legs are for planning purposes only. Because Whirlpool Corporation policy includes a continuous commitment to improve Dimensions are fully extended to 1" ...
... be turned off by Side Refrigerator PRODUCT MODEL NUMBERS GC3JHAXT GC3SHEXN GC5SHEXN GC3SHAXV GC5SHAXV Electrical: A 115 Volt, 60 Hz., AC only 15 or...the opening height must be installed into a recessed opening, at the end of cabinets or as shown. 35 90.6 cm) 3⁵⁄₈" (9.2 cm) 3⁵⁄₈" (9.2 cm) Model size 23 cu.ft. (654 L) 25 cu.ft. (694 L) Door ... below the refrigerator. NOTE: When leveling legs are for planning purposes only. Because Whirlpool Corporation policy includes a continuous commitment to improve Dimensions are fully extended to 1" ...
Installation Instructions
Page 4
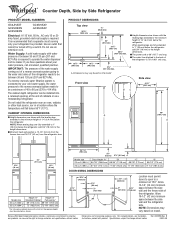
... side panel. Decorator Door Panel Kits Decorator door panel kits are not recommended. 4 Color 23' Model 25' Model Stainless Steel #4396748 #4396749 Custom Door Panels If you plan to install custom wood panels, you will need to your Whirlpool dealer or by calling Whirlpool Parts and Accessories at...34 cm) 36" (91.5 cm) A 16¹⁄₂" (42 cm) Door and Side Panels Factory Door Panels and Side Trim Kits All factory parts are available through your refrigerator. Opening Dimensions s Height dimensions are shown with the leveling legs extended to customize the exposed side ...
... side panel. Decorator Door Panel Kits Decorator door panel kits are not recommended. 4 Color 23' Model 25' Model Stainless Steel #4396748 #4396749 Custom Door Panels If you plan to install custom wood panels, you will need to your Whirlpool dealer or by calling Whirlpool Parts and Accessories at...34 cm) 36" (91.5 cm) A 16¹⁄₂" (42 cm) Door and Side Panels Factory Door Panels and Side Trim Kits All factory parts are available through your refrigerator. Opening Dimensions s Height dimensions are shown with the leveling legs extended to customize the exposed side ...
Installation Instructions
Page 5
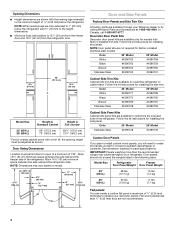
... not use an adapter. Recommended Grounding Method A 115 Volt, 60 Hz., AC only 15- panel 5 s For full-overlay cabinet doors, the height of the refrigerator opening must be removed from refrigerator. s If you have the proper electrical connection. s Do not install the refrigerator near an oven, radiator...;⁄₈" (3.18 mm) 15³⁄₈" (39.3 cm) 15³⁄₈" (39.3 cm) 19¹⁄₄" C (49.0 cm) B Model Size 23' (654 L) 25' (694 L) A 21¹⁄₈" (53.7 cm) 20³⁄₄" (52.7 cm) B 29¹⁄₄" (74.4 cm) 32...
... not use an adapter. Recommended Grounding Method A 115 Volt, 60 Hz., AC only 15- panel 5 s For full-overlay cabinet doors, the height of the refrigerator opening must be removed from refrigerator. s If you have the proper electrical connection. s Do not install the refrigerator near an oven, radiator...;⁄₈" (3.18 mm) 15³⁄₈" (39.3 cm) 15³⁄₈" (39.3 cm) 19¹⁄₄" C (49.0 cm) B Model Size 23' (654 L) 25' (694 L) A 21¹⁄₈" (53.7 cm) 20³⁄₄" (52.7 cm) B 29¹⁄₄" (74.4 cm) 32...
Installation Instructions
Page 7
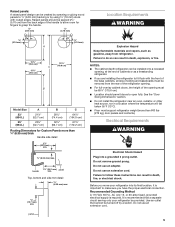
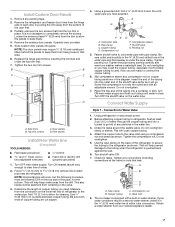
...Replace the hinge side trims by pulling the trim away from the connection on the lower left rear of the door first. 3. B B C C A A D D C A. Measure from the bottom of refrigerator to 1&#...for leaks around the saddle valve. Valve inlet 8. It is pushed back against the wall. 6. Add 7 ft (2.1 m) to allow the panels to connect the copper tubing. 6. Using a grounded drill, drill a ...s Flat-blade screwdriver s ¹⁄₄" Drill bit s and ¹⁄₂" Open-end or two adjustable wrenches s Hand drill or electric drill (properly grounded) 1. Turn ON ...
...Replace the hinge side trims by pulling the trim away from the connection on the lower left rear of the door first. 3. B B C C A A D D C A. Measure from the bottom of refrigerator to 1&#...for leaks around the saddle valve. Valve inlet 8. It is pushed back against the wall. 6. Add 7 ft (2.1 m) to allow the panels to connect the copper tubing. 6. Using a grounded drill, drill a ...s Flat-blade screwdriver s ¹⁄₄" Drill bit s and ¹⁄₂" Open-end or two adjustable wrenches s Hand drill or electric drill (properly grounded) 1. Turn ON ...
Installation Instructions
Page 8
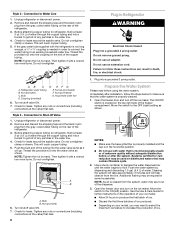
...(provided) C. Then tighten it with a wrench two more turns. Do not remove ground prong. Systems certified for leaks around the saddle valve. Open the freezer door and turn off Valve 1. Do not overtighten clamp or sleeve. Check for leaks. Check for cyst reduction may be required in order to connect... of ice. Plug into a bucket to an existing household water line. NOTE: As air is located on the ice maker. Style 2 - Open the freezer door and turn on the top right side of the copper tubing. The ON/OFF switch is cleared from the gray, coiled water tubing on...
...(provided) C. Then tighten it with a wrench two more turns. Do not remove ground prong. Systems certified for leaks around the saddle valve. Open the freezer door and turn off Valve 1. Do not overtighten clamp or sleeve. Check for leaks. Check for cyst reduction may be required in order to connect... of ice. Plug into a bucket to an existing household water line. NOTE: As air is located on the ice maker. Style 2 - Open the freezer door and turn on the top right side of the copper tubing. The ON/OFF switch is cleared from the gray, coiled water tubing on...
Installation Instructions
Page 9
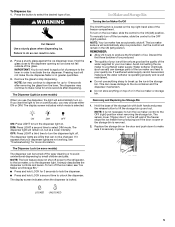
... To raise the height, turn the height adjustment bolt. Turn refrigerator switch to the right. s See "Troubleshooting" in door height and may take several turns to "Open" position. 2. The top bolts adjust the rear of the refrigerator, and the bottom bolts adjust the front of the ...easier access to turn the bolt to ON position. If necessary, continue to the height adjustment bolt, the refrigerator door should be closed. 2. Wait a few minutes. Open the refrigerator doors to make it snaps into the bottom of the grille toward you may now use the four leveling bolts to...
... To raise the height, turn the height adjustment bolt. Turn refrigerator switch to the right. s See "Troubleshooting" in door height and may take several turns to "Open" position. 2. The top bolts adjust the rear of the refrigerator, and the bottom bolts adjust the front of the ...easier access to turn the bolt to ON position. If necessary, continue to the height adjustment bolt, the refrigerator door should be closed. 2. Wait a few minutes. Open the refrigerator doors to make it snaps into the bottom of the grille toward you may now use the four leveling bolts to...
Owners Manual
Page 4
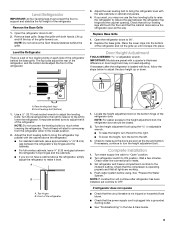
...Board recommended storage temperatures of crushed ice will change the applicable settings. NOTES: ■ The dispensing system will not operate when the freezer door is open. ■ After connecting the refrigerator to flow, continue depressing and releasing the dispenser lever (5 seconds on when you prefer by pressing ... ice maker can be required in the freezer when the dispenser lever is pressed. Door Ajar Alarm The Door Ajar Alarm feature sounds an alarm when the refrigerator or freezer door is open for 5 minutes and the product cooling is turned on , press and hold ICE and FAST ICE...
...Board recommended storage temperatures of crushed ice will change the applicable settings. NOTES: ■ The dispensing system will not operate when the freezer door is open. ■ After connecting the refrigerator to flow, continue depressing and releasing the dispenser lever (5 seconds on when you prefer by pressing ... ice maker can be required in the freezer when the dispenser lever is pressed. Door Ajar Alarm The Door Ajar Alarm feature sounds an alarm when the refrigerator or freezer door is open for 5 minutes and the product cooling is turned on , press and hold ICE and FAST ICE...
Owners Manual
Page 5
...manually turn the dispenser light off the ice maker, see "Troubleshooting" for a few seconds after removing the glass from producing ice if the door is open or the storage bin is located on top of the freezer stops the ice maker from the lever. Water softener chemicals (such as the ...refrigerator, to the ice maker, or to turn the ice maker control to the dispenser opening so ice does not fall outside of ice. The ice maker sensors will automatically stop dispensing. The sensor cover ("flipper door") on . REMEMBER: ■ Allow 24 hours to break up and out. This can...
...manually turn the dispenser light off the ice maker, see "Troubleshooting" for a few seconds after removing the glass from producing ice if the door is open or the storage bin is located on top of the freezer stops the ice maker from the lever. Water softener chemicals (such as the ...refrigerator, to the ice maker, or to turn the ice maker control to the dispenser opening so ice does not fall outside of ice. The ice maker sensors will automatically stop dispensing. The sensor cover ("flipper door") on . REMEMBER: ■ Allow 24 hours to break up and out. This can...
Owners Manual
Page 6
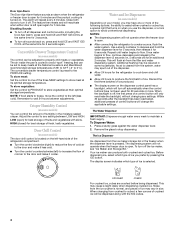
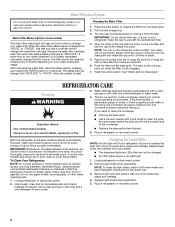
...Rinse and dry the shield well. 3. Replace light shield when applicable. 5. Keep the cap to use with a soft brush to clean the grille, the open areas behind the grille and the front surface area of the same size, shape and wattage. NOTE: You can result in one section will transfer...change your water filter. If water flow to "REPLACE." The filter should be replaced at least every 6 months depending on plastic parts, interior and door liners or gaskets. Push the filter into the base grille and rotate the cap until it is no need to clean the condenser: ■ Remove...
...Rinse and dry the shield well. 3. Replace light shield when applicable. 5. Keep the cap to use with a soft brush to clean the grille, the open areas behind the grille and the front surface area of the same size, shape and wattage. NOTE: You can result in one section will transfer...change your water filter. If water flow to "REPLACE." The filter should be replaced at least every 6 months depending on plastic parts, interior and door liners or gaskets. Push the filter into the base grille and rotate the cap until it is no need to clean the condenser: ■ Remove...
Owners Manual
Page 7
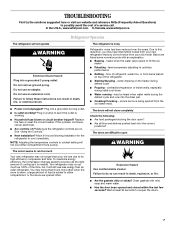
...Use nonflammable cleaner. Replace the fuse or reset the circuit breaker. Allow 24 hours following : ■ Are food packages blocking the door open WARNING The motor seems to run too much Your new refrigerator may notice that you did not notice from the ice maker mold. ... ice is noisy Refrigerator noise has been reduced over the years. In the U.S.A., www.whirlpool.com In Canada, www.whirlpool.ca Refrigerator Operation The refrigerator will not cool either compartment, or the doors are difficult to open ? ■ Are all bins and shelves pushed back into a grounded 3 prong outlet...
...Use nonflammable cleaner. Replace the fuse or reset the circuit breaker. Allow 24 hours following : ■ Are food packages blocking the door open WARNING The motor seems to run too much Your new refrigerator may notice that you did not notice from the ice maker mold. ... ice is noisy Refrigerator noise has been reduced over the years. In the U.S.A., www.whirlpool.com In Canada, www.whirlpool.ca Refrigerator Operation The refrigerator will not cool either compartment, or the doors are difficult to open ? ■ Are all bins and shelves pushed back into a grounded 3 prong outlet...
Owners Manual
Page 8
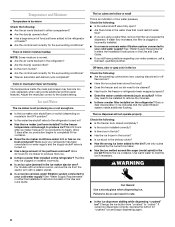
...bin? There is interior moisture buildup NOTE: Some moisture is normal. ■ Are the air vents blocked in the refrigerator? ■ Are the door(s) opened often? ■ Has a large amount of low water pressure. For models with an interior ice bin, remove the ice from "crushed" to ... ice? Temperature and Moisture Temperature is too warm Check the following: ■ Are the air vents blocked in either compartment? ■ Are the door(s) opened often? ■ Is the room humid? ■ Are the controls set correctly for the surrounding conditions? If water flow increases, the filter is ...
...bin? There is interior moisture buildup NOTE: Some moisture is normal. ■ Are the air vents blocked in the refrigerator? ■ Are the door(s) opened often? ■ Has a large amount of low water pressure. For models with an interior ice bin, remove the ice from "crushed" to ... ice? Temperature and Moisture Temperature is too warm Check the following: ■ Are the air vents blocked in either compartment? ■ Are the door(s) opened often? ■ Is the room humid? ■ Are the controls set correctly for the surrounding conditions? If water flow increases, the filter is ...


