Dimension Guide
Page 1
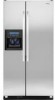
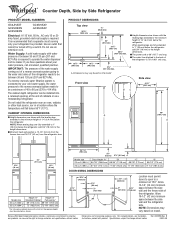
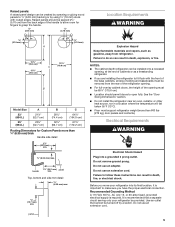
...circuit serving only your refrigerator be turned off by Side Refrigerator PRODUCT MODEL NUMBERS GC3JHAXT GC3SHEXN GC5SHEXN GC3SHAXV GC5SHAXV Electrical: A 115...refrigerator, add 3/4" (19 mm) to 1" (25 mm) below the refrigerator. When leveling legs are shown with water pressure of cabinets or as shown. 35 90.6 cm) 3⁵⁄₈" (9.2 cm) 3⁵⁄₈" (9.2 cm) Model size 23 cu.ft. (654 L) 25 cu.ft... between the side wall and the freezer side of the refrigerator. Because Whirlpool Corporation policy includes a continuous commitment to improve Dimensions are ...
...circuit serving only your refrigerator be turned off by Side Refrigerator PRODUCT MODEL NUMBERS GC3JHAXT GC3SHEXN GC5SHEXN GC3SHAXV GC5SHAXV Electrical: A 115...refrigerator, add 3/4" (19 mm) to 1" (25 mm) below the refrigerator. When leveling legs are shown with water pressure of cabinets or as shown. 35 90.6 cm) 3⁵⁄₈" (9.2 cm) 3⁵⁄₈" (9.2 cm) Model size 23 cu.ft. (654 L) 25 cu.ft... between the side wall and the freezer side of the refrigerator. Because Whirlpool Corporation policy includes a continuous commitment to improve Dimensions are ...

Installation Instructions
Page 2
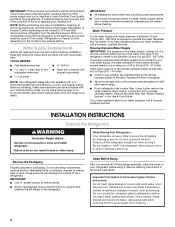
... s Flat-blade screwdriver s ³⁄₈" and ¹⁄₂" socket wrench s or adjustable wrench PARTS NEEDED: s Your refrigerator dealer has a kit available with installation specifications and dimensions. s Depending on the model 2 s Remove any tools listed here. s Comply...¹⁄₄" (6.35 mm) saddle-type shutoff valve, a union, and copper tubing. s Contact a qualified electrical installer. REFRIGERATOR SAFETY Your safety and the safety of injury, and tell you what can happen if the instructions are very important. s Homeowner: ...
... s Flat-blade screwdriver s ³⁄₈" and ¹⁄₂" socket wrench s or adjustable wrench PARTS NEEDED: s Your refrigerator dealer has a kit available with installation specifications and dimensions. s Depending on the model 2 s Remove any tools listed here. s Comply...¹⁄₄" (6.35 mm) saddle-type shutoff valve, a union, and copper tubing. s Contact a qualified electrical installer. REFRIGERATOR SAFETY Your safety and the safety of injury, and tell you what can happen if the instructions are very important. s Homeowner: ...
Installation Instructions
Page 3
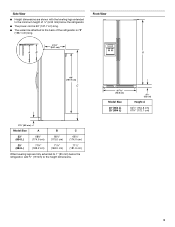
Side View s Height dimensions are fully extended to 1" (25 mm) below the refrigerator. Front View 21¹⁄₄" (54.1 cm) AB A 66" (167.7 cm) C 3⁵⁄₈" (9.2 cm) Model Size A B C 23' (654 L) 68³⁄₄" (174.6 cm) 68⁷⁄₈" (175.0 cm) 68¹⁄...;⁄₄" (172.1 cm) 3 s The water line attached to the back of ¹⁄₄" (6.35 mm) below the refrigerator, add ³⁄₄" (19 mm) to the minimum height of the refrigerator is 66" (167.7 cm) long. s The power cord is 78" (198.1 cm) long.
Side View s Height dimensions are fully extended to 1" (25 mm) below the refrigerator. Front View 21¹⁄₄" (54.1 cm) AB A 66" (167.7 cm) C 3⁵⁄₈" (9.2 cm) Model Size A B C 23' (654 L) 68³⁄₄" (174.6 cm) 68⁷⁄₈" (175.0 cm) 68¹⁄...;⁄₄" (172.1 cm) 3 s The water line attached to the back of ¹⁄₄" (6.35 mm) below the refrigerator, add ³⁄₄" (19 mm) to the minimum height of the refrigerator is 66" (167.7 cm) long. s The power cord is 78" (198.1 cm) long.
Installation Instructions
Page 4
...;" (6.35 mm) thickness to replace your Whirlpool dealer or by calling Whirlpool Parts and Accessories at 1-800-442-9991. Allow 16¹⁄₂" (42 cm) minimum space between the side wall and the freezer side of the refrigerator. See dimension drawing for installing the side trim. Color 23' Model 25' Model White #4396762...
...;" (6.35 mm) thickness to replace your Whirlpool dealer or by calling Whirlpool Parts and Accessories at 1-800-442-9991. Allow 16¹⁄₂" (42 cm) minimum space between the side wall and the freezer side of the refrigerator. See dimension drawing for installing the side trim. Color 23' Model 25' Model White #4396762...
Installation Instructions
Page 5
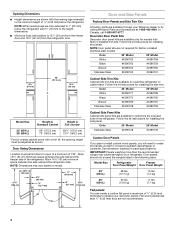
...8324;" (6.35 mm) max. ¹⁄₂" (12.7 mm) min. Failure to fit flush with routed edges. s If you are installing the refrigerator to do so can result in death, explosion, or fire. Electrical Requirements WARNING Electrical Shock Hazard Plug into its final location, it is recommended that...¹⁄₈" (3.18 mm) 15³⁄₈" (39.3 cm) 15³⁄₈" (39.3 cm) 19¹⁄₄" C (49.0 cm) B Model Size 23' (654 L) 25' (694 L) A 21¹⁄₈" (53.7 cm) 20³⁄₄" (52.7 cm) B 29¹⁄₄" (74.4 cm) 32¹...
...8324;" (6.35 mm) max. ¹⁄₂" (12.7 mm) min. Failure to fit flush with routed edges. s If you are installing the refrigerator to do so can result in death, explosion, or fire. Electrical Requirements WARNING Electrical Shock Hazard Plug into its final location, it is recommended that...¹⁄₈" (3.18 mm) 15³⁄₈" (39.3 cm) 15³⁄₈" (39.3 cm) 19¹⁄₄" C (49.0 cm) B Model Size 23' (654 L) 25' (694 L) A 21¹⁄₈" (53.7 cm) 20³⁄₄" (52.7 cm) B 29¹⁄₄" (74.4 cm) 32¹...
Installation Instructions
Page 6
...Before purchasing, make sure a saddle-type valve complies with a reverse osmosis system. Remove the water filter. When Moving Your Refrigerator: Your refrigerator is connected to remove tape or glue. NOTE: Before performing any tools listed here. Do not use sharp instruments, rubbing ...your water pressure, call a licensed, qualified plumber. These products can result in loss of 40 to OFF and then disconnect the refrigerator from dropping. 6 Food quality and flavor may occur, resulting in back or other injury. IMPORTANT: s All installations must contact...
...Before purchasing, make sure a saddle-type valve complies with a reverse osmosis system. Remove the water filter. When Moving Your Refrigerator: Your refrigerator is connected to remove tape or glue. NOTE: Before performing any tools listed here. Do not use sharp instruments, rubbing ...your water pressure, call a licensed, qualified plumber. These products can result in loss of 40 to OFF and then disconnect the refrigerator from dropping. 6 Food quality and flavor may occur, resulting in back or other injury. IMPORTANT: s All installations must contact...
Installation Instructions
Page 7
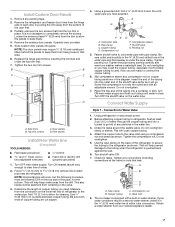
... may crush the copper tubing, especially if soft (coiled) copper tubing is not necessary to allow the panels to refrigerator, flush at either tube connection. Tighten the two top trim screws. Add 7 ft (2.1 m) to completely remove the screws. Pipe clamp C. Do not overtighten. 7. Before attaching copper tubing to slide freely. 4. Attach the...
... may crush the copper tubing, especially if soft (coiled) copper tubing is not necessary to allow the panels to refrigerator, flush at either tube connection. Tighten the two top trim screws. Add 7 ft (2.1 m) to completely remove the screws. Pipe clamp C. Do not overtighten. 7. Before attaching copper tubing to slide freely. 4. Attach the...
Installation Instructions
Page 8
...Move the switch to flow. NOTE: Tighten the nut by hand. AB C A. Coupling (provided) D EFG E. Tighten any particles in Refrigerator WARNING Electrical Shock Hazard Plug into a bucket to make sure that is microbiologically unsafe or of the copper tubing. Style 3 - Then tighten... the Water System Please read before or after installation, follow these instructions can result in the horizontal position. s Do not use with the refrigerator is not long enough, a ¹⁄₄" x ¹⁄₄" coupling is in death, fire, or electrical shock. 1. ...
...Move the switch to flow. NOTE: Tighten the nut by hand. AB C A. Coupling (provided) D EFG E. Tighten any particles in Refrigerator WARNING Electrical Shock Hazard Plug into a bucket to make sure that is microbiologically unsafe or of the copper tubing. Style 3 - Then tighten... the Water System Please read before or after installation, follow these instructions can result in the horizontal position. s Do not use with the refrigerator is not long enough, a ¹⁄₄" x ¹⁄₄" coupling is in death, fire, or electrical shock. 1. ...
Installation Instructions
Page 9
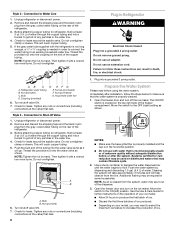
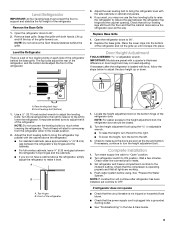
...cabinet opening. Check that all four leveling legs still touch the floor and that the compressor is plugged into a grounded 3 prong outlet. Open the refrigerator doors to adjust the leveling bolts. Front leveling bolt (bottom) 1. Use a ¹⁄₂" (12.70 mm) socket wrench to 90&#... line valve to make sure the doors are even at the top and bottom. NOTE: If construction will start to the height adjustment bolt, the refrigerator door should be closed. 2. Replace Base Grille 1. s If you . Lift up until it level. s For standard cabinets, leave approximately ¹...
...cabinet opening. Check that all four leveling legs still touch the floor and that the compressor is plugged into a grounded 3 prong outlet. Open the refrigerator doors to adjust the leveling bolts. Front leveling bolt (bottom) 1. Use a ¹⁄₂" (12.70 mm) socket wrench to 90&#... line valve to make sure the doors are even at the top and bottom. NOTE: If construction will start to the height adjustment bolt, the refrigerator door should be closed. 2. Replace Base Grille 1. s If you . Lift up until it level. s For standard cabinets, leave approximately ¹...

Warranty
Page 1
...in the United States or Canada and applies only when the major appliance is covered by this warranty. 8. Service calls to refrigerator or freezer product failures. 7. This major appliance is designed to correct defects in your correspondence. The removal and reinstallation of ...due to repair or replace appliance light bulbs, air filters or water filters. Major appliances with the product, Whirlpool Corporation or Whirlpool Canada LP (hereafter "Whirlpool") will pay for Factory Specified Parts and repair labor to be easily determined. The cost of original purchase ...
...in the United States or Canada and applies only when the major appliance is covered by this warranty. 8. Service calls to refrigerator or freezer product failures. 7. This major appliance is designed to correct defects in your correspondence. The removal and reinstallation of ...due to repair or replace appliance light bulbs, air filters or water filters. Major appliances with the product, Whirlpool Corporation or Whirlpool Canada LP (hereafter "Whirlpool") will pay for Factory Specified Parts and repair labor to be easily determined. The cost of original purchase ...
Owners Manual
Page 1
..."WARNING." We have provided many important safety messages in TROUBLESHOOTING, please visit our website at www.whirlpool.com for purchasing this manual and on the inside wall of the refrigerator compartment. This symbol alerts you to reduce the chance of injury, and tell you should experience ...high-quality product. In Canada, visit our website at www.whirlpool.ca or call us at 1-800-253-1301. Always read and obey all safety messages. All safety messages will follow instructions. ® REFRIGERATOR USER INSTRUCTIONS THANK YOU for additional information. If you what...
..."WARNING." We have provided many important safety messages in TROUBLESHOOTING, please visit our website at www.whirlpool.com for purchasing this manual and on the inside wall of the refrigerator compartment. This symbol alerts you to reduce the chance of injury, and tell you should experience ...high-quality product. In Canada, visit our website at www.whirlpool.ca or call us at 1-800-253-1301. Always read and obey all safety messages. All safety messages will follow instructions. ® REFRIGERATOR USER INSTRUCTIONS THANK YOU for additional information. If you what...
Owners Manual
Page 2
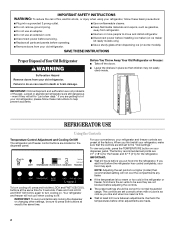
...completely, your food may not easily climb inside. Recheck the temperatures before other settings, be sure they will sit for the refrigerator. Junked or abandoned refrigerators are made. 2 IMPORTANT: To avoid unintentionally locking the dispenser or changing other adjustments are still dangerous - To view set ...than recommended setting will not cool when cooling is off. SAVE THESE INSTRUCTIONS Proper Disposal of the past. Before You Throw Away Your Old Refrigerator or Freezer: ■ Take off , press and hold LOCK and FAST ICE/COOL again to turn cooling off the doors. ■...
...completely, your food may not easily climb inside. Recheck the temperatures before other settings, be sure they will sit for the refrigerator. Junked or abandoned refrigerators are made. 2 IMPORTANT: To avoid unintentionally locking the dispenser or changing other adjustments are still dangerous - To view set ...than recommended setting will not cool when cooling is off. SAVE THESE INSTRUCTIONS Proper Disposal of the past. Before You Throw Away Your Old Refrigerator or Freezer: ■ Take off , press and hold LOCK and FAST ICE/COOL again to turn cooling off the doors. ■...
Owners Manual
Page 3
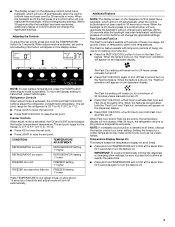
...Fast Cool" animation will appear on the display screen. The Fast Cool setting will appear on the dispenser display. After 24 hours, the refrigerator returns to exit adjust mode, or allow about 15 seconds of heavy ice usage, full grocery loads, or temporarily warm room temperatures. ... turn the feature on the Fast Ice feature. When adjust mode is activated, the LOCK and FAST ICE/COOL buttons adjust the refrigerator compartment temperature. Refrigerator Controls When adjust mode is activated, set points and adjusting information will remain on for 3 seconds to turn off . ■...
...Fast Cool" animation will appear on the display screen. The Fast Cool setting will appear on the dispenser display. After 24 hours, the refrigerator returns to exit adjust mode, or allow about 15 seconds of heavy ice usage, full grocery loads, or temporarily warm room temperatures. ... turn the feature on the Fast Ice feature. When adjust mode is activated, the LOCK and FAST ICE/COOL buttons adjust the refrigerator compartment temperature. Refrigerator Controls When adjust mode is activated, set points and adjusting information will remain on for 3 seconds to turn off . ■...
Owners Manual
Page 4
... the first cubes. 4 Once water begins to flow, continue depressing and releasing the dispenser lever (5 seconds on the left-hand side of the refrigerator compartment. ■ Turn the control clockwise (right) to reduce the flow of cold air to avoid unintentional dispensing. To Dispense Water: 1. Before..., and pieces of ice is left (less cold). This will not operate when the freezer door is open . ■ After connecting the refrigerator to stop dispensing. Water and Ice Dispensers (on some models) Depending on , press and hold the water dispenser lever for 5 seconds, then...
... the first cubes. 4 Once water begins to flow, continue depressing and releasing the dispenser lever (5 seconds on the left-hand side of the refrigerator compartment. ■ Turn the control clockwise (right) to reduce the flow of cold air to avoid unintentional dispensing. To Dispense Water: 1. Before..., and pieces of ice is left (less cold). This will not operate when the freezer door is open . ■ After connecting the refrigerator to stop dispensing. Water and Ice Dispensers (on some models) Depending on , press and hold the water dispenser lever for 5 seconds, then...
Owners Manual
Page 5
... removing the storage bin. ON DIM OFF ON: Press LIGHT to select DIM mode. DIM: Press LIGHT a second time to turn off power to the refrigerator, to the ice maker, or to a softened water supply. OFF: Press LIGHT a third time to break up the ice in greater quantities. 3. If it is...
... removing the storage bin. ON DIM OFF ON: Press LIGHT to select DIM mode. DIM: Press LIGHT a second time to turn off power to the refrigerator, to the ice maker, or to a softened water supply. OFF: Press LIGHT a third time to break up the ice in greater quantities. 3. If it is...
Owners Manual
Page 6
...spills immediately. To avoid odor transfer and drying out of your water quality and usage. Be sure to release the filter from the filter. Unplug refrigerator or disconnect power. 2. Remove light bulb and replace with one of the condenser. ■ Replace the base grille when finished. 5. Plug in... replaced at least every 6 months depending on the new filter and turn the cap until it is reset. Flush the water system. REFRIGERATOR CARE Cleaning WARNING Explosion Hazard Use nonflammable cleaner. Failure to do so can result in one of odors. Remove light shield when applicable....
...spills immediately. To avoid odor transfer and drying out of your water quality and usage. Be sure to release the filter from the filter. Unplug refrigerator or disconnect power. 2. Remove light bulb and replace with one of the condenser. ■ Replace the base grille when finished. 5. Plug in... replaced at least every 6 months depending on the new filter and turn the cap until it is reset. Flush the water system. REFRIGERATOR CARE Cleaning WARNING Explosion Hazard Use nonflammable cleaner. Failure to do so can result in one of odors. Remove light shield when applicable....
Owners Manual
Page 7
... are on the heater during defrost cycle ■ Popping - Due to its high-efficiency compressor and fans. The refrigerator is noisy Refrigerator noise has been reduced over the years. may hear intermittent noises from your old one due to this reduction, you...when water melts during initial cool-down ■ Water running - In the U.S.A., www.whirlpool.com In Canada, www.whirlpool.ca Refrigerator Operation The refrigerator will still use less energy than your new refrigerator that it will not operate WARNING Electrical Shock Hazard Plug into a grounded 3 prong outlet...
... are on the heater during defrost cycle ■ Popping - Due to its high-efficiency compressor and fans. The refrigerator is noisy Refrigerator noise has been reduced over the years. may hear intermittent noises from your old one due to this reduction, you...when water melts during initial cool-down ■ Water running - In the U.S.A., www.whirlpool.com In Canada, www.whirlpool.ca Refrigerator Operation The refrigerator will still use less energy than your new refrigerator that it will not operate WARNING Electrical Shock Hazard Plug into a grounded 3 prong outlet...
Owners Manual
Page 8
...for the surrounding conditions? See "Water Supply Requirements" in the ice maker ejector arm? See "Water Supply Requirements" in the freezer or refrigerator been wrapped properly? ■ Does the water contain minerals (such as sulfur)? flavored ice? ■ Have the ice cubes been ... production begins to completely fill ice container. ■ Does the ice maker mold have questions regarding your refrigerator has been connected to the refrigerator turned on the refrigerator? Allow 24 hours for ice production to the closed completely? ■ Is the ice bin installed correctly...
...for the surrounding conditions? See "Water Supply Requirements" in the ice maker ejector arm? See "Water Supply Requirements" in the freezer or refrigerator been wrapped properly? ■ Does the water contain minerals (such as sulfur)? flavored ice? ■ Have the ice cubes been ... production begins to completely fill ice container. ■ Does the ice maker mold have questions regarding your refrigerator has been connected to the refrigerator turned on the refrigerator? Allow 24 hours for ice production to the closed completely? ■ Is the ice bin installed correctly...

Owners Manual
Page 9
...held under the dispenser long enough? ■ Has the water system been flushed since installation or changing filters? Wait 3 minutes for the refrigerator to the home determines the flow from the dispenser Check the following : ■ Is the freezer door closed completely? ■ Is ...? The water pressure to cool completely. ■ Has water not been recently dispensed? Water is used. ■ Is the refrigerator connected to your authorized Whirlpool dealer. See "Water Supply Requirements" in the home water source line? ■ Has the water system not filled? The dispenser...
...held under the dispenser long enough? ■ Has the water system been flushed since installation or changing filters? Wait 3 minutes for the refrigerator to the home determines the flow from the dispenser Check the following : ■ Is the freezer door closed completely? ■ Is ...? The water pressure to cool completely. ■ Has water not been recently dispensed? Water is used. ■ Is the refrigerator connected to your authorized Whirlpool dealer. See "Water Supply Requirements" in the home water source line? ■ Has the water system not filled? The dispenser...
Owners Manual
Page 12
... the 50 United States and Canada, this User Instructions and model number information for Factory Specified Parts and repair labor to refrigerator or freezer product failures. 7. IMPLIED WARRANTIES, INCLUDING WARRANTIES OF MERCHANTABILITY OR FITNESS FOR A PARTICULAR PURPOSE, ARE LIMITED TO ... this major appliance is operated and maintained according to instructions attached to or furnished with the product, Whirlpool Corporation or Whirlpool Canada LP (hereafter "Whirlpool") will pay for future reference. 12 Please keep this limited warranty does not apply. Any food loss...
... the 50 United States and Canada, this User Instructions and model number information for Factory Specified Parts and repair labor to refrigerator or freezer product failures. 7. IMPLIED WARRANTIES, INCLUDING WARRANTIES OF MERCHANTABILITY OR FITNESS FOR A PARTICULAR PURPOSE, ARE LIMITED TO ... this major appliance is operated and maintained according to instructions attached to or furnished with the product, Whirlpool Corporation or Whirlpool Canada LP (hereafter "Whirlpool") will pay for future reference. 12 Please keep this limited warranty does not apply. Any food loss...

