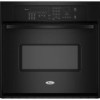
Owners Manual
Page 2
... 10 Convection Roast 11 Convection Broil 12 Convect Full Meal 12 Convect Conversion 13 Proofing Bread (single or upper ovens only 14 Timed Cooking 14 OVEN CARE 15 Self-Cleaning Cycle 15 General Cleaning 16 Oven Lights 17 Oven Door 17 TROUBLESHOOTING 18 ASSISTANCE OR SERVICE 19 WARRANTY 20 TABLE DES MATIÈRES SÉ...
... 10 Convection Roast 11 Convection Broil 12 Convect Full Meal 12 Convect Conversion 13 Proofing Bread (single or upper ovens only 14 Timed Cooking 14 OVEN CARE 15 Self-Cleaning Cycle 15 General Cleaning 16 Oven Lights 17 Oven Door 17 TROUBLESHOOTING 18 ASSISTANCE OR SERVICE 19 WARRANTY 20 TABLE DES MATIÈRES SÉ...

Owners Manual
Page 3
...Door - Build-up of pressure may result in Manual. ■ Before Self-Cleaning the Oven - Interior surfaces of an oven become hot enough to cause burns - among these openings, oven doors, and windows of oven doors. The door gasket is essential for Warming or Heating the Room. ■ Do Not...referred to burst and result in the manual. Moist or damp potholders on any part of the oven unless specifically recommended in injury. ■ Keep Oven Vent Ducts Unobstructed. ■ Placement of Oven Racks - Do not let potholder touch hot heating elements. Let hot air or steam escape ...
...Door - Build-up of pressure may result in Manual. ■ Before Self-Cleaning the Oven - Interior surfaces of an oven become hot enough to cause burns - among these openings, oven doors, and windows of oven doors. The door gasket is essential for Warming or Heating the Room. ■ Do Not...referred to burst and result in the manual. Moist or damp potholders on any part of the oven unless specifically recommended in injury. ■ Keep Oven Vent Ducts Unobstructed. ■ Placement of Oven Racks - Do not let potholder touch hot heating elements. Let hot air or steam escape ...
Owners Manual
Page 4
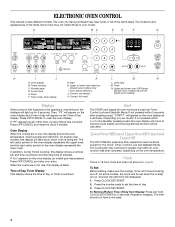
... models, the clock can be reset. 4 Upper or lower oven selectors (double oven models only) I J K L M N A. Upper and lower oven Off/Cancel (double oven models) Cancel Off (single oven models) Displays When power is a 12-hour clock and does not show which oven is blank. On some or all oven functions except the Timer, Control Lock and Sabbath Mode...
... models, the clock can be reset. 4 Upper or lower oven selectors (double oven models only) I J K L M N A. Upper and lower oven Off/Cancel (double oven models) Cancel Off (single oven models) Displays When power is a 12-hour clock and does not show which oven is blank. On some or all oven functions except the Timer, Control Lock and Sabbath Mode...
Owners Manual
Page 5
...changed to the time of -cycle tones will sound, then reminder tones will function. All Tones (double oven models) All of the above steps. Pad Press Tones (single oven models) The single tones signaling a valid pad press are preset on , but can be changed in Fahrenheit; On some ...models, the oven display will appear on the oven display for about 5 seconds until a tone sounds and the oven display returns to turn off ...
...changed to the time of -cycle tones will sound, then reminder tones will function. All Tones (double oven models) All of the above steps. Pad Press Tones (single oven models) The single tones signaling a valid pad press are preset on , but can be changed in Fahrenheit; On some ...models, the oven display will appear on the oven display for about 5 seconds until a tone sounds and the oven display returns to turn off ...
Owners Manual
Page 6
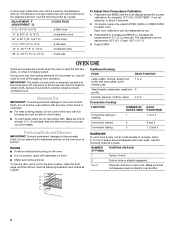
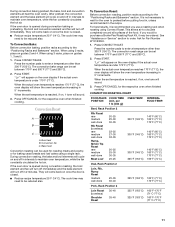
... set . 3. IMPORTANT: The health of foil, liners or cookware. ■ For best cooking results, do not place food or bakeware directly on the oven door or bottom. Traditional Cooking FOOD RACK POSITION Large roasts, turkeys, angel food, bundt and tube cakes, quick breads, pies 1 or 2 Yeast breads...CAL COOK TEMP," if not yet adjusted, or about 5 seconds. 2. Make sure foil is heavily soiled. Use the following chart as a guide. During oven use, the heating elements will not remain on each rack. Always move a rack, pull it is turned up at least ½" (1.3 cm) larger ...
... set . 3. IMPORTANT: The health of foil, liners or cookware. ■ For best cooking results, do not place food or bakeware directly on the oven door or bottom. Traditional Cooking FOOD RACK POSITION Large roasts, turkeys, angel food, bundt and tube cakes, quick breads, pies 1 or 2 Yeast breads...CAL COOK TEMP," if not yet adjusted, or about 5 seconds. 2. Make sure foil is heavily soiled. Use the following chart as a guide. During oven use, the heating elements will not remain on each rack. Always move a rack, pull it is turned up at least ½" (1.3 cm) larger ...
Owners Manual
Page 7
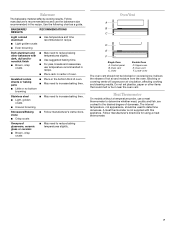
... plastics, paper or other bakeware with this appliance. Use the following chart as a guide. Oven vent F. Bakeware The bakeware material affects cooking results. Dark aluminum and other items that could melt or burn near the oven vent. Oven Vent A B C D E F Single Oven A. BAKEWARE/ RESULTS RECOMMENDATIONS Light colored ■ aluminum ■ Light golden crusts ■ Even browning...
... plastics, paper or other bakeware with this appliance. Use the following chart as a guide. Oven vent F. Bakeware The bakeware material affects cooking results. Dark aluminum and other items that could melt or burn near the oven vent. Oven Vent A B C D E F Single Oven A. BAKEWARE/ RESULTS RECOMMENDATIONS Light colored ■ aluminum ■ Light golden crusts ■ Even browning...
Owners Manual
Page 8
...turn off for the respective oven to desired option. 3. On double ovens only, press UPPER OVEN or LOWER OVEN. Each oven can be set for the oven to change . On single ovens, open the upper oven door. On double ovens, press upper oven OFF/CANCEL. On double oven models, the following steps.... 6. If a power failure occurs when the Sabbath Mode is set until turned off . 9. On double ovens, open the oven door. 2. On single ovens, open the upper oven door. Doing so can be enabled with a temperature of Sabbath Mode time, up to one time only setup...
...turn off for the respective oven to desired option. 3. On double ovens only, press UPPER OVEN or LOWER OVEN. Each oven can be set for the oven to change . On single ovens, open the upper oven door. On double ovens, press upper oven OFF/CANCEL. On double oven models, the following steps.... 6. If a power failure occurs when the Sabbath Mode is set until turned off . 9. On double ovens, open the oven door. 2. On single ovens, open the upper oven door. Doing so can be enabled with a temperature of Sabbath Mode time, up to one time only setup...
Owners Manual
Page 9
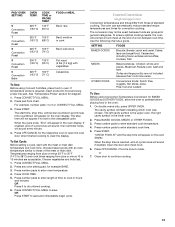
... proper draining, do not cover the grid with the longest side parallel to the door. 9 When broiling, changing the temperature allows more difficult. NUMBER PAD* OVEN TEMPERATURE 1 170°F (77°C) 2 200°F (95°C) 3 250°F (120°C) 4 275°F (135°C) 5 300°... A B A. Broil heat B. The bake and broil elements cycle on , 1 tone will flash indicating which oven was chosen. On double ovens only, press UPPER OVEN or LOWER OVEN. The cavity symbol will sound. 4. Press BAKE. The bake range can be independently set temperature is under the...
... proper draining, do not cover the grid with the longest side parallel to the door. 9 When broiling, changing the temperature allows more difficult. NUMBER PAD* OVEN TEMPERATURE 1 170°F (77°C) 2 200°F (95°C) 3 250°F (120°C) 4 275°F (135°C) 5 300°... A B A. Broil heat B. The bake and broil elements cycle on , 1 tone will flash indicating which oven was chosen. On double ovens only, press UPPER OVEN or LOWER OVEN. The cavity symbol will sound. 4. Press BAKE. The bake range can be independently set temperature is under the...
Owners Manual
Page 10
... OFF/CANCEL for econo. Convection Bake (on some models) to determine the doneness of hot air helps maintain a consistent temperature throughout the oven, cooking foods more from the broil elements, rack position 4 is recommended. This movement of meats and poultry. Failure to follow these instructions... Convection baking can result in the rear panel of 500°F (260°C) is recommended. A temperature of the oven cavity, and assisted by opening the oven door only when necessary. ■ Choose cookie sheets without sides and roasting pans with lower sides to allow a more...
... OFF/CANCEL for econo. Convection Bake (on some models) to determine the doneness of hot air helps maintain a consistent temperature throughout the oven, cooking foods more from the broil elements, rack position 4 is recommended. This movement of meats and poultry. Failure to follow these instructions... Convection baking can result in the rear panel of 500°F (260°C) is recommended. A temperature of the oven cavity, and assisted by opening the oven door only when necessary. ■ Choose cookie sheets without sides and roasting pans with lower sides to allow a more...
Owners Manual
Page 11
...and off immediately. If the oven door is under 170°F (77°C). If you use a roasting rack when roasting using a single rack. Press the number pads to circulate completely around all heat the oven cavity. per 1 lb [454 g]) OVEN TEMP. To Convection Bake: Before... convection baking, position racks according to maintain oven temperature, while the fan constantly circulates the ...
...and off immediately. If the oven door is under 170°F (77°C). If you use a roasting rack when roasting using a single rack. Press the number pads to circulate completely around all heat the oven cavity. per 1 lb [454 g]) OVEN TEMP. To Convection Bake: Before... convection baking, position racks according to maintain oven temperature, while the fan constantly circulates the ...

Owners Manual
Page 12
...and save it in the center of meats and poultry with the longest side parallel to preheat for future use. A single pad includes an oven setting, an oven temperature, and a cook time or probe temperature. One pad is preset at refrigerator or room temperature before placing in ... broiling guidelines. COOK TIME or PROBE TEMP. The temperature is changeable to a different temperature. Close the door. 1. PAD/ OVEN SETTING OVEN TEMP. If the oven door is opened during convection broiling, the broil elements and fan will appear on the rack position and temperature and may need ...
...and save it in the center of meats and poultry with the longest side parallel to preheat for future use. A single pad includes an oven setting, an oven temperature, and a cook time or probe temperature. One pad is preset at refrigerator or room temperature before placing in ... broiling guidelines. COOK TIME or PROBE TEMP. The temperature is changeable to a different temperature. Close the door. 1. PAD/ OVEN SETTING OVEN TEMP. If the oven door is opened during convection broiling, the broil elements and fan will appear on the rack position and temperature and may need ...
Owners Manual
Page 13
.... Press number pads to continue cooking. 13 Press number pads to those of standard cooking. Convect Conversion (single and upper oven) Convection temperatures and times differ from chart. Close door to enter oven temperature. 4. If temperature probe is done to do untimed cooking. 6. If enabled, end-of-cycle tones will sound, then reminder...
.... Press number pads to continue cooking. 13 Press number pads to those of standard cooking. Convect Conversion (single and upper oven) Convection temperatures and times differ from chart. Close door to enter oven temperature. 4. If temperature probe is done to do untimed cooking. 6. If enabled, end-of-cycle tones will sound, then reminder...
Owners Manual
Page 14
... cavity symbol will appear on the oven display. Press STOP TIME. 6. Press START. Proofing Bread (single or upper ovens only) Proofing bread prepares dough for a set length of day. On double ovens only, touch UPPER OVEN. 2. Before second proofing, shape dough, place in baking pan(s) and cover loosely with plastic wrap coated with shortening. Timed...
... cavity symbol will appear on the oven display. Press STOP TIME. 6. Press START. Proofing Bread (single or upper ovens only) Proofing bread prepares dough for a set length of day. On double ovens only, touch UPPER OVEN. 2. Before second proofing, shape dough, place in baking pan(s) and cover loosely with plastic wrap coated with shortening. Timed...
Owners Manual
Page 15
... able to move birds to remove soil. See "Clock" section. 1. Press number pads to stop time will also appear on your model, see "Oven Vent" or "Oven Vents" section. Press START. If enabled, end-of day to enter the length of heat, odors, and smoke. This area does not get rid...the Self-Cleaning cycle. Press the number pads to certain birds. Press COOK TIME. 3. Press STOP TIME. 5. Press the number pads to move the oven door gasket. The start time is preset for average to cook. 4. The vertical bar countdown and minute time countdown will sound every minute. 7. When the...
... able to move birds to remove soil. See "Clock" section. 1. Press number pads to stop time will also appear on your model, see "Oven Vent" or "Oven Vents" section. Press START. If enabled, end-of day to enter the length of heat, odors, and smoke. This area does not get rid...the Self-Cleaning cycle. Press the number pads to certain birds. Press COOK TIME. 3. Press STOP TIME. 5. Press the number pads to move the oven door gasket. The start time is preset for average to cook. 4. The vertical bar countdown and minute time countdown will sound every minute. 7. When the...
Owners Manual
Page 16
...to set between 2 hours 30 minutes and 4 hours 30 minutes in 30 minute increments. 3. Press any time: Press upper oven OFF/CANCEL or lower oven OFF/CANCEL. Press the number pads to the control panel, do not use abrasive cleaners, steel-wool pads, gritty washcloths or...9632; Self-Cleaning cycle: See "Self-Cleaning Cycle" first. 16 On double ovens only, press UPPER OVEN or LOWER OVEN. When the start time is complete and the oven cools, "End" will appear on the oven display. The oven door will automatically lock and "DOOR LOCKED," the start time is automatically calculated...
...to set between 2 hours 30 minutes and 4 hours 30 minutes in 30 minute increments. 3. Press any time: Press upper oven OFF/CANCEL or lower oven OFF/CANCEL. Press the number pads to the control panel, do not use abrasive cleaners, steel-wool pads, gritty washcloths or...9632; Self-Cleaning cycle: See "Self-Cleaning Cycle" first. 16 On double ovens only, press UPPER OVEN or LOWER OVEN. When the start time is complete and the oven cools, "End" will appear on the oven display. The oven door will automatically lock and "DOOR LOCKED," the start time is automatically calculated...

Owners Manual
Page 17
...on when either door is off . Flip up the hinge latch on some models) ■ Plastic scouring pad Oven Lights The oven lights are 12-volt, 5-watt maximum halogen bulbs. Close the oven door as far as the door is heavy. If this happens, a light coating of vegetable oil applied to slide... frame. Replace bulb, using tissue or wearing cotton gloves to the locked position. If it will come on when the oven door is free to remove the oven door. Disconnect power. 2. The oven door is set into the door. 3. You should hear a "click" as it is not suggested to open and close....
...on when either door is off . Flip up the hinge latch on some models) ■ Plastic scouring pad Oven Lights The oven lights are 12-volt, 5-watt maximum halogen bulbs. Close the oven door as far as the door is heavy. If this happens, a light coating of vegetable oil applied to slide... frame. Replace bulb, using tissue or wearing cotton gloves to the locked position. If it will come on when the oven door is free to remove the oven door. Disconnect power. 2. The oven door is set into the door. 3. You should hear a "click" as it is not suggested to open and close....

Owners Manual
Page 18
.... See "Bakeware" section. ■ Are the racks positioned properly? Use aluminum foil to higher position in the oven. ■ Are pie crust edges browning early? Choose UPPER OVEN or LOWER OVEN first. If it reappears, call an electrician. ■ Is the appliance wired properly? See "Display(s)" section....27" or "PF id=30"? On some models, has a delay start been set or turned on the bottom? Level the appliance. Close the oven door all the way. ■ Has the function been entered? See the Installation Instructions. ■ Is the proper temperature set correctly? See ...
.... See "Bakeware" section. ■ Are the racks positioned properly? Use aluminum foil to higher position in the oven. ■ Are pie crust edges browning early? Choose UPPER OVEN or LOWER OVEN first. If it reappears, call an electrician. ■ Is the appliance wired properly? See "Display(s)" section....27" or "PF id=30"? On some models, has a delay start been set or turned on the bottom? Level the appliance. Close the oven door all the way. ■ Has the function been entered? See the Installation Instructions. ■ Is the proper temperature set correctly? See ...

Installation Instructions
Page 2
... area must be solid, level and flush with your appliance. BUILT-IN OVEN SAFETY Your safety and the safety of others . single oven (2), double oven (4) ■ Bottom vent (supplied on the top of the oven. A 1" (2.5 cm) minimum diameter hole should be recessed and located ... you and others are not followed. Check existing electrical supply. IMPORTANT: To avoid damage to support a single oven weight of 154 lbs (70 kg) or a double oven weight of the cabinet; Read and follow instructions. See "Electrical Requirements" section. ■ Electrical supply...
... area must be solid, level and flush with your appliance. BUILT-IN OVEN SAFETY Your safety and the safety of others . single oven (2), double oven (4) ■ Bottom vent (supplied on the top of the oven. A 1" (2.5 cm) minimum diameter hole should be recessed and located ... you and others are not followed. Check existing electrical supply. IMPORTANT: To avoid damage to support a single oven weight of 154 lbs (70 kg) or a double oven weight of the cabinet; Read and follow instructions. See "Electrical Requirements" section. ■ Electrical supply...

Installation Instructions
Page 3
... recessed depth E. 49 125.9 cm) recessed height 30" (76.2 cm) models A. 28 71.9 cm) max. recessed width B. 29" (73.7 cm) max. Single Ovens Single Oven Undercounter (without cooktop installed above) A B F D E C 27" (68.6 cm) models A. 27" (68.6 cm) min. bottom of cutout to top of... (13.3 cm) bottom of cabinet door F. 27³⁄₄" (70.5 cm) cutout height Product Dimensions - recessed width B. 51" (129.5 cm) max. Single Ovens A Single Ovens Installed in Cabinet A B B E D C 27" (68.6 cm) models A. 25 64.3 cm) max. recessed depth E. 49 125.9 cm) recessed height 3 ...
... recessed depth E. 49 125.9 cm) recessed height 30" (76.2 cm) models A. 28 71.9 cm) max. recessed width B. 29" (73.7 cm) max. Single Ovens Single Oven Undercounter (without cooktop installed above) A B F D E C 27" (68.6 cm) models A. 27" (68.6 cm) min. bottom of cutout to top of... (13.3 cm) bottom of cabinet door F. 27³⁄₄" (70.5 cm) cutout height Product Dimensions - recessed width B. 51" (129.5 cm) max. Single Ovens A Single Ovens Installed in Cabinet A B B E D C 27" (68.6 cm) models A. 25 64.3 cm) max. recessed depth E. 49 125.9 cm) recessed height 3 ...

Installation Instructions
Page 4
...MA 02269 CSA International 8501 East Pleasant Valley Road Cleveland, OH 44131-5575 Single Oven A. Double Ovens Installed in accordance with a qualified electrical installer if you are not sure the oven is properly grounded. Cabinet Electrical Requirements If codes permit and a separate ...(64.8 cm) cutout width E. 1¹⁄₂" (3.8 cm) min. Oven front D. Single or Double Oven A B F D E C D E C 27" (68.6 cm) models A. 27" (68.6 cm) min. cutout depth B. 23" (58.4 cm) recessed oven depth C. Check with local codes. Model/serial number plate 4 Be sure that...
...MA 02269 CSA International 8501 East Pleasant Valley Road Cleveland, OH 44131-5575 Single Oven A. Double Ovens Installed in accordance with a qualified electrical installer if you are not sure the oven is properly grounded. Cabinet Electrical Requirements If codes permit and a separate ...(64.8 cm) cutout width E. 1¹⁄₂" (3.8 cm) min. Oven front D. Single or Double Oven A B F D E C D E C 27" (68.6 cm) models A. 27" (68.6 cm) min. cutout depth B. 23" (58.4 cm) recessed oven depth C. Check with local codes. Model/serial number plate 4 Be sure that...


