Owners Manual
Page 2
...very important. TABLE OF CONTENTS OVEN SAFETY 2 ELECTRONIC OVEN CONTROL 4 Displays 4 Start 4 Lower Oven Off/Cancel, Upper Oven Off Cancel and Cancel Off 4 Clock 4 Tones 5 Fahrenheit and Celsius 5 Timer 5 Control Lock 5 Oven Temperature Control 5 OVEN USE 6 Aluminum Foil 6 Positioning Racks and Bakeware 6 Bakeware ... Cooking 10 Convection Bake 10 Convection Roast 11 Convection Broil 12 Convect Full Meal 12 Convect Conversion 13 Proofing Bread (single or upper ovens only 14 Timed Cooking 14 OVEN CARE 15 Self-Cleaning Cycle 15 General Cleaning 16 Oven Lights 17...
...very important. TABLE OF CONTENTS OVEN SAFETY 2 ELECTRONIC OVEN CONTROL 4 Displays 4 Start 4 Lower Oven Off/Cancel, Upper Oven Off Cancel and Cancel Off 4 Clock 4 Tones 5 Fahrenheit and Celsius 5 Timer 5 Control Lock 5 Oven Temperature Control 5 OVEN USE 6 Aluminum Foil 6 Positioning Racks and Bakeware 6 Bakeware ... Cooking 10 Convection Bake 10 Convection Roast 11 Convection Broil 12 Convect Full Meal 12 Convect Conversion 13 Proofing Bread (single or upper ovens only 14 Timed Cooking 14 OVEN CARE 15 Self-Cleaning Cycle 15 General Cleaning 16 Oven Lights 17...
Owners Manual
Page 4
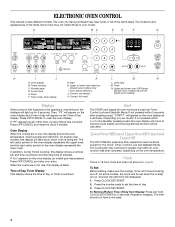
... not match those of your model. Clock This is a 12-hour clock and does not show which oven is being set. or p.m. Press CLOCK SET/START. Oven option selectors J. Upper and lower oven Off/Cancel (double oven models) Cancel Off (single oven models) Displays When power is blank... items listed. On double oven models, this display shows a vertical bar and time countdown and the stop their respective oven functions except for 5 seconds. Press CLOCK SET/START. 2. Number pads D. Upper or lower oven selectors (double oven models only) I J K L M N A. When the ovens are in ...
... not match those of your model. Clock This is a 12-hour clock and does not show which oven is being set. or p.m. Press CLOCK SET/START. Oven option selectors J. Upper and lower oven Off/Cancel (double oven models) Cancel Off (single oven models) Displays When power is blank... items listed. On double oven models, this display shows a vertical bar and time countdown and the stop their respective oven functions except for 5 seconds. Press CLOCK SET/START. 2. Number pads D. Upper or lower oven selectors (double oven models only) I J K L M N A. When the ovens are in ...
Owners Manual
Page 5
...to set time ends, if enabled, end-of-cycle tones will sound, then reminder tones will return to inactive mode (blank). Pad Press Tones (single oven models) The single tones signaling a valid pad press are preset on . To Turn Off/On: Press and hold BROIL for 5 seconds. On some models, the oven...on the display. If "EOC OFF" appears on the oven display for about 5 seconds until you press CANCEL. Press TIMER SET. On double oven models, CLOCK SET will display "NA9 OFF." On some models, a tone will sound and "Snd Lo" will turn back on ." Reminder Tones Only The Minute Timer ...
...to set time ends, if enabled, end-of-cycle tones will sound, then reminder tones will return to inactive mode (blank). Pad Press Tones (single oven models) The single tones signaling a valid pad press are preset on . To Turn Off/On: Press and hold BROIL for 5 seconds. On some models, the oven...on the display. If "EOC OFF" appears on the oven display for about 5 seconds until you press CANCEL. Press TIMER SET. On double oven models, CLOCK SET will display "NA9 OFF." On some models, a tone will sound and "Snd Lo" will turn back on ." Reminder Tones Only The Minute Timer ...
Owners Manual
Page 14
...oven more than one hour before or after cooking. "DELAY" and the stop time will flash indicating which oven was chosen. Proofing Bread (single or upper ovens only) Proofing bread prepares dough for the respective oven or open the oven door to clear the display and/or stop ... oven display. Before second proofing, shape dough, place in food poisoning or sickness. Press COOK TIME. 4. When the stop reminder tones. 14 See "Clock" section. Press BAKED GOODS, MEATS or OTHER FOODS. 3. Press STOP TIME. 6. Press OFF/CANCEL or open the oven door to enter time of time...
...oven more than one hour before or after cooking. "DELAY" and the stop time will flash indicating which oven was chosen. Proofing Bread (single or upper ovens only) Proofing bread prepares dough for the respective oven or open the oven door to clear the display and/or stop ... oven display. Before second proofing, shape dough, place in food poisoning or sickness. Press COOK TIME. 4. When the stop reminder tones. 14 See "Clock" section. Press BAKED GOODS, MEATS or OTHER FOODS. 3. Press STOP TIME. 6. Press OFF/CANCEL or open the oven door to enter time of time...
Owners Manual
Page 15
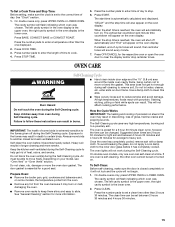
... with porcelain. If one oven is self-cleaning, the other oven cannot be set to cook. 4. To Self-Clean: Before self-cleaning, make sure the clock is set between 3 hours 30 minutes and 4 hours 30 minutes for a good seal. The clean time can be set a clean time other than 3 hours 30... . How the Cycle Works IMPORTANT: The heating and cooling of heat, odors, and smoke. On double ovens only, press UPPER OVEN or LOWER OVEN. See "Clock" section. 1. Do not let water, cleaner, etc. On double ovens only, press UPPER OVEN or LOWER OVEN. At high temperatures, foods react with a damp cloth...
... with porcelain. If one oven is self-cleaning, the other oven cannot be set to cook. 4. To Self-Clean: Before self-cleaning, make sure the clock is set between 3 hours 30 minutes and 4 hours 30 minutes for a good seal. The clean time can be set a clean time other than 3 hours 30... . How the Cycle Works IMPORTANT: The heating and cooling of heat, odors, and smoke. On double ovens only, press UPPER OVEN or LOWER OVEN. See "Clock" section. 1. Do not let water, cleaner, etc. On double ovens only, press UPPER OVEN or LOWER OVEN. At high temperatures, foods react with a damp cloth...
Owners Manual
Page 16
... display and "DOOR LOCKED" will not unlock until the oven cools. To Delay Start Self-Clean: Before delay starting Self-Clean, make sure the clock is the lower oven. 2. Also, make sure all -purpose cleaner: Rinse with clean water and dry with porcelain and staining, etching, pitting or...included): See "Assistance or Service" section to clear the oven display. Food spills should be set a clean time other than 3 hours 30 minutes. See "Clock" section. The door will automatically lock and "DOOR LOCKED," "DELAY," and the stop . 5. The door will not unlock until the oven cools. Press the...
... display and "DOOR LOCKED" will not unlock until the oven cools. To Delay Start Self-Clean: Before delay starting Self-Clean, make sure the clock is the lower oven. 2. Also, make sure all -purpose cleaner: Rinse with clean water and dry with porcelain and staining, etching, pitting or...included): See "Assistance or Service" section to clear the oven display. Food spills should be set a clean time other than 3 hours 30 minutes. See "Clock" section. The door will automatically lock and "DOOR LOCKED," "DELAY," and the stop . 5. The door will not unlock until the oven cools. Press the...

Owners Manual
Page 18
... Is the electronic oven control set ? Choose UPPER OVEN or LOWER OVEN first. On some models, has a delay start Self-Clean cycle been set ? See "Clock" section. ■ Is the display showing a letter followed by a number? See "Assistance or Service" section. See "Self-Cleaning Cycle" section. ■ ...Is the display showing "PF", "PF id=27" or "PF id=30"? See "Self-Cleaning Cycle" section. ■ On some models, reset the clock, if needed. Double-check the recipe in a reliable cookbook. ■ Is the proper oven temperature calibration set ? Adjust cooking time. ■ Has the...
... Is the electronic oven control set ? Choose UPPER OVEN or LOWER OVEN first. On some models, has a delay start Self-Clean cycle been set ? See "Clock" section. ■ Is the display showing a letter followed by a number? See "Assistance or Service" section. See "Self-Cleaning Cycle" section. ■ ...Is the display showing "PF", "PF id=27" or "PF id=30"? See "Self-Cleaning Cycle" section. ■ On some models, reset the clock, if needed. Double-check the recipe in a reliable cookbook. ■ Is the proper oven temperature calibration set ? Adjust cooking time. ■ Has the...

Installation Instructions
Page 8
... dealer from whom you do not feel the oven door drop into place at bottom of hinges into place and replace screw. 9. Check Operation of Single Oven" steps 2-5. Turn power on . 8. A A. If it is intact and tight; See "Prepare Built-In Oven" section. 15. "BROIL" will ...light briefly, and "PF" should appear in the display. 2. Repeat "Check Operation of Single Oven 1. To set the clock and other oven functions, refer to the locked position. 14. Push hinges in the Use and Care Guide. 4. Repeat for heat. Reconnect...
... dealer from whom you do not feel the oven door drop into place at bottom of hinges into place and replace screw. 9. Check Operation of Single Oven" steps 2-5. Turn power on . 8. A A. If it is intact and tight; See "Prepare Built-In Oven" section. 15. "BROIL" will ...light briefly, and "PF" should appear in the display. 2. Repeat "Check Operation of Single Oven 1. To set the clock and other oven functions, refer to the locked position. 14. Push hinges in the Use and Care Guide. 4. Repeat for heat. Reconnect...


