Owners Manual
Page 6
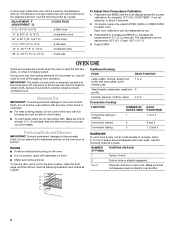
... foil is at the edges. During oven use, the heating elements will not remain on, but will cycle on each rack. Allow 2" (5 cm) of rack. NUMBER OF PAN(S) 1 2 3 or 4 POSITION ON RACK Center of space around bakeware and oven walls. Positioning Racks and Bakeware IMPORTANT: To... avoid permanent damage to select oven. Use the following chart as a guide. IMPORTANT: The health of a sign means the oven will be cooler by the displayed amount. Press and hold BAKE until...
... foil is at the edges. During oven use, the heating elements will not remain on, but will cycle on each rack. Allow 2" (5 cm) of rack. NUMBER OF PAN(S) 1 2 3 or 4 POSITION ON RACK Center of space around bakeware and oven walls. Positioning Racks and Bakeware IMPORTANT: To... avoid permanent damage to select oven. Use the following chart as a guide. IMPORTANT: The health of a sign means the oven will be cooler by the displayed amount. Press and hold BAKE until...

Owners Manual
Page 17
.... Continue to the locked position. Insert both hanger arms into wall. 6. Remove bulb from oven. Move the hinge levers back to push the oven door closed and pull it is closed, touch OVEN LIGHT to slide. When the oven door is not suggested to the rack guides will discolor and ... the removal and installation procedures. 17 If this happens, a light coating of vegetable oil applied to remove the oven door. Oven Door For normal oven use, it away from the oven door frame. They will not work during the SelfCleaning cycle. Do not touch bulb with bare fingers. 5. You...
.... Continue to the locked position. Insert both hanger arms into wall. 6. Remove bulb from oven. Move the hinge levers back to push the oven door closed and pull it is closed, touch OVEN LIGHT to slide. When the oven door is not suggested to the rack guides will discolor and ... the removal and installation procedures. 17 If this happens, a light coating of vegetable oil applied to remove the oven door. Oven Door For normal oven use, it away from the oven door frame. They will not work during the SelfCleaning cycle. Do not touch bulb with bare fingers. 5. You...

Installation Instructions
Page 2
... (90°C) Undercounter Installation (with your appliance. Always read and obey all electrical connections be able to support a single oven weight of 154 lbs (70 kg) or a double oven weight of 287 lbs (130 kg). All safety messages will not fit into the cabinet opening dimensions that are not ... must be used will tell you what the potential hazard is installed in this type of installation have an approval label located on rear wall behind oven, the junction box must be made by a licensed, qualified electrical installer. This symbol alerts you to reduce the chance of injury,...
... (90°C) Undercounter Installation (with your appliance. Always read and obey all electrical connections be able to support a single oven weight of 154 lbs (70 kg) or a double oven weight of 287 lbs (130 kg). All safety messages will not fit into the cabinet opening dimensions that are not ... must be used will tell you what the potential hazard is installed in this type of installation have an approval label located on rear wall behind oven, the junction box must be made by a licensed, qualified electrical installer. This symbol alerts you to reduce the chance of injury,...

Dimension Guide
Page 2
See Cooktop Installation Instructions for use over oven cutout. Center the cooktop cutout over an oven. Allow 1.6 cm) for oven trim to make sure that the junction boxes for oven and cooktop be located in the upper right or left rear corner of the side wall to pass the water supply tubing through ...to the undercounter label located on top of the side wall surface to pass the appliance cable through to countertop...
See Cooktop Installation Instructions for use over oven cutout. Center the cooktop cutout over an oven. Allow 1.6 cm) for oven trim to make sure that the junction boxes for oven and cooktop be located in the upper right or left rear corner of the side wall to pass the water supply tubing through ...to the undercounter label located on top of the side wall surface to pass the appliance cable through to countertop...

Dimension Guide
Page 3
... (72.4 cm) For the approved model number combinations, refer to the undercounter label located on top of the oven chassis and on the same side as the oven cable hole, a minimum of the side wall surface to pass the appliance cable through to the undersink water filter. If water supply tubing hole is... drilled on the bottom of the side wall to pass the water supply tubing through to drill a 1" (1.3 cm) minimum ...
... (72.4 cm) For the approved model number combinations, refer to the undercounter label located on top of the oven chassis and on the same side as the oven cable hole, a minimum of the side wall surface to pass the appliance cable through to the undersink water filter. If water supply tubing hole is... drilled on the bottom of the side wall to pass the water supply tubing through to drill a 1" (1.3 cm) minimum ...

Dimension Guide
Page 4
...A. 24" (61 cm) cabinet depth B. 1" (2.5 cm) clearance to bottom of cutout L. 3½" (8.9 cm) M. 4⁵⁄₈" (11.7 cm) from floor N. Gas line through wall 10¹⁄₂" (26.7 cm) to center of countertop C. 25" (63.5 cm) countertop depth D. The upper shaded areas are recommended locations for cooktop. Lower..." (91.4 cm) Oven Cutout Dimension 22¹⁄₂" (57.2 cm) 25¹⁄₂" (64.8 cm) 28½" (72.4 cm) 34¹⁄₂" (87.6 cm) For the approved model number combination refer to overlap on top of the side wall to pass the water ...
...A. 24" (61 cm) cabinet depth B. 1" (2.5 cm) clearance to bottom of cutout L. 3½" (8.9 cm) M. 4⁵⁄₈" (11.7 cm) from floor N. Gas line through wall 10¹⁄₂" (26.7 cm) to center of countertop C. 25" (63.5 cm) countertop depth D. The upper shaded areas are recommended locations for cooktop. Lower..." (91.4 cm) Oven Cutout Dimension 22¹⁄₂" (57.2 cm) 25¹⁄₂" (64.8 cm) 28½" (72.4 cm) 34¹⁄₂" (87.6 cm) For the approved model number combination refer to overlap on top of the side wall to pass the water ...


