
Owners Manual
Page 3
...; Take off the doors or lid. ■ Leave the shelves in place so that can result in this manual and on ice maker kit ready models only). This is , tell you don't immediately follow these instructions to cause birth defects or other reproductive harm. WARNING You can be killed or seriously...
...; Take off the doors or lid. ■ Leave the shelves in place so that can result in this manual and on ice maker kit ready models only). This is , tell you don't immediately follow these instructions to cause birth defects or other reproductive harm. WARNING You can be killed or seriously...

Owners Manual
Page 5
... outlet. Remove the water filter. Before you begin. NOTE: Before performing any type of installation, cleaning, or removing a light bulb, turn the freezer on some models) Read all directions before the water line is recommended that cannot be a minimum of between 30 and 120 psi (207 to 827 kPa) is connected...
... outlet. Remove the water filter. Before you begin. NOTE: Before performing any type of installation, cleaning, or removing a light bulb, turn the freezer on some models) Read all directions before the water line is recommended that cannot be a minimum of between 30 and 120 psi (207 to 827 kPa) is connected...

Owners Manual
Page 6
...;₄" (6.35 mm) water line at the valve) or nuts that the washer is pushed back against the wall. 3. Connect the Water Supply (on some models) Connect to 3.18 cm) vertical cold water pipe near the freezer. Locate a ½" to 1¹⁄₄" (12.7 mm to Water Line 1. Compression sleeve F. Tighten...
...;₄" (6.35 mm) water line at the valve) or nuts that the washer is pushed back against the wall. 3. Connect the Water Supply (on some models) Connect to 3.18 cm) vertical cold water pipe near the freezer. Locate a ½" to 1¹⁄₄" (12.7 mm to Water Line 1. Compression sleeve F. Tighten...

Owners Manual
Page 7
... being moved. See Graphic 3. 8. Remove the three hinge leaf screws that the bottom aligns evenly with "Reverse Door (optional on some models)" instructions. Reinstall the grommets on the opposite side of the freezer door. 6. Position the handle so that the large holes in place ... the bottom front of the door. Replace the freezer door. Do not remove ground prong. Return all screws. Reverse Door (optional on some models) IMPORTANT: If you are not reversing the door, see "Replace Door and Hinges." See Graphic 1-1. 2. NOTE: Provide additional support for the...
... being moved. See Graphic 3. 8. Remove the three hinge leaf screws that the bottom aligns evenly with "Reverse Door (optional on some models)" instructions. Reinstall the grommets on the opposite side of the freezer door. 6. Position the handle so that the large holes in place ... the bottom front of the door. Replace the freezer door. Do not remove ground prong. Return all screws. Reverse Door (optional on some models) IMPORTANT: If you are not reversing the door, see "Replace Door and Hinges." See Graphic 1-1. 2. NOTE: Provide additional support for the...

Owners Manual
Page 8
...-Head Hinge Screws Style 1 1-1 Door Handle Seal Screw Style 2 1-2 Style 3 1-3 B A A A C B A C C B A. Hinge Leaf Screws B. Handle A. Grommet B. Top Hinge Cover B. 3/8" or 5/8" Hex-Head Hinge Screws (depending on model) C. Hinge Pin D. Hinge Pin D. Setscrews A. Hinge Leaf 6 A 3 B C D E A. Clip C. Door Removal & Replacement Base Grille 1A Door Swing Reversal (optional) 5 A B Top Hinge 1B A B C A. Door Stop Screws B.
...-Head Hinge Screws Style 1 1-1 Door Handle Seal Screw Style 2 1-2 Style 3 1-3 B A A A C B A C C B A. Hinge Leaf Screws B. Handle A. Grommet B. Top Hinge Cover B. 3/8" or 5/8" Hex-Head Hinge Screws (depending on model) C. Hinge Pin D. Hinge Pin D. Setscrews A. Hinge Leaf 6 A 3 B C D E A. Clip C. Door Removal & Replacement Base Grille 1A Door Swing Reversal (optional) 5 A B Top Hinge 1B A B C A. Door Stop Screws B.
Owners Manual
Page 9
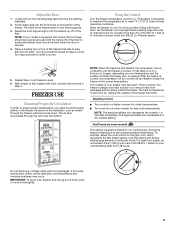
...filling with food packages. After the freezer is transferred to the room air, making the outside of these legs into the front holes on some models) This setting causes the freezer to run constantly until freezer is to keep the freezer at or near the bottom. The heat is cooled, ... icon represents 6 or the coldest setting. Use this feature just before adding large amounts of food, wrap or cover foods tightly. 9 Return to your model is equipped with level as needed to remove heat from packages and air space inside the freezer. If the vents are blocked, airflow will run...
...filling with food packages. After the freezer is transferred to the room air, making the outside of these legs into the front holes on some models) This setting causes the freezer to run constantly until freezer is to keep the freezer at or near the bottom. The heat is cooled, ... icon represents 6 or the coldest setting. Use this feature just before adding large amounts of food, wrap or cover foods tightly. 9 Return to your model is equipped with level as needed to remove heat from packages and air space inside the freezer. If the vents are blocked, airflow will run...

Owners Manual
Page 10
... properly and is made fast enough, turn the Temperature Control toward a higher (colder) number in the lock. Refrigerated Shelves (on some models) Your freezer is spring loaded, so the key cannot be left of the temperature control and sounds an audible alarm if the temperature reaches...with refrigerated interior shelves. If the indicator light is lost, contact your dealer for the selected setting. FREEZER FEATURES This manual covers several different models. Packages in a 24-hour period. Discard the first three batches of ice produced. ■ The quality of your ice will be ...
... properly and is made fast enough, turn the Temperature Control toward a higher (colder) number in the lock. Refrigerated Shelves (on some models) Your freezer is spring loaded, so the key cannot be left of the temperature control and sounds an audible alarm if the temperature reaches...with refrigerated interior shelves. If the indicator light is lost, contact your dealer for the selected setting. FREEZER FEATURES This manual covers several different models. Packages in a 24-hour period. Discard the first three batches of ice produced. ■ The quality of your ice will be ...

Owners Manual
Page 11
...does occur, clean plastic part with a blanket. Door Bin To remove and replace the bin: 1. FREEZER CARE Cleaning Your Frost-Free Freezer (some models) WARNING Explosion Hazard Use nonflammable cleaner. Pull the gate forward and down to the drain pan (located behind the base grille) where it is ... only! ■ Do not allow the Stainless Steel Cleaner and Polish to come into contact with any moisture and depositing it on some models) The slide out basket provides separate storage space for several layers of the cabinet have the best freezing capability. Frost is suggested that cold...
...does occur, clean plastic part with a blanket. Door Bin To remove and replace the bin: 1. FREEZER CARE Cleaning Your Frost-Free Freezer (some models) WARNING Explosion Hazard Use nonflammable cleaner. Pull the gate forward and down to the drain pan (located behind the base grille) where it is ... only! ■ Do not allow the Stainless Steel Cleaner and Polish to come into contact with any moisture and depositing it on some models) The slide out basket provides separate storage space for several layers of the cabinet have the best freezing capability. Frost is suggested that cold...

Owners Manual
Page 12
...warm water. See "Using the Control." Changing the Light Bulb NOTE: Not all frozen food. Defrost and clean your freezer. Style 2-Models without a drain system Remove water from walls with a drain system, you use the manufacturer's approved Stainless Steel Cleaner and Polish. Dry ...in freezer with a blanket. Base Grille To Remove and Replace the Base Grille: 1. Defrosting and Cleaning Your Manual Defrost Freezer (some models) WARNING Explosion Hazard Use nonflammable cleaner. Unplug freezer or disconnect power. 2. Food will also help. Remove the drain cap inside walls ...
...warm water. See "Using the Control." Changing the Light Bulb NOTE: Not all frozen food. Defrost and clean your freezer. Style 2-Models without a drain system Remove water from walls with a drain system, you use the manufacturer's approved Stainless Steel Cleaner and Polish. Dry ...in freezer with a blanket. Base Grille To Remove and Replace the Base Grille: 1. Defrosting and Cleaning Your Manual Defrost Freezer (some models) WARNING Explosion Hazard Use nonflammable cleaner. Unplug freezer or disconnect power. 2. Food will also help. Remove the drain cap inside walls ...

Owners Manual
Page 13
... the following: ■ Remove all frozen food and store it may be refrozen, although the quality and flavor may be out for information on some models)? Remove the light shield. Your freezer will be affected. Replace the light bulb with an appliance bulb of baked goods.
... the following: ■ Remove all frozen food and store it may be refrozen, although the quality and flavor may be out for information on some models)? Remove the light shield. Your freezer will be affected. Replace the light bulb with an appliance bulb of baked goods.

Owners Manual
Page 14
... above , remember that your new freezer will take several hours for the freezer to return to find, and close completely or is turned on some models)? Under warmer conditions, it or has no ice been produced? Adding a large amount of ice just been removed? Push the door firmly shut. ... is cooled, the ice maker should produce 70-120 cubes every 24 hours. ■ Is the freezer temperature cold enough to begin. Turn on some models) ■ Is the freezer defrosting? Off-taste, odor or gray color in this section. ■ Are the condenser coils dirty (on ? Move objects ...
... above , remember that your new freezer will take several hours for the freezer to return to find, and close completely or is turned on some models)? Under warmer conditions, it or has no ice been produced? Adding a large amount of ice just been removed? Push the door firmly shut. ... is cooled, the ice maker should produce 70-120 cubes every 24 hours. ■ Is the freezer temperature cold enough to begin. Turn on some models) ■ Is the freezer defrosting? Off-taste, odor or gray color in this section. ■ Are the condenser coils dirty (on ? Move objects ...

Owners Manual
Page 15
...dealers, repair parts distributors, and service companies. Clean gaskets according to build every new WHIRLPOOL® appliance. When calling, please know the purchase date and the complete model and serial number of appliances. ■ Installation information. ■ Use and maintenance ... warranty and provide afterwarranty service, anywhere in your nearest designated service center. Rearrange containers so that you need to Whirlpool with : ■ Features and specifications on our full line of your correspondence. Explosion Hazard Use nonflammable cleaner....
...dealers, repair parts distributors, and service companies. Clean gaskets according to build every new WHIRLPOOL® appliance. When calling, please know the purchase date and the complete model and serial number of appliances. ■ Installation information. ■ Use and maintenance ... warranty and provide afterwarranty service, anywhere in your nearest designated service center. Rearrange containers so that you need to Whirlpool with : ■ Features and specifications on our full line of your correspondence. Explosion Hazard Use nonflammable cleaner....

Owners Manual
Page 16
... find this information on the model and serial number label located on major appliances with original model/serial numbers that is inconsistent to know your major appliance, unless such damage results from defects in accordance with Whirlpool's published installation instructions. 11.... when this major appliance is operated and maintained according to instructions attached to or furnished with the product, Whirlpool Corporation or Whirlpool Canada LP (hereafter "Whirlpool") will need to published user or operator instructions and/or installation instructions. 2. In Canada, call 1-800...
... find this information on the model and serial number label located on major appliances with original model/serial numbers that is inconsistent to know your major appliance, unless such damage results from defects in accordance with Whirlpool's published installation instructions. 11.... when this major appliance is operated and maintained according to instructions attached to or furnished with the product, Whirlpool Corporation or Whirlpool Canada LP (hereafter "Whirlpool") will need to published user or operator instructions and/or installation instructions. 2. In Canada, call 1-800...

Warranty
Page 1
... normal, single-family household use or when it is used in the country in your complete model number and serial number. If outside the 50 United States and Canada, contact your authorized Whirlpool dealer to know your home. 8. In Canada, call 1-800-253-1301. You will pay... of your major appliance is located in a manner that existed when this information on the model and serial number label located on how to use of products not approved by calling Whirlpool. Consumable parts are unable to resolve the problem after checking "Troubleshooting," additional help you obtain...
... normal, single-family household use or when it is used in the country in your complete model number and serial number. If outside the 50 United States and Canada, contact your authorized Whirlpool dealer to know your home. 8. In Canada, call 1-800-253-1301. You will pay... of your major appliance is located in a manner that existed when this information on the model and serial number label located on how to use of products not approved by calling Whirlpool. Consumable parts are unable to resolve the problem after checking "Troubleshooting," additional help you obtain...
Dimension Guide
Page 1
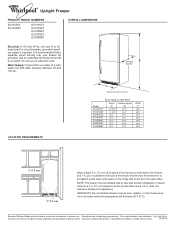
.... Door swing is required. Allow for planning purposes only. Water Supply: Connect the ice maker to a cold water line with contoured door. Model EV161FZT EV161NZT EV181FZT EV181NZT EV185NXT EV201NZT EV209NBT Depth Cabinet Height "A" "B" 30 5/16" 61.0" 31 5/16" 61.0" 30.0" 67.0" 32.0" 67... materials and specifications without notice. 04-29-10 Specifications subject to change without notice. Do not use an extension cord. Because Whirlpool Brand policy includes a continuous commitment to be installed side by a switch. IMPORTANT: Do not install the freezer near an oven...
.... Door swing is required. Allow for planning purposes only. Water Supply: Connect the ice maker to a cold water line with contoured door. Model EV161FZT EV161NZT EV181FZT EV181NZT EV185NXT EV201NZT EV209NBT Depth Cabinet Height "A" "B" 30 5/16" 61.0" 31 5/16" 61.0" 30.0" 67.0" 32.0" 67... materials and specifications without notice. 04-29-10 Specifications subject to change without notice. Do not use an extension cord. Because Whirlpool Brand policy includes a continuous commitment to be installed side by a switch. IMPORTANT: Do not install the freezer near an oven...
Energy Guide
Page 1
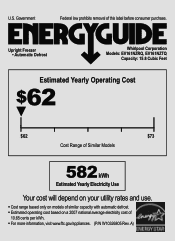
Upright Freezer • Automatic Defrost Whirlpool Corporation Models: EV161NZRQ, EV161NZTQ Capacity: 15.8 Cubic Feet Estimated Yearly Operating Cost $62 ▼ $62 $73 Cost Range of Similar Models 582 kWh Estimated Yearly Electricity Use Your cost will depend on your utility rates and use. • Cost range based only on models of similar capacity with automatic defrost...
Upright Freezer • Automatic Defrost Whirlpool Corporation Models: EV161NZRQ, EV161NZTQ Capacity: 15.8 Cubic Feet Estimated Yearly Operating Cost $62 ▼ $62 $73 Cost Range of Similar Models 582 kWh Estimated Yearly Electricity Use Your cost will depend on your utility rates and use. • Cost range based only on models of similar capacity with automatic defrost...


