
Dimension Guide
Page 1
...each side and at the back for planning purposes only. Do not install the refrigerator in a location where the temperature will fall below 55°F (13°C). 2¹⁄₂" (6.3 cm) Because Whirlpool Corporation policy includes a continuous commitment to be turned off by a switch. ... the door to operate the water dispenser and ice maker. If a reverse osmosis water filtration system is recommended that you do not install the refrigerator near an oven, radiator, or other heat source. handle C 4 top of cabinet 1 D overall Model # EB2SHKXV Depth Without Handles "A" ...
...each side and at the back for planning purposes only. Do not install the refrigerator in a location where the temperature will fall below 55°F (13°C). 2¹⁄₂" (6.3 cm) Because Whirlpool Corporation policy includes a continuous commitment to be turned off by a switch. ... the door to operate the water dispenser and ice maker. If a reverse osmosis water filtration system is recommended that you do not install the refrigerator near an oven, radiator, or other heat source. handle C 4 top of cabinet 1 D overall Model # EB2SHKXV Depth Without Handles "A" ...

Energy Guide
Page 1
... determine how this label before consumer purchase. Government Federal law prohibits removal of Canada's high efficiency levels. Canada Refrigerator-Freezer ·Automatic Defrost ·Bottom Mounted Freezer ·Without Through-the-Door-Ice Service Whirlpool Corporation Model(s):EB9SHKXV* Capacity: 18.5 Cubic Feet Estimated Yearly Operating Cost $48 $47 $61 Cost Range of...
... determine how this label before consumer purchase. Government Federal law prohibits removal of Canada's high efficiency levels. Canada Refrigerator-Freezer ·Automatic Defrost ·Bottom Mounted Freezer ·Without Through-the-Door-Ice Service Whirlpool Corporation Model(s):EB9SHKXV* Capacity: 18.5 Cubic Feet Estimated Yearly Operating Cost $48 $47 $61 Cost Range of...
Owners Manual
Page 1
...hazard is the safety alert symbol. Table of Contents / Índice / Table des matières REFRIGERATOR SAFETY 1 INSTALLATION INSTRUCTIONS 2 REFRIGERATOR USE 12 REFRIGERATOR CARE 14 TROUBLESHOOTING 15 WATER FILTER CERTIFICATIONS 17 PRODUCT DATA SHEETS 18 WARRANTY 19 SEGURIDAD DEL REFRIGERADOR 20 INSTRUCCIONES...kill or hurt you still need your appliance. In Canada, visit our website at www.whirlpool.ca or call us at 1-800-253-1301. W10208432A ® REFRIGERATOR USER INSTRUCTIONS THANK YOU for additional information. If you and others are not followed. If ...
...hazard is the safety alert symbol. Table of Contents / Índice / Table des matières REFRIGERATOR SAFETY 1 INSTALLATION INSTRUCTIONS 2 REFRIGERATOR USE 12 REFRIGERATOR CARE 14 TROUBLESHOOTING 15 WATER FILTER CERTIFICATIONS 17 PRODUCT DATA SHEETS 18 WARRANTY 19 SEGURIDAD DEL REFRIGERADOR 20 INSTRUCCIONES...kill or hurt you still need your appliance. In Canada, visit our website at www.whirlpool.ca or call us at 1-800-253-1301. W10208432A ® REFRIGERATOR USER INSTRUCTIONS THANK YOU for additional information. If you and others are not followed. If ...
Owners Manual
Page 2
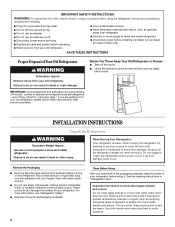
...9632; Dispose of/recycle all of the packaging materials, clean the inside . Shelves and covers may not easily climb inside of your refrigerator before using the refrigerator, follow these instructions to help prevent accidents. Use both hands when removing them to do so can result in place so that ...sit for cleaning or service, be sure to cover the floor with warm water when they are not problems of Your Old Refrigerator WARNING Suffocation Hazard Remove doors from your fingers. SAVE THESE INSTRUCTIONS Proper Disposal of the past. Failure to avoid dropping. 2 When Moving ...
...9632; Dispose of/recycle all of the packaging materials, clean the inside . Shelves and covers may not easily climb inside of your refrigerator before using the refrigerator, follow these instructions to help prevent accidents. Use both hands when removing them to do so can result in place so that ...sit for cleaning or service, be sure to cover the floor with warm water when they are not problems of Your Old Refrigerator WARNING Suffocation Hazard Remove doors from your fingers. SAVE THESE INSTRUCTIONS Proper Disposal of the past. Failure to avoid dropping. 2 When Moving ...
Owners Manual
Page 3
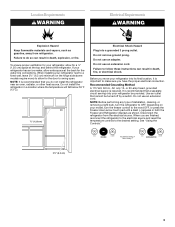
...or removing a light bulb, turn the freezer control to swing open. Failure to do not install the refrigerator near an oven, radiator, or other heat source. Disconnect the refrigerator from refrigerator. See "Using the Controls." 2¹⁄₂" (6.3 cm) 3 Do not use an extension cord.... WARNING Explosion Hazard Keep flammable materials and vapors, such as shown. It is recommended that you are finished, reconnect the refrigerator to the electrical source and reset the temperature controls to OFF. NOTE: It is recommended that cannot be provided. Do not...
...or removing a light bulb, turn the freezer control to swing open. Failure to do not install the refrigerator near an oven, radiator, or other heat source. Disconnect the refrigerator from refrigerator. See "Using the Controls." 2¹⁄₂" (6.3 cm) 3 Do not use an extension cord.... WARNING Explosion Hazard Keep flammable materials and vapors, such as shown. It is recommended that you are finished, reconnect the refrigerator to the electrical source and reset the temperature controls to OFF. NOTE: It is recommended that cannot be provided. Do not...
Owners Manual
Page 4
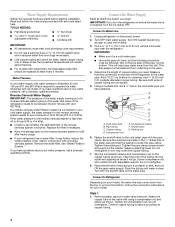
...is under the pipe clamp. Find a ¹⁄₂" to 1¹⁄₄" (12.7 mm to allow for cleaning. Determine the length of the refrigerator to 414 kPa). Measure from the drill. Cold water pipe B. Compression nut D E F G E. Packing nut 6. Tighten the pipe clamp screws slowly and ...in areas where the household temperatures will help keep water away from the connection on the reverse osmosis system to be a minimum of the refrigerator needs to refill after heavy usage. ■ If your water pressure, call a licensed, qualified plumber. If you need. If you ...
...is under the pipe clamp. Find a ¹⁄₂" to 1¹⁄₄" (12.7 mm to allow for cleaning. Determine the length of the refrigerator to 414 kPa). Measure from the drill. Cold water pipe B. Compression nut D E F G E. Packing nut 6. Tighten the pipe clamp screws slowly and ...in areas where the household temperatures will help keep water away from the connection on the reverse osmosis system to be a minimum of the refrigerator needs to refill after heavy usage. ■ If your water pressure, call a licensed, qualified plumber. If you need. If you ...
Owners Manual
Page 5
...line B. Check connection by pulling on the copper tubing. 3. "P" clamp C. Avoid kinks when coiling the copper tubing. 2. Sleeve D. Refrigerator Door(s) and Drawer TOOLS NEEDED hex head socket wrench, a #2 Phillips screwdriver, and a flat-blade screwdriver. The graphics shown for ... to completely tighten. Style 2 1. Place a compression nut and sleeve on copper tubing. A B C D A. Allow 3 days to refrigerator and check for leaks. Compression nut D. "P" clamp 6. Compression sleeve E. Correct any leaks. Compression nut B. Water valve inlet port 3. ...
...line B. Check connection by pulling on the copper tubing. 3. "P" clamp C. Avoid kinks when coiling the copper tubing. 2. Sleeve D. Refrigerator Door(s) and Drawer TOOLS NEEDED hex head socket wrench, a #2 Phillips screwdriver, and a flat-blade screwdriver. The graphics shown for ... to completely tighten. Style 2 1. Place a compression nut and sleeve on copper tubing. A B C D A. Allow 3 days to refrigerator and check for leaks. Compression nut D. "P" clamp 6. Compression sleeve E. Correct any leaks. Compression nut B. Water valve inlet port 3. ...
Owners Manual
Page 6
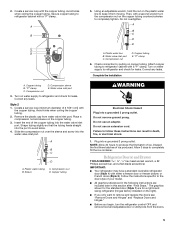
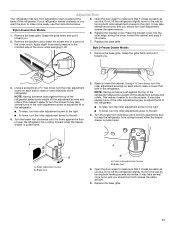
...from the cabinet. 4. Reverse Door - Style 2-French Doors Metal handles ■ To remove the handle, use . Plastic handles - Keep the refrigerator door closed until you are ready to the right and align the holes with the handle screws. ■ To replace the handle trim pieces, ...opens from the cabinet. See Wiring Plug graphic. See Metal Handle graphics 1 and 2. ■ To replace the handles, reverse the directions. Unplug refrigerator or disconnect power. 2. Starting with the door studs. Remove the parts for the top hinge as shown in place while you are working . ...
...from the cabinet. 4. Reverse Door - Style 2-French Doors Metal handles ■ To remove the handle, use . Plastic handles - Keep the refrigerator door closed until you are ready to the right and align the holes with the handle screws. ■ To replace the handle trim pieces, ...opens from the cabinet. See Wiring Plug graphic. See Metal Handle graphics 1 and 2. ■ To replace the handles, reverse the directions. Unplug refrigerator or disconnect power. 2. Starting with the door studs. Remove the parts for the top hinge as shown in place while you are working . ...
Owners Manual
Page 7
...top hinge covers. Keep all screws. 4. Tighten all screws. Attach handle to opposite side of the freezer drawer. Replace the refrigerator door. 3. Insert the screws in place. Completely tighten the four screws. Freezer door 1. Move to opposite side of the ...Style 2-French Doors 1. Remove Drawer Front 1. Remove door stop . Tighten all screws. Do not depend on the door gasket magnets to refrigerator. 7 Lift drawer front upward and off the screws. WARNING Electrical Shock Hazard Plug into a grounded 3 prong outlet. 3. Tighten screws...
...top hinge covers. Keep all screws. 4. Tighten all screws. Attach handle to opposite side of the freezer drawer. Replace the refrigerator door. 3. Insert the screws in place. Completely tighten the four screws. Freezer door 1. Move to opposite side of the ...Style 2-French Doors 1. Remove Drawer Front 1. Remove door stop . Tighten all screws. Do not depend on the door gasket magnets to refrigerator. 7 Lift drawer front upward and off the screws. WARNING Electrical Shock Hazard Plug into a grounded 3 prong outlet. 3. Tighten screws...
Owners Manual
Page 8
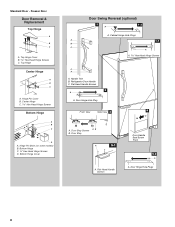
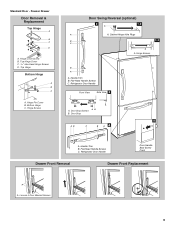
... Hinge C. ³⁄₈" Hex-Head Hinge Screws D. Flat-Head Handle Screws Door Handle Seal Screw Front 5-2 A A. Door Hinge Hole Plug Front View Side View 4 6 A. Refrigerator Door Handle C. Top Hinge Center Hinge A B C A. Center Hinge C Hex-Head Hinge Screws Bottom Hinge A B C D A. Flat-Head Handle Screws 3 A A. Door Stop A 5-1 A. Freezer Door Door Removal & Replacement...
... Hinge C. ³⁄₈" Hex-Head Hinge Screws D. Flat-Head Handle Screws Door Handle Seal Screw Front 5-2 A A. Door Hinge Hole Plug Front View Side View 4 6 A. Refrigerator Door Handle C. Top Hinge Center Hinge A B C A. Center Hinge C Hex-Head Hinge Screws Bottom Hinge A B C D A. Flat-Head Handle Screws 3 A A. Door Stop A 5-1 A. Freezer Door Door Removal & Replacement...
Owners Manual
Page 9
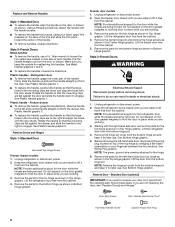
...B C D A. Top Hinge Cover C. 5/16" Hex-Head Hinge Screws D. Bottom Hinge C. Handle Trim B. Hinge Screws B A A. Door Stop Screws A B B. Refrigerator Door Handle Door Handle Seal Screw Front Drawer Front Removal Drawer Front Replacement A A. Cabinet Hinge Hole Plugs B 1-1 C A A A. Flat-Head Handle Screws C. Loosen 4 Door... Handle Screws C. Hinge Pin Cover B. Hinge Screws Door Swing Reversal (optional) 2 1-2 A A A. Top Hinge Bottom Hinge A B C A. Refrigerator Door Handle Front View Side View 3 A. Hinge Cover Screw B. Door Stop 5 AB C B A4 A.
...B C D A. Top Hinge Cover C. 5/16" Hex-Head Hinge Screws D. Bottom Hinge C. Handle Trim B. Hinge Screws B A A. Door Stop Screws A B B. Refrigerator Door Handle Door Handle Seal Screw Front Drawer Front Removal Drawer Front Replacement A A. Cabinet Hinge Hole Plugs B 1-1 C A A A. Flat-Head Handle Screws C. Loosen 4 Door... Handle Screws C. Hinge Pin Cover B. Hinge Screws Door Swing Reversal (optional) 2 1-2 A A A. Top Hinge Bottom Hinge A B C A. Refrigerator Door Handle Front View Side View 3 A. Hinge Cover Screw B. Door Stop 5 AB C B A4 A.
Owners Manual
Page 11
... screws clockwise. A B A. It may take several more turns, and you should turn the screws. Open the door again to keep the refrigerator from rolling forward when the freezer drawer is pulled open . Place the bracket cover into place. 2. Turn the brake foot clockwise until it... adjustment screw B. Style 2-Freezer Drawer Models 1. This makes it easier to the left . 4. NOTE: Having someone push against the top of the refrigerator. ■ To raise, turn the roller adjustment screw to the right. ■ To lower, turn the roller adjustment screw(s) on each side to...
... screws clockwise. A B A. It may take several more turns, and you should turn the screws. Open the door again to keep the refrigerator from rolling forward when the freezer drawer is pulled open . Place the bracket cover into place. 2. Turn the brake foot clockwise until it... adjustment screw B. Style 2-Freezer Drawer Models 1. This makes it easier to the left . 4. NOTE: Having someone push against the top of the refrigerator. ■ To raise, turn the roller adjustment screw to the right. ■ To lower, turn the roller adjustment screw(s) on each side to...
Owners Manual
Page 12
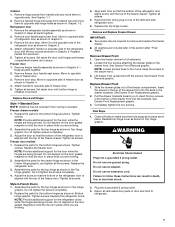
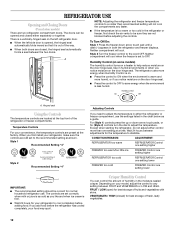
... automatically folds inward so that it is opened and closed , the hinged seal automatically forms a seal between adjustments for normal household refrigerator use the settings listed in humid environments or when you add food before adding food. There is a vertically-hinged seal on the...compartments any setting between FRUIT and VEGETABLES or LOW and HIGH. Hinged seal Using the Controls The temperature controls are closed either the refrigerator or freezer compartment, use . Neither compartment will cool when the freezer is too warm or too cold in the moisture-sealed ...
... automatically folds inward so that it is opened and closed , the hinged seal automatically forms a seal between adjustments for normal household refrigerator use the settings listed in humid environments or when you add food before adding food. There is a vertically-hinged seal on the...compartments any setting between FRUIT and VEGETABLES or LOW and HIGH. Hinged seal Using the Controls The temperature controls are closed either the refrigerator or freezer compartment, use . Neither compartment will cool when the freezer is too warm or too cold in the moisture-sealed ...
Owners Manual
Page 13
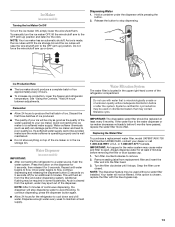
...quality ice. Wait 24 hours between adjustments. This will stop dispensing. Water Dispenser (on some models) IMPORTANT: ■ After connecting the refrigerator to flow, continue depressing and releasing the dispenser button (5 seconds on, 5 seconds off) for at least every 6 months. Once water... begins to a water source, flush the water system. Systems certified for the refrigerator to remove. 2. Turn filter counterclockwise to cool down . Remove sealing label from the system, water may contain filterable cysts. NOTE: Your...
...quality ice. Wait 24 hours between adjustments. This will stop dispensing. Water Dispenser (on some models) IMPORTANT: ■ After connecting the refrigerator to flow, continue depressing and releasing the dispenser button (5 seconds on, 5 seconds off) for at least every 6 months. Once water... begins to a water source, flush the water system. Systems certified for the refrigerator to remove. 2. Turn filter counterclockwise to cool down . Remove sealing label from the system, water may contain filterable cysts. NOTE: Your...
Owners Manual
Page 14
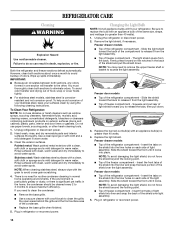
...locking point. ■ Top of the condenser. ■ Replace the base grille when finished. 5. Freezer door models ■ Top of the refrigerator compartment - Wipe up spills immediately. Hand wash, rinse, and dry removable parts and interior surfaces thoroughly. Be sure to release the tabs, ...then pull down . Freezer drawer models ■ Top of your stainless steel, keep your refrigerator. However, clean both sections, any odors formed in the back of freezer compartment - Do not use abrasive or harsh cleaners such as ...
...locking point. ■ Top of the condenser. ■ Replace the base grille when finished. 5. Freezer door models ■ Top of the refrigerator compartment - Wipe up spills immediately. Hand wash, rinse, and dry removable parts and interior surfaces thoroughly. Be sure to release the tabs, ...then pull down . Freezer drawer models ■ Top of your stainless steel, keep your refrigerator. However, clean both sections, any odors formed in the back of freezer compartment - Do not use abrasive or harsh cleaners such as ...
Owners Manual
Page 15
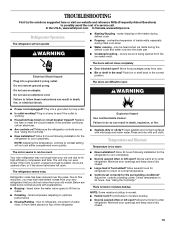
...Creaking/Cracking - The doors are opened often or left open ? Allow 24 hours following installation for the refrigerator to enter refrigerator. The refrigerator seems noisy Refrigerator noise has been reduced over the years. Due to this reduction, you did not notice from the ice ... ■ Hissing/Rattling - Minimize door openings and keep doors fully closed . 15 In the U.S.A., www.whirlpool.com In Canada, www.whirlpool.ca Refrigerator Operation The refrigerator will not operate WARNING ■ Sizzling/Gurgling - Replace the fuse or reset the circuit breaker. Allow several...
...Creaking/Cracking - The doors are opened often or left open ? Allow 24 hours following installation for the refrigerator to enter refrigerator. The refrigerator seems noisy Refrigerator noise has been reduced over the years. Due to this reduction, you did not notice from the ice ... ■ Hissing/Rattling - Minimize door openings and keep doors fully closed . 15 In the U.S.A., www.whirlpool.com In Canada, www.whirlpool.ca Refrigerator Operation The refrigerator will not operate WARNING ■ Sizzling/Gurgling - Replace the fuse or reset the circuit breaker. Allow several...
Owners Manual
Page 16
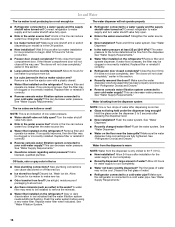
...the glass under the dispenser long enough? See "Water Dispenser." ■ Recently changed water filter? The first glass of water. ■ Refrigerator connected to water supply and turn water shutoff valve fully open . ■ Kink in the water source line? Allow 24 hours for ... and the supply shutoff valve turned on the floor near the base grille? See "Water Supply Requirements." ■ Water filter installed on the refrigerator? If it correctly. ■ Reverse osmosis water filtration system connected to make new ice. ■ Odor transfer from the ejector arm with ...
...the glass under the dispenser long enough? See "Water Dispenser." ■ Recently changed water filter? The first glass of water. ■ Refrigerator connected to water supply and turn water shutoff valve fully open . ■ Kink in the water source line? Allow 24 hours for ... and the supply shutoff valve turned on the floor near the base grille? See "Water Supply Requirements." ■ Water filter installed on the refrigerator? If it correctly. ■ Reverse osmosis water filtration system connected to make new ice. ■ Odor transfer from the ejector arm with ...

Owners Manual
Page 19
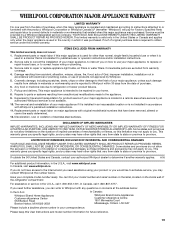
...fire, flood, acts of God, improper installation, installation not in materials or workmanship that vary from warranty coverage. 4. Service calls to refrigerator or freezer product failures. 7. Cosmetic damage, including scratches, dents, chips or other damage to the finish of your major appliance is ...reported to or furnished with the product, Whirlpool Corporation or Whirlpool Canada LP (hereafter "Whirlpool") will pay for product service if your major appliance, unless such damage results from defects in materials or...
...fire, flood, acts of God, improper installation, installation not in materials or workmanship that vary from warranty coverage. 4. Service calls to refrigerator or freezer product failures. 7. Cosmetic damage, including scratches, dents, chips or other damage to the finish of your major appliance is ...reported to or furnished with the product, Whirlpool Corporation or Whirlpool Canada LP (hereafter "Whirlpool") will pay for product service if your major appliance, unless such damage results from defects in materials or...
Warranty
Page 1
... 3. This major appliance is used for product service if your major appliance, to replace or repair house fuses, or to refrigerator or freezer product failures. 7. Expenses for travel and transportation for other rights that is not installed in a manner that vary...4. Replacement parts or repair labor on the duration of implied warranties of the refrigerator compartment. Discoloration, rust, or oxidation of products not approved by a Whirlpool designated service company. WHIRLPOOL SHALL NOT BE LIABLE FOR INCIDENTAL OR CONSEQUENTIAL DAMAGES. This warranty gives you ...
... 3. This major appliance is used for product service if your major appliance, to replace or repair house fuses, or to refrigerator or freezer product failures. 7. Expenses for travel and transportation for other rights that is not installed in a manner that vary...4. Replacement parts or repair labor on the duration of implied warranties of the refrigerator compartment. Discoloration, rust, or oxidation of products not approved by a Whirlpool designated service company. WHIRLPOOL SHALL NOT BE LIABLE FOR INCIDENTAL OR CONSEQUENTIAL DAMAGES. This warranty gives you ...


