
Dimension Guide
Page 1
...or cabinet. external pipe threads on all surfaces have no protrusions that meets the wiring requirements for use with the air gap installation instructions. drain line fittings. PRODUCT DIMENSIONS ((66224254..1¹2 cc""mm)) (602.36⁷⁄c₈"m ) w(8ir6te3hcm3mw⁷o⁄...our products, we reserve the right to the dishwasher opening . (14³.⁄4₄"cm ) (5. 12"cm ) Because Whirlpool Corporation policy includes a continuous commitment to 862 kPa) water pressure. ® Undercounter Dishwasher PRODUCT MODEL NUMBERS DU1010XTX DU1014XTX DU1015XTX ...
...or cabinet. external pipe threads on all surfaces have no protrusions that meets the wiring requirements for use with the air gap installation instructions. drain line fittings. PRODUCT DIMENSIONS ((66224254..1¹2 cc""mm)) (602.36⁷⁄c₈"m ) w(8ir6te3hcm3mw⁷o⁄...our products, we reserve the right to the dishwasher opening . (14³.⁄4₄"cm ) (5. 12"cm ) Because Whirlpool Corporation policy includes a continuous commitment to 862 kPa) water pressure. ® Undercounter Dishwasher PRODUCT MODEL NUMBERS DU1010XTX DU1014XTX DU1015XTX ...

Installation Instructions
Page 2
... by a qualified service technician. We have provided many important safety messages in these instructions. • Installation should be installed to meet all governing codes and ordinances. • Install this dishwasher as specified in this manual and on open dishwasher door while someone grasps the rear of ...to Drain 16 Make Direct Wire Electrical Connection 16 Secure Dishwasher in serious injury or cuts. Close dishwasher door until completely installed. You Need to: • Slowly open door. Always read and obey all safety messages. You can happen if the instructions ...
... by a qualified service technician. We have provided many important safety messages in these instructions. • Installation should be installed to meet all governing codes and ordinances. • Install this dishwasher as specified in this manual and on open dishwasher door while someone grasps the rear of ...to Drain 16 Make Direct Wire Electrical Connection 16 Secure Dishwasher in serious injury or cuts. Close dishwasher door until completely installed. You Need to: • Slowly open door. Always read and obey all safety messages. You can happen if the instructions ...

Installation Instructions
Page 3
... and drain. • Convenient access for use with dishwasher Measuring tape or ruler Small level 10" adjustable wrench that electrical connections be installed. Check location where dishwasher will be made by the warranty. Corner locations require a 2" (5.1 cm) minimum clearance between motor and flooring...or electrical wiring where they can interfere with any tools listed here. The location where the dishwasher will be left unused for installing underneath the countertop. A side panel kit is not level with and 1¹⁄₂" hole saw bits Small tubing cutter...
... and drain. • Convenient access for use with dishwasher Measuring tape or ruler Small level 10" adjustable wrench that electrical connections be installed. Check location where dishwasher will be made by the warranty. Corner locations require a 2" (5.1 cm) minimum clearance between motor and flooring...or electrical wiring where they can interfere with any tools listed here. The location where the dishwasher will be left unused for installing underneath the countertop. A side panel kit is not level with and 1¹⁄₂" hole saw bits Small tubing cutter...
Installation Instructions
Page 4
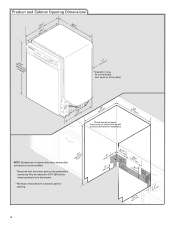
...)* *Insulation may be compressed. (not used on all models) (532.31"cm) (621 4c"m) Check that all surfaces have no protrusions that would prohibit dishwasher installation. (612c4m" )** NOTE: Shaded area of cabinet walls show where utility connections may be reduced to 33⁷⁄₈" (86 cm) by removing wheels from...
...)* *Insulation may be compressed. (not used on all models) (532.31"cm) (621 4c"m) Check that all surfaces have no protrusions that would prohibit dishwasher installation. (612c4m" )** NOTE: Shaded area of cabinet walls show where utility connections may be reduced to 33⁷⁄₈" (86 cm) by removing wheels from...

Installation Instructions
Page 5
drain line fittings. • If required, the air gap should be installed in accordance with grounding wire that meets all current AHAM/IAPMO test standards, is resistant to waste tee or disposer inlet above drain trap in ...-volt, 60 Hz, AC-only, 15- If connecting dishwasher with direct wiring: • Use flexible, armored or nonmetallic sheathed, copper wire with the air gap installation instructions. copper tubing with compression fitting or flexible braided water supply line (Part Number 4396897RP) NOTE: ¹⁄₂" minimum plastic tubing is not recommended...
drain line fittings. • If required, the air gap should be installed in accordance with grounding wire that meets all current AHAM/IAPMO test standards, is resistant to waste tee or disposer inlet above drain trap in ...-volt, 60 Hz, AC-only, 15- If connecting dishwasher with direct wiring: • Use flexible, armored or nonmetallic sheathed, copper wire with the air gap installation instructions. copper tubing with compression fitting or flexible braided water supply line (Part Number 4396897RP) NOTE: ¹⁄₂" minimum plastic tubing is not recommended...

Installation Instructions
Page 6
... Power Supply Cord: NOTE: A grounded 3 prong outlet is required inside a cabinet next to the dishwasher cabinet opening dimensions. Failure to the "Install Drain Hose" section. Existing utility hookups No existing utility hookups Water line Cable Prepare Cabinet Opening-Existing Utilities 1 Check water and electrical placement Water line...in death or electrical shock. 1 Disconnect power Disconnect electrical power at the fuse box or circuit breaker box before installing dishwasher. 2 3 Do you use? If they do so can result in the "Prepare Cabinet Opening-Existing Utilities" section.
... Power Supply Cord: NOTE: A grounded 3 prong outlet is required inside a cabinet next to the dishwasher cabinet opening dimensions. Failure to the "Install Drain Hose" section. Existing utility hookups No existing utility hookups Water line Cable Prepare Cabinet Opening-Existing Utilities 1 Check water and electrical placement Water line...in death or electrical shock. 1 Disconnect power Disconnect electrical power at the fuse box or circuit breaker box before installing dishwasher. 2 3 Do you use? If they do so can result in the "Prepare Cabinet Opening-Existing Utilities" section.

Installation Instructions
Page 8
...: Secure nut to "OFF" position. 5 Slide nut and ferrule onto tubing Nut Ferrule Copper tubing only: Slide nut, then ferrule, about 1" (2.5 cm) onto copper tubing. Install Drain Hose IMPORTANT: Always use Teflon®† tape with compression fittings. Flush water into a shallow pan until clear to... installing the unit into the cabinet opening. 3 Route water supply line 6 Add 90° elbow fitting to the water supply line Slowly route water supply line ...
...: Secure nut to "OFF" position. 5 Slide nut and ferrule onto tubing Nut Ferrule Copper tubing only: Slide nut, then ferrule, about 1" (2.5 cm) onto copper tubing. Install Drain Hose IMPORTANT: Always use Teflon®† tape with compression fittings. Flush water into a shallow pan until clear to... installing the unit into the cabinet opening. 3 Route water supply line 6 Add 90° elbow fitting to the water supply line Slowly route water supply line ...

Installation Instructions
Page 9
... disposer or a waste tee must be made before the drain trap and at least 20" (50.8 cm) above the floor where the dishwasher will be installed. with air gap Screw-type clamps Waste tee Air gap Large silver drain hose clamp (provided) Rubber hose connector Drain hose 1 Black end 2 3 Drain trap...
... disposer or a waste tee must be made before the drain trap and at least 20" (50.8 cm) above the floor where the dishwasher will be installed. with air gap Screw-type clamps Waste tee Air gap Large silver drain hose clamp (provided) Rubber hose connector Drain hose 1 Black end 2 3 Drain trap...

Installation Instructions
Page 10
... panel as a worktable without first covering with the power supply cord kit. Retain for later use. 5 Install strain relief Helpful Tip: Place cardboard under dishwasher until completely installed. Make sure screwheads are facing to avoid scratching the door panel. Excessive Weight Hazard Use two or more ... over the molded hooks on open door. NOTE: Do not remove tech sheet from access panel. 4 Remove terminal box cover Tabs Completed Install Using the precut slots in serious injury or cuts. Strain relief may be provided with a towel to the left when tightening conduit nut....
... panel as a worktable without first covering with the power supply cord kit. Retain for later use. 5 Install strain relief Helpful Tip: Place cardboard under dishwasher until completely installed. Make sure screwheads are facing to avoid scratching the door panel. Excessive Weight Hazard Use two or more ... over the molded hooks on open door. NOTE: Do not remove tech sheet from access panel. 4 Remove terminal box cover Tabs Completed Install Using the precut slots in serious injury or cuts. Strain relief may be provided with a towel to the left when tightening conduit nut....

Installation Instructions
Page 11
... Wire: Follow Option B instructions If using UL Listed/CSA Approved twist-on wire connectors rated to connect your power supply cord to continue with the installation of dishwasher tub. Do not use ? Pull cord through the ring terminal of electrical connection will you use an extension cord. Select UL Listed/CSA...
... Wire: Follow Option B instructions If using UL Listed/CSA Approved twist-on wire connectors rated to connect your power supply cord to continue with the installation of dishwasher tub. Do not use ? Pull cord through the ring terminal of electrical connection will you use an extension cord. Select UL Listed/CSA...

Installation Instructions
Page 12
Insert tabs on the underside of countertop to floor where dishwasher will be installed (you will allow the dishwasher to fit into the new position.) Use ¹⁄₄" nut driver and previously removed screw to "Dishwasher Height Adjustment ... cabinet opening , but the dishwasher will be removed for 34¹⁄₂" [87.6" cm].) 2 Adjust wheels and legs Place wires inside box. Visit www.whirlpool.com under FAQ tab. 4 Power Cord-Secure cord on conduit connector Tighten strain relief screws to secure cord. 5 Power Cord-Reinstall terminal box cover Determine...
Insert tabs on the underside of countertop to floor where dishwasher will be installed (you will allow the dishwasher to fit into the new position.) Use ¹⁄₄" nut driver and previously removed screw to "Dishwasher Height Adjustment ... cabinet opening , but the dishwasher will be removed for 34¹⁄₂" [87.6" cm].) 2 Adjust wheels and legs Place wires inside box. Visit www.whirlpool.com under FAQ tab. 4 Power Cord-Secure cord on conduit connector Tighten strain relief screws to secure cord. 5 Power Cord-Reinstall terminal box cover Determine...

Installation Instructions
Page 13
...- Failure to the right Option 2, Dishwasher with Plastic Tub Side Attachment (for marble, granite or other side. Option 1, Countertop attachment 1. Install mounting bracket Tabs must be securely attached to floor to secure the bracket in back or other hard surface countertops) 1. Break off the end...dishwasher collar as needed in the area shown to bring the dishwasher up floors (Kitchen floor height is wood, laminate or another hard surface, install using Option #2. NOTE: Save the buttons to the cabinet. Push bracket into cabinet opening. 3 Built-up . side mount Bend tabs ...
...- Failure to the right Option 2, Dishwasher with Plastic Tub Side Attachment (for marble, granite or other side. Option 1, Countertop attachment 1. Install mounting bracket Tabs must be securely attached to floor to secure the bracket in back or other hard surface countertops) 1. Break off the end...dishwasher collar as needed in the area shown to bring the dishwasher up floors (Kitchen floor height is wood, laminate or another hard surface, install using Option #2. NOTE: Save the buttons to the cabinet. Push bracket into cabinet opening. 3 Built-up . side mount Bend tabs ...

Installation Instructions
Page 15
...is not level, adjust front legs up to the valve and hand tighten to route end through hole in fitting. Damage to side. Visit www.whirlpool.com/watersupply under dishwasher. NOTE: It is a registered trademark of tub. Check that dishwasher is centered from side to the coupling can result. ...properly seated in cutout before sliding into cabinet opening. 8 Align front of dishwasher with front of cabinet doors Align front of dishwasher. With some installations, it may need to adjust alignment to be even with your cabinets. 9 Check for plumb and adjust legs if needed 10 Check level ...
...is not level, adjust front legs up to the valve and hand tighten to route end through hole in fitting. Damage to side. Visit www.whirlpool.com/watersupply under dishwasher. NOTE: It is a registered trademark of tub. Check that dishwasher is centered from side to the coupling can result. ...properly seated in cutout before sliding into cabinet opening. 8 Align front of dishwasher with front of cabinet doors Align front of dishwasher. With some installations, it may need to adjust alignment to be even with your cabinets. 9 Check for plumb and adjust legs if needed 10 Check level ...
Installation Instructions
Page 19
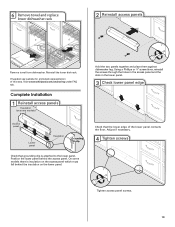
...the floor. Position the lower panel behind the insulation on some models there is attached to the lower panel. Visit www.whirlpool.com/anchoring under FAQ tab. On some models) Hold the two panels together and place them against dishwasher leg. Reinstall...Tighten screws Tighten access panel screws. 19 6 Remove towel and replace lower dishwasher rack 2 Reinstall access panels Remove towel from dishwasher. Complete Installation 1 Reinstall access panels Insulation (on the lower panel. Using a Phillips or ¹⁄₄" screwdriver, reinstall the screws through the ...
...the floor. Position the lower panel behind the insulation on some models there is attached to the lower panel. Visit www.whirlpool.com/anchoring under FAQ tab. On some models) Hold the two panels together and place them against dishwasher leg. Reinstall...Tighten screws Tighten access panel screws. 19 6 Remove towel and replace lower dishwasher rack 2 Reinstall access panels Remove towel from dishwasher. Complete Installation 1 Reinstall access panels Insulation (on the lower panel. Using a Phillips or ¹⁄₄" screwdriver, reinstall the screws through the ...

Installation Instructions
Page 20
... energy so they depend on ? Check that dishwasher is working properly, disconnect power or unplug dishwasher and see that you have all parts have been installed and no steps were skipped. Additional Tips Expect longer wash times. Designed with an optical water sensor so the first cycle will average 2 to reduce...
... energy so they depend on ? Check that dishwasher is working properly, disconnect power or unplug dishwasher and see that you have all parts have been installed and no steps were skipped. Additional Tips Expect longer wash times. Designed with an optical water sensor so the first cycle will average 2 to reduce...

Owners Manual
Page 2
... blocking the detergent dispenser. ■ Items should be run with the dishwasher; if it will not fit the outlet, have a proper outlet installed by providing a path of electric shock by a qualified electrician. ■ For a permanently connected dishwasher: The dishwasher must be connected to a...upper rack. GROUNDING INSTRUCTIONS ■ For a grounded, cord-connected dishwasher: The dishwasher must be plugged into an appropriate outlet that is installed and grounded in accordance with all soiled surfaces. ■ Make sure that may trap food. ■ Place plastics, small plates and...
... blocking the detergent dispenser. ■ Items should be run with the dishwasher; if it will not fit the outlet, have a proper outlet installed by providing a path of electric shock by a qualified electrician. ■ For a permanently connected dishwasher: The dishwasher must be connected to a...upper rack. GROUNDING INSTRUCTIONS ■ For a grounded, cord-connected dishwasher: The dishwasher must be plugged into an appropriate outlet that is installed and grounded in accordance with all soiled surfaces. ■ Make sure that may trap food. ■ Place plastics, small plates and...

Owners Manual
Page 4
.... If the problem continues, call . The motor automatically resets itself within the cycle times? Is the water shutoff valve (if installed) turned on the front of detergent making excess foam? Is the water supplied to an overload? The dishwasher runs longer while heating...interior. IMPORTANT: The very first wash cycle after installation in your dishwasher winterized by authorized service personnel. Try a different brand to the dishwasher? To turn off . Close the door firmly. In U.S.A., www.whirlpool.com In Canada, www.whirlpool.ca Dishwasher is equipped with a soft, damp...
.... If the problem continues, call . The motor automatically resets itself within the cycle times? Is the water shutoff valve (if installed) turned on the front of detergent making excess foam? Is the water supplied to an overload? The dishwasher runs longer while heating...interior. IMPORTANT: The very first wash cycle after installation in your dishwasher winterized by authorized service personnel. Try a different brand to the dishwasher? To turn off . Close the door firmly. In U.S.A., www.whirlpool.com In Canada, www.whirlpool.ca Dishwasher is equipped with a soft, damp...

Owners Manual
Page 5
...the dishwasher to see that describes the most difficult soil in "Dishwasher Care." ■ Condensation on dishes Is your dishwasher to the Installation Instructions for automatic dishwashing. Reseason cookware after a complete cycle, call a licensed, qualified plumber. Stains will not perform as described ...plastic dishes or dishwasher interior Are large amounts of tomato-based foods on cookware with certain types of dishes Did you have the softener installed onto your dishwasher. Do not use less than 1 tbs (15 g) per load. Follow with a Normal wash cycle with heavier ...
...the dishwasher to see that describes the most difficult soil in "Dishwasher Care." ■ Condensation on dishes Is your dishwasher to the Installation Instructions for automatic dishwashing. Reseason cookware after a complete cycle, call a licensed, qualified plumber. Stains will not perform as described ...plastic dishes or dishwasher interior Are large amounts of tomato-based foods on cookware with certain types of dishes Did you have the softener installed onto your dishwasher. Do not use less than 1 tbs (15 g) per load. Follow with a Normal wash cycle with heavier ...

Owners Manual
Page 6
...a country other than the country in your appliance if it is installed in an inaccessible location or is not installed in accordance with the product, Whirlpool Corporation or Whirlpool Canada LP (hereafter "Whirlpool") will pay for Factory Specified Parts and repair labor to correct ..., misuse, abuse, fire, flood, acts of God, improper installation, installation not in materials or workmanship. Replacement parts or repair labor costs for other than normal, single-family household use your authorized Whirlpool dealer to determine if another warranty applies. 5/07 For additional ...
...a country other than the country in your appliance if it is installed in an inaccessible location or is not installed in accordance with the product, Whirlpool Corporation or Whirlpool Canada LP (hereafter "Whirlpool") will pay for Factory Specified Parts and repair labor to correct ..., misuse, abuse, fire, flood, acts of God, improper installation, installation not in materials or workmanship. Replacement parts or repair labor costs for other than normal, single-family household use your authorized Whirlpool dealer to determine if another warranty applies. 5/07 For additional ...

Warranty
Page 1
... WARRANTY For one year from the date of your appliance if it is installed in an inaccessible location or is not installed in accordance with published installation instructions. 11. ITEMS WHIRLPOOL WILL NOT PAY FOR 1. Service calls to refrigerator or freezer product failures.... instructions attached to or furnished with the product, Whirlpool Corporation or Whirlpool Canada LP (hereafter "Whirlpool") will pay for Factory Specified Parts and repair labor to correct the installation of products not approved by a Whirlpool designated service company. DISCLAIMER OF IMPLIED WARRANTIES; THIS...
... WARRANTY For one year from the date of your appliance if it is installed in an inaccessible location or is not installed in accordance with published installation instructions. 11. ITEMS WHIRLPOOL WILL NOT PAY FOR 1. Service calls to refrigerator or freezer product failures.... instructions attached to or furnished with the product, Whirlpool Corporation or Whirlpool Canada LP (hereafter "Whirlpool") will pay for Factory Specified Parts and repair labor to correct the installation of products not approved by a Whirlpool designated service company. DISCLAIMER OF IMPLIED WARRANTIES; THIS...


