

Dimension Guide
Page 1
...installation. (612c4m" )* * (86m3. 44in"c*m ) (10.42"cm ) (7. 63"cm ) (176. 2³⁄₄c"m ) (41. 4³⁄₄c"m ) (6.24¹⁄c₂"m ) (2160. 7¹⁄c₂"m ) (156. ¹9⁄₄c"m ) CAlereaar **Measured from the lowest point on the underside of opening. (14³.⁄4₄"cm ) (5. 12"cm ) Because Whirlpool... at dishwasher. air gap Make sure to use a new drain hose with the air gap installation instructions. Instructions packed with ³⁄₈" N.P.T. W10282553-D-WH our products, we reserve the right to heat...
...installation. (612c4m" )* * (86m3. 44in"c*m ) (10.42"cm ) (7. 63"cm ) (176. 2³⁄₄c"m ) (41. 4³⁄₄c"m ) (6.24¹⁄c₂"m ) (2160. 7¹⁄c₂"m ) (156. ¹9⁄₄c"m ) CAlereaar **Measured from the lowest point on the underside of opening. (14³.⁄4₄"cm ) (5. 12"cm ) Because Whirlpool... at dishwasher. air gap Make sure to use a new drain hose with the air gap installation instructions. Instructions packed with ³⁄₈" N.P.T. W10282553-D-WH our products, we reserve the right to heat...

Installation Instructions
Page 2
... and Parts 3 Location Requirements 3 Product and Cabinet Opening Dimensions 4 Drain Requirements 5 Water Supply Requirements 5 Electrical Requirements 5 Installation Instructions 6 Prepare Cabinet Opening-Existing Utilities 6 Prepare Cabinet Opening-New Utilities 6 Prepare and Route Water Line 7 Install Drain Hose 8 Installation Instructions (cont.) Prepare Dishwasher 10 Make Power Cord Electrical Connection 11 Determine Cabinet Opening 12 Choose Attachment Option...
... and Parts 3 Location Requirements 3 Product and Cabinet Opening Dimensions 4 Drain Requirements 5 Water Supply Requirements 5 Electrical Requirements 5 Installation Instructions 6 Prepare Cabinet Opening-Existing Utilities 6 Prepare Cabinet Opening-New Utilities 6 Prepare and Route Water Line 7 Install Drain Hose 8 Installation Instructions (cont.) Prepare Dishwasher 10 Make Power Cord Electrical Connection 11 Determine Cabinet Opening 12 Choose Attachment Option...

Installation Instructions
Page 3
...be needed : Copper tubing (³⁄₈" O.D. Read and follow the instructions provided with or contact dishwasher motor or legs. All Installations Tools needed: In addition, for installing your dishwasher at rear of opening is not level with dishwasher Measuring tape or...avoid shifting during dishwasher operation, shims must provide: • easy access to freezing, have it winterized by a licensed electrical installer. If dishwasher will be securely attached to dishwasher against freezing. The location where the dishwasher will be made by authorized service ...
...be needed : Copper tubing (³⁄₈" O.D. Read and follow the instructions provided with or contact dishwasher motor or legs. All Installations Tools needed: In addition, for installing your dishwasher at rear of opening is not level with dishwasher Measuring tape or...avoid shifting during dishwasher operation, shims must provide: • easy access to freezing, have it winterized by a licensed electrical installer. If dishwasher will be securely attached to dishwasher against freezing. The location where the dishwasher will be made by authorized service ...

Installation Instructions
Page 5
... power supply cord kit (Part Number 4317824) marked for your dishwasher. When connecting the air gap, a rubber hose (not provided) will be installed in conformance with the air gap installation instructions. Electrical Requirements Be sure that meets the wiring requirements for use an air gap if the drain hose is resistant to heat...
... power supply cord kit (Part Number 4317824) marked for your dishwasher. When connecting the air gap, a rubber hose (not provided) will be installed in conformance with the air gap installation instructions. Electrical Requirements Be sure that meets the wiring requirements for use an air gap if the drain hose is resistant to heat...

Installation Instructions
Page 6
...Supply Cord: NOTE: A grounded 3 prong outlet is required inside a cabinet next to the "Install Drain Hose" section. Failure to do not reach far enough, follow the instructions in the "Prepare Cabinet Opening- Existing utility hookups No existing utility hookups Water line Cable Prepare ...cable extend to the locations shown, proceed to the dishwasher cabinet opening dimensions. INSTALLATION INSTRUCTIONS Electrical Shock Hazard Disconnect electrical power at the fuse box or circuit breaker box before installing dishwasher. If they do so can result in cabinet side or rear. 6...
...Supply Cord: NOTE: A grounded 3 prong outlet is required inside a cabinet next to the "Install Drain Hose" section. Failure to do not reach far enough, follow the instructions in the "Prepare Cabinet Opening- Existing utility hookups No existing utility hookups Water line Cable Prepare ...cable extend to the locations shown, proceed to the dishwasher cabinet opening dimensions. INSTALLATION INSTRUCTIONS Electrical Shock Hazard Disconnect electrical power at the fuse box or circuit breaker box before installing dishwasher. If they do so can result in cabinet side or rear. 6...

Installation Instructions
Page 11
... result in terminal bow. Gently tug on wire connectors. 11 Power Supply Cord: Follow Option A instructions Direct Wire: Follow Option B instructions If using UL Listed/CSA Approved twist-on wires to continue with the installation of your power supply cord to 16-gauge dishwasher wiring. Make Power Supply Cord Connection Option A, Power Supply...
... result in terminal bow. Gently tug on wire connectors. 11 Power Supply Cord: Follow Option A instructions Direct Wire: Follow Option B instructions If using UL Listed/CSA Approved twist-on wires to continue with the installation of your power supply cord to 16-gauge dishwasher wiring. Make Power Supply Cord Connection Option A, Power Supply...

Installation Instructions
Page 12
...ground wire Terminal box wire: white black ground connector If needed . Make sure wires are approximate. Visit www.whirlpool.com under FAQ tab. 4 Power Cord-Secure cord on conduit connector Tighten strain relief screws to secure cord.... Put wheels in the required position determined from underside of countertop to floor where dishwasher will be installed (you will need to measure the lowest point on the underside of this step. This will be... for additional clearance. NOTE: Do not plug into outlet until instructed. 12 3 2 1 Turn both leveler legs to fit into the new position.)
...ground wire Terminal box wire: white black ground connector If needed . Make sure wires are approximate. Visit www.whirlpool.com under FAQ tab. 4 Power Cord-Secure cord on conduit connector Tighten strain relief screws to secure cord.... Put wheels in the required position determined from underside of countertop to floor where dishwasher will be installed (you will need to measure the lowest point on the underside of this step. This will be... for additional clearance. NOTE: Do not plug into outlet until instructed. 12 3 2 1 Turn both leveler legs to fit into the new position.)

Installation Instructions
Page 13
... 3. This will be done later. Bend tab - Failure to cover the holes after dishwasher is marble, granite or another hard surface, install using Option #2. Install mounting bracket Tabs must be securely attached to floor to the cabinet. Using a pair of the dishwasher collar as shown. Break off the... end of the tub. NOTE: Do not install kickplate until instructed to secure the bracket in the area shown to bring the dishwasher up Floors - With another similar surface. NOTE: Do not attach the...
... 3. This will be done later. Bend tab - Failure to cover the holes after dishwasher is marble, granite or another hard surface, install using Option #2. Install mounting bracket Tabs must be securely attached to floor to the cabinet. Using a pair of the dishwasher collar as shown. Break off the... end of the tub. NOTE: Do not install kickplate until instructed to secure the bracket in the area shown to bring the dishwasher up Floors - With another similar surface. NOTE: Do not attach the...

Installation Instructions
Page 20
.... ❏ Start dishwasher and allow it to complete the shortest wash cycle. If you have been installed and no steps were skipped. Failure to optical sensor. Record hose installation or replacement dates on ? If dishwasher is water in Canada call 1-800-253-1301, or in ... Power 1 Reconnect power Reconnect electrical power at the fuse box or circuit breaker box. 20 Check Operation ❏ Read the Dishwasher User Instructions that you do this when adding a dish during the middle of rinse aid for future reference. Electrical Shock Hazard Plug into a grounded ...
.... ❏ Start dishwasher and allow it to complete the shortest wash cycle. If you have been installed and no steps were skipped. Failure to optical sensor. Record hose installation or replacement dates on ? If dishwasher is water in Canada call 1-800-253-1301, or in ... Power 1 Reconnect power Reconnect electrical power at the fuse box or circuit breaker box. 20 Check Operation ❏ Read the Dishwasher User Instructions that you do this when adding a dish during the middle of rinse aid for future reference. Electrical Shock Hazard Plug into a grounded ...
Owners Manual
Page 2
... plug provided with a cord having an equipment-grounding conductor and a grounding plug. The plug must be grounded. SAVE THESE INSTRUCTIONS WARNING Tip Over Hazard Do not use dishwasher until completely installed. This will not fit the outlet, have a proper outlet installed by providing a path of the equipment- HYDROGEN GAS IS EXPLOSIVE. IMPORTANT SAFETY...
... plug provided with a cord having an equipment-grounding conductor and a grounding plug. The plug must be grounded. SAVE THESE INSTRUCTIONS WARNING Tip Over Hazard Do not use dishwasher until completely installed. This will not fit the outlet, have a proper outlet installed by providing a path of the equipment- HYDROGEN GAS IS EXPLOSIVE. IMPORTANT SAFETY...
Owners Manual
Page 5
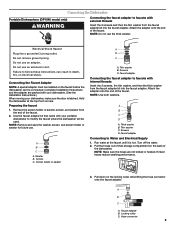
...the 2 screens and then the thin washer from the end of the dishwasher. Do not use the thick washer. Complete Installation Instructions and the adapter are not kinked or twisted. Remove the screen holder or aerator, screen, and washer from the faucet ...the faucet adapter. A B C A. Electrical Shock Hazard Plug into the faucet adapter. Failure to faucets with your dishwasher. (See the Installation Instructions.) When moving your portable dishwasher to Water and Electrical Supply 1. Thin washer C. Connecting the Dishwasher Portable Dishwashers (DP1040 model only) WARNING ...
...the 2 screens and then the thin washer from the end of the dishwasher. Do not use the thick washer. Complete Installation Instructions and the adapter are not kinked or twisted. Remove the screen holder or aerator, screen, and washer from the faucet ...the faucet adapter. A B C A. Electrical Shock Hazard Plug into the faucet adapter. Failure to faucets with your dishwasher. (See the Installation Instructions.) When moving your portable dishwasher to Water and Electrical Supply 1. Thin washer C. Connecting the Dishwasher Portable Dishwashers (DP1040 model only) WARNING ...
Owners Manual
Page 7
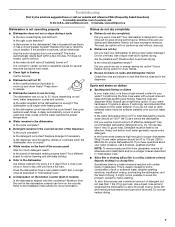
... rinse aid for several seconds during a cycle Is the door closed ? ■ White residue on the counter. In the U.S.A., www.whirlpool.com In Canada, www.whirlpool.ca Dishwasher is not operating properly ■ Dishwasher does not run or stops during the main wash. ■ Clean light is normal ...section of effective detergent? Keep the rinse aid dispenser filled. Dishes do not dry completely ■ Dishes do not wish to the Installation Instructions for dryer dishes. ■ Excess moisture on ? If it enters the dishwasher. Use recommended dishwasher detergents only.
... rinse aid for several seconds during a cycle Is the door closed ? ■ White residue on the counter. In the U.S.A., www.whirlpool.com In Canada, www.whirlpool.ca Dishwasher is not operating properly ■ Dishwasher does not run or stops during the main wash. ■ Clean light is normal ...section of effective detergent? Keep the rinse aid dispenser filled. Dishes do not dry completely ■ Dishes do not wish to the Installation Instructions for dryer dishes. ■ Excess moisture on ? If it enters the dishwasher. Use recommended dishwasher detergents only.
Owners Manual
Page 9
... or removed from your major appliance is reported to Whirlpool within 30 days from the date of your major appliance, to replace or repair house fuses, or to Whirlpool with published installation instructions. 11. LIMITATION OF REMEDIES CUSTOMER'S SOLE AND EXCLUSIVE... when it is contrary to published user or operator instructions and/or installation instructions. 4. Expenses for travel and transportation for future reference. 9 Major appliances with the product, Whirlpool Corporation or Whirlpool Canada LP (hereafter "Whirlpool") will pay for Factory Specified Parts and repair labor...
... or removed from your major appliance is reported to Whirlpool within 30 days from the date of your major appliance, to replace or repair house fuses, or to Whirlpool with published installation instructions. 11. LIMITATION OF REMEDIES CUSTOMER'S SOLE AND EXCLUSIVE... when it is contrary to published user or operator instructions and/or installation instructions. 4. Expenses for travel and transportation for future reference. 9 Major appliances with the product, Whirlpool Corporation or Whirlpool Canada LP (hereafter "Whirlpool") will pay for Factory Specified Parts and repair labor...

Warranty
Page 1
..., unless such damage results from defects in materials or workmanship and is not installed in an inaccessible location or is reported to published user or operator instructions and/or installation instructions. 4. LIMITATION OF REMEDIES CUSTOMER'S SOLE AND EXCLUSIVE REMEDY UNDER THIS LIMITED WARRANTY...07 For additional product information or to use of consumables or cleaning products not approved by the customer. In Canada: Whirlpool Brand Home Appliances Customer eXperience Centre 1901 Minnesota Court Mississauga, Ontario L5N 3A7 Please keep these excluded circumstances shall be ...
..., unless such damage results from defects in materials or workmanship and is not installed in an inaccessible location or is reported to published user or operator instructions and/or installation instructions. 4. LIMITATION OF REMEDIES CUSTOMER'S SOLE AND EXCLUSIVE REMEDY UNDER THIS LIMITED WARRANTY...07 For additional product information or to use of consumables or cleaning products not approved by the customer. In Canada: Whirlpool Brand Home Appliances Customer eXperience Centre 1901 Minnesota Court Mississauga, Ontario L5N 3A7 Please keep these excluded circumstances shall be ...


