
Dimension Guide
Page 1
... that meets all models) (532. 31"cm ) CABINET CUTOUT DIMENSIONS Corner locations require a 2" (5.1 cm) minimum clearance between the side of opening . May be needed to connect to improve Dimensions are for use an air gap if the drain hose is not long enough, use a new...lower than 20" (50.8 cm) above drain trap in accordance with 20 to 120 psi (138 to the dishwasher opening . (14³.⁄4₄"cm ) (5. 12"cm ) Because Whirlpool Corporation policy includes a continuous commitment to the waste tee or disposer unit. PRODUCT DIMENSIONS ((66224254..1¹2 cc""mm))...
... that meets all models) (532. 31"cm ) CABINET CUTOUT DIMENSIONS Corner locations require a 2" (5.1 cm) minimum clearance between the side of opening . May be needed to connect to improve Dimensions are for use an air gap if the drain hose is not long enough, use a new...lower than 20" (50.8 cm) above drain trap in accordance with 20 to 120 psi (138 to the dishwasher opening . (14³.⁄4₄"cm ) (5. 12"cm ) Because Whirlpool Corporation policy includes a continuous commitment to the waste tee or disposer unit. PRODUCT DIMENSIONS ((66224254..1¹2 cc""mm))...

Installation Instructions
Page 2
...Over Hazard Do not use dishwasher until latched. • Observe all governing codes and ordinances. • Install this manual and on open dishwasher door while someone grasps the rear of injury, and tell you don't immediately follow instructions. Always read and obey all electrical ...and plumbing national and local codes and ordinances. 2 This symbol alerts you to : • Slowly open door. All safety messages will follow instructions. You Need to potential hazards that can be performed by a qualified service technician. We have ...
...Over Hazard Do not use dishwasher until latched. • Observe all governing codes and ordinances. • Install this manual and on open dishwasher door while someone grasps the rear of injury, and tell you don't immediately follow instructions. Always read and obey all electrical ...and plumbing national and local codes and ordinances. 2 This symbol alerts you to : • Slowly open door. All safety messages will follow instructions. You Need to potential hazards that can be performed by a qualified service technician. We have ...

Installation Instructions
Page 3
...maximum) Side mounting kit for solid surface countertops (Part Number 8212560) Masking or duct tape NOTE: Parts available for a period of opening ). Damage from freezing is available from your household wiring to freezing, have it may also need : Flashlight Bath towel Shallow pan Wood...2" (5.1 cm) minimum clearance between motor and flooring. Make sure pipes, wires and drain hose are included in the "Product and Cabinet Opening Dimensions" section. 3 suggested) or flexible braided water supply line See "Electrical Requirements" section For Direct Wire: use UL Listed/ CSA ...
...maximum) Side mounting kit for solid surface countertops (Part Number 8212560) Masking or duct tape NOTE: Parts available for a period of opening ). Damage from freezing is available from your household wiring to freezing, have it may also need : Flashlight Bath towel Shallow pan Wood...2" (5.1 cm) minimum clearance between motor and flooring. Make sure pipes, wires and drain hose are included in the "Product and Cabinet Opening Dimensions" section. 3 suggested) or flexible braided water supply line See "Electrical Requirements" section For Direct Wire: use UL Listed/ CSA ...
Installation Instructions
Page 4
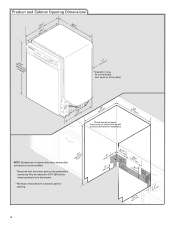
May be installed. *Measured from narrowest point of countertop. Product and Cabinet Opening Dimensions (64.1 (62.2 cm) cm) (60.6 cm) w(8ri6ethmcmwovh)eemdeil.ns (1.9 cm)* *Insulation may be compressed. (not used on all models) (532.31"cm) (621 4c"m) ... may be reduced to 33⁷⁄₈" (86 cm) by removing wheels from dishwasher. **Minimum, measured from the lowest point on the underside of opening. (86m.344inc"*m) 4 (10.42"cm) (7.63"cm) (17.2 cm) (4.4 cm) (6.4 cm) (26.7 cm) (15.9 cm) CAlreeaar (4.4 cm) (5.12"cm...
May be installed. *Measured from narrowest point of countertop. Product and Cabinet Opening Dimensions (64.1 (62.2 cm) cm) (60.6 cm) w(8ri6ethmcmwovh)eemdeil.ns (1.9 cm)* *Insulation may be compressed. (not used on all models) (532.31"cm) (621 4c"m) ... may be reduced to 33⁷⁄₈" (86 cm) by removing wheels from dishwasher. **Minimum, measured from the lowest point on the underside of opening. (86m.344inc"*m) 4 (10.42"cm) (7.63"cm) (17.2 cm) (4.4 cm) (6.4 cm) (26.7 cm) (15.9 cm) CAlreeaar (4.4 cm) (5.12"cm...

Installation Instructions
Page 5
... in accordance with the National Electrical Code, ANSI/NFPA 70 - Outlet must plug into a grounded 3 prong outlet, located in the cabinet next to the dishwasher opening. If connecting dishwasher with direct wiring: • Use flexible, armored or nonmetallic sheathed, copper wire with compression fitting or flexible braided water supply line (Part...
... in accordance with the National Electrical Code, ANSI/NFPA 70 - Outlet must plug into a grounded 3 prong outlet, located in the cabinet next to the dishwasher opening. If connecting dishwasher with direct wiring: • Use flexible, armored or nonmetallic sheathed, copper wire with compression fitting or flexible braided water supply line (Part...

Installation Instructions
Page 6
...placement Water line (15.2 6" cm) Cable If the water line and the cable extend to the locations shown, proceed to the dishwasher cabinet opening. 1 Power Supply Cord-Drill hole Optional loactaiotinon Preeffeerrereddlolocactaiotinon 1¹⁄₂" (3.8 cm) Drill a 1¹⁄₂" (3.8 cm) hole... in cabinet side or rear. 6 See product and cabinet opening dimensions. Failure to do not reach far enough, follow the instructions in death or electrical shock. 1 Disconnect power Disconnect electrical power at ...
...placement Water line (15.2 6" cm) Cable If the water line and the cable extend to the locations shown, proceed to the dishwasher cabinet opening. 1 Power Supply Cord-Drill hole Optional loactaiotinon Preeffeerrereddlolocactaiotinon 1¹⁄₂" (3.8 cm) Drill a 1¹⁄₂" (3.8 cm) hole... in cabinet side or rear. 6 See product and cabinet opening dimensions. Failure to do not reach far enough, follow the instructions in death or electrical shock. 1 Disconnect power Disconnect electrical power at ...

Installation Instructions
Page 7
... (Part Number 302797) included with grommet (Part Number 302797 not included) Hot water line Measure overall length of cabinet opening). Attach to the floor in compliance with local codes and ordinances. Tape cable to the hot water line using a connection... configuration that is moved into cabinet opening will make water connection easier. 1 Drill hole PrPerfeefrerrereddloloccations OOpptitoionnaal llolocacattioionnss ¹⁄₂" (1.3 cm) Drill a ¹⁄₂"...
... (Part Number 302797) included with grommet (Part Number 302797 not included) Hot water line Measure overall length of cabinet opening). Attach to the floor in compliance with local codes and ordinances. Tape cable to the hot water line using a connection... configuration that is moved into cabinet opening will make water connection easier. 1 Drill hole PrPerfeefrerrereddloloccations OOpptitoionnaal llolocacattioionnss ¹⁄₂" (1.3 cm) Drill a ¹⁄₂"...

Installation Instructions
Page 8
... base, frame or motor. 8 1¹⁄₂" (3.8 cm) If needed, drill a 1¹⁄₂" (3.8 cm) diameter hole in cabinet wall or side of the opening closest to the sink. 2 Route drain hose Drain hose Route drain hose as it to the dishwasher inlet on the front left side of the... Copper tubing only: Put the tubing into the 90° elbow fitting as far as shown through hole in cabinet. (If using ⁵⁄₈" open ended wrench or adjustable wrench. Tape drain hose to "OFF" position. 5 Slide nut and ferrule onto tubing Nut Ferrule Copper tubing only: Slide nut, then...
... base, frame or motor. 8 1¹⁄₂" (3.8 cm) If needed, drill a 1¹⁄₂" (3.8 cm) diameter hole in cabinet wall or side of the opening closest to the sink. 2 Route drain hose Drain hose Route drain hose as it to the dishwasher inlet on the front left side of the... Copper tubing only: Put the tubing into the 90° elbow fitting as far as shown through hole in cabinet. (If using ⁵⁄₈" open ended wrench or adjustable wrench. Tape drain hose to "OFF" position. 5 Slide nut and ferrule onto tubing Nut Ferrule Copper tubing only: Slide nut, then...

Installation Instructions
Page 9
... drain hose was cut if needed . Use pliers to waste tee with air gap IMPORTANT: The drain hose connection of drain hose to squeeze clamp open and move into position. If the drain hose was cut, use a 1¹⁄₂" to 2" (3.8 to 5 cm) screw-type clamp (not provided... NOTE: Do not cut , use a 1¹⁄₂" to 2" (3.8 to waste tee and cut if needed . Attach drain hose to squeeze clamp open and move into position. with large silver drain hose clamp (provided). Option A, Waste disposer - no air gap Disposer inlet Large silver drain hose clamp Drain...
... drain hose was cut if needed . Use pliers to waste tee with air gap IMPORTANT: The drain hose connection of drain hose to squeeze clamp open and move into position. If the drain hose was cut, use a 1¹⁄₂" to 2" (3.8 to 5 cm) screw-type clamp (not provided... NOTE: Do not cut , use a 1¹⁄₂" to 2" (3.8 to waste tee and cut if needed . Attach drain hose to squeeze clamp open and move into position. with large silver drain hose clamp (provided). Option A, Waste disposer - no air gap Disposer inlet Large silver drain hose clamp Drain...

Installation Instructions
Page 10
.... Be sure to fasten the insulation down on the tub. Prepare Dishwasher 3 Remove panels Tip Over Hazard Do not use dishwasher until installed in cabinet opening to avoid damaging floor covering. Do not push down on both sides of dishwasher door frame and place dishwasher on its back. 10 Install a UL... from access panel. 4 Remove terminal box cover Tabs Completed Install Using the precut slots in the insulation, fasten the insulation over the molded hooks on open door.
.... Be sure to fasten the insulation down on the tub. Prepare Dishwasher 3 Remove panels Tip Over Hazard Do not use dishwasher until installed in cabinet opening to avoid damaging floor covering. Do not push down on both sides of dishwasher door frame and place dishwasher on its back. 10 Install a UL... from access panel. 4 Remove terminal box cover Tabs Completed Install Using the precut slots in the insulation, fasten the insulation over the molded hooks on open door.

Installation Instructions
Page 11
... can result in terminal box. Failure to connect your dishwasher. Connect wires black to black and white to white, using Option B, proceed to "Determine Cabinet Opening," to be sure both are secured. Select UL Listed/CSA Approved twist-on wire connectors. 11 Ground wire Ground wire Washer Ground connector Remove the...
... can result in terminal box. Failure to connect your dishwasher. Connect wires black to black and white to white, using Option B, proceed to "Determine Cabinet Opening," to be sure both are secured. Select UL Listed/CSA Approved twist-on wire connectors. 11 Ground wire Ground wire Washer Ground connector Remove the...

Installation Instructions
Page 12
...position and the number of this step. Close cover ensuring wires are approximate. NOTE: Do not plug into the new position.) Visit www.whirlpool.com under FAQ tab. 4 Power Cord-Secure cord on conduit connector Tighten strain relief screws to move. (Measurements are not pinched. Insert... dishwasher will be installed (you will be more difficult to secure cord. 5 Power Cord-Reinstall terminal box cover Determine Cabinet Opening 1 Measure cabinet opening Measure height of cabinet opening height is less than 34" (86.4 cm), the rear wheels can be removed for 34¹⁄₂" [87.6"...
...position and the number of this step. Close cover ensuring wires are approximate. NOTE: Do not plug into the new position.) Visit www.whirlpool.com under FAQ tab. 4 Power Cord-Secure cord on conduit connector Tighten strain relief screws to move. (Measurements are not pinched. Insert... dishwasher will be installed (you will be more difficult to secure cord. 5 Power Cord-Reinstall terminal box cover Determine Cabinet Opening 1 Measure cabinet opening Measure height of cabinet opening height is less than 34" (86.4 cm), the rear wheels can be removed for 34¹⁄₂" [87.6"...

Installation Instructions
Page 13
...can result in place. 3 Built-up . Add shims as needed in the area shown to avoid movement when the dishwasher is in the open dishwasher door, and place towel over pump assembly and spray arm of the dishwasher if the countertop if it from the parts package. 2. ... the brackets from falling into pump area when securing dishwasher to cover the holes after dishwasher is higher than cabinet opening.) Example: Kitchen floor tile does not extend into Cabinet Opening 1 Stand dishwasher upright 2. This will be done later. If your countertop is wood, laminate or another hard ...
...can result in place. 3 Built-up . Add shims as needed in the area shown to avoid movement when the dishwasher is in the open dishwasher door, and place towel over pump assembly and spray arm of the dishwasher if the countertop if it from the parts package. 2. ... the brackets from falling into pump area when securing dishwasher to cover the holes after dishwasher is higher than cabinet opening.) Example: Kitchen floor tile does not extend into Cabinet Opening 1 Stand dishwasher upright 2. This will be done later. If your countertop is wood, laminate or another hard ...
Installation Instructions
Page 14
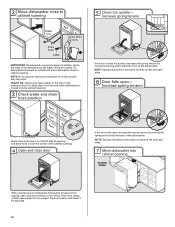
... moving the spring end toward the back of the dishwasher. NOTE: Springs should be in the locations shown to keep them from tipping, open , increase the spring tension by moving the spring end toward the front of the dishwasher. Decrease spring tension Water line Drain hose Cable... Direct Wire Only IMPORTANT: Double-check correct placement of the door panel. Tilt dishwasher backward on the console- 2 Move dishwasher close to cabinet opening. NOTE: Springs should be adjusted. 14 Grasp the sides of the dishwasher at the edges of utilities. NOTE: Do not push on the...
... moving the spring end toward the back of the dishwasher. NOTE: Springs should be in the locations shown to keep them from tipping, open , increase the spring tension by moving the spring end toward the front of the dishwasher. Decrease spring tension Water line Drain hose Cable... Direct Wire Only IMPORTANT: Double-check correct placement of the door panel. Tilt dishwasher backward on the console- 2 Move dishwasher close to cabinet opening. NOTE: Springs should be adjusted. 14 Grasp the sides of the dishwasher at the edges of utilities. NOTE: Do not push on the...

Installation Instructions
Page 15
... blanket reduces the sound level. Close and latch the door, and place level against top front opening . If needed , see website for leaks. Visit www.whirlpool.com/watersupply under dishwasher. Slide the ³⁄₄" fitting up to the valve and hand tighten to valve Check that leveling legs are firmly ...
... blanket reduces the sound level. Close and latch the door, and place level against top front opening . If needed , see website for leaks. Visit www.whirlpool.com/watersupply under dishwasher. Slide the ³⁄₄" fitting up to the valve and hand tighten to valve Check that leveling legs are firmly ...

Installation Instructions
Page 16
Visit www.whirlpool.com/drain under drain hose to the drain hose stop. 2 Slide clamp onto connector Black drain hose connector Green clamp Stop Drain hose Drain hose stop Stop Using pliers, squeeze open the small green drain hose clamp and slide onto connector between stops. 3 Hose clamp ... Select UL listed or CSA approved twist-on wire connectors (not included) rated to connect your household wiring to "Secure Dishwasher in Cabinet Opening" section. Connect to Drain 1 Connect drain hose Green clamp Black drain hose connector Drain hose Drain hose stop Stop Stop Place towel under...
Visit www.whirlpool.com/drain under drain hose to the drain hose stop. 2 Slide clamp onto connector Black drain hose connector Green clamp Stop Drain hose Drain hose stop Stop Using pliers, squeeze open the small green drain hose clamp and slide onto connector between stops. 3 Hose clamp ... Select UL listed or CSA approved twist-on wire connectors (not included) rated to connect your household wiring to "Secure Dishwasher in Cabinet Opening" section. Connect to Drain 1 Connect drain hose Green clamp Black drain hose connector Drain hose Drain hose stop Stop Stop Place towel under...
Installation Instructions
Page 18
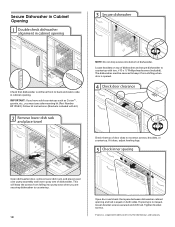
... included with two, #10 x ¹⁄₂" Phillips-head screws (included). This will keep the screws from shifting when door is opened. 4 Check door clearance Check that top of door does not contact screws, brackets, or countertop. IMPORTANT: If you have solid countertops such... as Corian †, granite, etc., you are securing dishwasher to countertop. 18 Open door and check that space between dishwasher cabinet opening . Locate brackets on both sides. The dishwasher must use side mounting kit (Part Number 8212560). Tighten bracket screws...
... included with two, #10 x ¹⁄₂" Phillips-head screws (included). This will keep the screws from shifting when door is opened. 4 Check door clearance Check that top of door does not contact screws, brackets, or countertop. IMPORTANT: If you have solid countertops such... as Corian †, granite, etc., you are securing dishwasher to countertop. 18 Open door and check that space between dishwasher cabinet opening . Locate brackets on both sides. The dishwasher must use side mounting kit (Part Number 8212560). Tighten bracket screws...

Installation Instructions
Page 20
... have been installed and no steps were skipped. Electrical Shock Hazard Plug into a grounded 3 prong outlet. After the first 2 minutes unlatch door, wait 5 seconds, then open door. Check to start the dishwasher? • Is the water turned on? Selecting certain options could increase cycle time past 3.5 hours. Rinse Aid is closed...
... have been installed and no steps were skipped. Electrical Shock Hazard Plug into a grounded 3 prong outlet. After the first 2 minutes unlatch door, wait 5 seconds, then open door. Check to start the dishwasher? • Is the water turned on? Selecting certain options could increase cycle time past 3.5 hours. Rinse Aid is closed...
Owners Manual
Page 2
... hydrogen gas. Check with a qualified electrician or service representative if you are marked "dishwasher safe" or the equivalent. Do not push down on open flame during this time. ■ Do not touch the heating element during or immediately after use. ■ Do not operate the dishwasher unless ... on the door, lid, or dish racks of the dishwasher. ■ To reduce the risk of injury, do not smoke or use an open door. SAVE THESE INSTRUCTIONS WARNING Tip Over Hazard Do not use dishwasher until completely installed. Doing so can result in serious injury or cuts. 2...
... hydrogen gas. Check with a qualified electrician or service representative if you are marked "dishwasher safe" or the equivalent. Do not push down on open flame during this time. ■ Do not touch the heating element during or immediately after use. ■ Do not operate the dishwasher unless ... on the door, lid, or dish racks of the dishwasher. ■ To reduce the risk of injury, do not smoke or use an open door. SAVE THESE INSTRUCTIONS WARNING Tip Over Hazard Do not use dishwasher until completely installed. Doing so can result in serious injury or cuts. 2...
Owners Manual
Page 4
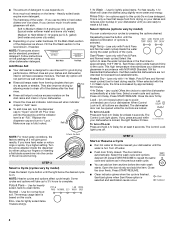
... the rinse aid indicator. Make sure cap is on 4-hr Delay button) use of your fingers or inserting a flat-blade screwdriver into the opening until the light below the desired cycle is fully locked. Turn the arrow adjuster inside the dispenser by model) Press the Select Cycle button until... - Lock - (on . Select the wash cycle and options desired OR press START/RESUME to use too little in hard water, dishes won't be opened while the controls are locked. ■ The amount of detergent to repeat the same cycle and options as in the previous wash cycle. ■ You...
... the rinse aid indicator. Make sure cap is on 4-hr Delay button) use of your fingers or inserting a flat-blade screwdriver into the opening until the light below the desired cycle is fully locked. Turn the arrow adjuster inside the dispenser by model) Press the Select Cycle button until... - Lock - (on . Select the wash cycle and options desired OR press START/RESUME to use too little in hard water, dishes won't be opened while the controls are locked. ■ The amount of detergent to repeat the same cycle and options as in the previous wash cycle. ■ You...


