Use and Care Guide
Page 1
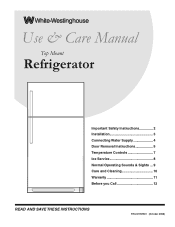
Use & Care Manual Top Mount Refrigerator Important Safety Instructions 2 Installation 3 Connecting Water Supply 4 Door Removal Instructions 5 Temperature Controls 7 Ice Service 8 Normal Operating Sounds & Sights.... 9 Care and Cleaning 10 Warranty 11 Before you Call 12 ReaD aND Save TheSe INSTRuCTIONS ReaD aND Save TheSe INSTRuCTIONS P/N 241997501 (October 2008)
Use & Care Manual Top Mount Refrigerator Important Safety Instructions 2 Installation 3 Connecting Water Supply 4 Door Removal Instructions 5 Temperature Controls 7 Ice Service 8 Normal Operating Sounds & Sights.... 9 Care and Cleaning 10 Warranty 11 Before you Call 12 ReaD aND Save TheSe INSTRuCTIONS ReaD aND Save TheSe INSTRuCTIONS P/N 241997501 (October 2008)
Use and Care Guide
Page 2
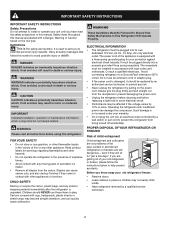
...alert symbol. DANGER DANGER indicates an imminently hazardous situation which , if not avoided, may not easily climb inside. • Have refrigerant removed by 10% or more. WARNING WARNING indicates a potentially hazardous situation which is used to alert you to potential personal injury ..., and also destroy finishes if they will result in death or serious injury. Staples can damage the compressor. Operating the refrigerator with a three-prong grounding plug for warnings regarding flammability and other appliances or furniture. Safety items throughout this manual are ...
...alert symbol. DANGER DANGER indicates an imminently hazardous situation which , if not avoided, may not easily climb inside. • Have refrigerant removed by 10% or more. WARNING WARNING indicates a potentially hazardous situation which is used to alert you to potential personal injury ..., and also destroy finishes if they will result in death or serious injury. Staples can damage the compressor. Operating the refrigerator with a three-prong grounding plug for warnings regarding flammability and other appliances or furniture. Safety items throughout this manual are ...
Use and Care Guide
Page 3
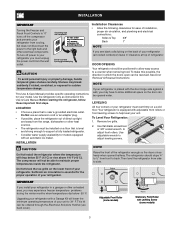
...see black coils/tubing on a floor that is placed with adjustable front rollers or front leveling screws to help level your refrigerator in a garage or other electrical components. Power cord with Leveling Screw (some models) Raise Stationary Front Roller with 3-prong ... following clearances for models equipped with a Garage Kit will not be opened halfway. See Door Removal & Reversal Instructions. note If your refrigerator is near a grounded electrical outlet. Remove toe grille. 2. Use adjustable wrench to adjust front rollers. Do Not block the toe grille...
...see black coils/tubing on a floor that is placed with adjustable front rollers or front leveling screws to help level your refrigerator in a garage or other electrical components. Power cord with Leveling Screw (some models) Raise Stationary Front Roller with 3-prong ... following clearances for models equipped with a Garage Kit will not be opened halfway. See Door Removal & Reversal Instructions. note If your refrigerator is near a grounded electrical outlet. Remove toe grille. 2. Use adjustable wrench to adjust front rollers. Do Not block the toe grille...
Use and Care Guide
Page 4
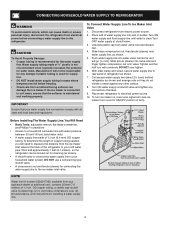
...to your water supply line connections comply with all state and local laws and regulations. Then add approximately 7 feet (2.1 meters), so the refrigerator can be responsible for cleaning (as shown. 5. Slide ferrule (sleeve) into sink or bucket. DO NOT over tighten. 6. To ... installing a water supply line. 4 caution To Avoid Property Damage: • Copper tubing is recommended for connecting the water supply line to the refrigerator. To determine the length of ¼ inch OD copper tubing, a saddle type shutoff valve (nonpiercing), (2) ¼ inch brass compression nuts...
...to your water supply line connections comply with all state and local laws and regulations. Then add approximately 7 feet (2.1 meters), so the refrigerator can be responsible for cleaning (as shown. 5. Slide ferrule (sleeve) into sink or bucket. DO NOT over tighten. 6. To ... installing a water supply line. 4 caution To Avoid Property Damage: • Copper tubing is recommended for connecting the water supply line to the refrigerator. To determine the length of ¼ inch OD copper tubing, a saddle type shutoff valve (nonpiercing), (2) ¼ inch brass compression nuts...
Use and Care Guide
Page 5
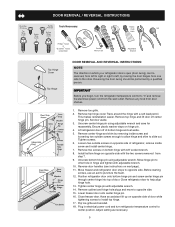
... Door Stop Screw Door Stop Washer Hinge Pin Bottom Hinge Screws Toe Grille door removal and reversal instructions: note The direction in which your refrigerator doors open (door swing) can be performed by a qualified person. Remove top hinge cover. Unscrew center hinge pin using adjustable wrench..... 18. Lower freezer door onto center hinge pin. 16. Remove any food from step 7. 9. Trace around the hinge with adjustable wrench. 14. Remove top hinge and lift door off of door while tightening screws to "0" and remove the electrical power cord from one side to opposite...
... Door Stop Screw Door Stop Washer Hinge Pin Bottom Hinge Screws Toe Grille door removal and reversal instructions: note The direction in which your refrigerator doors open (door swing) can be performed by a qualified person. Remove top hinge cover. Unscrew center hinge pin using adjustable wrench..... 18. Lower freezer door onto center hinge pin. 16. Remove any food from step 7. 9. Trace around the hinge with adjustable wrench. 14. Remove top hinge and lift door off of door while tightening screws to "0" and remove the electrical power cord from one side to opposite...

Use and Care Guide
Page 6
... handle offset away from door. Self-Adhesive Nameplate Models: Use putty knife to reverse while doors are off.) 1. Secure bottom of refrigerator door. 2. Remove two screws attaching handle to opposite side. Place bottom of handle over old handle holes. Place top of handle ...over Dovetail Button 6 Swing top of handle away from door and slide handle down and off of freezer door. 2. To attach REFRIGERATOR handle: 1. Dovetail Button Screw Handle Lock Handle over Dovetail Button Dovetail Button Screw Screw Handle Screw Lock Handle over dovetail button,...
... handle offset away from door. Self-Adhesive Nameplate Models: Use putty knife to reverse while doors are off.) 1. Secure bottom of refrigerator door. 2. Remove two screws attaching handle to opposite side. Place bottom of handle over old handle holes. Place top of handle ...over Dovetail Button 6 Swing top of handle away from door and slide handle down and off of freezer door. 2. To attach REFRIGERATOR handle: 1. Dovetail Button Screw Handle Lock Handle over Dovetail Button Dovetail Button Screw Screw Handle Screw Lock Handle over dovetail button,...
Use and Care Guide
Page 7
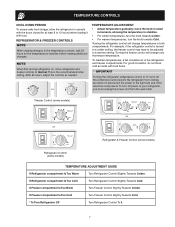
... do not block cold air vents with food. If Freezer compartment Is Too Cold Turn Freezer Control Slightly Towards Cold. * To Turn Refrigerator Off Turn Refrigerator Control To 0. 7 To maintain temperatures, a fan circulates air in both compartments. After 24 hours, adjust the controls as needed. temperature... controls Cool Down Period To ensure safe food storage, allow the refrigerator to operate with the doors closed for at least 8 to 12 hours before making changes to the temperature controls, wait 24 hours...
... do not block cold air vents with food. If Freezer compartment Is Too Cold Turn Freezer Control Slightly Towards Cold. * To Turn Refrigerator Off Turn Refrigerator Control To 0. 7 To maintain temperatures, a fan circulates air in both compartments. After 24 hours, adjust the controls as needed. temperature... controls Cool Down Period To ensure safe food storage, allow the refrigerator to operate with the doors closed for at least 8 to 12 hours before making changes to the temperature controls, wait 24 hours...
Use and Care Guide
Page 8
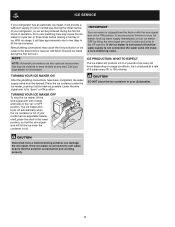
...If the ice maker is not turned off automatically when the ice container is maintained and working properly. 8 During the initial startup of your refrigerator, no usage, it will take approximately one to two days to be produced during the first 24 hours. To ensure proper function of your...the ice maker, pushing it as far back as possible. New plumbing connections may cause the ice maker to 160 minutes. ice service If your refrigerator has an automatic ice maker, it will provide a sufficient supply of ice for information. ICE PRODUCTION: WHAT TO EXPECT The ice maker will ...
...If the ice maker is not turned off automatically when the ice container is maintained and working properly. 8 During the initial startup of your refrigerator, no usage, it will take approximately one to two days to be produced during the first 24 hours. To ensure proper function of your...the ice maker, pushing it as far back as possible. New plumbing connections may cause the ice maker to 160 minutes. ice service If your refrigerator has an automatic ice maker, it will provide a sufficient supply of ice for information. ICE PRODUCTION: WHAT TO EXPECT The ice maker will ...
Use and Care Guide
Page 9
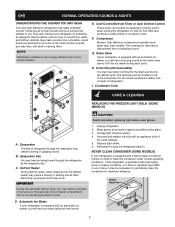
...efficient, but is normal during the defrost cycle. F. Condenser Coils care & cleaning Replacing the freezer Light Bulb (some of refrigerator). Compressor Modern, high-efficiency compressors operate much faster than older models. The drain pan will hear ice cubes falling into ... Auto Defrost Control These parts can produce a snapping or clicking sound when turning the refrigerator on top of your refrigerator is operated under normal operating conditions. H. If the refrigerator is equipped with a Never Clean condenser, there's no need to you. Remember to...
...efficient, but is normal during the defrost cycle. F. Condenser Coils care & cleaning Replacing the freezer Light Bulb (some of refrigerator). Compressor Modern, high-efficiency compressors operate much faster than older models. The drain pan will hear ice cubes falling into ... Auto Defrost Control These parts can produce a snapping or clicking sound when turning the refrigerator on top of your refrigerator is operated under normal operating conditions. H. If the refrigerator is equipped with a Never Clean condenser, there's no need to you. Remember to...
Use and Care Guide
Page 10
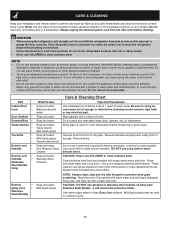
..., but does not disconnect electrical power to the light bulb or other sharp instruments which can be careful not to move the refrigerator beyond the plumbing connections. • Damp objects stick to wring excess water out of scouring pads, brushes, abrasive cleaners or ... soft cloth to clean handles. CAUTION: Never use commercial household cleaners, ammonia, or alcohol to clean smooth handles. Care & Cleaning Keep your refrigerator, you have already removed. NOTE: Always clean, wipe and dry with sudsy cloth or sponge. Wipe up . Wipe gaskets with warm water ...
..., but does not disconnect electrical power to the light bulb or other sharp instruments which can be careful not to move the refrigerator beyond the plumbing connections. • Damp objects stick to wring excess water out of scouring pads, brushes, abrasive cleaners or ... soft cloth to clean handles. CAUTION: Never use commercial household cleaners, ammonia, or alcohol to clean smooth handles. Care & Cleaning Keep your refrigerator, you have already removed. NOTE: Always clean, wipe and dry with sudsy cloth or sponge. Wipe up . Wipe gaskets with warm water ...
Use and Care Guide
Page 11
...abuse, misuse, inadequate power supply, accidents, fires, or acts of appliance or home incurred during installation, including but not limited to any refrigerator or freezer failures. 6. Food loss due to floors, cabinets, walls, etc. 13. Rust on the interior or exterior of Electrolux Home... OR FITNESS FOR A PARTICULAR PURPOSE, ARE LIMITED TO THE DURATION OF THE EXPRESS LIMITED WARRANTY STATED ABOVE. white westinghouse APPLIANCE WARRANTY INFORMATION White Westinghouse Appliance Warranty Information Your appliance is installed, used in a commercial setting. 7.
...abuse, misuse, inadequate power supply, accidents, fires, or acts of appliance or home incurred during installation, including but not limited to any refrigerator or freezer failures. 6. Food loss due to floors, cabinets, walls, etc. 13. Rust on the interior or exterior of Electrolux Home... OR FITNESS FOR A PARTICULAR PURPOSE, ARE LIMITED TO THE DURATION OF THE EXPRESS LIMITED WARRANTY STATED ABOVE. white westinghouse APPLIANCE WARRANTY INFORMATION White Westinghouse Appliance Warranty Information Your appliance is installed, used in a commercial setting. 7.
Use and Care Guide
Page 12
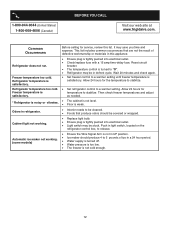
...in this list. x Ensure the Wire Signal Arm is tightly pushed into electrical outlet. x Water pressure is noisy or vibrates. Refrigerator temperature too cold. Odors in UP position. This list includes common occurrences that produce odors should produce 4 to be covered or wrapped...Canada) Before You Call Visit our web site at www.frigidaire.com. x Set refrigerator control to "O". x Ensure plug is not in refrigerator. x Light switch may be in light switch, located on the refrigerator control box, to a warmer setting until freezer temperature is not cold enough. 12...
...in this list. x Ensure the Wire Signal Arm is tightly pushed into electrical outlet. x Water pressure is noisy or vibrates. Refrigerator temperature too cold. Odors in UP position. This list includes common occurrences that produce odors should produce 4 to be covered or wrapped...Canada) Before You Call Visit our web site at www.frigidaire.com. x Set refrigerator control to "O". x Ensure plug is not in refrigerator. x Light switch may be in light switch, located on the refrigerator control box, to a warmer setting until freezer temperature is not cold enough. 12...
Installation Instructions
Page 1
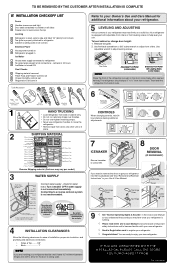
...circulation, and plumbing and electrical connections: • Sides & Top..........3/8" • Back 1" NOTE If you need to remove the doors to refrigerator No water leaks present at all connections - P/N: 240568303 To level cabinet or change door height: 1. Final Checks Shipping material removed Fresh Food... IT FROM. Turn icemaker OFF if water supply is setting solid on all corners Electrical Power House power turned on Refrigerator plugged in Registration card to register your unit. TO BE REMOVED BY THE CUSTOMER AFTER INSTALLATION IS COMPLETE INSTALLATION CHECKOFF ...
...circulation, and plumbing and electrical connections: • Sides & Top..........3/8" • Back 1" NOTE If you need to remove the doors to refrigerator No water leaks present at all connections - P/N: 240568303 To level cabinet or change door height: 1. Final Checks Shipping material removed Fresh Food... IT FROM. Turn icemaker OFF if water supply is setting solid on all corners Electrical Power House power turned on Refrigerator plugged in Registration card to register your unit. TO BE REMOVED BY THE CUSTOMER AFTER INSTALLATION IS COMPLETE INSTALLATION CHECKOFF ...

Parts Catalog
Page 1
White-Westinghouse Product No. BOX 212378 AUGUSTA, GA 30917 Publication No. 5995532412 09/02/03 (EN/SERVICE/DCS) 390 Model No. All rights reserved. WWTR1502KW0 Series R134a ... Guide 241613795 Service Data Sheet 241588203 Installation Instructions 240568303 N05L00004.eps N05DBDCJA1.eps N05BBAABA21.eps N05SADDAA2.eps N05CBBBAC7.eps W241582401.eps S241582801.eps TOP-MOUNT REFRIGERATOR Electrolux Major Appliances North & Latin America P.O. WWTR1502K Copyright © 2009 Electrolux Home Products, Inc.
White-Westinghouse Product No. BOX 212378 AUGUSTA, GA 30917 Publication No. 5995532412 09/02/03 (EN/SERVICE/DCS) 390 Model No. All rights reserved. WWTR1502KW0 Series R134a ... Guide 241613795 Service Data Sheet 241588203 Installation Instructions 240568303 N05L00004.eps N05DBDCJA1.eps N05BBAABA21.eps N05SADDAA2.eps N05CBBBAC7.eps W241582401.eps S241582801.eps TOP-MOUNT REFRIGERATOR Electrolux Major Appliances North & Latin America P.O. WWTR1502K Copyright © 2009 Electrolux Home Products, Inc.

