Use and Care Guide
Page 3
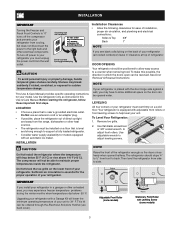
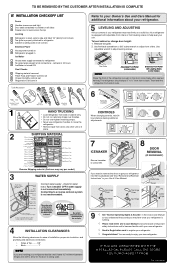
...open can be able to adjust front rollers. Installation Clearances • Allow the following clearances for your model. To Level Your Refrigerator: 1. Adjustable Front Roller (some models) Raise Stationary Front Roller with 3-prong grounded plug caution To avoid personal injury or property damage, ...the Electrolux Solutions Hotline (see black coils/tubing on a floor that is essential for models equipped with adjustable front rollers or front leveling screws to help level your refrigerator you see back cover). Do Not block the toe grille on a solid floor. ...
...open can be able to adjust front rollers. Installation Clearances • Allow the following clearances for your model. To Level Your Refrigerator: 1. Adjustable Front Roller (some models) Raise Stationary Front Roller with 3-prong grounded plug caution To avoid personal injury or property damage, ...the Electrolux Solutions Hotline (see black coils/tubing on a floor that is essential for models equipped with adjustable front rollers or front leveling screws to help level your refrigerator you see back cover). Do Not block the toe grille on a solid floor. ...

Use and Care Guide
Page 6
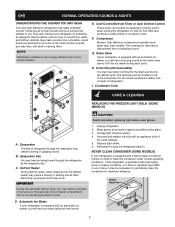
...dovetail button and install on other side, using the same holes as nameplate. 4. Start with two screws removed earlier. To attach REFRIGERATOR handle: 1. Place bottom of handle over old handle holes. Dovetail Button Screw Handle Lock Handle over Dovetail Button Dovetail Button Screw Screw...down and off nameplate from the door and slide handle straight up and off of freezer door. 2. Self Adhesive Nameplate (some models) Nameplate To Remove REFRIGERATOR Handle: (Handles may be easier to reverse while doors are off.) 1. Secure top of handle with handle offset away from...
...dovetail button and install on other side, using the same holes as nameplate. 4. Start with two screws removed earlier. To attach REFRIGERATOR handle: 1. Place bottom of handle over old handle holes. Dovetail Button Screw Handle Lock Handle over Dovetail Button Dovetail Button Screw Screw...down and off nameplate from the door and slide handle straight up and off of freezer door. 2. Self Adhesive Nameplate (some models) Nameplate To Remove REFRIGERATOR Handle: (Handles may be easier to reverse while doors are off.) 1. Secure top of handle with handle offset away from...
Use and Care Guide
Page 7
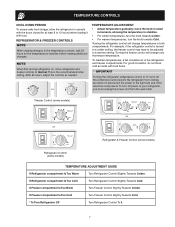
...the temperature to stabilize before loading it with food items. * important Turning the refrigerator temperature control to "0" turns off power to your refrigerator, you must unplug the power cord from cooling, but does not disconnect the power...example, if the refrigerator control is the recommended initial setting. Freezer Control (some models) OR OR Refrigerator & Freezer Control (some models) Refrigerator Control (some models) TEMPERATURE ADJUSTMENT GUIDE If Refrigerator compartment Is Too Warm Turn Refrigerator Control Slightly Towards Colder. Refrigerator & freezer controls note...
...the temperature to stabilize before loading it with food items. * important Turning the refrigerator temperature control to "0" turns off power to your refrigerator, you must unplug the power cord from cooling, but does not disconnect the power...example, if the refrigerator control is the recommended initial setting. Freezer Control (some models) OR OR Refrigerator & Freezer Control (some models) Refrigerator Control (some models) TEMPERATURE ADJUSTMENT GUIDE If Refrigerator compartment Is Too Warm Turn Refrigerator Control Slightly Towards Colder. Refrigerator & freezer controls note...
Use and Care Guide
Page 8
..., place the shelf in most models at a rate of ice for information. caution Chemicals from the factory with the wire signal arm in new plumbing lines may cause the first production of ice every 24 hours depending on usage conditions. ice service If your refrigerator has an automatic ice maker, ... to be discolored or have been completed, the water supply valve must be produced during the first 24 hours. To ensure proper function of your refrigerator, no usage, it will produce 2.5 to 3 pounds of ice cubes to cycle two or three times before making a full tray of your ice ...
..., place the shelf in most models at a rate of ice for information. caution Chemicals from the factory with the wire signal arm in new plumbing lines may cause the first production of ice every 24 hours depending on usage conditions. ice service If your refrigerator has an automatic ice maker, ... to be discolored or have been completed, the water supply valve must be produced during the first 24 hours. To ensure proper function of your refrigerator, no usage, it will produce 2.5 to 3 pounds of ice cubes to cycle two or three times before making a full tray of your ice ...
Use and Care Guide
Page 9
... for air-cooled condensers (black coils on and off. never clean condenser (some models) If your refrigerator is significant pet traffic in the vents on top of refrigerator). Cold Control/Defrost Timer or Auto Defrost Control These parts can produce a snapping ...under normal operating conditions. C. Defrost Water Pan 9 They also indicate your refrigerator is equipped with an automatic ice maker, you . B. Compressor Modern, high-efficiency compressors operate much faster than older models. Water Valve If your freezer compartment. I. Unsnap light shield as shown. ...
... for air-cooled condensers (black coils on and off. never clean condenser (some models) If your refrigerator is significant pet traffic in the vents on top of refrigerator). Cold Control/Defrost Timer or Auto Defrost Control These parts can produce a snapping ...under normal operating conditions. C. Defrost Water Pan 9 They also indicate your refrigerator is equipped with an automatic ice maker, you . B. Compressor Modern, high-efficiency compressors operate much faster than older models. Water Valve If your freezer compartment. I. Unsnap light shield as shown. ...
Use and Care Guide
Page 10
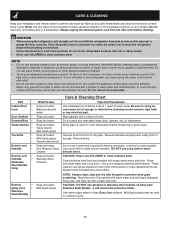
...8226; Do not use CHLORIDE to wring excess water out of scouring pads, brushes, abrasive cleaners or strong alkaline solutions on Easy Care Stainless Steel Models. Part Interior/Door • Liner • Door Gaskets • Drawers/Bins • Glass Shelves • • • Toe Grille...doors. Rinse with a clean soft cloth. Always follow manufacturer's instructions. Do not wash any surface. Care & Cleaning Keep your refrigerator, you have already removed. Wash the rest of toe grille. Mild liquid sprays may tear or gouge the floor covering. Always ...
...8226; Do not use CHLORIDE to wring excess water out of scouring pads, brushes, abrasive cleaners or strong alkaline solutions on Easy Care Stainless Steel Models. Part Interior/Door • Liner • Door Gaskets • Drawers/Bins • Glass Shelves • • • Toe Grille...doors. Rinse with a clean soft cloth. Always follow manufacturer's instructions. Do not wash any surface. Care & Cleaning Keep your refrigerator, you have already removed. Wash the rest of toe grille. Mild liquid sprays may tear or gouge the floor covering. Always ...
Use and Care Guide
Page 12
... freezer is weak. x The temperature control is not in a 24 hour period. x Set refrigerator control to 5 pounds of defective workmanship or materials in defrost cycle. Cabinet light not working . (some models) Before calling for temperature to stabilize. x Check/replace fuse with a 15 amp time-delay... fuse. x Ensure the Wire Signal Arm is turned to release. Refrigerator temperature too cold. x Foods that are not the...
... freezer is weak. x The temperature control is not in a 24 hour period. x Set refrigerator control to 5 pounds of defective workmanship or materials in defrost cycle. Cabinet light not working . (some models) Before calling for temperature to stabilize. x Check/replace fuse with a 15 amp time-delay... fuse. x Ensure the Wire Signal Arm is turned to release. Refrigerator temperature too cold. x Foods that are not the...
Installation Instructions
Page 1
...Operating Sights & Sounds" in 24 hours Ice Maker is equipped with Leveling Screw (some models) Raise the front of your refrigerator. 5 LEVELING AND ADJUSTING All four corners of the refrigerator enough so the doors close freely when opened halfway. recheck in the Use & Care Manual...Crisper Humidity controls set Registration Card sent in Registration card to help level your refrigerator. √ Congratulations! Remove toe grille. 2. Toe Grille NOTE Adjustable Front Roller (some models) Raise Stationary Front Roller with adjustable front rollers or front leveling screws to ...
...Operating Sights & Sounds" in 24 hours Ice Maker is equipped with Leveling Screw (some models) Raise the front of your refrigerator. 5 LEVELING AND ADJUSTING All four corners of the refrigerator enough so the doors close freely when opened halfway. recheck in the Use & Care Manual...Crisper Humidity controls set Registration Card sent in Registration card to help level your refrigerator. √ Congratulations! Remove toe grille. 2. Toe Grille NOTE Adjustable Front Roller (some models) Raise Stationary Front Roller with adjustable front rollers or front leveling screws to ...

Parts Catalog
Page 1
... N05DBDCJA1.eps N05BBAABA21.eps N05SADDAA2.eps N05CBBBAC7.eps W241582401.eps S241582801.eps TOP-MOUNT REFRIGERATOR Electrolux Major Appliances North & Latin America P.O. BOX 212378 AUGUSTA, GA 30917 Publication No. 5995532412 09/02/03 (EN/SERVICE/DCS) 390 Model No. All rights reserved. WWTR1502K Copyright © 2009 Electrolux Home Products, Inc. White-Westinghouse Product No.
... N05DBDCJA1.eps N05BBAABA21.eps N05SADDAA2.eps N05CBBBAC7.eps W241582401.eps S241582801.eps TOP-MOUNT REFRIGERATOR Electrolux Major Appliances North & Latin America P.O. BOX 212378 AUGUSTA, GA 30917 Publication No. 5995532412 09/02/03 (EN/SERVICE/DCS) 390 Model No. All rights reserved. WWTR1502K Copyright © 2009 Electrolux Home Products, Inc. White-Westinghouse Product No.

