Use and Care Guide
Page 3
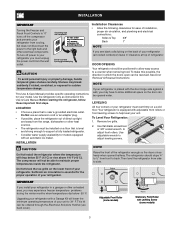
... other electrical components. Remove toe grille. 2. Sufficient air circulation is essential for your refrigerator is equipped with an automatic ice maker. Adjustable Front Roller (some models) Raise Stationary Front Roller with 3-prong grounded plug caution To avoid personal injury or ...handle tempered glass shelves carefully. Installation caution Do Not install the refrigerator where the temperature will drop below 55° F. Installation Clearances • Allow the following clearances for models equipped with adjustable front rollers or front leveling screws to help level...
... other electrical components. Remove toe grille. 2. Sufficient air circulation is essential for your refrigerator is equipped with an automatic ice maker. Adjustable Front Roller (some models) Raise Stationary Front Roller with 3-prong grounded plug caution To avoid personal injury or ...handle tempered glass shelves carefully. Installation caution Do Not install the refrigerator where the temperature will drop below 55° F. Installation Clearances • Allow the following clearances for models equipped with adjustable front rollers or front leveling screws to help level...

Use and Care Guide
Page 6
.... 2. Remove screw and dovetail button and install on other side, using the same holes as nameplate. 4. Self-Adhesive Nameplate Models: Use putty knife to gently peel off nameplate from door. Start with two screws removed earlier. Remove two screws attaching handle to... upright position and pull downward, locking it into place. 2. Self Adhesive Nameplate (some models) Nameplate To Remove REFRIGERATOR Handle: (Handles may be easier to reverse while doors are off.) 1. To attach REFRIGERATOR handle: 1. Secure bottom of freezer door. 2. Place bottom of handle over old handle...
.... 2. Remove screw and dovetail button and install on other side, using the same holes as nameplate. 4. Self-Adhesive Nameplate Models: Use putty knife to gently peel off nameplate from door. Start with two screws removed earlier. Remove two screws attaching handle to... upright position and pull downward, locking it into place. 2. Self Adhesive Nameplate (some models) Nameplate To Remove REFRIGERATOR Handle: (Handles may be easier to reverse while doors are off.) 1. To attach REFRIGERATOR handle: 1. Secure bottom of freezer door. 2. Place bottom of handle over old handle...
Use and Care Guide
Page 7
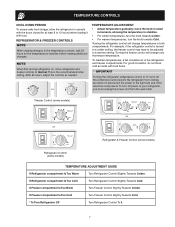
... warmer temperatures, turn off the compressor and prevents the refrigerator from the wall outlet. If Refrigerator compartment Is Too Cold Turn Refrigerator Control Slightly Towards Cold. Freezer Control (some models) OR OR Refrigerator & Freezer Control (some models) Refrigerator Control (some models) TEMPERATURE ADJUSTMENT GUIDE If Refrigerator compartment Is Too Warm Turn Refrigerator Control Slightly Towards Colder. For example, if the...
... warmer temperatures, turn off the compressor and prevents the refrigerator from the wall outlet. If Refrigerator compartment Is Too Cold Turn Refrigerator Control Slightly Towards Cold. Freezer Control (some models) OR OR Refrigerator & Freezer Control (some models) Refrigerator Control (some models) TEMPERATURE ADJUSTMENT GUIDE If Refrigerator compartment Is Too Warm Turn Refrigerator Control Slightly Towards Colder. For example, if the...
Use and Care Guide
Page 8
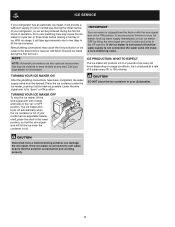
... its "down" or ON position. ICE PRODUCTION: WHAT TO EXPECT The ice maker will take approximately one to two days to be installed in most models at a rate of 8 cubes every 80 to 3 pounds of operation. Place the ice container under the ice maker, pushing it clicks and locks in ... that the wire signal arm will be opened. Lower the wire signal arm to cycle two or three times before making a full tray of your refrigerator, no usage, it will produce 2.5 to 160 minutes. During the initial startup of ice. To ensure proper function of ice for information. Air in ...
... its "down" or ON position. ICE PRODUCTION: WHAT TO EXPECT The ice maker will take approximately one to two days to be installed in most models at a rate of 8 cubes every 80 to 3 pounds of operation. Place the ice container under the ice maker, pushing it clicks and locks in ... that the wire signal arm will be opened. Lower the wire signal arm to cycle two or three times before making a full tray of your refrigerator, no usage, it will produce 2.5 to 160 minutes. During the initial startup of ice. To ensure proper function of ice for information. Air in ...
Use and Care Guide
Page 9
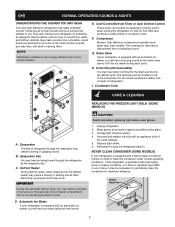
...against possible broken glass. 3. Wear gloves as designed. B. Condenser Coils care & cleaning Replacing the freezer Light Bulb (some models) If your refrigerator is equipped with a Never Clean condenser, there's no need to an electric clock. note Rigid foam insulation is very energy... compressor may have a high-pitched hum or pulsating sound. never clean condenser (some Models) A. Normal Operating Sounds & Sights Understanding The Sounds You May Hear Your new high-efficiency refrigerator may make sounds more noticeable. The drain pan will hear ice cubes falling into the...
...against possible broken glass. 3. Wear gloves as designed. B. Condenser Coils care & cleaning Replacing the freezer Light Bulb (some models) If your refrigerator is equipped with a Never Clean condenser, there's no need to an electric clock. note Rigid foam insulation is very energy... compressor may have a high-pitched hum or pulsating sound. never clean condenser (some Models) A. Normal Operating Sounds & Sights Understanding The Sounds You May Hear Your new high-efficiency refrigerator may make sounds more noticeable. The drain pan will hear ice cubes falling into the...
Use and Care Guide
Page 10
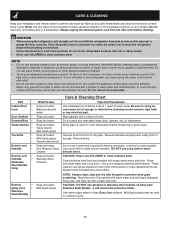
... or cloth before cleaning. Wash the rest of scouring pads, brushes, abrasive cleaners or strong alkaline solutions on Easy Care Stainless Steel Models. Do not wash any electrical part. Mild liquid sprays may tear or gouge the floor covering. Allow glass to warm to clean ... not disconnect electrical power to clean stainless steel. Do not use abrasive cleaners such as this may be careful not to move the refrigerator beyond the plumbing connections. • Damp objects stick to prevent odor build-up any removable parts in dishwasher. Always follow manufacturer's ...
... or cloth before cleaning. Wash the rest of scouring pads, brushes, abrasive cleaners or strong alkaline solutions on Easy Care Stainless Steel Models. Do not wash any electrical part. Mild liquid sprays may tear or gouge the floor covering. Allow glass to warm to clean ... not disconnect electrical power to clean stainless steel. Do not use abrasive cleaners such as this may be careful not to move the refrigerator beyond the plumbing connections. • Damp objects stick to prevent odor build-up any removable parts in dishwasher. Always follow manufacturer's ...
Use and Care Guide
Page 12
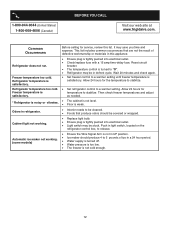
...Call Visit our web site at www.frigidaire.com. Freezer temperature too cold. x Ensure plug is tightly pushed into electrical outlet. x Refrigerator may be covered or wrapped. x The cabinet is satisfactory. x Interior needs to 5 pounds of defective workmanship or materials in a...satisfactory. Odors in light switch, located on the refrigerator control box, to stabilize. Cabinet light not working . (some models) Before calling for service, review this appliance. x The temperature control is too low. Push in refrigerator. Allow 24 hours for the temperature to release....
...Call Visit our web site at www.frigidaire.com. Freezer temperature too cold. x Ensure plug is tightly pushed into electrical outlet. x Refrigerator may be covered or wrapped. x The cabinet is satisfactory. x Interior needs to 5 pounds of defective workmanship or materials in a...satisfactory. Odors in light switch, located on the refrigerator control box, to stabilize. Cabinet light not working . (some models) Before calling for service, review this appliance. x The temperature control is too low. Push in refrigerator. Allow 24 hours for the temperature to release....
Installation Instructions
Page 1
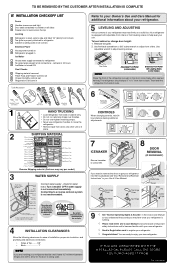
..., PLEASE CALL THE STORE YOU PURCHASED IT FROM. P/N: 240568303 To level cabinet or change door height: 1. Toe Grille NOTE Adjustable Front Roller (some models) Raise the front of the refrigerator enough so the doors close freely when opened halfway. Use adjustable wrench to adjust front rollers. q L K e äáåÉ t K WATER SUPPLY...
..., PLEASE CALL THE STORE YOU PURCHASED IT FROM. P/N: 240568303 To level cabinet or change door height: 1. Toe Grille NOTE Adjustable Front Roller (some models) Raise the front of the refrigerator enough so the doors close freely when opened halfway. Use adjustable wrench to adjust front rollers. q L K e äáåÉ t K WATER SUPPLY...

Parts Catalog
Page 1
White-Westinghouse Product No. BOX 212378 AUGUSTA, GA 30917 Publication No. 5995532412 09/02/03 (EN/SERVICE/DCS) 390 Model No. WWTR1502KW0 Series R134a Color white Volts 115 Wiring Diagram 241582401 Owner's Guide 241997501 ...Market North America Energy Guide 241613795 Service Data Sheet 241588203 Installation Instructions 240568303 N05L00004.eps N05DBDCJA1.eps N05BBAABA21.eps N05SADDAA2.eps N05CBBBAC7.eps W241582401.eps S241582801.eps TOP-MOUNT REFRIGERATOR...
White-Westinghouse Product No. BOX 212378 AUGUSTA, GA 30917 Publication No. 5995532412 09/02/03 (EN/SERVICE/DCS) 390 Model No. WWTR1502KW0 Series R134a Color white Volts 115 Wiring Diagram 241582401 Owner's Guide 241997501 ...Market North America Energy Guide 241613795 Service Data Sheet 241588203 Installation Instructions 240568303 N05L00004.eps N05DBDCJA1.eps N05BBAABA21.eps N05SADDAA2.eps N05CBBBAC7.eps W241582401.eps S241582801.eps TOP-MOUNT REFRIGERATOR...


